Home Search Gallery How-To Books Links Workshops About Contact
Travel
Photo Tricks from Maui, Hawaii  I
get my goodies at Amazon
and Adorama.
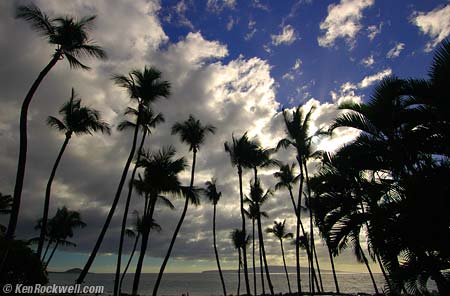
Palms,
Maui, Hawaii. The island of Lanai is on the horizon. INTRODUCTION I went to Maui for a week to photograph. While waiting for my wife to get ready the first morning I realized I could use that time to feature and post an image from the day before. I challenged myself to make a winner image each day and tell you how I did it. Of course this page wound up taking a lot more than just my wife's shower time and I had no internet connection until I returned, but tough, here's a week long photo workshop - for free! I hope you enjoy it. Camera and Lenses The less gear you bring the more you can concentrate on making great images. I took only my Nikon D70 (same as today's D70s) and two lenses: my 12 - 24 mm and 80 - 400 VR. Each has a Hoya 77mm 81A filter on it for protection and to add a little warmth. These two lenses are all I ever really need. Everything else, like my macro lens, only comes out in rare cases where for a specific need. When I travel I leave all my other junk home. I should stress that you will be much happier and make better images when you can learn not to carry your entire collection with you. I didn't bring a normal, mid-range zoom, and never missed it. I loved not having to haul it all around with me! I did bring my SB-600 flash which I used a little, but not for any of the shots you see here. Filters I brought only two extra filters: a 77mm Hoya circular polarizer and a 77mm Tiffen screw-in graduated 2-stop neutral density filter. I use the least expensive Hoya circular (not linear) polarizer which costs $77; I see no need for the $100 and up thin or multicoated versions. The Grad ND filter is simply half clear and half dark gray and costs about $58. You screw it in and rotate to get your effect, usually to darken an overly bright sky while keeping detail in a darker foreground. I prefer the Tiffen because it's both truly neutral and made of glass. Other grad NDs, including more expensive brands, are made of clear plastic. Worse, the plastic ones often cause unexpected color casts in the part that looked neutral gray through your finder. I'm thinking of getting a Tiffen "Sunset" grad filter, which is orange on the top and clear at the bottom. Obviously I got along fine without it. Adding a couple of filters makes a huge difference in photography. Spend a couple of hundred dollars on the right filters and, used properly, they can make a huge improvement in your images. I haven't shown how boring or bad some of the images below would have been without the polarizer or the grad ND. This is far more important that spending an extra thousand dollars on a fancier camera. When "The Blair Witch Project" stunned Hollywood with its success after being shot with a $300 video camera, the film maker was asked how he did it. "$600 worth of filters" was his answer. Camera Settings I almost always shoot at Nikon's default ISO 200, Large image size, JPG Normal file type, Matrix metering and Program Automatic. White Balance is usually set to Automatic and trimmed to -3 to add a little more warmth. In the Taking Menu under Optimize Image I choose Custom and leave everything at the default automatic settings, except I set Saturation to + and Color Mode to IIIa. Each of those two color settings boosts the color a little bit, and I love the vividness of the combined settings. I used these settings for each shot below except as noted. Of course I used Photoshop CS2 on my 2 year old 12" Apple iBook laptop to size these images for the web and make this website. I made over 1,600 shots, and I surprised myself that many of them are pretty good. My challenge was to pick just one from each day that was both a decent shot and illustrated a few points to help you get great shots. Trip Basics My wife found a great deal online for a nonstop flight on Aloha Airlines. It was such a great deal we couldn't afford not to make this trip for photography. We almost stayed at the usually very expensive Ritz Carlton since my wife also found a great deal online. It turns out the Ritz is at the very north where all it does is rain. You have to take a shuttle just to get to the beach! We decided not to stay there. My wife eventually found another place online for $70 a night and we figured we'd take our chances. We expected the worst. We got up at 5 AM San Diego time to catch our 8 AM flight to Maui. We arrived at our hotel at 2:30PM and were overjoyed when we saw the facility and the view you see above from the pool and below from our room. God bless the Internet! We flew mid-week. Maui's slowest period is the first two weeks of December. That's how we got away with such an inexpensive trip just to make photos. As of December 15th everyone starts showing up for vacation and the rates skyrocket. 07 December 2005, Wednesday
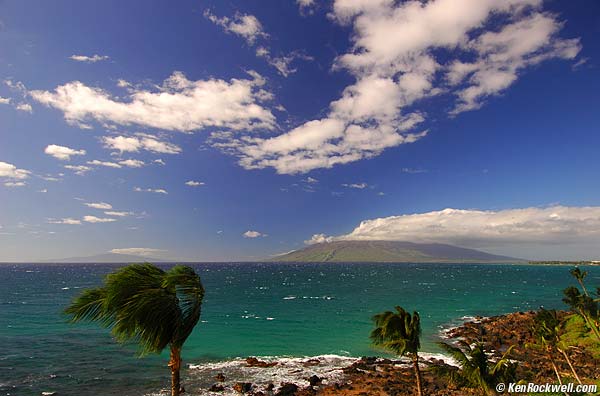
Western Maui as Seen from our Hotel Room in Southern Maui, Hawaii. Nikon D70, Nikkor 12 - 24mm at 14mm, stacked 81A and polarizing filters. This is a trivial shot after a long journey. I used the 14mm zoom setting to get the composition I wanted, and also to avoid darkening the corners from using two stacked filters. I use ordinary Hoya filters, not expensive wide angle versions. Either one works great on the Nikkor 12 - 24mm, however if you're as silly as I am to use both at the same time you will get a little vignetting at 12mm. This is easy to see through the viewfinder if you look for it, but easy to miss if you don't. Of course it's obvious when you playback on the LCD. The darkening is caused by the very wide angle lens starting to see the black rings of the filters on the extreme corners instead of seeing out to your subject. Zooming in a little removes the dark corners. Again, this is never a problem with just one filter or at any other than the widest settings. The darkening effect of the polarizer is seen as a band across the sky from center to upper right. This is because the polarization of the sky is maximum in a band 90 degrees away from the sun, and minimum near the sun and 180 degrees opposite it. A super wide lens will accentuate this. I was able to get away with a polarizer with my wide lens because the dark band just happened to follow the big cloud. If the sky has no clouds one usually can't use a polarizer with an ultrawide lens because there will be an obvious unnatural dark band across the sky. 08 December 2005, Thursday
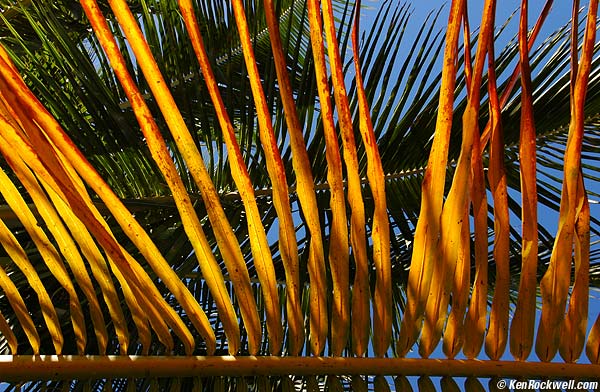
Backlit Palm Frond, Lahaina, Maui, Hawaii Backlighting makes these colors so vivid. Nikon D70, Nikkor 12 - 24mm, 81A filter, program auto exposure. Technically this is no big deal. They key is in your head. I look for wild colors and then point the camera their way. Backlit grass and trees, just like photographic slides, have much more vivid colors than things seen with light reflecting off of them. 09 December 2005, Friday
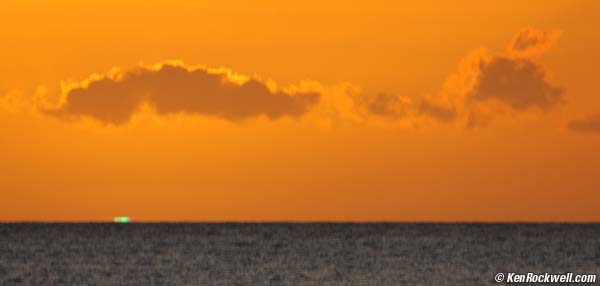
The
Green Flash at Sunset, South of Lahaina, Maui, Hawaii. The green flash is the last bit of sun becoming a brilliant emerald flash as it disappears below the horizon. Surfers, sailors and others who spend a lot of time on the water see this often. It only happens in very clear air and when you have a sunset over a distant, sharp edge like the horizon. This is caused by chromatic dispersion in the refraction of light as it passes through the air. Snell's law predicts the red light gets bent the least, so the red image of the sun "sets" first. Rayleigh scattering is what makes the sky look blue. Air scatters blue light much more than green or red. When the sun sets on the horizon the light passes through much more air than in the day, so more blue light is filtered out. This is why the sun looks yellow at sunset. The atmosphere has an additional slight molecular absorbance in yellow (distinct from Rayleigh scattering), which becomes more significant at these low angles. At just the right moment, the red image has set, the yellow image is absorbed, and the blue and violet images are scattered. This leaves only the green image until it sets a moment later. Under slightly varying conditions it's possible to see a yellow flash, a blue flash or a violet flash, although they tend to be much fainter. If you're really lucky and things are really, really clear you can see colors even cooler than green. I've seen colors approaching cyan, which you almost see above. It is also possible to see a "pseudo-green flash" due to entirely perceptual effects (i.e. after image formation due to the difference time scale of color receptors in the eye), but that's quite different. I've been trying to get a shot of this for decades. I often see this effect but have never caught it in a photo. Look for it as the very last thing you see as the sun slips below the water after a very clear day. One needs a very long lens, luck, some crafty exposure, and more luck. The green flash is so bright that my previous attempts have given a blown-out white (not green) dot. In person the effect is brilliantly fantastic. It's as if someone shot a green laser at you. It's always magic: one never knows if there's going to be a green flash until it happens. The green flash only happens some of the time even if you live at the beach and see the sunset every night. Most photos that people think are green flashes are actually green lens flare from multicoated lenses. The green flash is the disk of the sun turning green for an instant! My thanks to Sam Lipoff of MIT for the explanation. Here's a great bunch of info on green flashes. This shot is cropped a little bit from the full Nikon D70 DX frame with a 400mm lens, 81A and 2-stop grad ND filters, program auto exposure. I think the blurring is the key to getting a green image of the elusive green flash. With this crop the full disc of the sun fills about a quarter of the screen. The green flash is as tiny as it it short and brilliant: it's just the very last tip left as the sun disappears below the horizon. I suspect the blurring (my fault) is why the dot is green and not simply a blown-out white point. 10 December 2005, Saturday
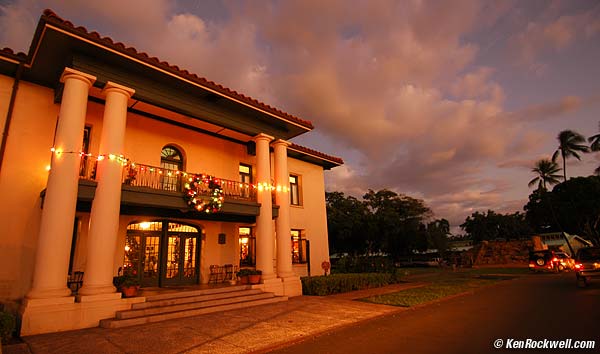
Old Lahaina Courthouse, Est. 1859, Maui, Hawaii. I love what happens just after the sun goes down. The colors explode after most people have put away their cameras. This was hand-held 23 minutes after sunset. These shots are easy today with no tripod: I set my Nikon D70 to ISO 400, program auto exposure (1/5 second at f/4), Nikkor 12 - 24mm at 12 mm with 81A filter. I got these great warm colors with the Shade white balance setting. The Auto WB setting would have been much cooler and boring. With super-wide lenses I get away with much slower speeds hand holding. All my shots were sharp, but to be sure I used the continuous shutter release mode and held the shutter button down for three shots each so I could choose the sharpest shot afterwards. This is a perfect example of why I stress the importance of a fast-handling camera over meaningless lab measurements. It's not obvious that I made this image while crossing the street in front of a moving taxi. The taxi's headlights are what's lighting up the foreground so well! I had to set the continuous shutter mode, Shade white balance and ISO400 while also looking both ways to cross the street in front of the taxi. If I had to fumble through menus to set these I would have missed the shot and also could have been run over. A camera like the D70 with direct buttons to set all this means I got the shot, and should impress upon you that any minute difference in laboratory measured noise at ISO 400 is clearly irrelevant in selecting a camera. More on this at Static vs. Dynamic Camera Measurements. 11 December 2005, Sunday
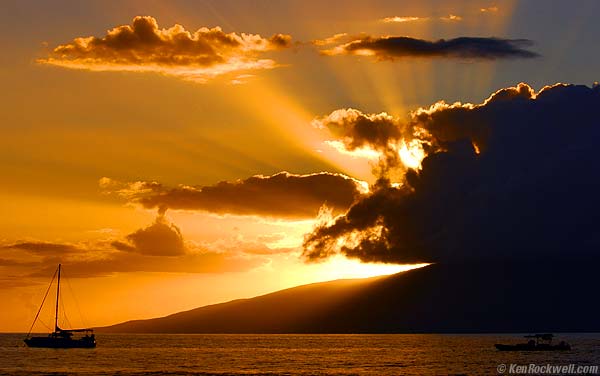
Sunset over Lanai as seen from Lahaina Harbor, Maui, Hawaii. This is a technically easy shot made with my D70, 80 - 400 mm VR at 80 mm and possibly a 2-stop graduated neutral density filter, Program auto exposure, Matrix metering. I just pointed and shot. For decades I've loved how Nikon's Matrix meter has dealt with complex light. I just point my Nikons right at the sun with no need to fumble guessing at exposures. (Of course you can still go blind or melt the camera if you do this when the sun is too bright!) I selected Shade white balance to warm the image which otherwise looked mostly gray to the eye. It turned out too warm, so I corrected my JPG's White Balance with Photoshop's Color Balance tool. (More at my PhotoShop page.) It's trivial to fix this with JPGs. You don't have to slow yourself down with RAW just to fix color balance or exposure. Technically this shot is trivial. What makes it my wife's favorite was waiting for the right conditions. I made a lot of shots so I could pick the best one. Digital is free. I wanted the boat to be on the left to balance with the sun. Most of my shots had boats not where I wanted them. Also different zoom settings emphasized different aspects of the sun, sea and sky. At least as important was getting the most God Beams coming from behind the clouds. As a sunset unfolds things change faster and more dramatically than we realize. When you get your images back you'll see huge changes from one moment to the next which weren't obvious when shooting. God Beams come and go and the light changes literally from second to second. Just keep shooting when you're using digital. 12 December 2005, Monday
Kamaole Beach Park 1 Lifeguard Tower at Dusk, Kihei, Maui, Hawaii. This is just an ordinary yellow lifeguard shack and sunset. Waiting until after the obvious sunset got me something out of the ordinary. It takes patience to linger and see what happens, instead of packing up and having dinner. That's what gets shots like this, not luck or equipment. You don't have to go to Maui to get a shot like this. Just find any lifeguard tower or other building with a light on it. Wait and shoot as the sky dims after sunset. You can get this anywhere and don't need an ocean. The yellow lifeguard shack was lit with the usual orange-white high-pressure sodium light. This enhanced the yellow. The sky had turned from light blue to dark blue. This was made at 6:22:07PM, 36 minutes after the sun disappeared at 5:46:25 PM. This was the only shot all week for which I whipped out my tripod. I used my Nikon D70, 12-24mm lens at 12mm, manual exposure of f/8 at 3 seconds, automatic white balance trimmed to my usual -3. I only used manual exposure to keep the same exposure as I changed composition after the LCD had confirmed I liked this exposure. Auto exposure gave me the same results. I think I used my usual 81A filter. I had been experimenting with my graduated neutral density a little earlier to dim the earlier bright sky on the right. This is another example of the newspaperman's answer to all technical questions about how they made an image: "f/8 and be there." Technique is secondary, and ha ha, this image was made at f/8. Most important is to be in the right place at the right time and see what's going on. Today every camera can take care of the basics of exposure automatically as well or better than I can, and this automation lets us concentrate on what's important to an image since we're not bothered with having to change fixed lenses and setting shutter speeds and apertures like we did in the old days. Just be there and concentrate on what's changing around you and avoid worrying about heading out to dinner. 13 December 2005, Tuesday Fly back from Maui. Thanks for reading! Ken |