Home Search Gallery How-To Books Links Workshops About Contact
|
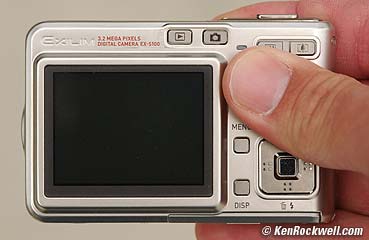
ERGONOMICS AND USABILITY back to top of review Introduction Introduction top of page top of review Having the correct controls and the ability to get to them quickly is the most important factor in practical image quality. A good camera makes it easy to adjust the critical settings crucial to making a good shot. Poor cameras hide these under incomprehensible menus. Accomplished photographers make these adjustments sometimes for each and every shot, since conditions and camera angles change continuously. This Casio is the most usable camera I've ever used. Because of this it will enable one to get more good shots under a broader range of conditions than many other cameras that may be more impressive in a sterile laboratory. In lab tests there is no penalty for having to stop and read a manual for every setting, and in life this is the difference between getting the shot or missing it. Ergonomics top of page top of review The S100, and all of the Exilim series, are the easiest to use compact digital cameras I've ever used. All the menus and functions are extremely well thought out and thus easier and faster to use than any other fixed lens camera I've used, including Nikon and Canon. My Canons all take a while to respond to menu inputs while the S100 responds instantly. The S100's functions are easy to find and don't need the manual while I've always found Nikon's fixed lens digital cameras impossible to operate without the manual. The S100 is a tiny, dense camera with little to no blank space on the rear to place a thumb while holding it. Also the buttons require little force to operate. Thus I often accidentally hit the AF Mode button when I grab it with my big American thumb.
My big American thumb has to find the textured thumb rest and avoid the AF mode button Because it's tiny, dense and made of slippery stainless steel you ought always to use a leash or strap. It's easy to have it slip out of your hand compared to a big rubberized SLR. You easily can program which settings you wish the camera to retain when it's turned back on. By default most settings reset each time. In the REC mode use the MEMORY menu. This lets you define which settings are memorized each time the camera is turned off. You may select Scene mode, Flash mode, AF mode, White Balance setting, ISO, AF area, Self Timer, Flash compensation (called Flash intensity), digital zoom on/off, manual focus distance and the focal length setting of the zoom lens! Trick: A cute feature for playing images to people standing in front of you is to press the SET button and the shutter at the same time. The image INVERTS so you just flip over the camera to show the image the same way Japanese present business cards to each other. It also automatically removes all the info from the shot so your friend sees a clean image without writing all over it. Since you also use the SET button to play any audio you've recorded this doesn't work with images that have audio with them. Just tap the shutter or set button again to return the image to normal. Power Switch top of page top of review The regular power switch works like everything else. The camera turns on in the record mode. There's a very clever extra: just like the brilliant design of a Bang & Olufsen stereo, the S100 is smart enough to turn on the power if you just hit the PLAY or RECORD button, in which case it wakes up in that mode. Contrast this to most other products that waste your time requiring the redundant pressing of a power switch and then the RECORD or PLAY buttons, duh. You may deactivate the automatic power on when pressing the PLAY or RECORD buttons, and you also may set these to turn off the camera when pressed again. This is all easy to set in the SET UP menu. Speed top of page top of review Everything is fast. Menu response is instantaneous, far better than my Canon A70 or the Canon S70. Playback images scroll at ten per second, and they are sharp, not fuzzy like Canon under fast scrolling. Pressing power on to making the first properly autofocused photo is just two seconds. My Sony Mavica used to take 10 seconds to wake up, and the original Canon Digital Rebel takes two seconds just to turn on. The Casio S100 takes only two to three seconds to make a completely autofocused photo. Casio rates it as a new photo 1.2 seconds, which it does if you don't let it fully focus each time. If the camera hasn't focused yet just press the shutter anyway and it automatically reverts to the hyperfocal distance. Autofocus speed is pretty good for a compact, but still not up to shooting sports. No fixed lens digital camera is either. Grid Lines top of page top of review It's easy to get basic grid lines on the LCD, ideal for anything like landscapes and architecture and anything with horizons and lines that need to be kept straight. Set this in the REC menu under Grid. Even sneakier, for those of us who prefer the more complete grid lines of a view camera you can get these in the "Collection" bestshot mode #18. I have no idea what else this mode does, but it sure puts up a better grid. This bestshot mode #18 can't make an exposure longer than 1/8 second, so I have not figured out how to get the finer grid for use at night. No big deal. This is another sign that a photographer actually designed this camera. I find these grids indispensable for keeping my shots straight and wish other digital cameras had them. LCD and Viewfinder top of page top of review The big 2.0" LCD is bright, sharp and colorful. It has a native 354 x 240 pixel resolution. It's about as big as one can fit on a camera this small. The S100 has no conventional peephole viewfinder. That's how it makes room for the huge LCD. I never use peepholes anyway. You always use the rear LCD to compose. The LCD, like all LCDs and Ansel Adams' view camera's ground glass, it's next to impossible to see if the sun is shining on it. Do as Ansel did and shade it with a black cloth, shirt or your jacket while in direct sunlight. The good news is that things always look much better in the image than they do on the LCD in daylight. If you can get a composition that looks at all decent on the LCD in direct sunlight then the resulting image will beam with brilliance on your computer or in print. A washed out LCD makes you work hard to get a good image so it actually helps you. The Review mode is weak. When selected it lets you see the image you just made right after you make it. The problem is it only stays up for a second and then vanishes. Other cameras allow one to choose a longer review time, or even to hold and zoom that image indefinitely without having to resort to the Play mode. On the S100 you have to revert to play mode to see it in detail. I found no trick for this; on my Canon A70 you keep the shutter pressed and the image holds indefinitely Bestshot or Scene Modes top of page top of review Casio calls their preprogrammed scene modes "Bestshot" modes, not to be confused with Nikon's Bestshot mode which selects the sharpest of several tries. There are some handy settings in these modes. For instance, the twilight mode adds a magenta filter electronically, saving me from bringing my glass CC30M for trick shots. There are some clever new ones as well as the usual Portrait, Scenery, B/W and Sepia modes. The "Coupling Shot" mode allows one to make in instant in-camera left-right composite image. This is designed for a couple to to make a photo of both of them in a location without a third person or tripod. It's easy to use: select the Coupling Shot mode and have the non-photographer of the couple make the exposure of the other on the left side. Now the two swap places and the photographer composes the image so that it matches up with what was just shot. It holds as a preview a transparent image of the first half shot. It then records the composite image as a single JPG, and you have a shot of you and the wife in front of Mount Rushmore! Obviously this is designed for Japanese tourist's obsession with photographing themselves in front of everything and for that it's brilliant. Try that with your 1Ds-MkII! I suggest the non-photographer make the first shot since the second person has to be careful to line it up. Shooting in reverse order means the non-photographer will usually not understand what's going on and you get two random backgrounds instead of a continuous one that matches. Another application is showing two details in one image. I needed to show that my car's trunk lid was misaligned. Snap two closeups from the same distance and you now have a single image showing the details of the left and right trunk lid alignments. Before the S100 I had to composite that in Photoshop which took me a while. The "Preshot" mode is designed to help you if you hand your S100 to someone else to photograph you in front of something. We all like to get the perfect composition, and of course strangers always put us right smack in the middle of the frame. In this mode you make the shot the way you want it composed without you in it. Now the camera holds that image as a transparent image superimposed with the live one. If you can get the stranger to line up the transparent image with the live shot you'll have a final image composed exactly as you envisioned. Again this is brilliant for people who love to come home with photos of themselves in front of things. The Sundown mode adds an electronic equivalent of a CC30R red filter. The Twilight mode adds an electronic equivalent of a CC30M magenta filter. The Fireworks mode sets a two second exposure. Here's the coolest: the Business Card and Whiteboard modes automatically crop out a card or powerpoint slide then corrects keystoning! You shoot, it gives a preview of where it thinks the corners are, and then it does the perspective transformations and saves the corrected and cropped image!!! Actually I tried this as a trick for real estate and architectural work to save from having to use Photoshop or a view camera, but it won't work since it crops out everything outside of what it perceives as the center rectangular subject. It works great for shooting a slide, but for buildings or racks of equipment or furniture it crops away the outside borders or landscape. Oh well. Since this mode is cropping and transforming from a larger image the largest final image size it will make is 1,600 x 1,200. Trick: In the BestShot mode just press the center (unmarked) SET button to allow immediate selection of the scene mode (bestshot) you want. You can do this, and still have the L/R buttons immediately shifting the ISO or WB or whatever you've assigned to the L/R selectors. Custom User Presets top of page top of review This feature is usually only found in the best $4,000 SLR cameras. My $1,000 D70 can't do this and the $5,000 D2X and this Casio can. The Nikon forgets some settings like the AF mode while the Casio remembers most of them. Once you've found a set of camera settings you like you can save them to be used again. For example I have a setting for night shots with tungsten white balance at ISO 400 along with my focus, resolution, quality, contrast, sharpness and saturation settings. It's much faster to recall presets than to set all of this each time. You do this in the Bestshot (scene) mode. If you're in the Bestshot mode just press the center SET button and keep clicking to the right to get to "Register User Scene;" no menus required. Select your shot with the settings you want to save. It saves the settings along with an index of the image you used for the settings. One may program in 999 complete sets of cameras settings as presets! This is more than any camera I've ever seen at any price. These presets remember ISO setting, AF mode, White Balance, exposure compensation, flash mode, flash exposure compensation, flash underexposure correction, contrast, saturation, sharpening and the presence or absence of various viewfinder grids. I'm unsure if any SLR camera regardless of price can do this. If you selected manual gray-card set WB then the preset will recall the MWB setting, but will use your most recent MWB setting and not the one stored when the "bestshot" preset was saved. Even better than the $5,000 D2X, this Casio recalls these settings as not simply "setting 1" and "setting 2" but actually uses a little version of the photo that you used as the reference to save the setting. After making a shot at the settings you want to save I suggest shooting a slate with the settings written in big letters. Now you'll you see the slate as you recall the presets. "Slate" is the term we use in Hollywood to refer to a clapper board with writing put in front of a camera to mark a shot at the beginning of a take in a movie. For instance, I shoot a slate that says "ISO 200 Tungsten" as more informative than just a photo made under those conditions. Of course if I was saving scenes for my mom I'd leave it as is. Great news is that you can back up and restore these presets. They are stored in the camera's SCENE folder as files in the form "US100xxx.JPE." "xxx" goes from 001 to 999. I've never gotten around to putting in more than a dozen. You ought to be able to trade the user configuration/scene/camera setup files by email between other users. Here's my custom preset I use for landscapes. Copy it to your computer, remove your SD card from your S100, connect the SD100 to your computer and copy that .JPE (not .JPG) file into your camera's SCENE folder. That setting fixes ISO 50, high saturation, fine compositional grid and cloudy White Balance. Have you caught your breath yet? If so, I'll go on to mention that when you're using these presets all you have to do is hit the SET (center) button to use the L/R buttons to select among them! This really goes to show that a real photographer designed this; this is years ahead of Canon and Nikon's models that cost ten to twenty times as much. This means you can recall all your settings immediately to allow instant adaptation to changing conditions to get the shot you need NOW. Newspaper photographers pay big bucks for the big Nikon and Canon SLRs which at best offer a few presets labeled A, B, C and D and not with an index image like this cute little Casio. You will erase all your presets if you format the camera's internal memory. This only happens if you format the camera with an empty SD card slot. Doing that formats the S100's internal memory instead of the SD card. You also may erase them when the S100 is connected to your computer with no SD card by using your computer to erase the .JPE files contained in the camera's SCENE folder. Over time you will store and erase these presets. Each new one is numbered from the last one, thus in a year you might have just six numbered 23, 34, 36, 42, 56 and 68. If you want rename them as 1, 2, 3, 4, 5 and 6 then copy them all to your computer, rename them (that means change the last three digits of the .JPE file only), restore those to the S100 and erase the originals. I suppose you also could rename the files in the S100 directly from your computer, however I like to have a backup before messing with them. Live YRGB Histograms! top of page top of review Histograms help you set exposure. The S100 has the best histograms I've ever used. The S100 shows a full YRGB histogram on playback. YRGB means luminance (Y), red, green and blue. Some cameras can do this, although many only show one channel instead of all four and are therefore useless. Even better than playback only, the S100 shows a living YRGB histogram as you compose, zoom, set white balance or exposure or whatever. It doesn't get better than this. OK, it does get better. Unlike other cameras this Casio makes it easy to get the histogram and to turn it off. Other cameras may have this but you'll never find it again. With the S100 you just hit the DISPlay button and you select between 1.) a screen with just the picture and no data, 2.) all the numeric data superimposed on the screen at the same time (flash mode, shooting mode, pictures remaining, resolution, JPG mode, date, time and battery charge) and 3.) all that data and add the histogram. The manual is incorrect explaining that a correct histogram is one evenly centered about the middle. In fact a correct histogram usually is one where one of the three colors just barely makes it to the far right of the graph. If any color clips off on the right you have a clipped highlight, and if none of them make it all the way to the right you'll have a dark image. It's normal for dark images to have most of the graph towards the left and for light images to cluster to the right; just beware if any part gets clipped off the right edge of the histogram. You even get live histograms, although only the Y channel, in movie mode! Users' Manuals top of page top of review One of the best things about this Casio is that anyone experienced with digital cameras doesn't need a manual. It's all easy and obvious. Like the Olympus Stylus Verve the Casio comes only with an excellent but basic 16 page booklet that covers all you might want to know. There is no full printed manual; instead it's a PDF on a CD. That's OK since few people read the manuals and this lets Casio spend more on the camera for the same selling price. Those of us who read manuals are a minority and will whine, but honestly today the larger manuals are mostly just filled up with idiotic legal warnings and no more actual instructions than the basic get started guides. For instance, the big manual makes you wait until page 16 to get to the "How to Get Started" section and waits until page 39 to tell you how to turn on the power! I read it all so if you read this entire review I'll tell you all the tricks I found to save you the trouble. Here's the full manual (6.3MB PDF) Tripod Socket top of page top of review The tripod socket is made of metal, not plastic as most other digital and compact cameras. Triple Self Timer Not only does it have 2 and 10 second delay settings, it also has a setting in which it makes three shots a couple of seconds apart after waiting 10 seconds! How does Casio think of all these things? This means you stick it on a tripod, run into the photo, and you get THREE shots a few seconds apart. This saves you most of the running back and forth to get a good shot. Brilliant! Sounds It's easy to make the camera silent. It's the very first menu under SET UP. Please turn everything off out of respect for others. Idiot (Status) Light Most digital cameras have an assortment of idiot lights to let you know if the flash is ready or if the camera can't focus etc. The S100 has just one. Steady green is good, flashing amber is the flash charging and flashing green means the autofocus failed. The brief manual lists 26 different things that the camera can tell you with this one light! They do this by changing the light to any of three colors (green, amber and red) and by leaving it on or flashing it at one of three different rates. It takes two pages, from page 194 to page 195, to explain all this if you care. Cold Weather top of page top of review The Casio EX-S100 works great in the cold. To my amazement after soaking it at 0ºF (-20º C) for ten hours it worked the same as it does at room temperature, even though the battery is only rated for use down to 32º F (0º C). It's as if it doesn't even know it's cold. It focuses and zooms without lubricants solidifying and the LCD and backlight looks great. Bravo Casio! As expected the LCD screen was a little slow to respond, meaning you get a fade effect when switching between playback images and get a little bit of smear when pointing the camera around in taking mode. This doesn't affect the taken images and is much faster than other LCDs which pretty much freeze up and stop working. Amazingly the colors on the LCD were unchanged! Even the flash works fine at 0º F. I didn't perform a battery life test at 0º F since I couldn't crawl inside my temperature chamber while I ran down the battery for an hour or more at 0ºF. I made over thirty shots before I got bored and the camera started to warm up anyway. Some of these were with flash and the battery indicator read full the whole time. Many other cameras read half dead even with new batteries at 0ºF. Since 0 degrees F is below what's specified, so any operation at all is a gift. I used the real Casio battery included with the camera, not an off brand. One word of caution: don't lick the metal camera when frozen! It's made of real metal, not painted plastic, so it could stick to your tongue. Cleaning It's easy to clean the lens since the only exposed optical surface is only 6 x 7 mm! I haven't let it get dirty, however I suspect that dust specs on the lens will be less of a problem than with larger cameras because they are so much closer to the front nodal point and therefore more out of focus. Like all fixed lens cameras and unlike DSLRs the sensor never needs to be cleaned since it's sealed. Durability Because it's bare metal and not covered in leather or rubber it can slip out of your hand if you don't use a strap. I had it fall four feet onto concrete. It was just fine and not even dented. Fonts I like the font used for the graphics on the camera's body to label the controls. This is a personal observation for sure since I just happen to like DIN Schriften variants. Next Page: Power and Battery Performance |