|


Nikon
D200 User's Guide
© 2006 KenRockwell.com


I bought mine from Ritz here. I bought another D200 from Adorama here. Also try Amazon here. Adorama usually has D200/18-70 kits in stock here. It helps me keep adding to this site when you click these links to get yours.
REAR CONTROLS
Want free live phone support? In the USA, call (800) NIKON-UX, 24 hours a day, 365 days a year.
From left to right, top to bottom:
BKT: Bracketing. I don't use bracketing. Hold it and spin the two control rings on the right of the camera while looking at the top LCD to choose how many shots and the exposure increments. Nikon always has designed their cameras defectively here: you have to make as many exposures as the bracket sequence is expecting. If you count wrong, your next shot will be at some weird exposure offset from the last shot. Canon had this down years ago: you held down the shutter and made as many auto bracketed exposures as you wanted. When you stopped, so did the bracketing sequence.
Trash (also doubles as one of the two FORMAT buttons): With an image on the LCD, press once. You'll get an "Are you sure?" message. Press again and the shot's gone. The D200 ignores this button if it's not playing back.
Hold this along with its brother (the MODE button) to format a memory card as I explained on the previous page.
Play [>] Button: Press it to see your pictures. Press again to turn them off.
There are a lot of trick play modes. My favorite is explained under the settings for the rear thumbswitch and the Command Dials.
MENU: This gets you inside your D200.
I'll cover what you can screw up with this in the 11 long pages that follow.
Checkerboard Button: Hold it and turn the rear dial to selector one, four or nine shots up at once.
TRICK: Hold the checkerboard and spin the front knob to flip quickly between these pages of images!
? / Key:
Playback: It protects (locks) the image from erasure. Warning 1.): it marks the file so well that it won't empty out of my trash on my computer unless I go in and remark the file on my computer first. Warning 2.): these images are erased from your memory card when you format anyway. Now you see why I don't use the lock feature.
Menus: Press for more information about whatever you're setting.
TRICK: Hold the "?" as you turn on the power and the D200 creates a new folder and saves the new images you make to it. This is extremely handy because when you load the images into your computer they already will be sorted into folders. I find this extremely helpful!
Magnifying Glass / ENTER:
During playback: Press to zoom in on image. When you do this you can zoom in more by pressing the checkerboard button and spinning the rear dial. You can use the thumb switch to scroll around the image. I prefer to set a trick mode explained here to zoom in a lot more by pressing the center of the thumb navigation button.
While in the menus: takes action on what you've set.
AE-L AF-L (Top center): Hold this to lock settings while shooting. You can alter what this button does in the Custom Setting Menu c1 and c2.
AF-ON: Focuses the lens but doesn't take a picture.
This button is helpful if you disable the AF from activating when you press the D200's shutter in this menu. If you do then you can focus with this button, and have an AF lock when you release it. I'd rather it was a self-timer, but Nikon didn't ask me about this one.
Thumb Button: Used for menu navigation, selecting AF areas , scrolling through playback images and a whole lot more.
You can configure this button in custom setting f1 and f2. I set mine to zoom way into an image when pressed in the center.
TRICK: If you set a center push to zoom on playback, you can spin the rear dial to move to different images at the same position and zoom! This makes it easy to pick out the sharpest image. Unfortunately as soon as you hit the delete key it goes back to unmagnified, sort of making this less useful for in-camera selection and deletion.
L / * on Thumb Button: this is a lock. It's smart: it only locks the AF selection. It doesn't lock you from anything else.
Focus Area Mode Selector Switch
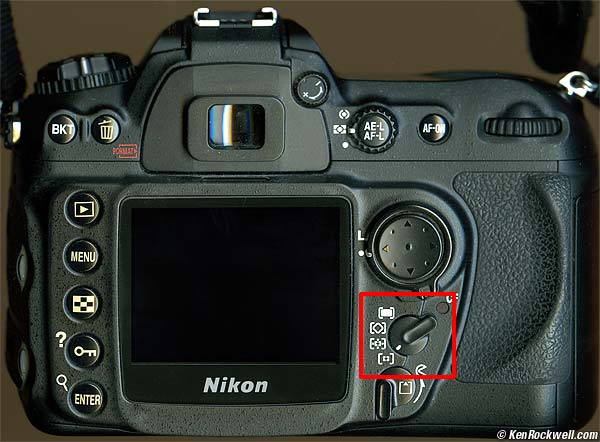
Focus Area Mode Selector Switch
The Focus Area Mode Selector Switch lets you choose how the D200's brilliant AF system uses all 11 sensors. This switch is important for switching from shooting static subjects to action.
Little Box: Leave it as shown to use just one sensor. That's how I shoot still subjects. You use the thumb button to choose which sensor. Nikon calls this "Single-area AF."
Cross: The next position up is for sports and action. Set AF-C mode on the front of the D200. Choose the AF sensor with the thumb switch. The D200 sets focus using that sensor and tracks your subject, even if it moves around the frame! It really works. It will track birds, runners, cars or anything. It's easy for the D200 to track a bird against a blank sky. It's tougher for it to stay locked you have a lot of other things immediately in front or behind your subject. Nikon calls this "Dynamic-area AF."
Diamond: This does the same as the previous position,except it limits the D200 only to the AF areas next to the chosen sensor. Nikon calls this "Group-dynamic AF." You can tweak some of this function in the Custom Settings Menu a4. I never use this setting.
White Rectangle: The D200 chooses the best sensor automatically. It ignores your input. Use this when you hand your camera to a non-photographer or when the action is too fast for you to be able to choose sensors. It works great: I got lazy one day and photographed a bunch of kids this way, and everything looked perfect. Nikon's name for this, even less understandable than the others, is "Dynamic area AF with closest subject priority."
The D200 doesn't display the focus area that it has chosen while shooting in three modes. You can see which it chose in playback if you go to MENU > PLAYBACK MENU > Display Mode, check "Focus Area" and select OK.
Pac Man Switch: this cool switch does nothing but pop open the CF card door.
PLUG
My D200 User's Guide continues below.
It took me two months to write this D200 User's Guide. No one pays me anything. If you find it as helpful as a book you might have had to buy or a workshop you may have had to take, feel free to help me share more.
Thanks!
Ken
Back to Top of D200 User's Guide
KNOBS and BUTTONS
MENUS
PLAYBACK < < NEXT