Home Search Gallery How-To Books Links Workshops About Contact
© 2006 KenRockwell.com I bought mine from Ritz here. I bought another D200 from Adorama here. Also try Amazon here. Adorama usually has D200/18-70 kits in stock here. It helps me keep adding to this site when you click these links to get yours. PERFORMANCE (continued) White Balance All presets (Auto, Day, Shade, etc.) offer +3 to -3 trims. A great new mode is COLOR TEMP. It's trivial to set: hold the WB button and spin the rear dial to "K" (as in Ken Rockwell or degrees Kelvin) and then spin the front dial to your choice from 2,500 K to 10,000 K. I'm going to love this mode for use in mixed and tungsten light. I always found the tungsten setting too cool, and the other settings too warm. I never could get a setting in the middle with my D1H or D70 unless I messed with a manual white card preset. Today I can just spin to 4,000K and be there in an instant, no menus required. The K adjustment goes in rational steps so it's easy to set fast. It goes in 50K steps at the 2500K end which spread to 900K steps at 10,000K. These steps are small enough to be as fine as you can see and big enough so you can spin through them immediately. if you need finer adjustment of course you can use the manual white card setting process. I wish the K setting didn't wrap from 10,000 back to 2,500 K and vice versa. I would prefer it stopped at each end. More good news: there are FIVE manual white-card presets labeled 0 - 4. I love this: I can save five different kinds of crummy weird lighting values and not have to whip out my gray card each time. White Balance Bracketing Only works for JPGs, not raw. Viewfinder It's BIG! After lowering my expectations from using film-camera-converted DSLRs this greater magnification is a welcome improvement. The D200 is also at least as bright as my smaller D70's viewfinder. A "CF" symbol blinks if I'm dumb enough to try to make photos with no CF card inserted. Likewise for a low battery, which flags below about 20%. You may turn off this warning if you consider yourself omnipotent. A "B/W" symbol blinks in the image area if you've set the camera to black-and-white. You can cancel this warning you prefer. The P, S, A or M mode is shown in the finder as you adjust it. Yahoo!, no need to take your eye away from the finder for adjustment. Same for ISO: you can see it at the bottom right. The D70s lacks these. The D70s has a redundant focus area indicator in green at the bottom of the finder. The D200 lacks this. Neither camera needs it. The screens of both cameras go fuzzy and dark if you take out the battery. Weird but true! There are a few ticks that represent segments which show the 8mm center-weighted metering circle. I often confuse these short segments with dirt in the finder. If you look really closely you'll see little ticks in the middle of each AF area. I have no idea about these. The Flash Ready bolt is green. I would prefer red since green blends in with everything else on the bottom. I've seen no indication of the flash sync mode in finder, however pages 6 and 79 of the US manual imply them. In the dark it's normal to see the whole viewfinder screen turn a bit red if lit by one of the red AF area lights. It's just spill light. Optional Manual Focus Screen I found a third-party seller of a traditional manual focus screen for the D200 here. Standard AF screens are optimized for brightness, but don't show depth of field correctly for lenses faster than f/2.8. The manual focus screens did, as the one at this link claims. This screen will be darker and will alter your exposure, so be sure to use the D200's trick exposure trim hidden deep in the menu systems. This will allow you to recalibrate your meter but not have that show up in the viewfinder as exposure compensation. Three Kinds of Mirror Lock Up Mirror lock up is needed only for tripod shots with long lenses in the 1/60 - 1 second range. With shorter exposures there's no problem, and with longer exposures any short vibration is also invisible. If you need it: Method One: Select "Mup" on the ring on the camera's top left. Press the release and the mirror flips up. Press it again to fire the shutter. Yipee! Of course you'd do this with a remote cord to make sense. I use an older MC-20 cord. This works great if the camera is in BULB, too. Use the cord's regular - -- -- mode. For time exposures with the MC-20 cord set the D200 to Bulb and Mup. Set the MC-20 cord to TIME. Tap the camera's release to flip up the mirror. Now tap the MC-20's release to start and count off the exposure. Don't use the MC-20's button to flip the mirror in TIME mode, since in TIME mode the MC-20 is trying to keep the shutter released continuously. You have to use the camera's release to pop up the mirror first. For a precisely clocked preset long exposure with the MC-20 do the same thing with the MC-20's LONG TIME mode. Set the H:M:S value on the MC-20. Set the D200 to BULB and Mup. Tap the D200's release to pop up the mirror, and then the MC-20's release to start your preprogrammed exposure. More at Long Exposures. Method Two: Exposure Delay mode. This mode locks up the mirror a second before the shutter fires. It's hidden under Shooting Menu > Shooting/Display > Exp. Delay Mode (d5). I'd skip it. Method Three: There's a mirror up mode solely for cleaning. I always use BULB and cajones instead. This isn't for shooting. Built-in Flash Exposure control is superbly accurate. I couldn't fool it, regardless of range or how much of the frame was occupied by the subject. The iTTL system is improved from the D70. There are fewer preflashes and they are which are much closer to the actual time the shutter fires. The D70 fired the preflash quite a while before the actual photo. My dogs still blink with the D200 in TTL mode, but less than they do with the D70. Best results are had in Manual mode which uses no preflashes. It's excellent. it seems to have a huge range at ISO 100, but then again I was using an f/1.4 lens. There are now two buttons for the flash: one to pop it up and another to adjust sync mode and exposure compensation. The D50/D70/D70s share the button, so you have to pop up the flash to see or adjust your flash settings. You can adjust these on the D200 without popping up the flash. At full manual power, I measure GN 28 in feet at ISO 100. This is GN 8.5 in meters, which is exactly one stop less than specified. The Japanese have rated their flashes one stop brighter than they actually are for decades, so this is right-on. Remote Flash The built-in can control an external flash, for free. See my page on remote wireless flash control. It uses a lot of obvious preflashes to do this, so this is awful for people and pet photography. It's great for me photographing places and things. Oddly the D200 defaults to channel one in commander mode, while my D70 and SB600 default to channel three. I set my D200 to channel three to talk to my flash. The preflashes in commander mode ensure many people and pets will look like this every shot:
Blinking is almost assured when using the built-in flash as a remote commander. My doggie was awake and had her eyes open the whole time, except each time I made a flash photo. Remote Flash Fixes Use the D200's front FUNC button in its default Fv Lock mode. Tap it and the flash (or flashes) go off to preset the exposure. Now each shot will use the same exposure value and skip almost all the preflashes! If you're only using on-camera flash it now skips all the preflashes, solving the problem. Yippee! Once set you'll see Fv* in your finder. It recalls this value until either you unset it by tapping the FUNC button again or the camera's meter times out in a few seconds. Be careful; if the Fv lock resets you'll get blinking again, and if it doesn't reset and you change the distance to your subject you'll get the wrong exposure. Modeling Flash A really annoying feature is Modeling Flash. This is a blinding several-second-long continuous burst of flash. It happens when you press the depth-of-field preview button when the flash is on. It nearly blinded me since I have the habit of looking into my lens and stopping it down to peer at the diaphragm. HA! Fooled me! That hurt. Default is ON. I turned this off under CUSTOM SETTING (pencil icon) > Bracketing/Flash > Modeling Flash (e4). This also works with the SB-600 and SB-800 both on-camera and remotely. It runs the batteries down, too. Remote Cable Releases Thank goodness my old MC-20 cord works. I'll be darned if I'm going to spend another $100 just for another clumsy dedicated cable release. My MC-20 works without it's own battery when connected to the D200. The MC-20 works like a regular release when you first plug it in. Set the MC-20 to TIME, set the D200 to Manual and BULB and tap the MC-20's release. The shutter opens and the MC-20 starts counting the elapsed time on it's display! Set the MC-20 to LONG EXP and program the exposure time on the MC-20 in H:M:S for time exposures to 9h59m59s. Want star trails and want to get some sleep? Set it to however many hours you want and go to sleep. Look out: the battery only lasts 80 minutes before it dies on a time exposure, so you may have to get crafty with an AC adapter. More at Long Exposures. Data Transfer Just plug in the USB cable. Even better, plug in any mini USB cable; you don't need Nikon's. When your done just hit eject on your Mac and pull out the cable. You never have to touch the camera! There is no dedicated PC position required to connect as on my old D1H. The D200 recognizes the connection and showed up on my Mac by magic. The D200's top LCD shows a continuously advancing bar graph even if there is no active data transfer. Wish List I wish I could program it to select between two White Balance and ISO settings based on whether or not the flash is charged and on. This way I could have the correct WB with flash, and not have to jam it manually between AUTO and ISO 100 and tungsten and ISO 1600 if I turn off the flash for a shot. Likewise, I wish I could program the FUNC button to allow selection among the shooting and Custom presets, which would let me do the above with fewer clicks. I wish the Kelvin Color Temp White Balance mode had a wider range. There is some dim lighting which still looks too orange to me at the 2500K setting, and I also will probably want warmer settings than the 10,000K setting in shade. I use WB to get a look, not for laboratory calibration. Thus I want a wider range for artistic expression. I wish the K setting didn't circle around from 10,000 back to 2,500 K and back. I refer it stopped at each end. ISO Auto needs to cancel in Manual exposure mode. Noise Levels: Since I know the weenies out there worry about this, here's what I see. See my High-ISO Comparison for examples. ISO 100: Smooth and perfect. No visible noise. ISO 200: Looks great. You can see a tiny bit of noise if you deliberately look for it, but any normal person would be looking at your great photo and never notice it unless you waste your time shooting test charts. ISO 400: Looks great. You can see noise if you deliberately look for it, but still only in flat areas. I would have no problem shooting at ISO 400 all day. It's still less than film grain. Feel free to use this setting as your default even in daylight. ISO 800: Still looks great. Nerds will start to see noise in more than just flat areas, and some of the noise is almost getting a bit blotchy instead of just grainy. Use this if you need ISO 800. No one is going to notice it unless they are the sort of nerd who looks for grain rather than great images. Normal people still won't see any noise at this setting. ISO 1,600: Nerds will be able to see noise in about half the image. Normal people looking at normal sized prints will be perfectly happy. The noise isn't objectionable. For you real nerds, two out of three of the D200s I've used have had a hot pixel or two.
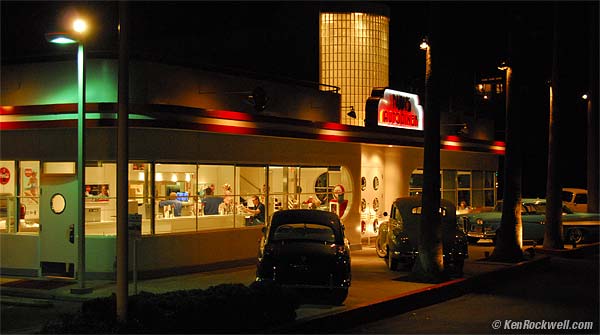
Ruby's Diner, 07 January, 2006. D200 auto-everything, auto ISO at 1600, 18 - 200 VR at 35 mm, 1/20 second at f/4.2, VR hand-held. Full frame horizontally. I cropped a little dead space from the top and bottom.
100% crop from above center, no further sharpening. This is at 6.5x compared to the above. Shot below is sharpened with my standard treatment for web images (150% at 0.3 radius). Both crops saved in CS2's Save For Web at 80% quality, top overall image at 40%. Not much noise, more importantly, the exposure was dead on and didn't need any + compensation as I usually need in these conditions. Note also no banding, no halos and no blooming!
Sorry not to have great art examples for you. This is an initial grab shot while my wife went in to check the menu. What impresses me is that these all were perfectly sharp and all made on my D200's full auto everything setting. ISO 3,200 (Hi-1): Looks great for ISO 3,200! I can no longer compare it to my old D1H because I sold it, but ISO 3,200 is perfectly usable for low light. I think it might be cleaner than my D1H. Nerds will be able to see noise in most of the image blown up huge. Normal people won't notice noise consciously, but might get the gritty feeling that it's a low-light shot. It depends how big you blow it up; at just 8 x 12" it's still not an issue if you need ISO 3,200. On each of the three D200s I've tried there is usually a hot pixel or two. "Normal people" are just that: folks like my family, not photo nerds looking for problems. Real people look at photos for their content, not what's wrong with them. ISO Setting Thankfully you can slide right into ISO 3,200 without needing to revert to menus as I did in my old D1H. You can see the ISO all the time in the finder; a great solution for idiots like me who sometimes forget from the night before and accidentally shoot outdoors all morning at ISO 1,600! ISO AUTO Good: You may select the maximum ISO to which the D200 will increase the ISO in ISO Auto. Default is 1600. You may select the shutter speed below which ISO Auto begins to increase the ISO. Default is 1/30. Better Still: The actual ISO, either your setting or the setting to which ISO Auto has increased, is always displayed in the finder. Bad: Nikon still has a firmware flaw which doesn't deactivate ISO Auto in manual exposure mode. If you forget to turn off ISO AUTO the D200 will attempt to outthink your manual settings by changing the ISO! When I go to Manual mode I also have to furz around in the menus to turn off Auto ISO. Viewfinder Huge 0.94x magnification with a 50 mm lens, bigger than just about anything out there, and for all I know the biggest finder of any DSLR. 95% coverage. Everything else is about 0.70 magnification. I'm going to love this, even though I find smaller viewfinders help me compose more powerfully. ISO has been added to the finder's information. I love this, since I reset ISO all the time. Glass pentaprism. -2 to +1 diopter adjustment. No built-in blind like the pro cameras. There are clever high-priority idiot overlays to the ground glass that indicate B/W mode, low battery or no memory card. I like those. Ergonomics Superb! You really have to pick up and try the D200 to appreciate it. It's even better than my beloved D70 since the ISO, WB and QUALITY controls have been moved to their own dedicated buttons on top, which is the same panel on which the setting LCD is located. The D70, D70s and D50 share these recording functions with playback function buttons, so the older cameras required you to tap the shutter button to get the camera back to the shooting mode before hitting them, otherwise you'd tweak a playback function by accident instead of your ISO. The D200 is brilliant! New Function Button The D200 adds a special programmable function button just below the depth-of-field preview button. You can use this to give you instant access to the feature of your choice, which ought to make swapping between banks of presets a breeze. You can preset this button to do any one of: turning off the flash, locking the flash exposure, changing exposure in full stops, duplicating the AF-L/AE-L button, shooting a bunch of brackets, changing to Spot, Center or Matrix metering modes, and more. Of course you only get one of these functions at a time, set in a menu. Exposure compensation has a new twist: as always you can set "easy exposure compensation," to save having to press a button to set this with the dial. The D200 adds the ability to tell this to reset itself automatically in case you forget to.
Nikon D200. ISO: 100 to 3,200. ISOs are settable in full, 1/2 and 1/3 stops. These are marked correctly in your images' EXIF data, however on-camera Nikon still labels ISOs above 1,600 as "pushes." Thus ISO 2,000 is h+0.3, ISO 2,500 is h+0.7 and ISO 3,200 is h+1.0. That's just Nikon. Thank goodness you can set the increments in which ISO is adjusted separately from the increments for other parameters like exposure. Unlike the D70, on the D200 I can adjust ISO in full stops as I prefer and still set exposure in thirds. Whoo hoo! The AUTO ISO setting is very flexible, since you can define the shutter speed below which to start increasing the ISO, and the maximum ISO to use. Brilliant. Flash Sync: Only 1/250. Poo. You all know how much I love 1/500 sync. There is a trick FP sync mode which goes to 1/8,000 with some flashes, but doesn't count as you can read at my FP sync page. All else being the same of course I prefer a camera with 1/500 sync. In this case the D200 offers so much more of a little bit of everything over my D70 I'm still getting a D200. This mostly means the built-in flash is going to be working harder to make fill in daylight. The built-in flash only has the same power as the D70s, D50 and D70. This is like stepping back over five years to film for me. I may or may not have to carry my SB-600 everywhere for enough power for daylight fill; we'll see. Of course every other comparable camera today has fallen back to 1/250 except the D70s and D50 I still suggest for most normal people. Built-In Flash: Works with SB-600 and SB-800 for free remote flash control as I explain here. Even better than the D70, the built-in flash of the D200 has the ability to control numerous external flashes simultaneously in three channels (one channel is the built-in flash itself) and with four different frequency settings so four different photographers can work in the same location and not interfere with each other. Better than a Canon 5D with no flash at all, eh? ISO 100 Guide Number: 40 (feet), 12 (meters), which means like all built-ins it's puny and great for fill. Nikon is unclear if the Repeating Flash, Modeling Flash and FP High-Speed Sync flash features are also included in the built-in flash. Like most Nikons, flash exposure is right on, even in close-up. This is better than on the Canon DSLRs I've used like the Canon Rebel XT whose flash exposures vary. Flash Control: i-TTL flash control, the same excellent system as the rest of the current Nikon DSLRs. It gives great exposure in just about any crazy condition. PC Sync terminal. FV (Flash Value) Lock locks-in the value of flash exposure from one shot to the next. Auto FP (Focal Plane Shutter) High-Speed Sync is a trick mode to get sync above 1/250. Flash exposure compensation from -3 to +1 stops. White Balance: Auto, Tungsten, Fluorescent, Daylight, Flash, Cloudy, Shade, White-Card (gray-card) manual and new 2,500º to 10,000º Kelvin preset manual. White balance bracketing of 2 to 9 frames in increments of 1, 2 or 3 of arbitrary Nikon WB tweak units. One NWBTU equals about 10 mireds. I love the new Kelvin adjustment, since it will finally let me get my hands around settings halfway between tungsten and daylight for my indoor interior shots. I think it may have four memories for gray-card white balances, which will be extremely handy. Auto WB under tungsten still comes out a bit warm, like most cameras. Remote release via 10-pin MC-22, MC-30 or MC-36 There is no built-in IR remote sensor as I prefer on my D70. For that you need the the $165 wireless ML-3! There is no conventional cable release socket. The D200 requires the $55 MC-30 or MC-36 cords. The bargain $50 MC-22 is just a cord: there are just wires coming out of it to connect to mad-scientist devices. The D200 also can be controlled through the optional Nikon Capture 4 software and the WiFi WT-3 at even greater expense. Mirror Lock-Up: This is a selection on the shooting mode dial on the top left. Press the release once to pop up the mirror, press again to fire the shutter. This is better than nothing, but not as good as most cameras from the 1970s which locked up the mirror automatically at the start of the self-timer operation. MLU is a selection separate from the self timer on the same dial, so you can't get both at the same time. Battery: EN-EL3e, rated 1,800 shots. I only get about 500 shots per charge. Battery gauge is in five segments, up from the three of previous cameras. Battery display options add charge percentage, the number of shots made since the last charge and a general indicator of how many more charges you can get out of your battery. That doesn't mean it indicates how many shots you have left. This displays on the rear color LCD; the 5-stage gauge displays on the top LCD. The EN-EL3e looks like it can drop into the D50, D70, D100 and D70s. The older EN-EL3a and EN-EL3 batteries won't work in the D200 since they lack some additional circuitry of the newest EN-EL3e. The "e" in EN-EL3e stands for electronic communications. The EN-EL3e has an electrical capacity of 1,500 mAh, just a little more than the EN-EL3 of the D70 and D50 and the same as the EN-EL3a of the D70s. You can use the D200 battery in the D50, D100, D70 and D70s, but only the D200 battery will work in the D200. The emergency throw-away lithium holder of the D70 unfortunately won't work in the D200. This is because the D200 needs two-way data communication for the clever battery gauge, and this communication is lacking in earlier batteries. If you're a wise guy and file a new notch in your old D70 battery I'm told the D200 will pop on for a moment, then show LOW BATT and turn itself off. Oh well. New JPG compression option: You can ignore this, but I've always whined that some brands, like Nikon and Casio, create almost the same size JPG files regardless of image complexity. This means I have to crank up the quality setting by hand for complex images to maintain the same quality. Other brands like Canon and Sony compress JPGs so that the quality remains constant regardless of image complexity, which I prefer. Canon and Sony JPG files will vary wildly in size depending on the image. A world's first for the D200 is the choice between these two systems. Nikon calls the constant file size option it's always used "Size Priority," and the method used by Canon and Sony which I prefer as "Optimal Quality." I'm setting mine to "Optimal Quality." This saves me from wanting to tweak the JPG quality setting for different subjects, but will make it almost impossible for you to predict how many shots you'll get on a card with any accuracy. Most files are about 2.5 MB for JPG Normal Large. Flat subjects will drop to 1.3 MB. File Data: EXIF contains everything easily readable by any of my programs. Many cameras, like my Casio, hide data like ISO in weird places such that you can't read it except in the camera or with the camera makers own software. I avoid camera maker software if I can because it's usually always buggy. Oddly a D200 JPG file won't zoom when played back in a D70. No big deal; you only see this when swapping cards between cameras which isn't a good idea. Professional practice is to reformat a card immediately every time it's put in a camera. Noise Reduction Options: You can turn these all off and on as you prefer. In addition to the usual cumbersome dark-frame subtraction for long exposures, you can control the nature of the grain reduction applied to the images made at ISO of 400 and above. You can control how much grain reduction happens, or turn it off entirely. I have to test how well this works versus doing it with my favorite degraining tools in Photoshop. Mechanical: Magnesium body and weather seals! The pop up flash housing seems like plastic. The weather sealing is to the same level as the $5,000 D2X, which is more than the F5. I have friends who drop their F5s in snow and use them in pouring rain and they work great. I'm too chicken to try, but I suspect the D200 will put up with a lot of abuse and just eat it up. The D200 strap lugs are small reinforced holes in machined posts requiring D rings. Contrast this to the elongated stamped sheet metal attachment points of the D70 through which webbed straps can thread directly. The D200 is made in Thailand, just like my D70. It's really well made, like everything Nikon does that costs this much. NEXT: D200 HIGH SPEED PERFORMANCE or back to PERFORMANCE PAGE 1 or back to D200 review page index or back to top of D200 review |


