Home Donate New Search Gallery How-To Books Links Workshops About Contact
Nikon
D5000 User's Guide:
Top Panel Controls
© 2009 KenRockwell.com. All rights reserved.

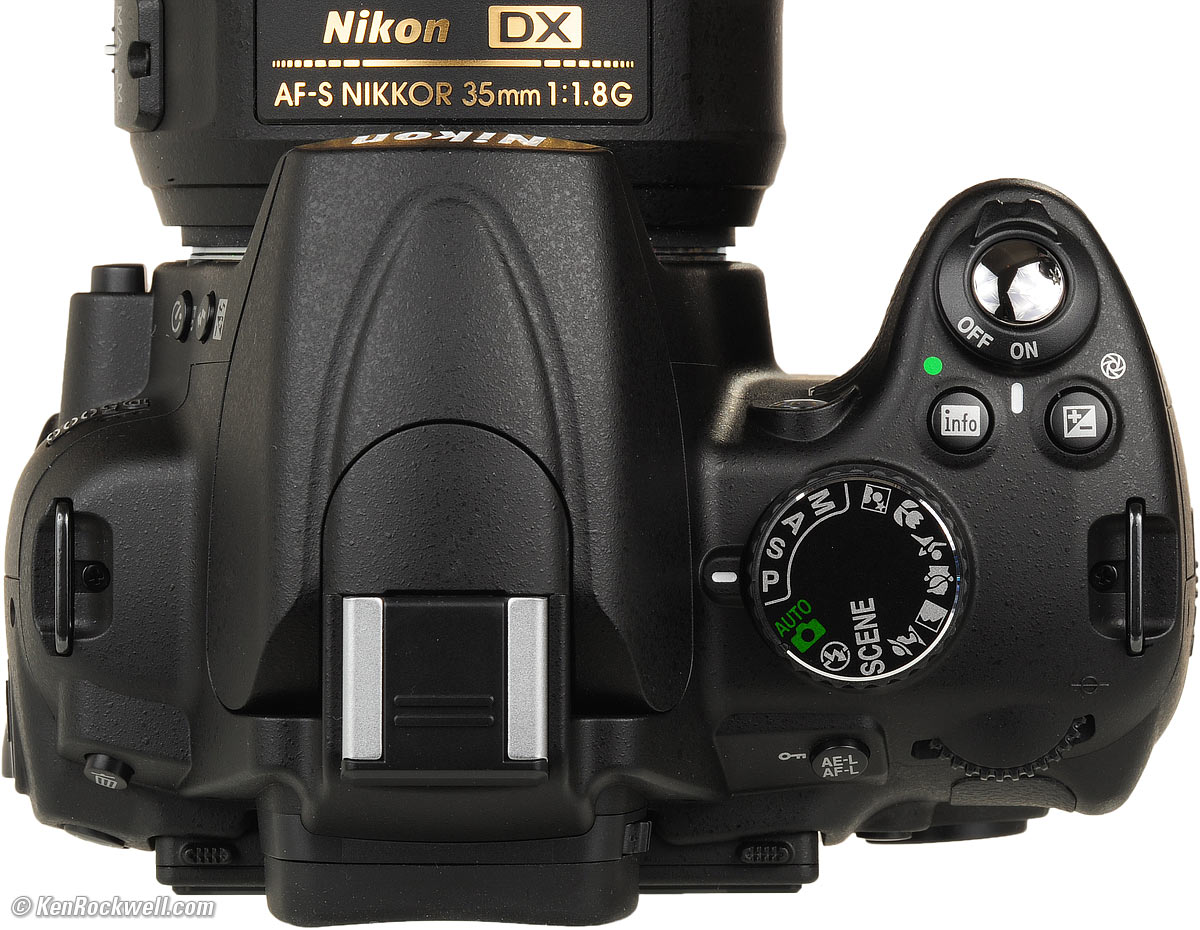
Nikon D5000 top controls. enlarge.
June 2009 Top of D5000 Users Guide D5000 Review More Nikon Reviews
NEW: Nikon D5000 Users Guide for iPhone and iPod 23 December 2009
Want free live phone support? In the USA, call (800) NIKON-UX, 24 hours a day, 365 days a year.
Exposure Mode Selector Knob top
Spin this knob to select among exposure modes.
AUTO
This is the point-and-shoot mode. I don't use this, because in this mode, many of the controls I'll address later are locked out. I don't even use this mode when I hand a D5000 to a stranger to take my picture.
P: Professional Mode (formerly called " Program")
I use the "P" setting (Professional) almost all the time.
In Professional mode the D5000 chooses the f/stop and shutter speed for you.
If I want different apertures or shutter speeds I rotate the rear command dial, which selects alternate combinations of f/stops and shutter speeds which give the same exposure. Nikon calls this "Program Shift."
An asterisk ( * ) shows up next to "Programmed Auto" on the INFO panel and a "P*" icon appears in the finder to let you know you've shifted the shutter speeds and aperture. The exposure stays the same; this lets you change depth-of-field or capture motion differently in odd circumstances.
The asterisk goes away when you return to the standard combinations.
The standard combinations are f/1.4 @ 1/8, f/2 @ 1/15, f/2.8 @ 1/30, f/4 at 1/60, f/5.6 @ 1/125, f/8 @ 1/250, f/11 @ 1/500, etc.
An easy way to return to these standard combinations is to flip to a different mode and back to P, or turn the D5000 off and back on.
A, S and M Modes
If you want to use a fixed aperture or shutter speed, then use S or A mode and the camera will automatically pick the other value.
If you want to set both the hard way, use M, manual, mode.
The rear dial usually sets the shutter speed, except in Aperture Priority (A) mode, where is sets the aperture.
In manual exposure mode, hold the [+/-] button near the shutter release and spin the rear dial to change the aperture.
A Mode: Aperture Priority
In A mode you choose the Aperture and the D5000 chooses the shutter speed.
S Mode: Shutter Priority
In S mode you set the Shutter and the D5000 sets the aperture.
If the D5000 runs out of good apertures you easily can get under or over exposure in S mode: watch that the D5000 can select a correct aperture for your lighting.
M Mode: Manual
You set everything the hard way. Look at the LCD after you shoot to check exposure. You can use the bar graph in the finder, but why? If you wanted to do that, use another mode and let the D5000 do the setting for you.
Hint and Firmware Defect: AUTO ISO doesn't deactivate in Manual mode. I always turn off AUTO ISO when I enter Manual Mode.
Cute Icon Modes (flower, portrait, sports, etc.)
I never use these.
These are preset scene modes that some people might find helpful, but I don't.
Try them yourself, and see Nikon's user's manual or ask them at (800) NIKON-UX if you have any questions.
I don't use these because I make all the settings myself as I'm explaining here.
SCENE
Set this and you can select from even more scene modes with the rear dial.
I never use these; feel free to play around yourself.
No Flash (no bolt)
This is the same as AUTO, but without flash.
If you use AUTO, use this if you need to turn off the flash indoors.
INFO [i] / RESET • Button top
Nikon D5000 INFO / RESET Button. enlarge.
This lights up the INFO panel on the rear LCD, from which you can see and set just about anything as I explained in the introduction.
Lighten/Darken [+/-] Button (Exposure Compensation) top
Nikon D5000 Lighten/Darken Button. enlarge.
This is the most important control on the D5000.
This controls the brightness of your next picture.
Hold the button and spin the rear dial to adjust it. You'll see a number and a bar graph in the finder. + makes the next picture you take brighter, and - makes it darker.
If your photo is too dark or light, just change the setting and try again. Easy!
Remember to set it back to zero when you're done. If you don't, you'll see a bar graph on the bottom of the finder. It's perfectly OK to shoot with it set all day long if you need it.
See more at How to Set Exposure. Ignore Nikon when they suggest you don't use this with Matrix Metering; I do it all the time.
I usually leave it set at 0.0. Look at your pictures on the rear LCD and set it to make them look perfect.
Hint: You can see the + or minus value displayed in the finder as well as on the rear INFO panel, so you can adjust this with or without your eye on the finder.
Hint: This changes the setting for the next photos you take. It doesn't change any photos you've already made.
My D5000 User's Guide continues below.
I support my growing family through this website.
This guide is free to read online, but copyrighted and registered. If you haven't helped yet and would like to save or make a printed copy of this article for your camera bag, please send me $5.00 for each complete or partial copy that you print or save, for personal use only. Others charge $29.99 for crappier information, and with your honesty I can continue to offer these guides online for less.
If you bought your D5000 by clicking through my links, then you've saved money and also helped me write this guide. Thank you and please enjoy it. It's great people like you, and those who help me otherwise, who allow me to keep adding to this site for everyone's benefit.
The biggest help is to use these links to Adorama, Amazon, B&H, Ritz and J&R when you get your goodies. It costs you nothing and is a huge help to me. These places have the best prices and service, which is why I've used them since before this website existed. I recommend them all personally.
Thanks for reading!
Ken
Back to Top of D5000 User's Guide or Top of Nikon D5000 Review
KNOBS and BUTTONS
BACK < < NEXT
MENUS
RECENT ITEMS (or MY MENU) MENU
Home Donate New Search Gallery How-To Books Links Workshops About Contact