Home Donate New Search Gallery How-To Books Links Workshops About ContactNikon
D90 User's Guide:
Top Panel Controls
© 2008 KenRockwell.com. All rights reserved.

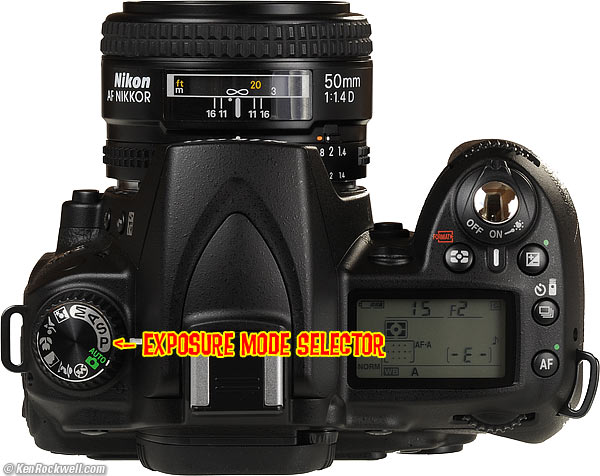
Nikon D90 top controls.
September 2008 Top of D90 Users Guide D90 Review More Nikon Reviews
Want free live phone support? In the USA, call (800) NIKON-UX, 24 hours a day, 365 days a year.
NEW: Nikon D90 iPod and iPhone App.
Exposure Mode Selector (right side) top
Spin this knob to select among exposure modes.
Auto: This is the point-and-shoot mode. I don't use this, because in this mode, many of the controls I'll address later are locked out. I don't even use this mode when I hand a D90 to a stranger to take my picture.
P: Program
I use "P" for program auto exposure. In this mode the camera chooses the f/stop and shutter speed for you.
If I want different apertures or shutter speeds I rotate the rear command dial, which selects alternate combinations of f/stops and shutter speeds which give the same exposure. Nikon calls this "Program Shift."
An asterisk ( * ) shows up next to the P on the top LCD to let you know you've chosen a different combination for exposure. The asterisk doesn't appear in the finder, but you can see the apertures and shutter speeds. The asterisk goes away when you return to the standard combinations. The standard combinations are f/1.4 @ 1/8, f/2 @ 1/15, f/2.8 @ 1/30, f/4 at 1/60, f/5.6 @ 1/125, f/8 @ 1/250, f/11 @ 1/500, etc.
An easy way to return to these standard combinations is to flip to a different mode and back to P, or turn the D90 off and back on.
A, S and M Modes
If you want to use a fixed aperture or shutter speed, then use S or A mode and the camera will automatically pick the other value.
If you want to set both the hard way, use M, manual, mode.
In these three modes you select the aperture with the front dial and the shutter speed with the rear dial. You can reverse which dial does what in the Custom Setting: Controls Menu. Of course in A or S mode you can't set one of the two values because the camera is setting one for you.
A Mode: Aperture Priority
In A mode you choose the Aperture and the D90 chooses the shutter speed.
S Mode: Shutter Priority
In S mode you set the Shutter and the D90 sets the aperture.
If the D90 runs out of good apertures you easily can get under or over exposure in S mode: watch that the D90 can select a correct aperture for your lighting.
M Mode: Manual
You set everything the hard way. Look at the LCD to check exposure. You can use the bar graph in the finder, but why? If you wanted to do that, use another mode and let the D90 do the setting for you.
Hint and Firmware Defect: AUTO ISO doesn't deactivate in Manual mode. I always turn off AUTO ISO when I enter Manual Mode.
Cute Icon Modes
I never use these. Thee are preset scene modes that some people might find helpful, but I don't. Try them yourself, and see Nikon's user's manual or ask them at (800) NIKON-UX if you have any questions.
I don't use these because I make all the settings myself as I'm explaining here.
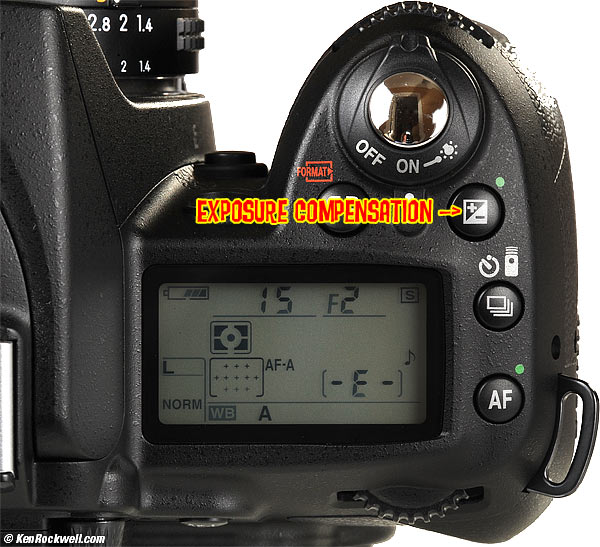
Nikon D90 exposure compensation button.
Exposure Compensation Button • (+/- and a green dot) top
This is the most important control on the D90 or any other camera.
Hold the button and spin the rear dial. + makes the next picture you take brighter, and - makes it darker. If your photo is too dark or light, just change the setting and try again. Easy!
Remember to set it back to zero when you're done. If you don't, you'll see a bar graph on the bottom of the finder, on the top LCD and if you hit the INFO button. It's perfectly OK to shoot with it set all day long.
See more at How to Set Exposure. Ignore Nikon when they suggest you don't use this with Matrix Metering; I do it all the time.
I usually leave it set at 0.0. If I'm outdoors in bright light with the Picture Control set to VIVID, I'll usually leave it at -0.7. Forget what I do, look at your own pictures on the rear LCD and set it to make them look perfect.
Hint: You can see the + or minus value displayed in the finder as well as the top LCD, so you can adjust this without taking your eye from the finder. The two displays only read the value when the button is held, otherwise those digits read exposures remaining.
Hint: This changes the setting for the next photos you take. It doesn't change any photos you've already made.

Nikon D90, top right controls.
Power Switch (right side) top
Tap it past ON to light up the top LCD and wake up the meter.
There's no need to turn OFF the D90 except to prevent accidental operation when squashed in a camera bag. The D90 turns off by itself after a few seconds of being ignored. The only thing the OFF position does is act as a lock against unintentional operation.
I set Custom Function Menu f1 to "Both" so that this also pops on the rear INFO panel. No big deal, since you also can do it with the dedicated rear INFO button.
Metering Selector (and one of two FORMAT buttons) top
The light meter has three settings. Hold this button and spin the rear knob to change them. You'll see the meter mode icon change on the top and rear LCDs.
Matrix
Matrix is the rectangle with the dot in the middle, which matches the icon on the button.
I always use Matrix metering, period.
Center Weighted
I never use the Center Weighted option. Its icon is the circle with a central dot.
In Center Weighted metering, the D90 only measures light the way Nikons did back in the 1960s.
The CW meter was useful in its day because it measured just the right area of the finder so you could point the camera at the main subject, set a manual exposure, recompose, and shoot. Unless the subject just happened to be the right tone, you'd always have to use exposure compensation for light and dark subjects. In the 1970s, AE cameras had AE locks, so you'd point, meter, lock, recompose, and shoot. What a pain!
Center-Weighted is a leftover for old-timers.
Spot
I never use the Spot meter option. Its icon is the small dot. In this setting, the D90 only measures light from the selected AF sensor.
It requires knowing the Zone System to use well, since few scenes actually have any tones at exactly Zone V from which to spot meter. See How to Use the Nikon Spot Meter.
This setting is also a leftover for old-timers. TOday, just look at the LCD to see how a picture looks.
Why I use Matrix Metering
Matrix is a magic system which really figures out what you're shooting, even if it's very dark or very bright and white, and just gives the correct exposure. It sees in color, it sees depth, it sees all over the finder, and has an astounding amount of perception in getting exactly the exposure I want. Even with Nikon's first Matrix meter in the Nikon FA of 1983, I could point the camera at anything, even right into the sun, and get perfect exposures.

Sunrise, Mono Lake.
I shot this with a Nikon FA, 600mm f/5.6 ED Nikkor AI-s, Matrix Meter, Program Auto exposure and Fuji Velvia. I just pointed and shot; the Matrix meter does the exposure calculations so I can pay attention to the composition.
The meter in the D90 is many times better.
I wish there was a way to lock this in Matrix, as there is on the pro cameras.
FORMAT (combined with Metering button)
Hold this along with its brother on the back left rear of the camera (combined with the trash button). You'll get a blinking "For" on the top LCD.
Hold both of these again and you'll completely reformat the memory card.
Professionals reformat a card each and every time a card is put in the camera. This is because files and folder structures are sometimes messed up or changed when read with a card reader, read in-camera by a computer or used in any other camera. Professionals prefer to be safe than sorry. They don't use cards to archive previous photos.
One time I kept saving my winner shots on a card by simply erasing the rest each time. After a few months I started to get errors. These went away as soon as I reformatted the card. Reformatting completely renovates the card. Erasing does not, and may leave the potential for errors.
Advance Mode Button top
This sets single frame or continuous shooting, and if you chose continuous shooting, how fast. It also selects the self timer, and sets the D90 to be ready to shoot when triggered from the excellent optional $17 ML-L3 remote release.
[S]: Single Frame
One frame for each press of the shutter button.
L: Continuous Low
I use this setting. Press the shutter once and you get one photo. Hold it down and the D90 takes pictures continuously at three frames per second.
If I need just one shot, I get just one shot.
If the light is dim and I want a few shots to ensure I get a sharp one, I hold the release down and make several from which I'll pick the sharpest.
3 FPS is the default. You may change this to 1FPS, 2 FPS, 3FPS or 4 FPS in Custom Setting d6.
H: Continuous High
The D90 runs at 4.5 FPS as long as you hold down the shutter.
Use this for sports and action, but be prepared to sort through a lot of files.
Self Timer (clock icon)
Press the shutter and the D90 takes a picture some seconds afterwards. We can set the delay in CFN c3.
Even more fun, you can set the D90 to make between one and nine shots each time. This is a great idea, because you can then pick the shot with everyone's eyes open.
Remote Control (remote control icon)
If you have an optional $17 ML-L3 remote release, and everyone should because it works on many Nikon cameras, you select this setting to put the D90 on alert to shoot when you press the remote.
If you call up the self-timer and remote icons, the D90 will start clocking down the self timer when you trigger it with the remote.
For long night time exposures, set the top mode dial to Manual (M) and set the shutter one click to the left of 30 seconds, where bulb used to be. You'll now get two dashes ( - - ). Press the remote, and the D90's shutter opens. Press it again, even hours later, and the D90's shutter closes.
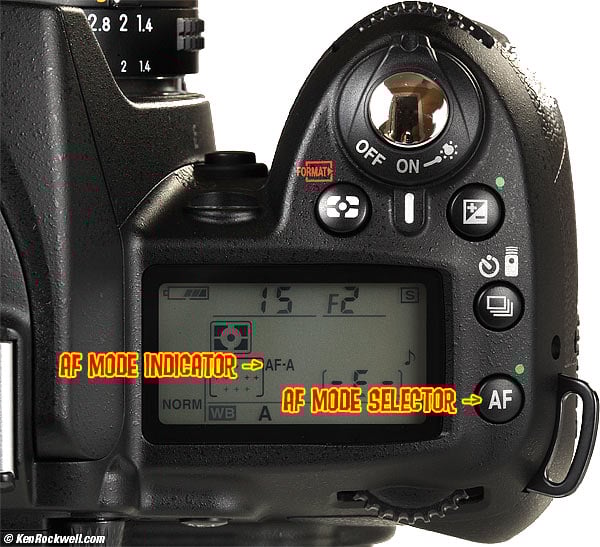
Nikon D90 top AF controls.
I explain these controls in my Nikon D90 AF Settings Guide.
My D90 User's Guide continues below.
I support my growing family through this website.
This guide is free to read online, but copyrighted and registered. If you haven't helped yet and would like to save or make a printed copy of this article for your camera bag, please send me $5.00 for each complete or partial copy that you print or save, for personal use only. Others charge $29.99 for crappier information, and with your honesty I can continue to offer these guides online for less.
If you bought your D90 by clicking through my links, then you've saved money and also helped me write this guide. Thank you and please enjoy it. It's great people like you, and those who help me otherwise, who allow me to keep adding to this site for everyone's benefit.
The biggest help is to use these links to Adorama, Amazon, B&H, Ritz and J&R when you get your goodies. It costs you nothing and is a huge help to me. These places have the best prices and service, which is why I've used them since before this website existed. I recommend them all personally.
Thanks for reading!
Ken
Back to Top of D90 User's Guide or Top of Nikon D90 Review
KNOBS and BUTTONS
BACK < < NEXT
MENUS
Home Donate New Search Gallery How-To Books Links Workshops About Contact