How to Photograph the Solar Eclipse
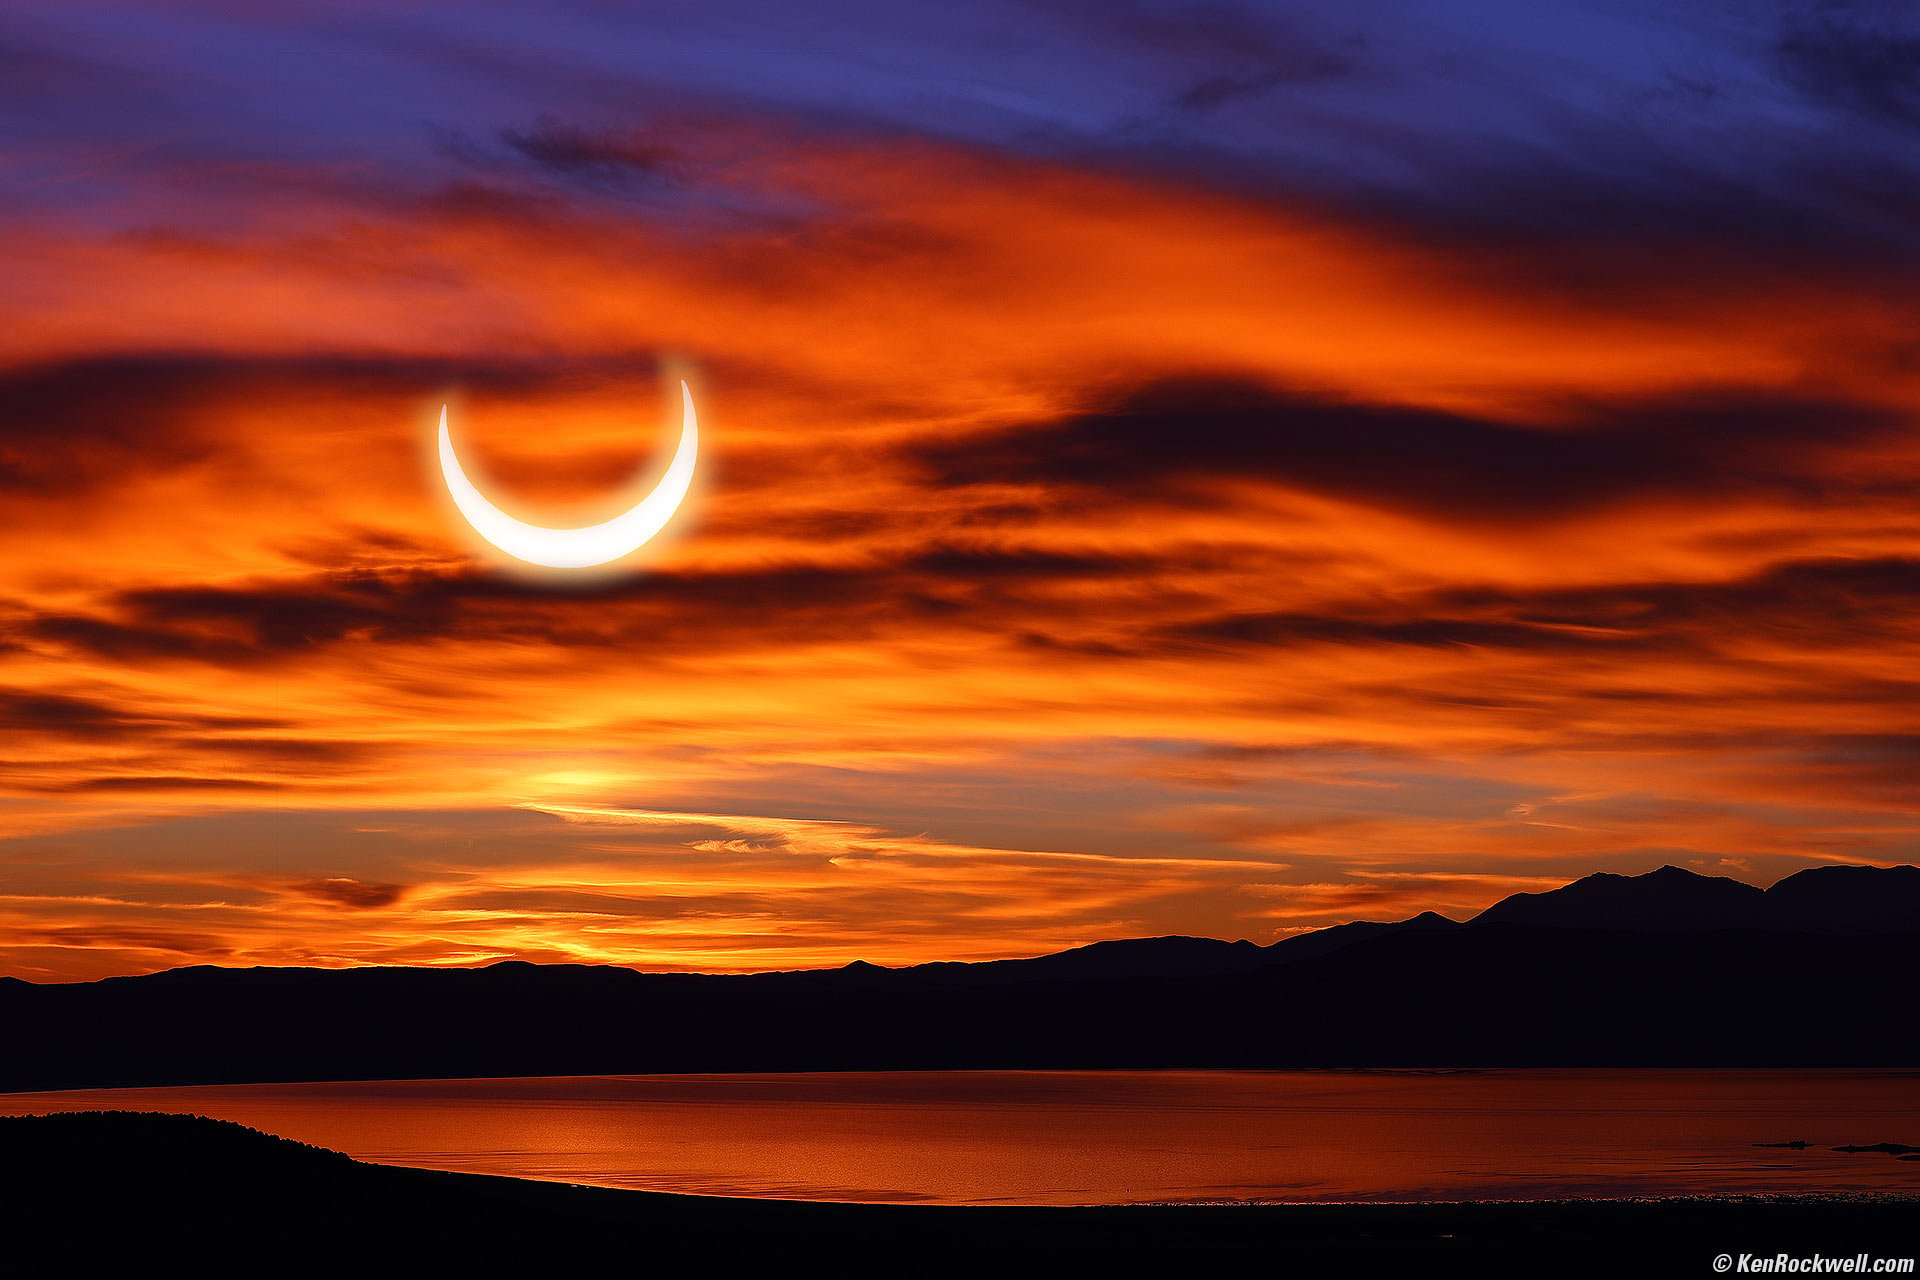
Devil's Dawn, Mono Lake, California, 9:25 A.M., Saturday, 14 October 2023. Canon EOS R6 II and EF 100-400mm L II IS USM on EF to RF Ring adapter.
This all-content, junk-free website's biggest source of support is when you use any of these links to approved sources when you get anything, regardless of the country in which you live. Buy only from the approved sources I use myself for the best prices, service, return policies and selection. Thanks for helping me help you! Ken.
April 2024, October 2023, August 2017 Better Pictures Canon Sony Nikon Fuji LEICA All Reviews
NASA's Map to where and when the eclipse happened on Monday, 08 April 2024.

Introduction

I buy only from these approved sources. I can't vouch for ads below. |


I'm an artist, not an astronomer. Here's how to make photographs that will stand on their own as works of art and get normal people to say Ooooh! and Aaaah!, rather than simply record an event directly as a copy machine or astronomer might.
Other articles talk about how to record the eclipse, but that's not this article. I'm trying to make interesting pictures I haven't seen a hundred times before. We've all seen photos of the various phases of the sun composited across the sky with totality in the middle. Those images are clichés, and not me.
Not to spoil the fun, but in life you're either a participant or an observer. Most of the world sits around and watches while very few of us are actually out doing.
Personally I bought a stack of these German-made solar glasses to enjoy with friends, and otherwise I'm not going to try to make the same astro photos everyone else does.
If you're photographing, you're simply an observer, not a participant. If you're in the path of totality, I'd suggest the best use of the minute or so you might get of totality in your life you spend actually enjoying and experiencing what's going on all around you, instead of trying to make the same photos everyone else is. Simply feeling what's going on is good; you'll remember it the rest of your life. Why not do something really special with someone special for that minute? Do something you'll enjoy remembering or telling your grandkids about. Unlike volcanic eruptions, earthquakes or blackouts where people never know where they'll be when it happens, we know about eclipses for thousands of years in advance. Why not plan something really great to do for that minute or two other than peering at the back of a camera and missing the actual event?
At the top is a composite image with the crescent of the eclipsed sun shot from the a parking lot behind The Mobile Station in Lee Vining, California — dropped on top of a shot of the glorious sunrise from Conway Summit the day before! I had planned to do this even before I shot the eclipse, since I realized the eclipse would be up in the sky at 9:22 AM and not make for much of an image by itself. During the eclipse it was the middle of the day and pretty boring by itself.
Both images used for the composite were shot with my Canon EOS R6 II and EF 100-400mm L II IS USM with EF to RF Ring adapter.
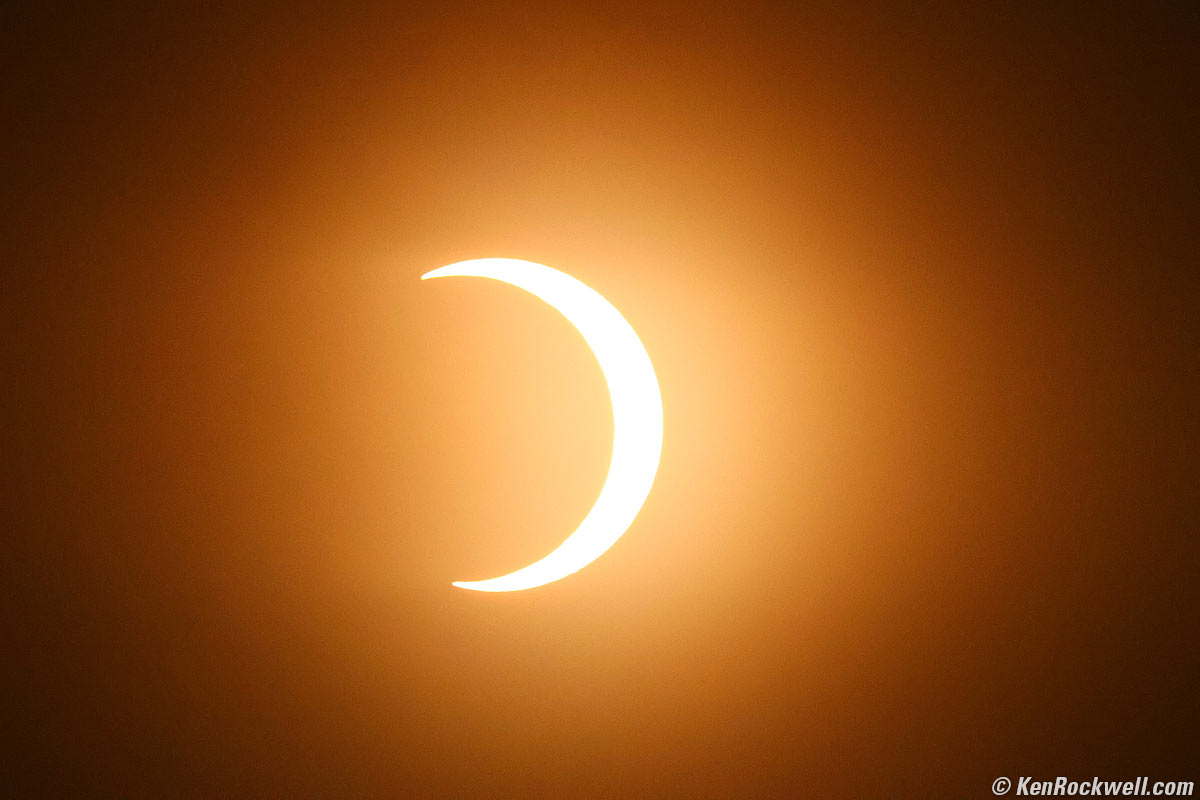
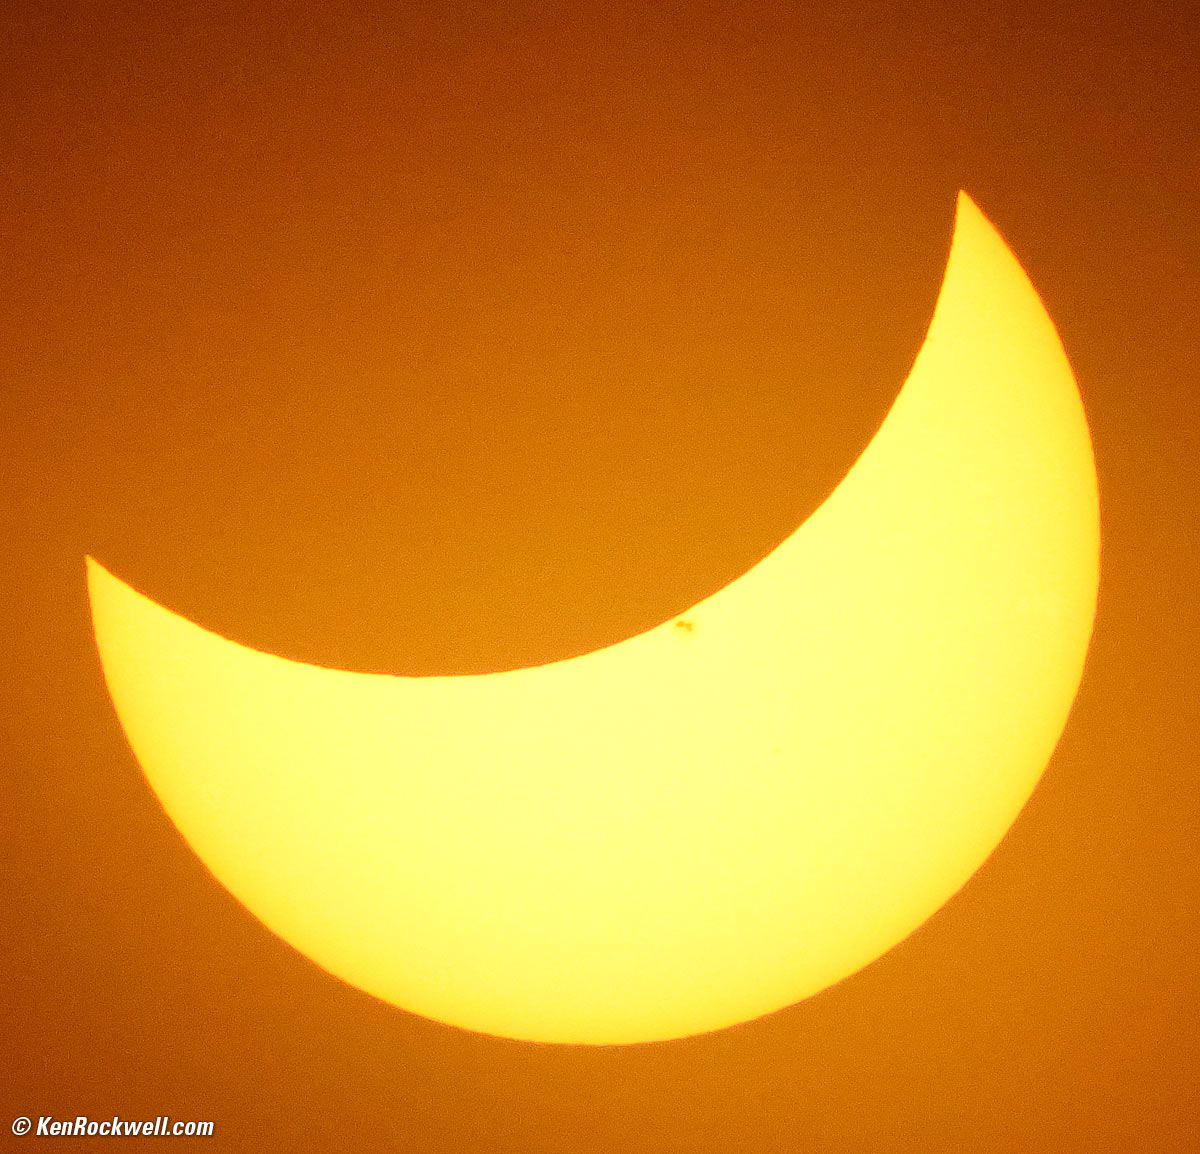
The shot of the eclipsed sun's crescent was made through a borrowed solar filter and with additional stacked EF TC 1.4× II and EF TC 2× II extenders. My EF 100-400mm L II IS USM was set to 400mm, an effective focal length of 1,120mm. The exposure was T16 (wide open) at 1/30 at ISO 25,600 (LV 5.0). If I was picking picking solar filters I would have picked a thirteen-stop less dense one to let me shoot at ISO 100 and 1/1,000, but beggars can't be choosers.
Here's the rig I used with two extenders and an adapter between my R6 II and EF 100-400mm L II IS USM, sitting on my tripod system:
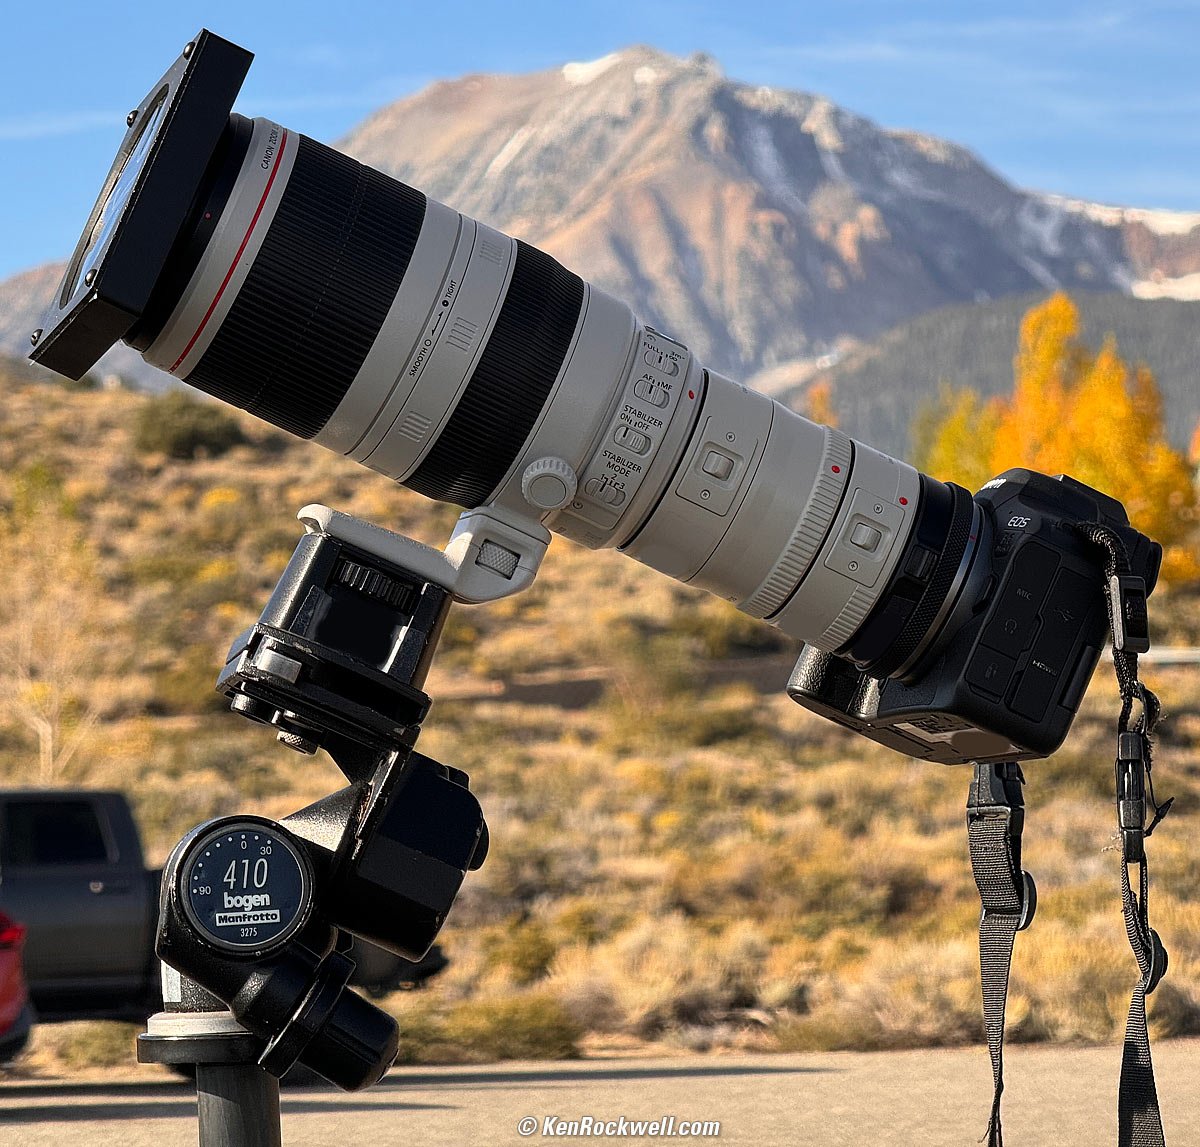
Borrowed Solar Filter on Canon EF 100-400mm L II IS USM on Canon EF TC 2× II extender on Canon EF TC 1.4× II extender on Canon EF to RF Ring adapter on Canon EOS R6 II on Nikon AH-5 Tripod Adapter on Manfrotto 410 (née Bogen 3275) Geared Head on my original 1995 Gitzo M1228 Mountaineer Carbon-Fibre Tripod, October 2023. bigger.
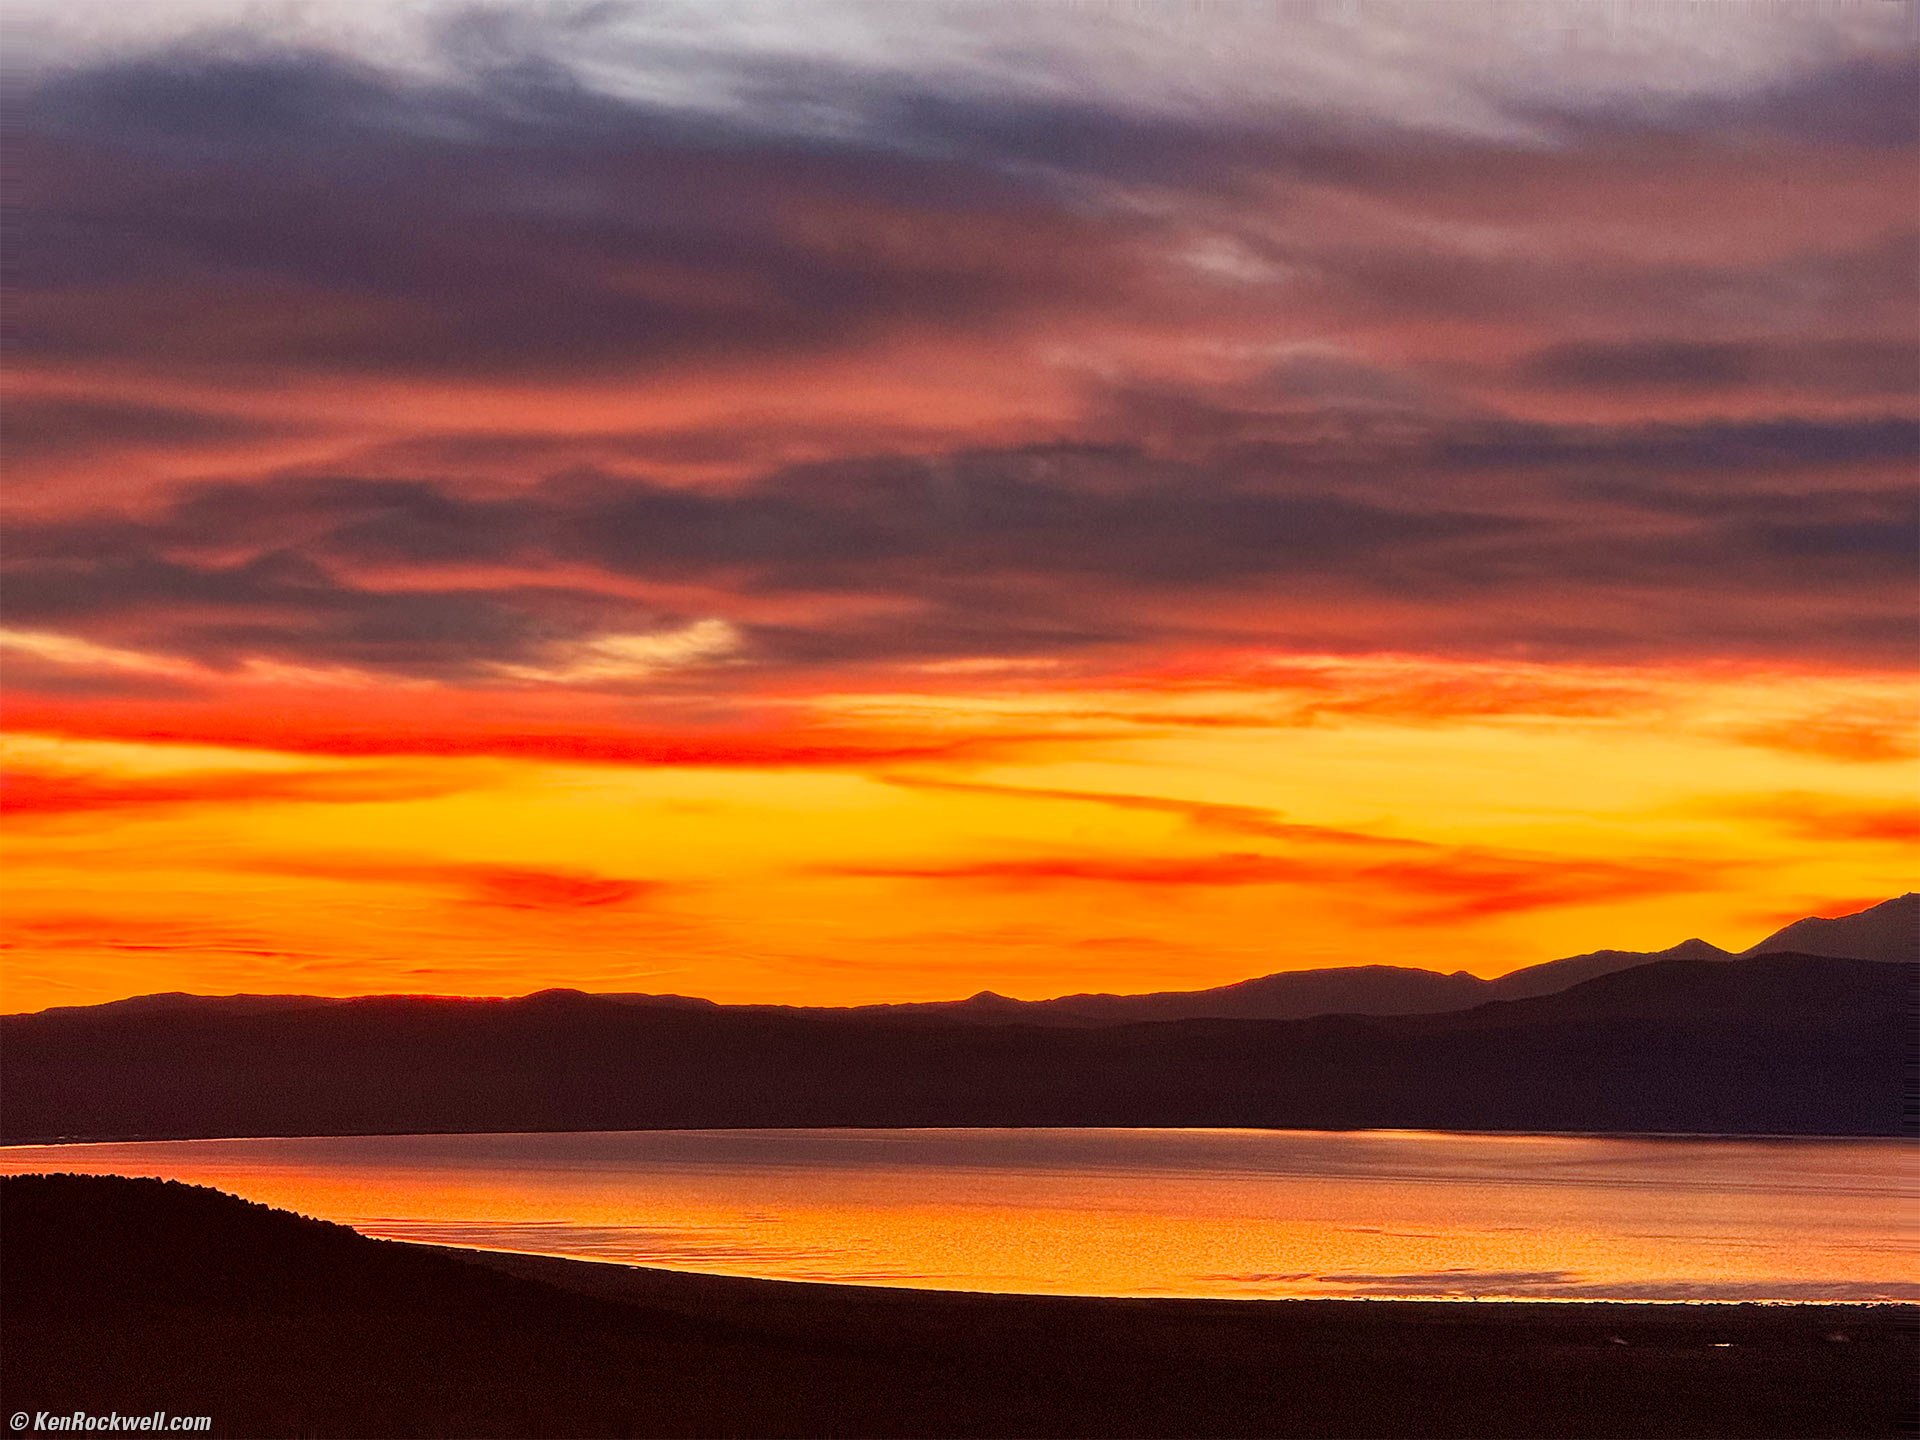
The sunrise background shot was made the day before at 6:57 AM with my EF 100-400mm L II IS USM at 100mm at f/7.1 at 1/250 at ISO 100 with -0.7 stops exposure compensation (LV 13.6). I used the sunrise background exactly as shot because I wanted it a bit dark so the crescent would stand out.
I used Photoshop CS6 (from 2012) to composite the two images. To make it Satanic I invoked The Devil's Horns by rotating the crescent layer to be almost like two horns poking upwards. The actual crescent shot was pointed to the left. I didn't make them perfectly level to make it a little more subtle and thus more powerful.
To do this in Photoshop CS6 (Mac), open both images. To give yourself working room when you move layers around, increase the canvas size of the background image to about 10,000 × 10,000 pixels (Image > Canvas Size). Now select the entire crescent image (⌘ + A on Mac) and copy it (⌘+ C on Mac). Swap to the background image (⌘ + ~) and paste it (⌘ + P).
Now your Photoshop document has a new layer: the crescent image on top of the background. The crescent was huge, filling half the frame with the crescent, so I reduced its size to taste as seen above.
To move and rotate the top crescent image, be sure it's selected in your Layers Pallet (Window > Layers) and then right-click it and select "Convert to Smart Object," which lets us keep moving it around without losing any pixels if we want to enlarge it later.
Keep the crescent's layer selected, then click Edit > Transform > Scale. Grab a corner, then hold the shift key as you resize the image. Let go of the corner and now you can drag it around to taste. Keep the Shift key pressed as you resize (scale) it, or otherwise it's easy to get it out of round if you change its size unequally in each dimension.
Once you've got it in about the right place, press Return to lock it in. Feel free to reduce the canvas size back to the original (Image > Trim).
To rotate the crescent, select its layer and Edit > Transform > Rotate. Grab a corner and drag to taste. Press Return to lock it down.
Now make a layer mask to hide most of the crescent image other than the crescent itself. Select the crescent layer again, then click Layer > Layer Mask > Reveal All. You'll see a little white rectangle appear next to the Crescent image in your Layers Pallet. Click that white rectangle (the layer mask) and now use a paint brush (just press "B") and make it black (press "D" for default white/black colors) and then "X" (eXchange) to swap black for white, making the brush paint in black to hide parts of the crescent layer. Hold Shift+ CTL+Option and move the mouse around to select the hardness (try a low percentage) and the size of the brush.
If all is well, paint with this brush and parts of the crescent image will go away and show the background behind it. Press X to swap the brush to white, which lets you paint back the crescent image if you make a mistake. Paint the mask to get the look you want.
I created the glow around the crescent by using a soft brush to paint the layer mask, making the light orange background of the crescent image only show as a glow around the crescent. A soft brush makes it look like evil is naturally piercing the soft veil of the clouds.
Feel free to use the same Edit > Transform tools to fine-tune size, location and rotation. All this and the masks are editable at any time in the future if you save it as a PSD fie.
Sorry about how complex this is; I've been using Photoshop for decades and decades and do this in my sleep intuitively; I forgot how many different steps are involved. Come on over and I can show you in person.
Here's the same rig I used in April 2024, but this time I actually bought my own basic filter that you see sitting over my lens:

Basic solar filter on Canon EF 100-400mm L II IS USM on Canon EF TC 2× II extender on Canon EF TC 1.4× II extender on Canon EF to RF Ring adapter on Canon EOS R6 II on Nikon AH-5 Tripod Adapter on Manfrotto 410 (née Bogen 3275) Geared Head on my original 1995 Gitzo M1228 Mountaineer Carbon-Fibre Tripod, April 2024. bigger.
This rig has so much magnification (1,120 actual millimeters) that you can see how large is the image, and this is on full frame!
Kinds of Solar Eclipses

The Sun (no eclipse).
There are three kinds of solar eclipse.
1.) Partial solar eclipse: The moon covers some of the sun:
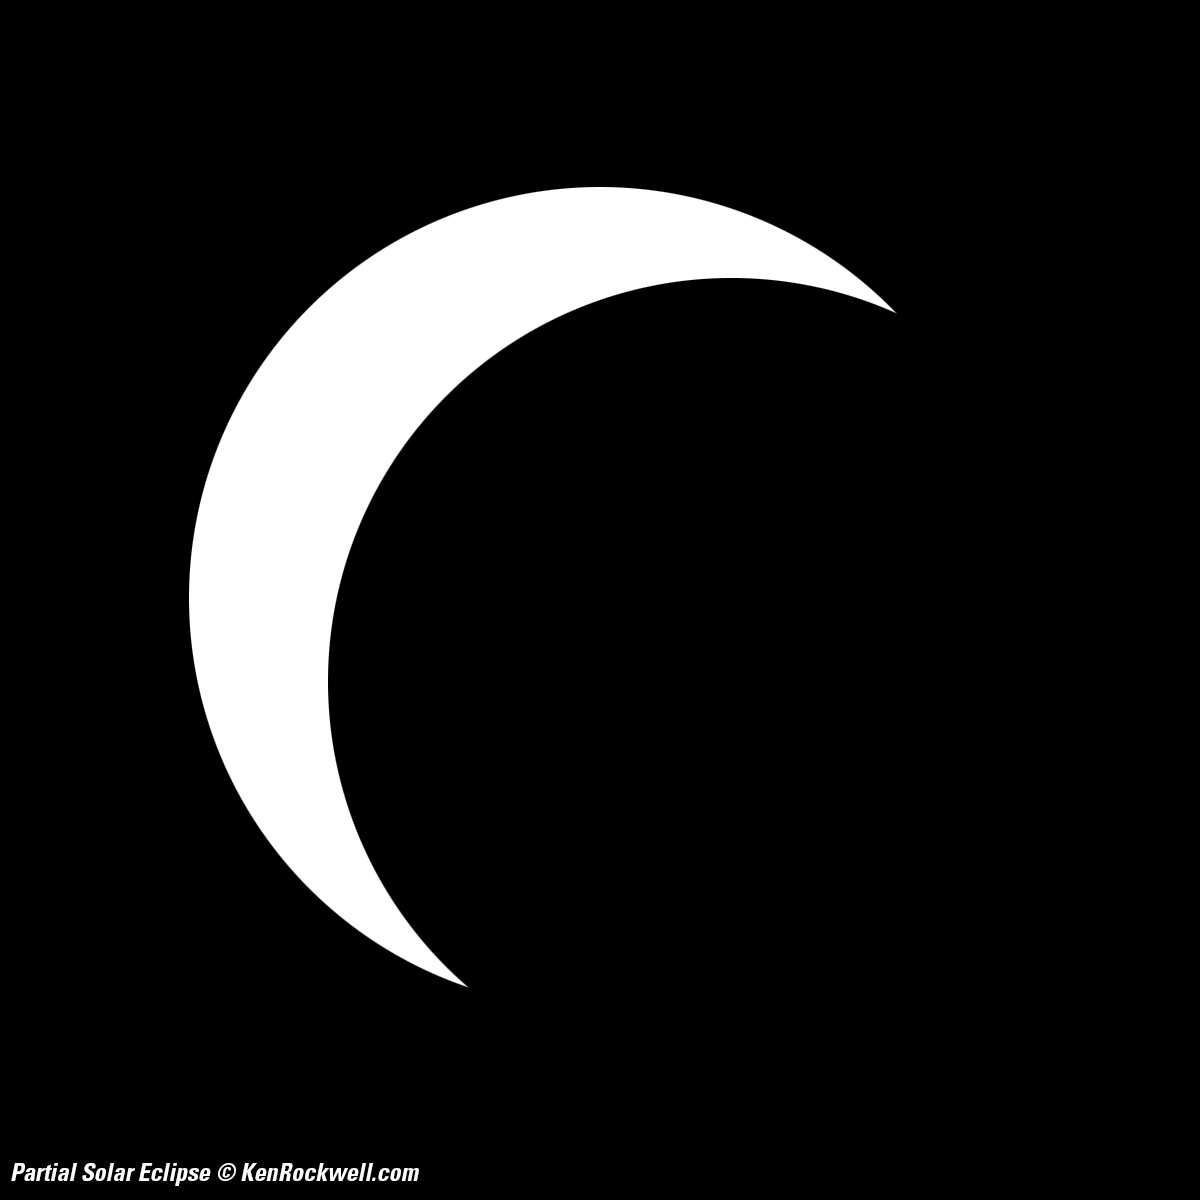
Partial Solar Eclipse (moon partially covering sun).
2.) Annular solar eclipse: The moon is directly over the sun, however in this case their orbits are such that the moon appears just a bit smaller and one can still see an outer ring of the sun as a small bright circle. This is an extra-cool kind of partial eclipse.
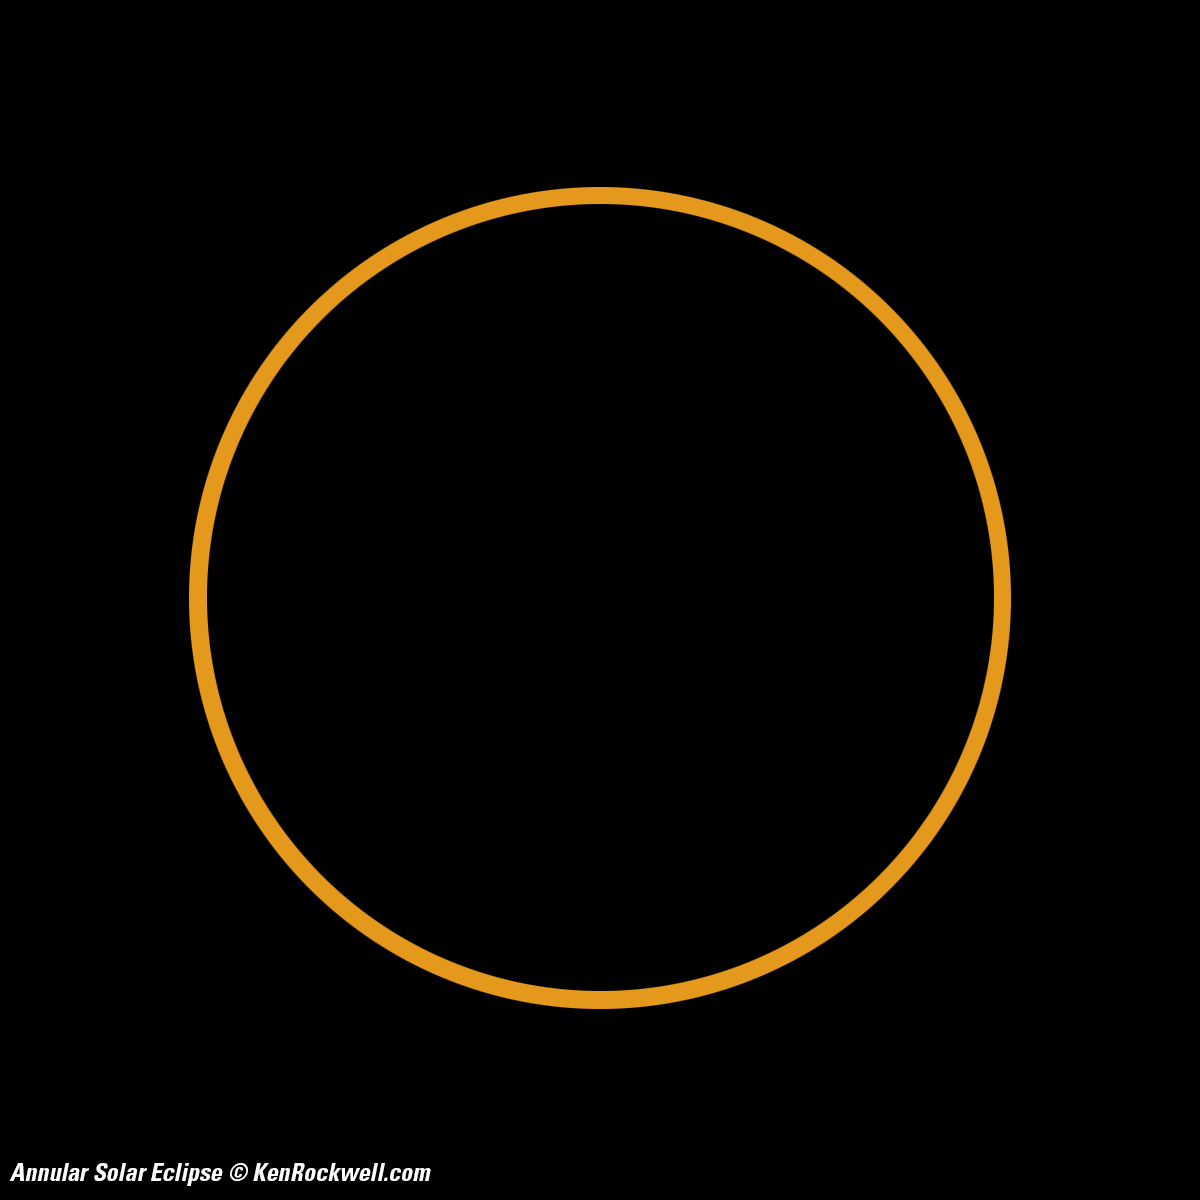
Annular Solar Eclipse (moon partially covering sun).
3.) Total solar eclipse. The moon completely covers the sun. The stars come out and it gets as dark as night! These are literally night and day different from annular and partial eclipses.
Other Ways to See, Show and Photograph the Eclipse (Use Shadows!)
Eclipse shadows, 9:53 AM, 21 August 2017. iPhone 7 Plus at 4mm at f/1.8 at 1/563 at Auto ISO 20, Perfectly Clear. bigger.
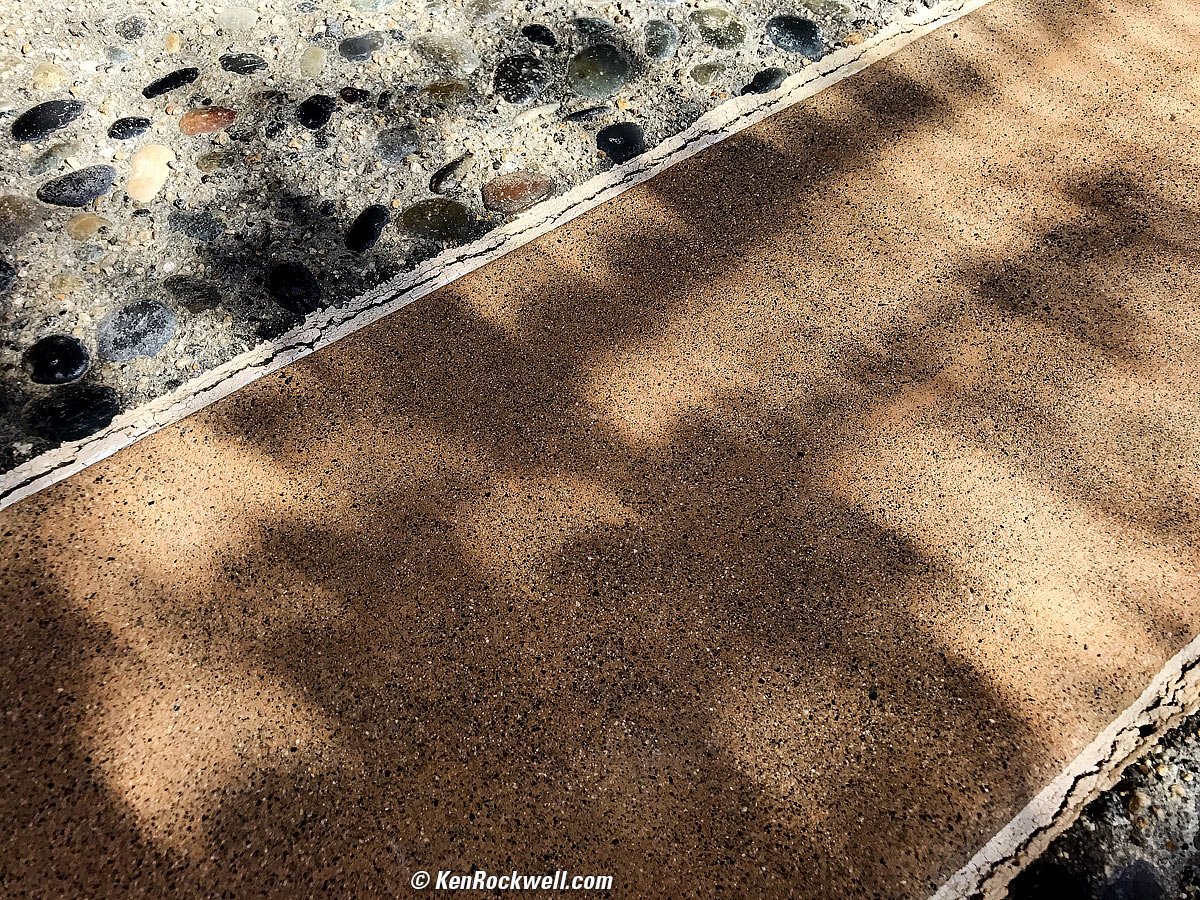
We all know about shadows, but did you know that if you let light pass through a small hole and travel some distance that it makes a picture, just as a lens would, except softer?
We have this same effect when shadows are cast. Shadows get softer as they travel farther because they come from a small circle of light (the sun), rather than a point.
When the sun becomes a sliver instead of a circle, shadows look different. If you have small holes between leaves of a tree, each of these usually cast small circles of light, but during an eclipse these cast small slivers of light as shown above. Look for these everywhere. The little slivers, which are images of the eclipsed sun, get bigger as they have to travel farther; the taller the tree, the bigger the slivers.
You can cup one hand to make a small hole, and use that to project an image of the crescent of the sun:

Ryan and the solar eclipse, 6:53PM, 20 May 2012. You can see the eclipsed sun in the middle of the shadow cast by my hand. (Canon 5D Mark III, Canon EF 28-105mm USM II.) bigger.
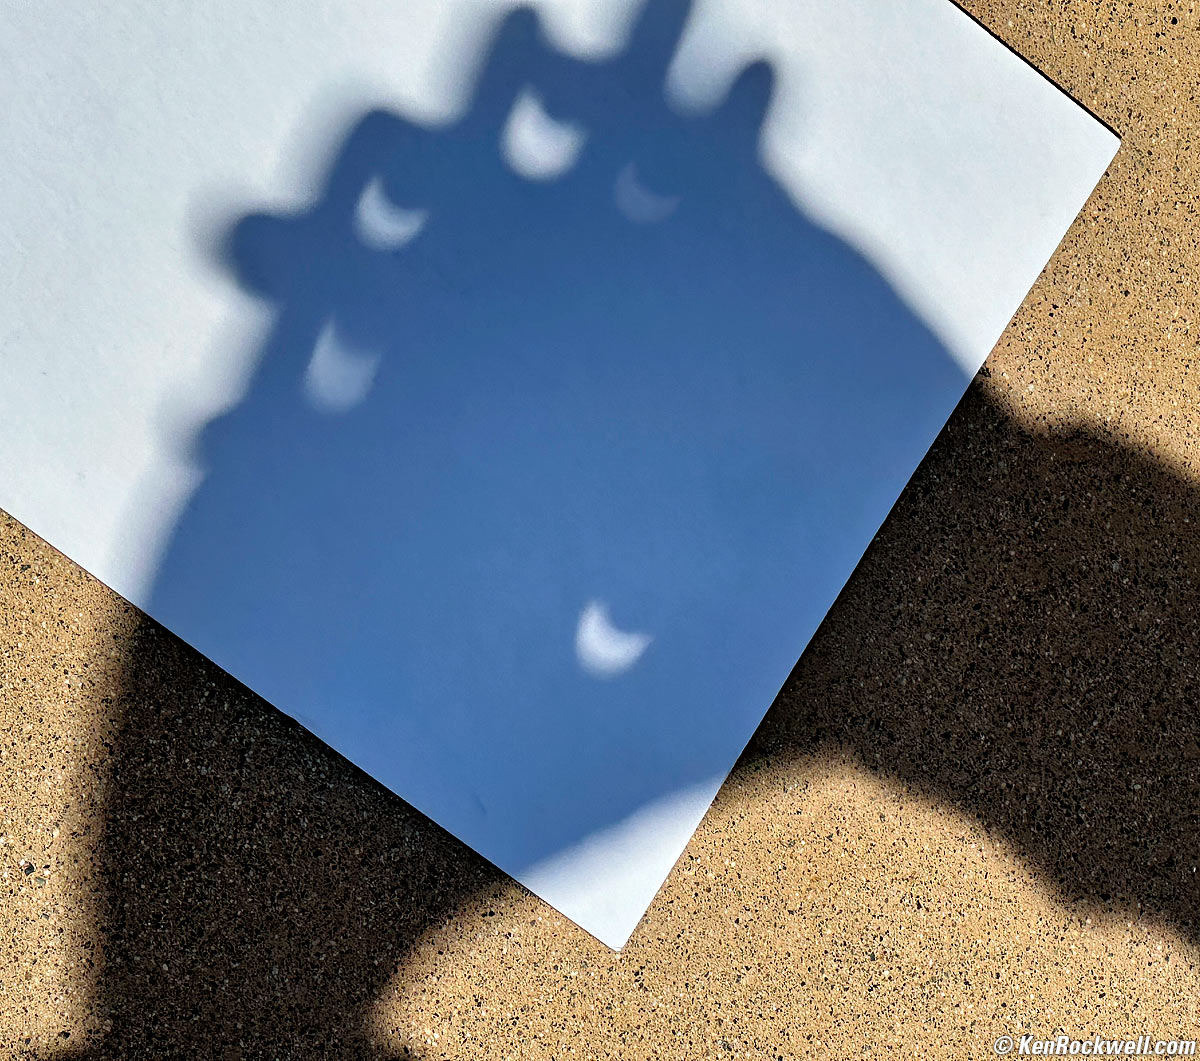
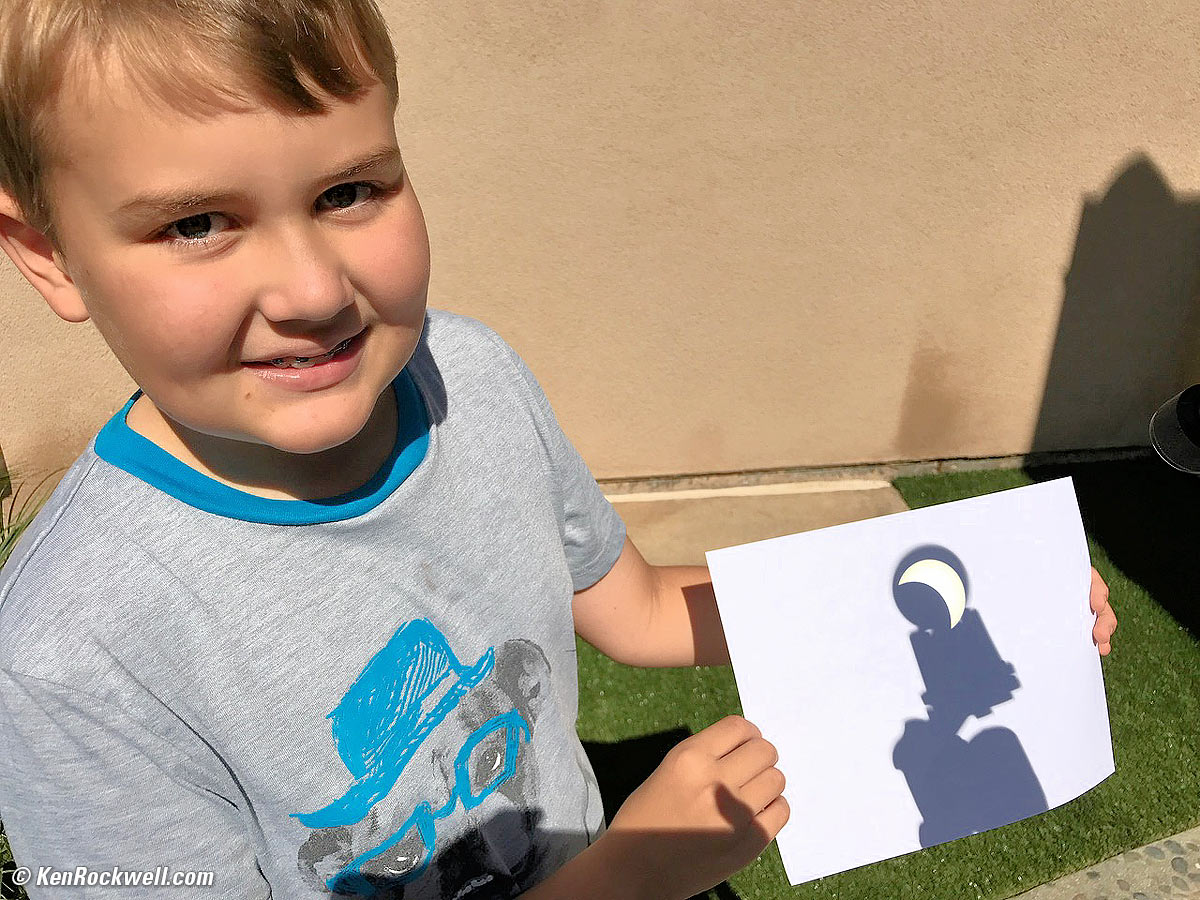
Hands projecting the eclipse on paper, 08 April 2024. bigger.
Few people realize that a telescope or half a binocular will project an image of the sun on paper or the ground, which makes it easy for your whole group to see. In this care I'm pointing my little scope at the sun without a filter; do not look through the scope this way, and I'd only do this with small scopes and be careful to pay attention that you're not frying your scope. In my case my Russian scope is all alloy, no plastic to melt:
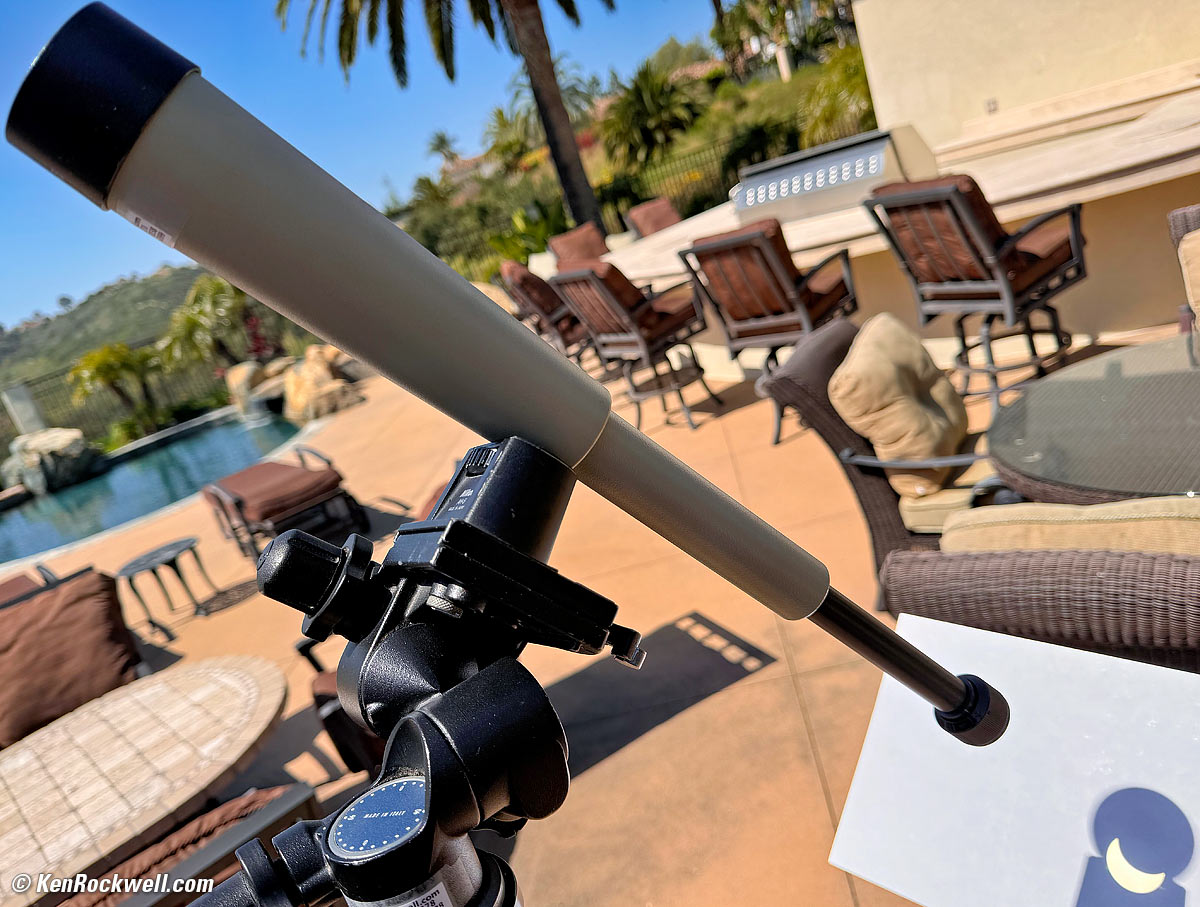
Russian 20 x 50 scope projecting on paper, no filter needed. bigger.
When you do this, you can put the paper farther away for a bigger image:
Ryan and the Eclipse, 10:08 AM, 21 August 2017. Image projected on paper from a Russian 20x50 spotting scope mounted on my Bogen Manfrotto 3275 410 Geared Head on my big Gitzo 1228 tripod, iPhone 7 Plus at 4mm at f/1.8 at 1/1,996 at Auto ISO 20, Perfectly Clear. bigger.
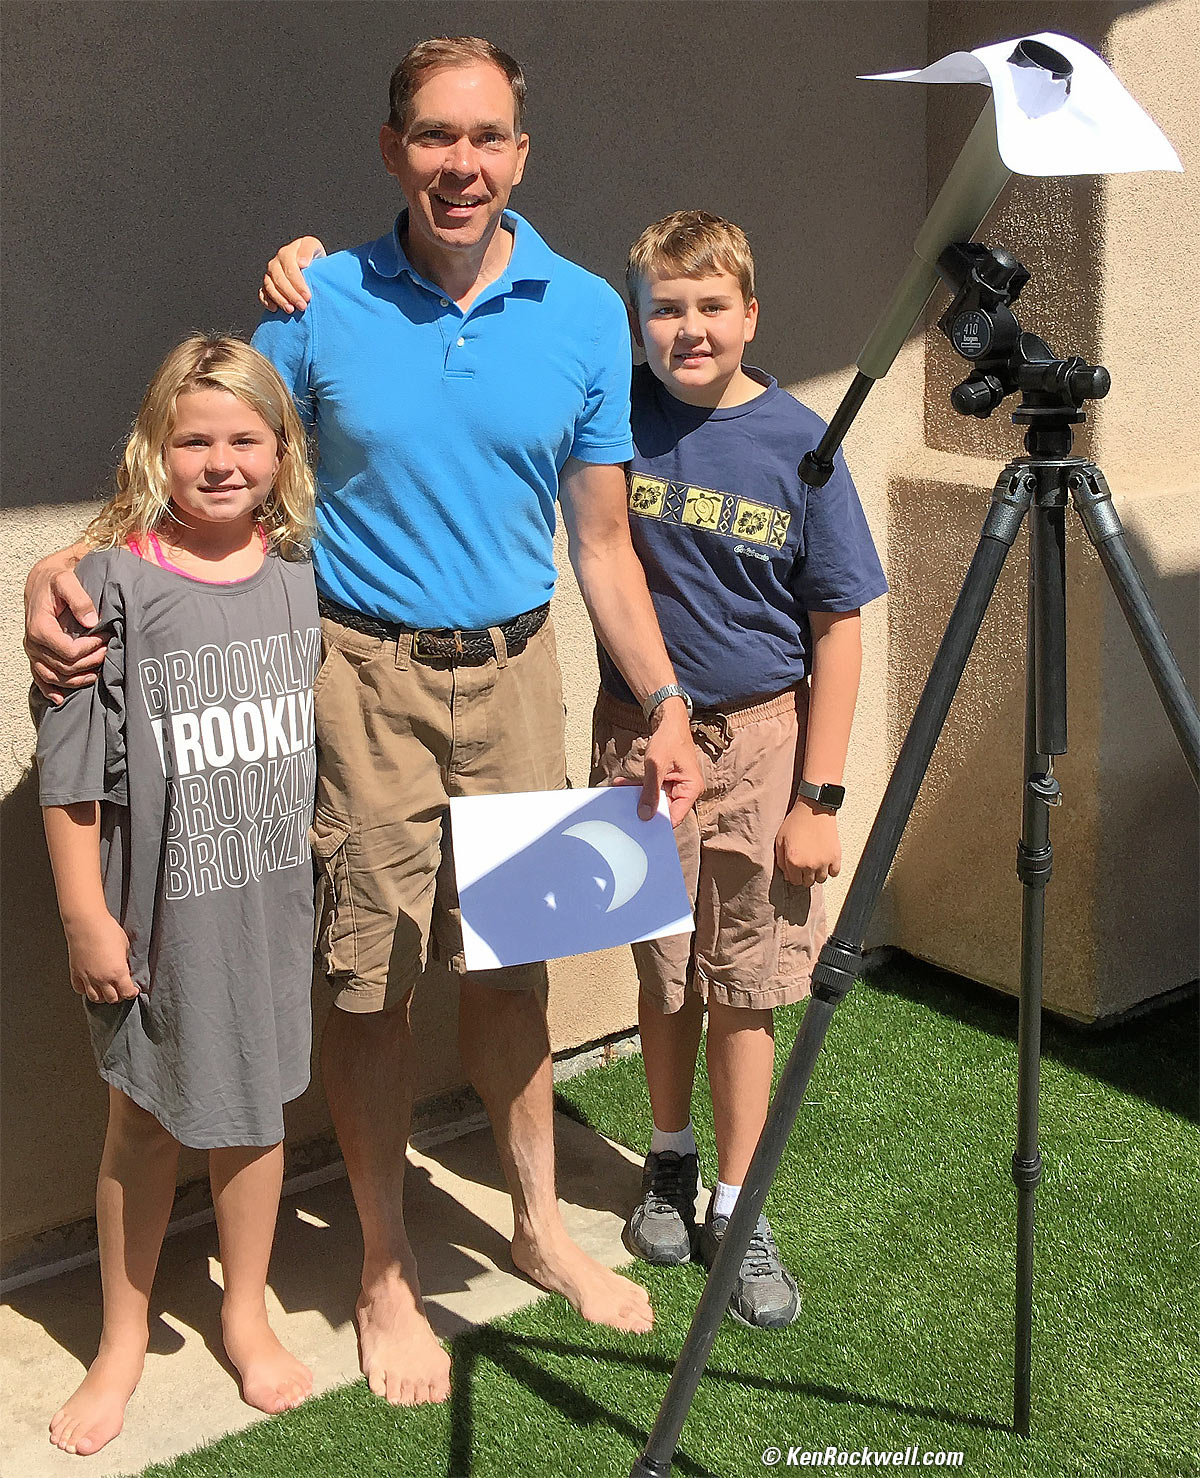
For best results, try to make a shadowed area into which you can project. Here's what I did for my family. I threw together the telescope and two pieces of paper in about two seconds. I put a Russian 20x50 spotting scope on my Bogen Manfrotto 3275 410 Geared Head on my big Gitzo 1228 tripod. I held a price of paper behind it. The paper on the front of the scope is casting a shadow to make the projected image clearer. Two seconds of setup and voila, much better family viewing than solar glasses, which would lead to a tiny image. The kids and I could see sunspots and mountains on the moon!
Family viewing the eclipse, 10:33 AM, 21 August 2017. iPhone 6S Plus at 4.2mm at f/2.2 at 1/615 at Auto ISO 25, Perfectly Clear. bigger.
Photographing Partial Eclipses
Don't
Partial eclipses are boring to photograph directly with a long lens, typically with a solar filter in front of the lens, and a teleconverter. All you'll get are photos like everyone else's, which are little slivers looking like this:
Partial Solar Eclipse (moon partially covering sun). Shot with this rig. bigger.
Boring.
Worse, if you forget the solar filter you'll do the same thing to your eyes and camera as we all did to ants with magnifying glasses back in the day.
I wouldn't get excited about this sort of shooting, unless you're trying to make the same documentation photos as everyone else.
If you do want to photograph this, you'll need a real solar filter that also filters ultraviolet and especially heat and infra-red.
Regular sunglasses, neutral-density (ND) filters, polarizers, crossed-polarizers and stacked ND filters block only visible light — but NOT infra-red! They look very dark to our eyes for visible light, but since these photography filters don't stop infra-red, you'll burn your eyes out looking at the sun through them. Ordinary filters and sunglasses are clear to infra-red; do not use them!
To save yourself the expense of buying filters to make these fairly boring scientific shots, you can use a pinhole to cast a shadow onto a white card in a long box. Ideally the box should be a few feet long or longer, or put a small hole in a window in a dark room to let the shadow grow across ten feet or more.
When I was a kid, our dad made boxes about a foot across with a pinhole and a way to look into the otherwise dark box to see the image of the sun at the bottom on a white card.
The 60mm Tasco telescope I had as a kid had a 5x5" white projection screen on a small pole I could use to project an image onto that screen. You also could put a screen behind one side of a pair of binoculars to project an image, but be careful; you are playing with fire.
Don't forget the obvious: there's no reason to buy any telescopes or filters if you have astronomer friends. These people will be set up all over, and your local school, science museum or similar may have the right scopes set up to look through. If so, just point your iPhone into the eyepiece (or the projected image), and you're good. Be sure to figure out where the little lens is on your iPhone and hold that over the center of the eyepiece.
Many people like to make composite images (or multiple exposures back in the days of film) showing the progress of the eclipse in one image, but these are cliché: most of you probably already can see images like these in your head, so making them doesn't show anyone anything new.
Do
You'll get much better and more unique photos by looking at the shadows cast on the ground through leaves of trees of the partial sun. Be creative; look for crazy patterns and what people are doing around them.
Instead of getting the usual blurry shadows, you'll see a zillion little half-sun slivers making patterns all over the ground.
If you're observant, which is a requirement for photographers, look for shadows cast across long distances anywhere. The longer the light has to travel, the larger the images of the disc of the sun. Usually these come the holes between leaves in trees, but can be cast by anything, even your own hand:
Ryan and the solar eclipse, 6:53PM, 20 May 2012. You can see the shape of the eclipsed sun in the shadow cast by my hand in the lower right. (Canon 5D Mark III, Canon EF 28-105mm USM II.) bigger.
Honestly, we've all seen too many boring partial solar eclipse photos of the disc of the sun. They all look the same; they're clichés. Look around, look behind you, look at what other people are doing. Make photos of the reflections in people's eyeglasses as they look through a telescope. Look everywhere you can. Know that the shapes of shadows change when the sun casting those shadows changes shape, and as always, put people in your photos to make them unique and far more interesting than otherwise blank photos of slivers.
You don't need any special equipment for the sort of photos I'd make; your iPhone is plenty. Using ultralong lenses to snap the disc of the sun isn't very exciting.
Photographing Annular Eclipses
The coolest sort of partial eclipse is an annular solar eclipse. If you uses a super-long lens you still need to use a solar filter .
If shot at sunrise or sunset, which was the case in San Diego in 1992, people got amazing photos of this disc setting into the sea — and you probably won't need a solar filter if the sun is far enough down and orange enough, just like a regular sunset.
Put this circle wherever you can to put it in an interesting sunset or sunrise photo. If it's mid-day, then treat it as I suggested at partial eclipses.
Photographing Total Eclipses
As you may have gathered, photographing partial and annular eclipses isn't that exciting unless you're an astronomer excited about the eclipse itself. It's very difficult to make notable photographs of partial eclipses that stand on their own merit as fine art, or have strangers gush "great picture!" Partial eclipses aren't that exciting as photo subjects; they're just another interesting element for the creative photographer to spin into something intriguing.
Total eclipses are completely different. Day turns to night, the birds start chirping, wild animals are very confused and primitive peoples are terrified. Crazy things happen to the earth and sky as the moon's shadow passes over and enrobes all in darkness, and when it is dark, you can see the solar corona. Here's an exposure guide for the corona and other parts of the eclipse if you're using an ultra-telephoto lens, but with a digital camera, just look at your LCD on playback. As you'll see, exposure times with long lenses are too long unless you're on a clock drive to track the motion of the sun. With long lenses the sun will turn into a blur as it's moving across the sky.
When it's dark outside, try exposures that look about one stop (twice) as bright as they ought to be on your camera's LCD, because when you look at these photos later in a normal place that's not dark, you'll wish that you had made them lighter. Ideally you'll have your camera mounted to your telescope with a clock drive. I use an old classic Celestron 8:
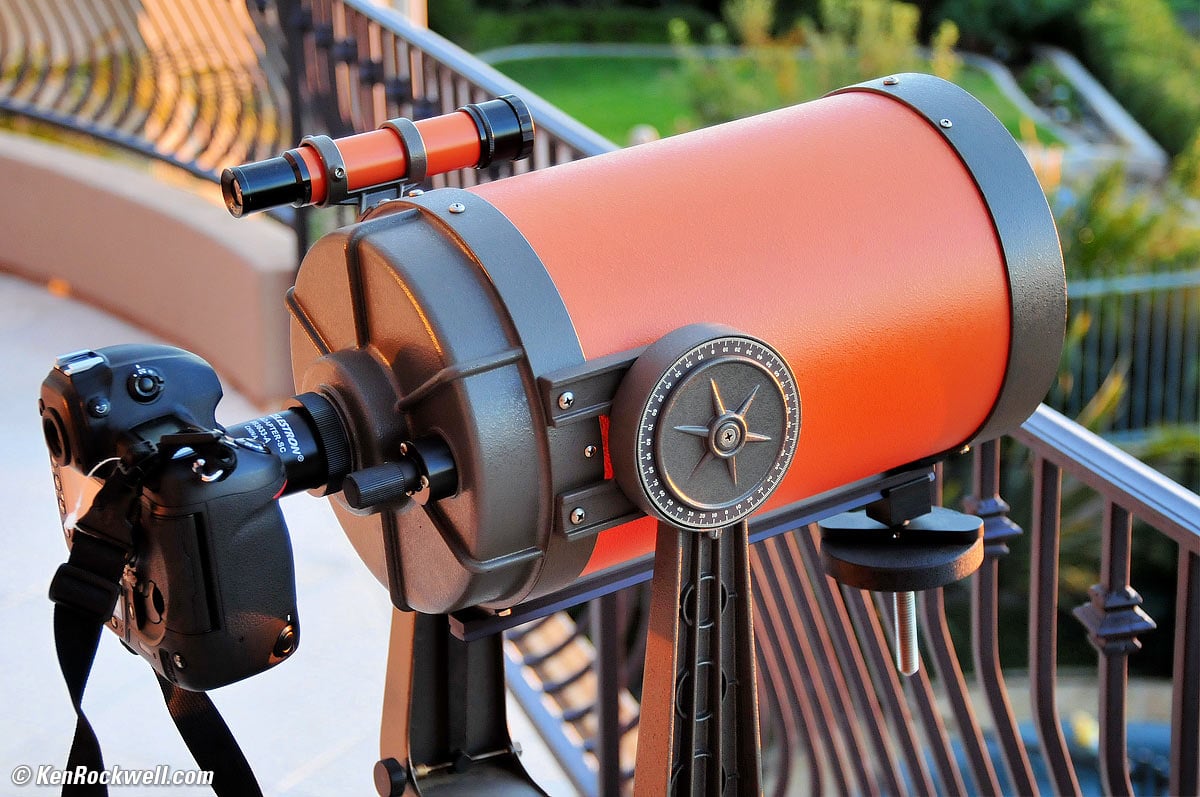
Nikon mounted with a T-mount on a Celestron 8. bigger.
You don't need any solar filters during the total part of the eclipse because it's dark. In fact, it gets so dark that you'll probably need to mount your camera on a telescope with a clock drive to track the sun so that exposures aren't blurred — it's like night time.
If you can make photos of the strange things that appear in the sky during a total eclipse, you'll have interesting photos, but you'll need a 'scope and a clock drive.
Total eclipses. are so bizarre that you really need to look around and be observant and receptive to what's going on. There will be plenty of crazy things to see, so photograph those if you want unique "wow!" photos. I'll leave the astronomers to make the HDR photos of coronas and everything else.
While any kind of camera, especially iPhones, are great for photographing most things, when it gets as dark as night during a total eclipse, you'll want an advanced camera like a Canon or Nikon DSLR or a Sony or Fuji mirrorless. Using a flash probably won't give great results, unless you make photos that take advantage of how the flash will highlight whatever's close to your camera or iPhone and leave the background black.
Recommendations
Not to spoil the fun, but in life you're either a participant or an observer. Most of the world sits around and watches while very few of us are actually out doing. If you're photographing, you're simply an observer, not a participant. I'd suggest the best use of the minute or so you might get of totality in your life you spend actually enjoying and experiencing what's going on all around you, instead of trying to make the same photos everyone else is. Simply feeling what's going on is good; you'll remember it the rest of your life. Why not do something really special with someone special for that minute? Do something you'll enjoy remembering or telling your grandkids about. Unlike volcanic eruptions, earthquakes or blackouts where people never know where they'll be when it happens, we know about eclipses for thousands of years in advance. Why not plan something really great to do for that minute or two other than peering at the back of a camera and missing the actual event?
If you're really into Schadenfreude (a uniquely German word meaning to take pleasure in another person's unhappiness), you could venture to a genuinely primitive place and watch the locals freak out. By primitive, I mean places with no Internet and no written language; people who don't have iPhones, schools, books or newspapers. If you don't get done-in by a spear, you could set yourself up as a god for life.
Whatever you do, don't be driving a car or bike riding during a total eclipse. People go nuts and everyone will be grabbing their phones taking pictures as they're driving. It won't be safe to be on the road.
As always, be sure to keep your imagination open and look around you, not just at the main event. Look behind you, see what others are doing, show the eclipse in the context of where it's happening, look for pinhole shadows and reflections, and keep your mind clear to see the things that others miss. Be sure to F.A.R.T. first for fantastic photos.
Enjoy!
Ken
© Ken Rockwell. All rights reserved. Tous droits réservés. Alle Rechte vorbehalten.
Help Me Help You
I support my growing family through this website, as crazy as it might seem.
The biggest help is when you use any of these links when you get anything. It costs you nothing, and is this site's, and thus my family's, biggest source of support. These places always have the best prices and service, which is why I've used them since before this website existed. I recommend them all personally.
If you find this page as helpful as a book you might have had to buy or a workshop you may have had to take, feel free to help me continue helping everyone.
If you've gotten your gear through one of my links or helped otherwise, you're family. It's great people like you who allow me to keep adding to this site full-time. Thanks!
If you haven't helped yet, please do, and consider helping me with a gift of $5.00.
As this page is copyrighted and formally registered, it is unlawful to make copies, especially in the form of printouts for personal use. If you wish to make a printout for personal use, you are granted one-time permission only if you PayPal me $5.00 per printout or part thereof. Thank you!
Thanks for reading!
Ken Rockwell