Home Search Gallery How-To Books Links Workshops About Contact
Night Photography © 2006 KenRockwell.com
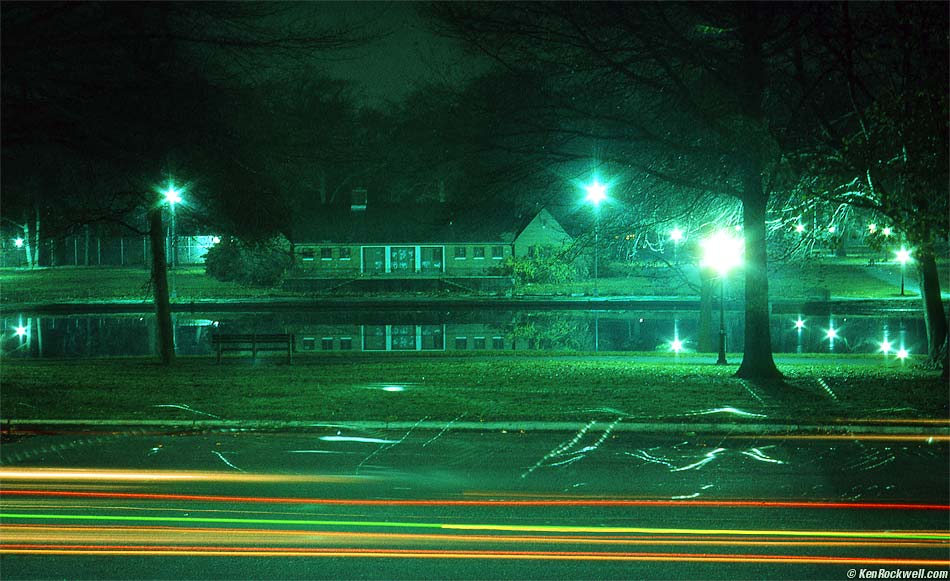
Rosedale, New York, 1973. enlarge. See also Timing and How to Get Great Colors. INTRODUCTION Night photography is easy. I've done it since I was 11 years old. I made this shot on frame 21 of my very first roll of Kodachrome. It was made with my very first SLR I had bought it the week before, used. If an 11 year old can do it on his first try on slide film without bracketing on a totally manual camera, any idiot can. It's easier with digital cameras. I calculated my first exposure over 30 years ago from a Kodak book. Today every camera can set this automatically. The colored lines are tail lights of passing vehicles along Brookville Blvd. What might look like scratches are reflections from the passing cars. The green tint is from the mercury lighting. Today most people use digital cameras. I'll explain using those first. I'll explain how to do this on film further down. Tech details for my shot above: 30 seconds at f/5.6. Infinity focus. Minolta SR-1 camera, 53mm (yes, 53mm) Auto-Rokkor PF f/2 lens (see photo below) Kodachrome-X (ASA 64), processed by Kodak, Fairlawn, NJ. 7:45 PM, Thursday, Thanksgiving evening, 22 November, 1973. I only realized at lunch on August 1st, 2006 that I met my wife exactly thirty years to the day after I made that shot. Actually it was exactly 30 years to the hour! Weird. Even as a small kid I took notes. Back then I wrote them on paper, and when I got my slides a month later when the roll was finished I copied them from the paper to the slide mount. If I had made a mistake, I would have been able to correct it next time. 33 years later, the data is still on the slide.
Self Portrait, 1974 DIGITAL CAMERAS This is too easy: 1.) Use a tripod (or rest the camera on something solid). 2a. [easier]) Use Program (P) exposure mode. or 2b. [a little more work]) Use "A" exposure mode. Choose f/5.6. 3.) Use the self timer or a cable release. 4.) Look at your results on the LCD. 4.) Too dark or light? Use the exposure compensation control. It doesn't matter if "LOW" is displayed in finder. If too dark and the shutter was open for 30 seconds, then use a larger aperture, or use Manual exposure mode, Bulb shutter setting, and a cable release. Bulb setting lets you hold the shutter open as long as needed for correct exposure. 5.) Set White Balance to taste if needed. Start with Auto. Digital cameras have a hard time with extremes of light and dark. If in doubt, expose less. You always can lighten the shadows, but once a highlight is blown out to white there is no recourse. I've tried, but don't need, complex dynamic range tricks. FILM CAMERAS Use 35mm cameras in aperture priority (usually called A) mode, stop down a few stops and let the automatic exposure system time your exposure. Use medium format for great film flatness and best results. Watch out with 4 x 5. Usually the film jumps during exposure outdoors due to the humidity. This winds up giving you what looks like a double exposure because you have the film in two places: before and after the "pop." Also it's so dark that you have to use very long exposures (many minutes or fractions of hours) due to the slower lenses. When shooting 4 x 5 at night I suggest: 1.) Use a little piece of double-sided tape in the holder behind the film when loading to hold it flat. 2.) Tap the holder against the palm of your hand before putting it in the camera to get the film settled to the bottom of the holder. 3.) Let everything sit and equalize before exposing. Temperature and humidity variations can pop your film during exposure, giving you a double image that looks as if the tripod got knocked. 4.) Look for crazy exotic film holder made by Linhof and others which use pressure plates or clamps to holds the film fixed and flat. Metering Tricks If your meter won't
give a reading, try: The above works on most all cameras. When using a spot meter, if you can't read most of the areas and Zone V falls below the range of you meter, just read on a highlight and use the zone system to set the highlight (that you can read) accordingly. This way you can set Zone V to something below the sensitivity of the meter. The Nikon FA, FE and EM The FA The original AMP meter in the Nikon FA came before matrix balanced fill-flash. It works great for photographing outdoor scenes at night under available light with automatic exposure. The FA's AMP meter will make magnificent automatic exposures as long as many minutes, far longer than the manual meter will indicate. Just put the camera on a tripod, select A mode, stop your lens down a few stops for sharpness, and let the camera do the rest. I know the Nikon only claims exposures to 1 second, but the camera works great out to several minute long exposures. The biggest problem you have is just before sunrise and after sunset when the light changes from minute to minute. I have made four-minute automatic exposures before dawn, and the light level at the end of the exposure is much brighter than when the exposure started. The Nikon makes its exposure measurement just before the start of exposure. You may need to dial in some compensation to forecast the change in light. The FE and EM Both these Nikons feature analog circuitry, and although they lack the superior AMP Matrix meter of the FA, still automatically measure and time long night exposures out to at least several minutes. They also offer automatic mirror lock-up when you use the self-timer, so you not only don't even need a cable release, you get better sharpness than you do with an amateur camera like the F100 which has no ability to lock the mirror up prior to exposure. With any of the Nikons above: 1.) Compose your
photo The Nikon F100 The F100 and modern Nikons add balanced fill flash to matrix metering. These meters are programmed presuming you will be using the flash at all times in dim light. Make sure to set slow sync, otherwise you'll get nasty lit-by-flash-only images. In very dim light (below about LV5) the F100's matrix meter is programmed to underexpose the ambient light to give a better impression of "night" while it presumes your subject will be lit by the fill-flash. This is a very valid presumption based on the fact that Nikons are supposed to be used for journalism and that below EV5 things are pretty dark. Heck, every other indoor night shot in National Geographic and your local newspaper is done this way, that's how the subject is frozen and also blurry at the same time. The problem is if you are photographing without the flash in this very dim light. Light this dim is found outdoors at night and indoors in places too dark to read. If you are shooting in available light this dim in matrix mode you will have UNDEREXPOSURE. When working in light this dim select CENTER WEIGHTED metering and be careful what you choose to meter. Don't use spot, since the spot meter's range does not extend into this dark range. You can see this effect by pointing the camera at an evenly illuminated dim wall. Switch the meter between modes and you will see several stops difference between them. For instance, if the scene needs 3 seconds at f/4 at EI50 you will see that in center-weighted mode, but maybe only 1/2 second at f/4 in matrix. Of course if its light enough (above about LV5) then the meters agree. The F100, unlike the FA, only can make exposures as long as 30 seconds. OK, actually it goes to 32 seconds, the photographically correct time for what is nominally called 30 seconds. In dim light you may see the warning "LO" in A mode in the viewfinder if you are below the rated measurement range but still shorter than 30 seconds. You are still OK if you see this and NOT the analog bar graph underexposure warning (same indicator that pops up in Manual and compensation modes.) Remember if you are in Matrix mode you will never see any of this, because the Matrix meter deliberately underexposes dark scenes for both better realism with flash, and to prevent sticking you with 30 second long exposure while you're photographing moving people. Remember that the F100 is intended for professional journalism far more than professional landscape photography. You need to use Center Weighted mode with the F100. I also suggest A mode to let the camera do most of the hard work. In M mode the camera won't indicate exposures when the light gets darker than the specified meter range, even though it will give correct exposures in A mode well below what it's specified to do. If you have a "LO" warning and the warning bar graph displayed you can still make a correct metered exposure the hard way! Look at how many stops it's reading, add that to 30 seconds, and that's your exposure which you must time manually! For instance, let's say you want to photograph a very, very dark night scene at f/8. If it requires more than 30 seconds, first just select a larger aperture and see if you can get a decent reading. If you do, translate that in your head and use that setting at f/8 and time the exposure manually in BULB. If not, see what exposure is indicated by the bar graph and apply that to 30 seconds to derive the exposure time at full aperture. Now add more time to arrive at the correct exposure at f/8. Luckily I find that reciprocity failure can be ignored with Velvia up to a couple of minutes. Hey, I never said this would be easy. Artists need to be able to make their tools do what they want. Sometimes its easy when you want the tools to do what they were designed to do. One of the things that make an artist an artist is the ability to use whatever tools are available to complete the task, even if the designer of the tools didn't make it easy for you. The good news is that for ordinary night photography the light levels are fine for the standard camera so long as you select center weighting. The screwy stuff requiring calculations in your head really only apply if you want to shoot oddball stuff like landscapes under starlight. MORE PHOTOS Here's another site with cool night photos. PLUG If you find this as helpful as a book you might have had to buy or a workshop you may have had to take, feel free to help me write more with a donation. Thanks for reading! Ken |


Home Gallery How-To Links Workshops About Contact