Nikon D780 User's Guide
<— back to Nikon D780 Review
Intro Free Live Help Charging Power Switch
Menus Formatting Cards Dual-Card Shooting
Lens Compatibility Lens Suggestions
AF Settings Focus Peaking Focus Stacking
Rear Multi-Controller Advance Modes
Continuous Frame Rates Auto ISO
Program Exposure Mode Program Shift
Exposure Compensation Level Finder Grid
Auto White Balance Flickering Lights
Vibration-Free Shutter Release
Time Exposures & Extended Shutter Speeds
Film Scanning Playback Instant Playback Zoom
U1 & U2 Modes Save & Recall Menu Settings
Nikon D780 (29.7 oz./840g with battery and card, two SD slots, $2,297) and 100% compatible Noct-NIKKOR 58mm f/1.2 AI-s. bigger.
I got mine at B&H. I'd also get it at Adorama, at Amazon or at Crutchfield, or used at eBay if you know How to Win at eBay.
It also comes with the 24-120mm VR as a kit for $2,797 at Adorama, at Amazon, at B&H or at Crutchfield.
This all-content, junk-free website's biggest source of support is when you use those or any of these links to approved sources when you get anything, regardless of the country in which you live. Thanks for helping me help you! Ken.
April 2021 Better Pictures Nikon Reviews Nikon Lenses Nikon Flash All Reviews
Introduction D780 review top
This D780 User's Guide will teach you tricks and secrets to get the most from your D780, however photography is all about seeing the picture in the first place, not simply how to operate a camera.
This page will teach you how to be an expert D780 operator, but this page can't teach you how to take great pictures. Be sure to read all my articles at How to Take Better pictures, especially the classics like F. A R. T. and What Makes a Great Photo. Once you're learned how to take better pictures, you'll be able to take great pictures with any camera.
Hint: If you don't want to read all this and prefer to download my own settings and shoot that way, skip to the bottom to My Own Camera Settings File.
Free Live Help D780 review top
If you're in the USA and have a legal USA version, just phone Nikon at (800) NIKON-US and they'll walk you though whatever you need. Last I checked, they're open from 9AM ~ 8PM NYC time.
Charging D780 review top
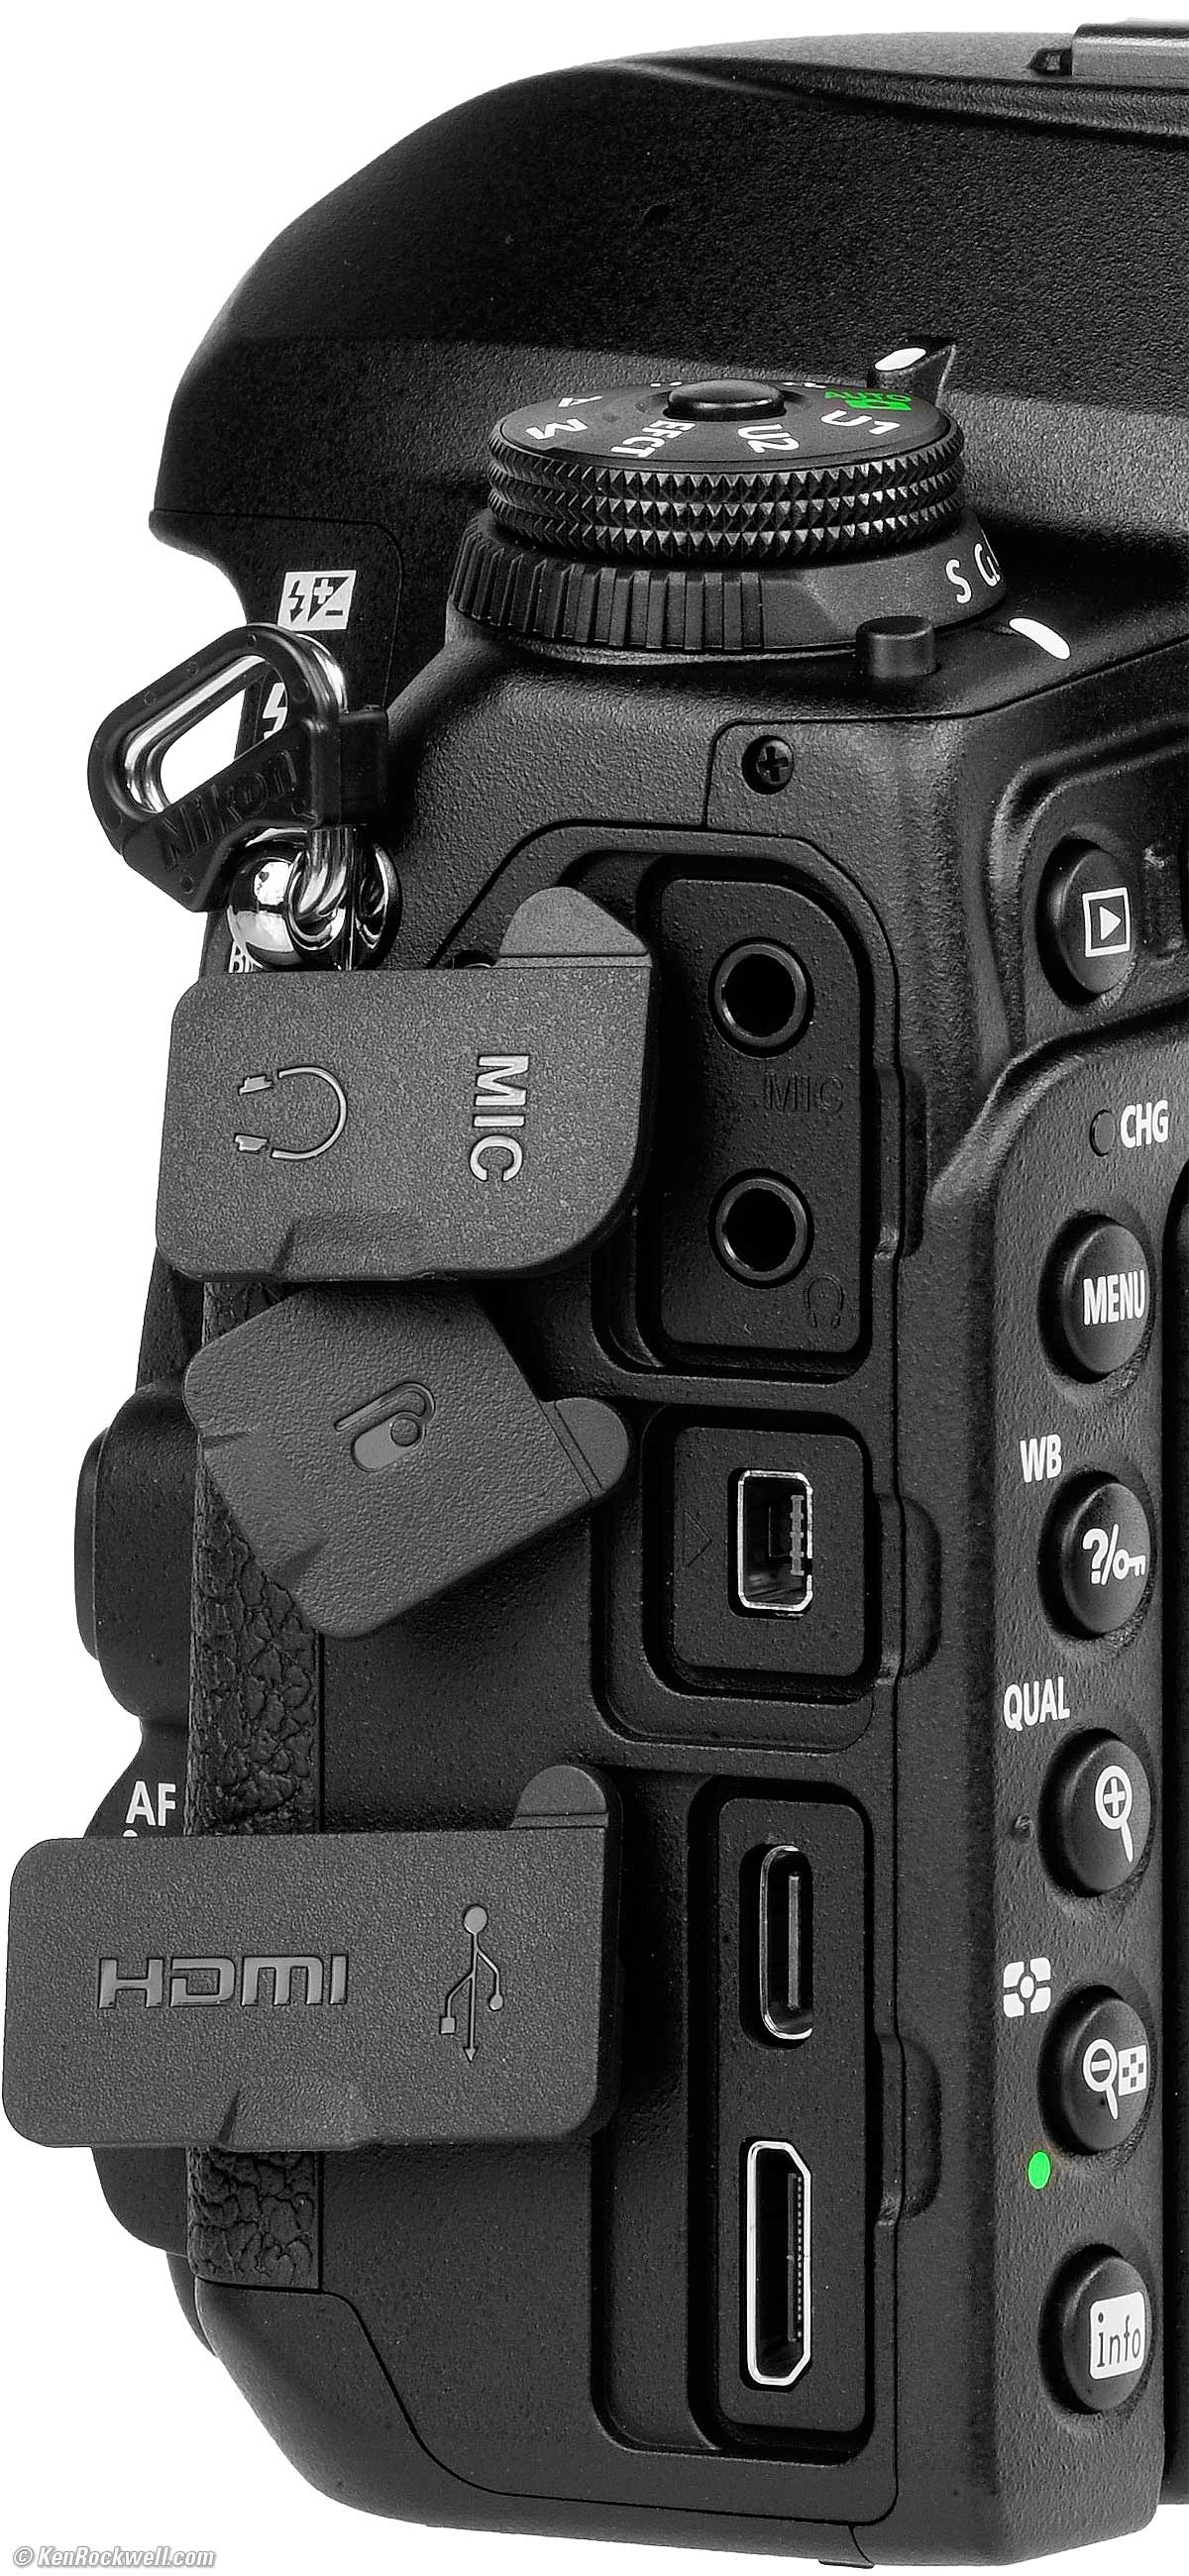
I charge via USB-C, or you can use the included external charger. The USB-C connector is the second from the bottom connector.
There's an orange charge LED on the top left on the back marked "CHG."
The orange LED lights while charging, and turns off when done.
The D780 has to be turned OFF to charge via USB.
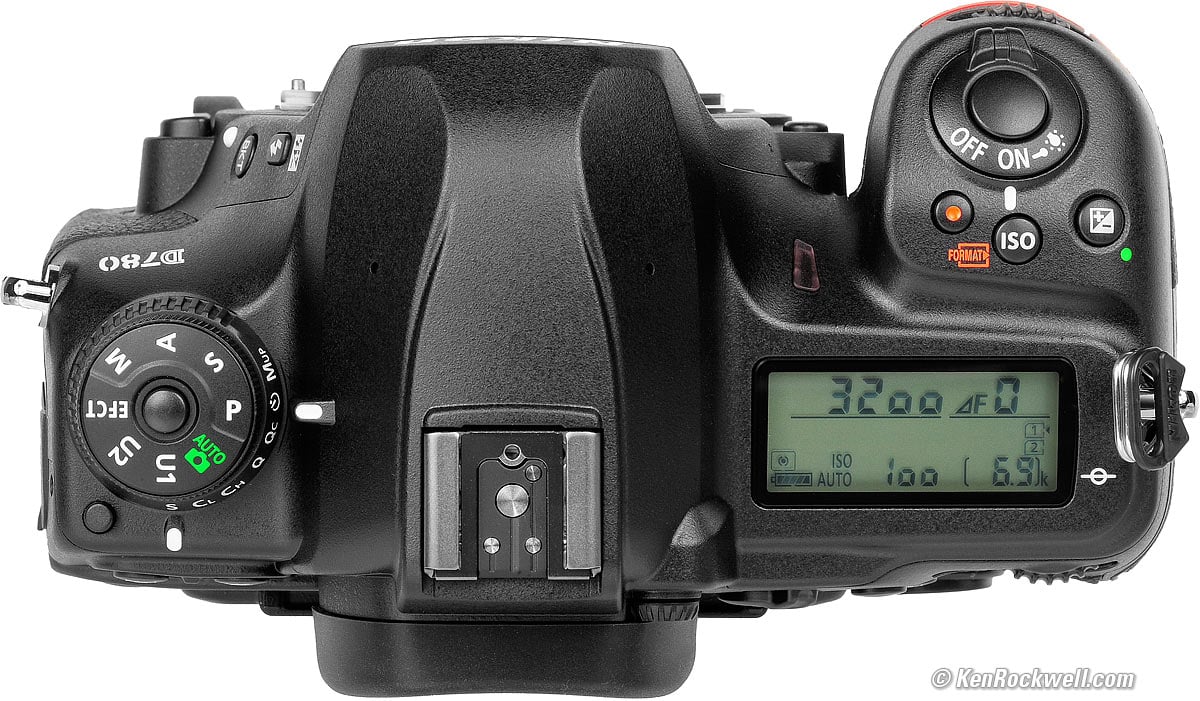
Power Switch D780 review top
The power switch is more a shutter lock than a power switch; it's OK to it leave ON all the time.
I only turn it OFF to prevent accidental shutter releases when I put my D780 away in a case or wrap it in a towel where the shutter might get hit by accident.
Menus D780 review top
You often have to hit OK after making a menu selection, especially when selecting playback display options.
Often if you forget to hit OK the D780 will ignore you.
Formatting Cards D780 review top
There are two ways to format the cards. Each card is formatted one at a time. The old way is to press:
MENU > SETUP MENU (wrench icon) > Format memory card > choose one of them > OK,
or,
the easier way is to hold both buttons marked with a [ FORMAT ] icon (that's the Trash and ISO buttons) for a few seconds at the same time, use the front or rear dial to select which card you want to format, and then hold both buttons again.
I always format a card when I put it in my D780 because it lowers the risk of any problems from anything that may have been corrupted while the card was out of the camera, or if the card was formatted for a different camera. You don't need to do this, but it is good practice. Of course be sure you've downloaded all your pictures before formatting.
Using Two Cards D780 review top
I always use two SD cards, setting my D780 to record the same thing to both of them. This way when I accidentally delete a good image or format over a card before downloading it, I have the second card (card 2, the bottom one) with those images untouched.
To set this:
MENU > PHOTO SHOOTING MENU (camera icon) > Role played by card in slot 2 > Backup.
You'll notice when you delete an image you can delete it from both cards, but only if you choose that option. By default the D780 only deletes from card 1, the top card. Likewise, the Format options only format one card at a time.
The other second-card options are Overflow (records to card 2 if card 1 gets full) or recording RAW to card 1 (top) and JPG to card 2 (bottom).
Paradoxicallyt there is no similar option in MENU > MOVIE SHOOTING MENU (movie camera icon), so you can't record movies to Card 2, and likewise when you Save Menu Settigns they only save to Card 1.
Lens Compatibility D780 review top
The D780 can work with most Nikon lenses made since 1959, if you want it to:
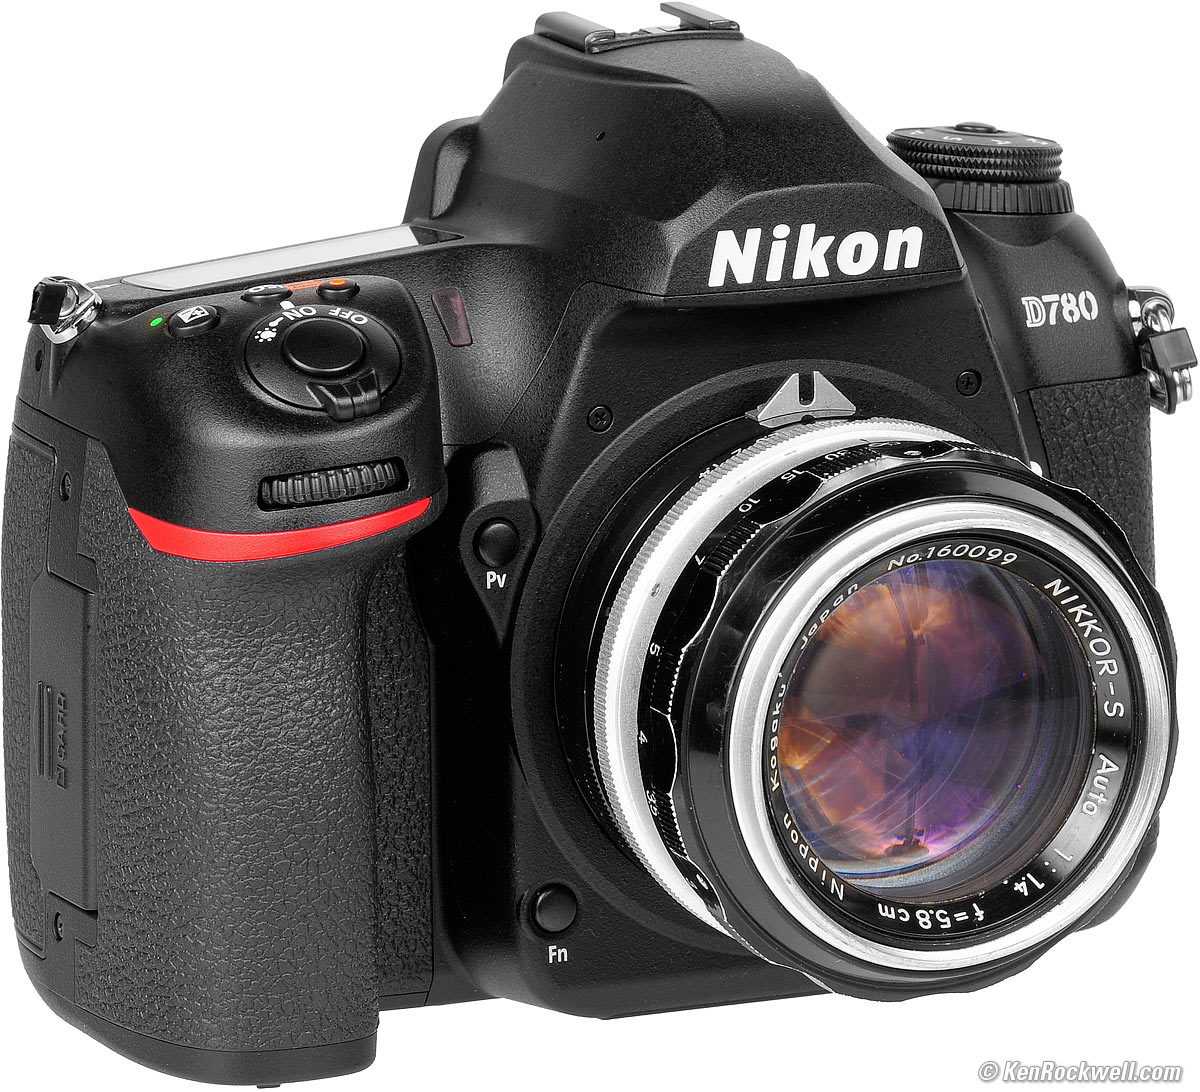
With Nikon F 5.8 cm f/1.4 (1959-1962), AI converted. bigger. |
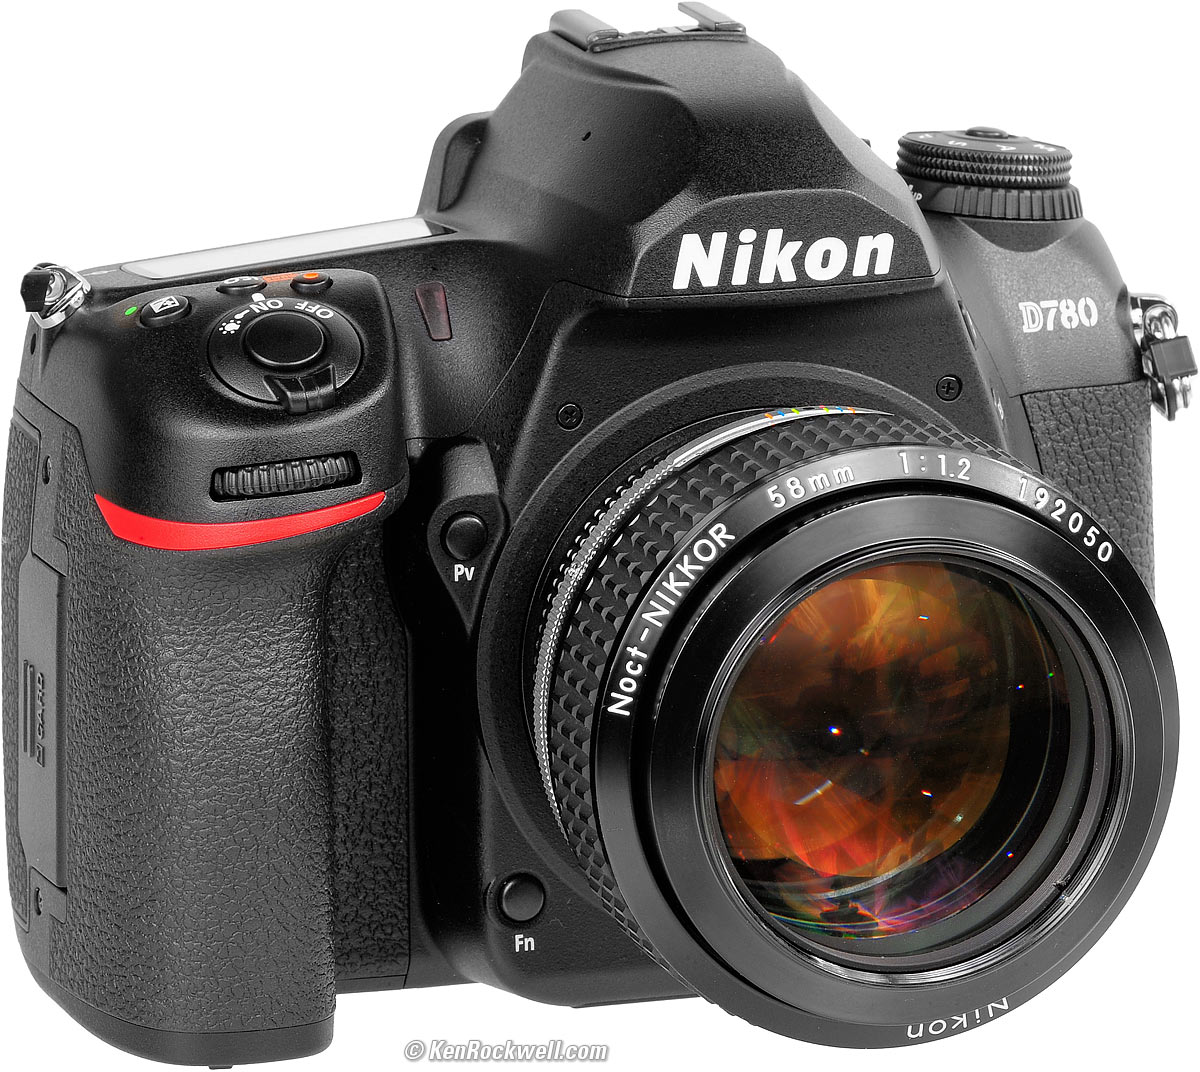
With Noct-NIKKOR 58mm f/1.2 AI-s (1977-1997). bigger. |
With Nikon 50mm f/1.4 AF-D (1986-today). bigger. |
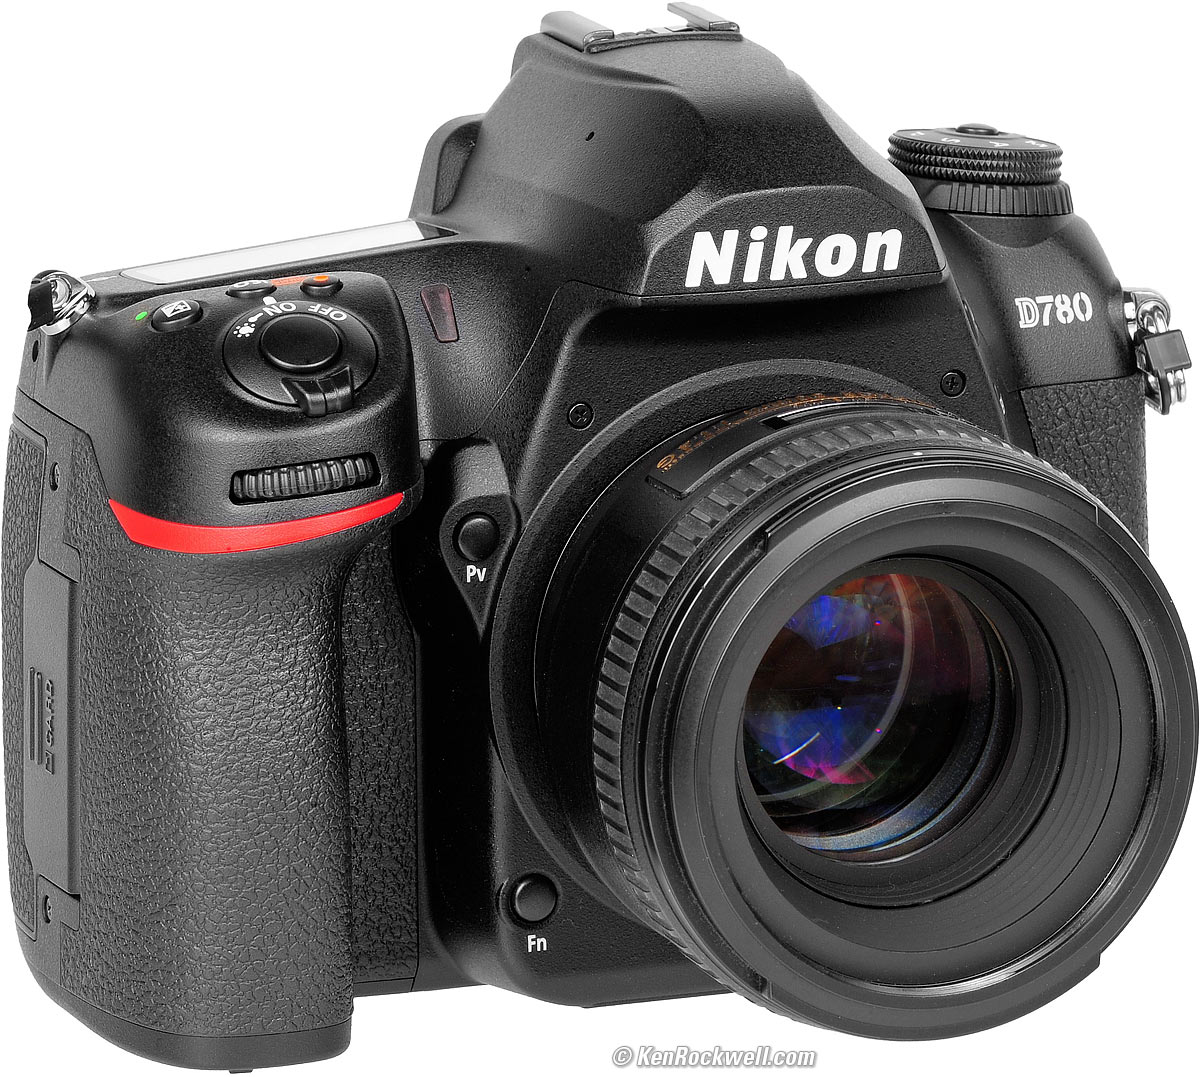
With Nikon 50mm f/1.4 G (2008-today). bigger. |
With manual focus lenses (1959-today), be sure to set:
MENU > SETUP MENU (wrench icon) > Non-CPU lens data > to your lens' focal length and maximum aperture, and be sure to press OK when done. Now you'll have full color Matrix Metering and EXIF data!
See D780 Lens Compatibility as covered at my D780 review for specifics, and also see Nikon Lens Compatibility for a broader overview.
Lens Suggestions D780 review top
While Nikon has made hundreds of different models of lenses, almost all of which work great on the D780, the only lens I use is my 28-300mm VR, which does everything and is super-sharp as you can see at my Nikon D780 Sample Images and my 28-300mm VR Sample Images.
If I need a wider lens I use my 16-35mm VR, and for macro, I use my exotic AF Micro-NIKKOR 200mm f/4D if my 28-300mm doesn't focus close enough.
See also Best Full-Frame Lenses covered at Best Nikon Lenses.
Facial Recognition D780 review top
Turn on Facial Recognition at MENU > CUSTOM SETTING MENU (pencil icon) > a Autofocus > a4 3D-tracking face-detection > ON.
Shoot in the AUTO AREA AF mode and the D780 will magically find faces and focus on the eyes — but if you don't set all this (or get it as part of my setup file), your D780 won't have any face recognition while shooting.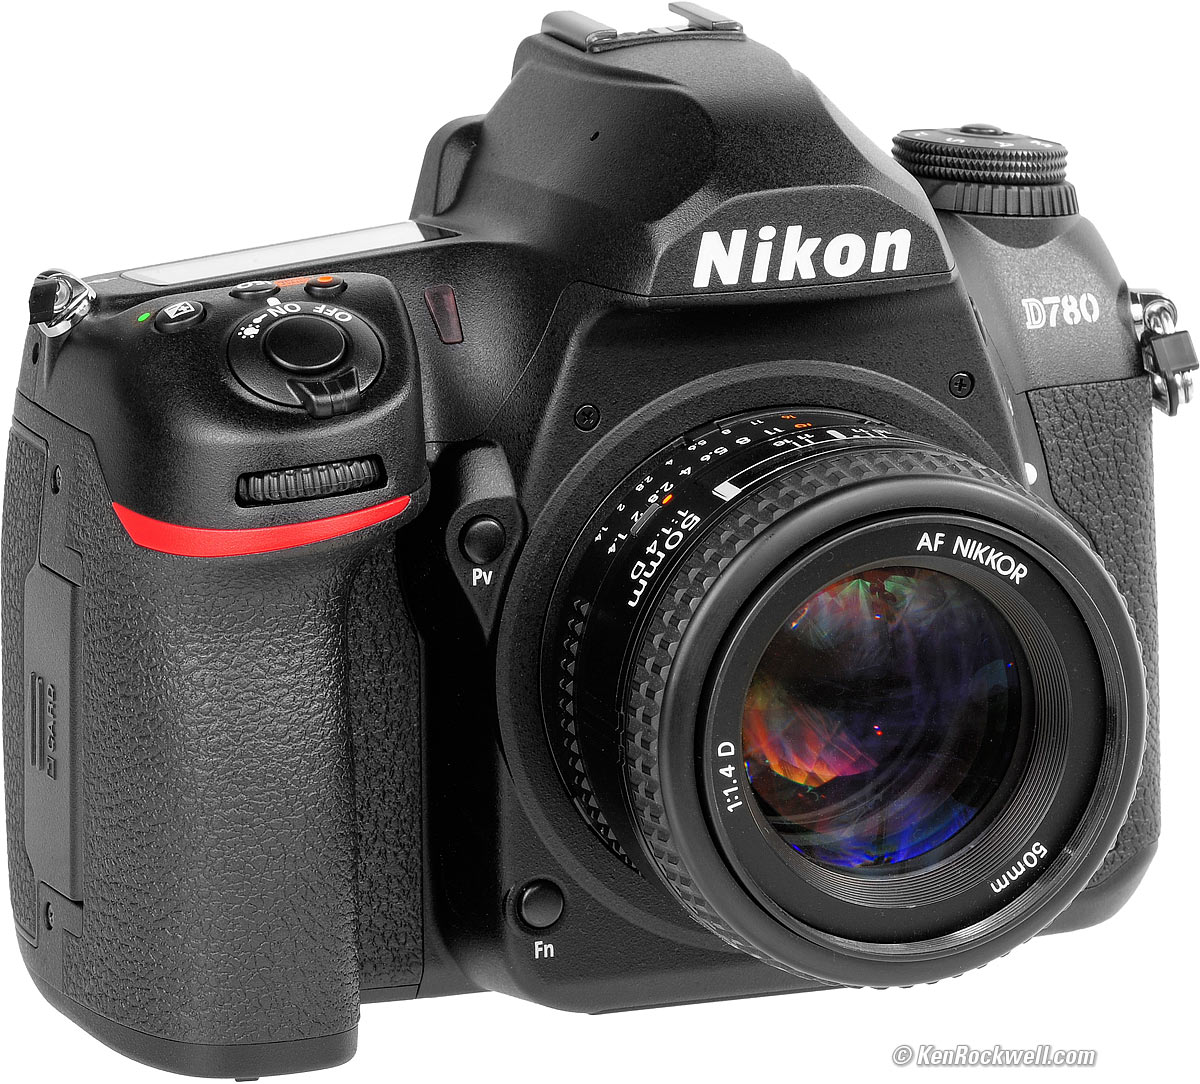
Autofocus Settings D780 review top
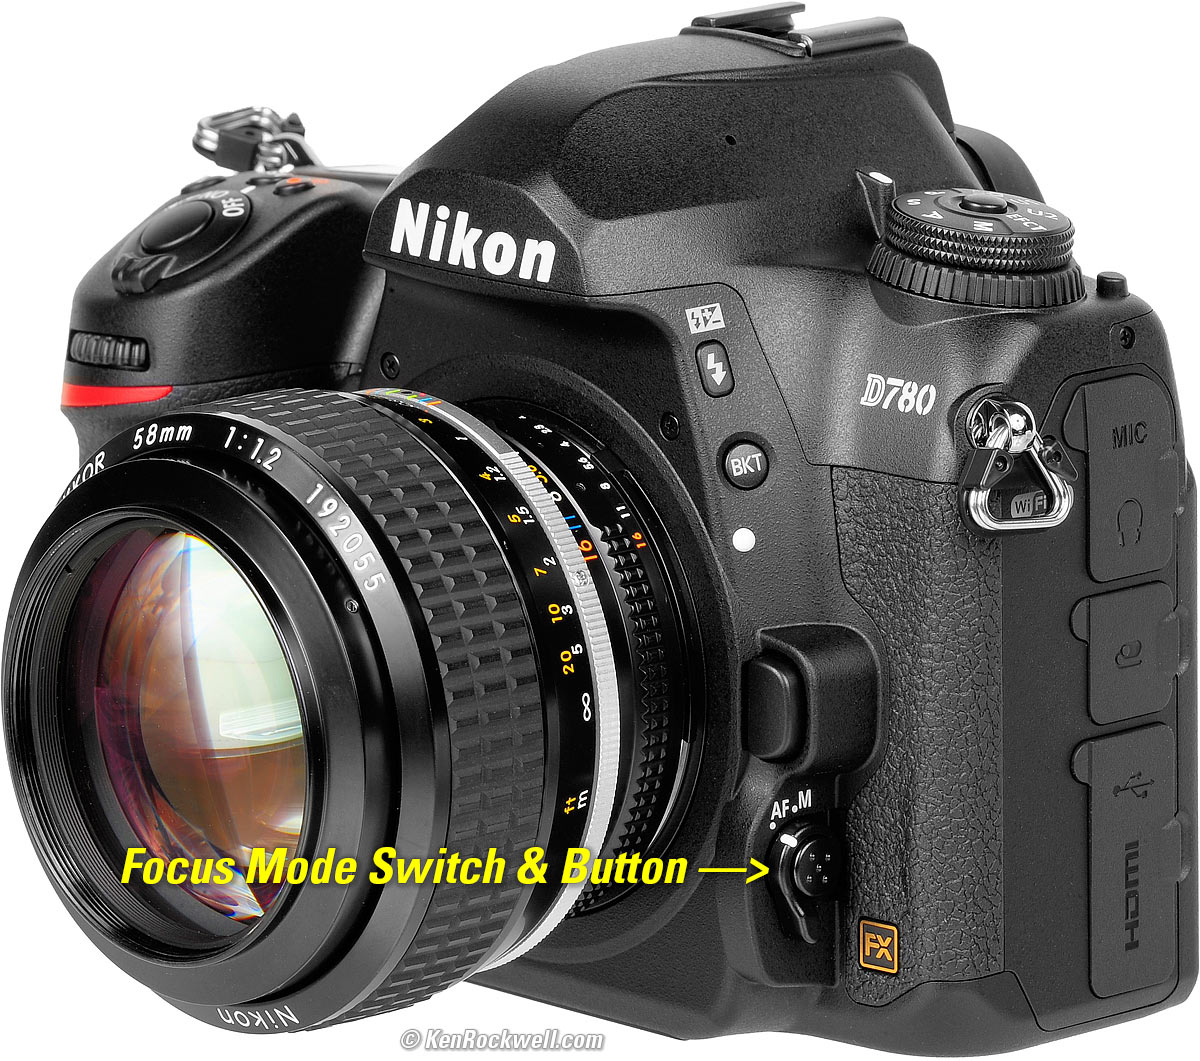
Nikon D780 with 58mm Noct-NIKKOR f/1.2 AI-s. bigger.
Autofocus modes are set with the lever and little button near the bottom of the lens mount as shown above.
Set the lever to AF for Autofocus, and to M for manual focus. I leave it at AF, unless I'm doing something more serious like time exposures on a tripod — and even then, I'm usually on AF.
Hold the AF MODE Button and turn the rear dial to select among AF-S (single auto focus and lock, used for still subjects), AF-C (continuous tracking autofocus, used for moving subjects, sports and action) or AF-A (magically selects either AF-S or AF-C depending on your subject). This sets how the AF system works over time, either focussing once and locking, or free-running with the shutter pressed halfway.
I use AF-A mode, unless I know I'm shooting sports that session. AF-A magically selects AF-S for photos of things that hold still and AF-C for things that move. Easy.
Hold the AF MODE Button and turn the front dial to select how the many AF Areas are used (single-point, group, auto select, 3D tracking, etc.). I leave it at AUTO, and my D780 usually finds the right subject, eyes and faces all automatically. In AUTO and AF-C (or AF-A), AUTO will find and track a moving subject all over the finder! Brilliant.
If and only if my D780 can't figure out the correct AF zone to use on its own, I'll use S (single) AF Area mode in AF-S, or 3D in AF-C. Single lets me pick just one sensor, and 3D lets me pick one sensor and then the camera moves it around the finder to track the subject. I only select a single sensor if the AUTO function isn't auto-selecting the AF sensors I need, which is rare.
I ignore all the other AF area mode settings like group, d9 and etc. Nikon adds all these extra modes to sell more cameras; you don't have to use them. Like all the other features in the D780, they are there because some people like them, but no one ever uses all the options. Use whatever works for you; these are what works for me.
AUTO AF-AREA MODE usually works wonders picking the right AF areas all by itself, or you can use the rear controller manually to pick them in the other AF AREA modes, but you can't use a finger on the rear LCD while looking through the viewfinder to select them as is common today on mirrorless.
AF Settings for People D780 review AF Settings top
I use AF-C and AUTO AF Area Select.
It finds their eye or eyes, focuses and tracks them all around as they move of breathe.
AF Settings for Places and Things D780 review AF Settings top
I use AF-A and AUTO Area Select, which usually just locks as soon as focused, but will track if something just happens to be moving.
If AUTO AF Area doesn't find the subject, I use Single AF area and set it myself, with AF-S to be sure it locks.
AF Settings for Sports D780 review AF Settings top
For shooting sports and action, I set AF-C and either Auto AF-Area or 3D.
In 3D, you have to select the AF Area manually, and then that selected area will run all over the frame tracking your subject. I prefer to use AUTO AF Area select, so long as it usually finds the correct subject and tracks it. I only force 3D if I have to select an area manually.
Also see How to Shoot Sequences with Flash and How to Shoot Sports.
Focus Peaking (Live View) D780 review top
To use Focus Peaking for stills and for movies, which highlights in-focus areas with a bright color during Live-View only during manual focus, set:
MENU > CUSTOM SETTING MENU (pencil icon) > d Shooting/display > d11 Peaking highlights > Peaking Level (set to 1, 2 or 3) and select a color (Red, Yellow, Blue or White).
To see in-focus areas highlight in your selected color (red is default) as you focus manually, press the [LV] button to start Live View on the rear LCD either for movies or for stills.
Once you set all this the peaking is always active in manual focus mode, or with a manual focus lens.
Peaking does not show in autofocus mode, unless you both hold the shutter or AF-ON button and move a manual-focus ring for manual focus override at the same time.
Focus Stacking D780 review top
Focus stacking, or "Focus Shift Shooting," snaps a sequence of raw files with different focus distances.
Once shot, you have to process these in your computer using whatever software you prefer to composite them into a single image that has everything in focus. The D780 isn't smart enough to be able to do this in-camera.
Set this mode at
MENU > PHOTO SHOOTING MENU (camera icon) > Focus shift shooting.
Rear Multi-Controller D780 review top
There is a lock control around the rear multi-controller. If it suddenly stops working, be sure to check this lock and move it from the L (lock) position and back to the ● (operate) position.
The lock is electronic so you won't feel it when it's locked — it will just stop responding.
Nikon D780. bigger.
Advance Modes D780 review top
These are set on the bottom ring of the top left dial.
I usually shoot in the Quiet Continuous (QC) mode, which runs at 3 FPS and is very quiet.
I only shoot in the regular modes if I need speed, or am shooting in my studio where I find it weird that my studio strobes (and the shutter) fire a little later than I expect; it's just weird - the photos are the same.
Continuous Shooting Frame Rates D780 review top
In the CL (Continuous Low) mode you can set the frame rate to your choice of 1, 2, 3, 4, 5, or 6 FPS at CUSTOM SETTING MENU (pencil icon) > d Shooting/display > d1 CL mode shooting speed.
I set 3 FPS because I can get off one shot and remove my finger in time to get just one shot, or hold it to get several. If I set 5 FPS or faster I often get two shots by the time I remove my finger. I release my shutter slowly for sharp shots; I don't jab my shutter button.
Auto ISO D780 review top
Auto ISO programs the camera to set ISO automatically based on lighting and your lenses. I only use manual ISO settings if I'm on a tripod and set ISO 50 or 100, otherwise, Auto ISO picks ISO for me instantly as the light and focal lengths change from shot to shot so I can pay attention to my picture rather than my camera.
Set Auto ISO at MENU > PHOTO SHOOTING MENU (camera icon) > ISO sensitivity settings > Auto ISO sensitivity control : ON.
Once you get this all set you also can turn Auto ISO on and off by holding the ISO button on the top near the shutter button and turning the front dial.
Auto ISO Maximum ISO D780 review Auto ISO top
This is the highest ISO to which the camera will set itself in Auto ISO as the light gets darker.
Set this at MENU > PHOTO SHOOTING MENU (camera icon) > ISO sensitivity settings > Auto ISO sensitivity control/Maximum sensitivity
I set mine to ISO 51,200 because it looks fine if I need it. I'd rather shoot at ISO 51,200 (or higher) and have a sharp picture than a blurry one at ISO 25,600.
Auto ISO Minimum Shutter Speed D780 review Auto ISO top
This is the slowest shutter speed to which the D780 will set itself before Auto ISO starts increasing ISO to ensure that it doesn't shoot at slower than this shutter speed to prevent blur. It only shoots at slower than this speed when it's shooting at the highest ISO just programmed above and the light gets even darker.
Set this at MENU > PHOTO SHOOTING MENU (camera icon) > ISO sensitivity settings > Auto ISO sensitivity control/Minimum shutter speed.
This is critical as this setting is what ultimately defines the ISO at which my D780 shoots, which then defines the aperture and shutter speed.
I rarely change aperture or shutter speed or ISO directly. I change Auto ISO Minimum Shutter Speed depending on my subject and that makes all the other settings optimize themselves the same way I would manually.
If my subject holds still, I set AUTO, which sets the minimum shutter speed to 1/focal length. If I have a VR lens I set it to Auto Slow or Auto Slower, because I can hand-hold at even slower speeds. Set these at MENU > PHOTO SHOOTING MENU (camera icon) > ISO sensitivity settings > Auto ISO sensitivity control/Minimum shutter speed > Auto > (click right) > (click left or right to choose minimum shutter speeds ±2 stops from 1/focal length).
If snapping people, I set 1/125 for Minimum Shutter Speed as that keeps them sharp.
If shooting sports, I set 1/500 or 1/1,000 for Minimum Shutter Speed as that keeps runners and other sports action sharp.
Program (Professional) Exposure Mode D780 review top
Left Dial set to P (Program or Professional) Exposure Mode. bigger.
I shoot almost everything in Program exposure mode. Press the little unlock button and turn the dial to P.
This lets the camera pick the same apertures and shutter speeds I would have, but it does it for me faster so I can concentrate on what really matters: what's in my picture.
If I need a different shutter speed or aperture, I just turn the rear dial and it shifts them exactly as I'd do manually, but it does it much faster so I can spend my time taking better pictures rather than fiddling with settings manually. The key is to program your camera to do what you'd do, so it can worry about this so you don't have to. My setup file has all this programing in it.
I only use A, S or M modes if I need to.
If you see a flashing "fEE" in your finder, that means that your lens has an aperture ring and that it's not set to the smallest aperture (the largest number), usually in orange. Set it there and the problem goes away.
Program Shift D780 review top
If you shift the program with the rear dial, it resets when you turn the power off and on again.
If you have the program shifted and save it into U1 or U2, that setting recalls the shifted program.
Exposure Compensation D780 review top
To set exposure compensation, which makes the next pictures you take darker or lighter, hold the +/- button (near the shutter button) as you spin the rear dial. You'll see a number on the top LCD or in the finder as you set this. + means brighter, and - is darker, Easy.
I usually leave exposure compensation at 0. If my picture is too light, I'll try -0.7, and if too dark, +0.7. There is no right or wrong; just whatever makes your picture look the way you want it.
Level (Virtual Horizon) D780 review top
To see a level or virtual horizon display on the rear LCD, press the rear INFO button (the bottom button on the left) a few times until it displays.
To see a level in the finder, press MENU > CUSTOM SETTING MENU (pencil icon) > f Controls > f3 Custom controls > select a control button you'd like to use for the level > and then select "Viewfinder Virtual Horizon."
Finder Grid D780 review top
Set this at MENU > CUSTOM SETTING MENU (pencil icon) > d Shooting/display > d10 Framing grid display > ON.
As-Shot Crops D780 review top
I often use the as-shot crop modes, and select them with a function button.
Often I want to shoot square images. When I do this their thumbnails also appear much bigger in my sorting program, speeding my workflow. When I shoot square I don't have to worry about turning my camera for vertical or horizontal; I just shoot away and my editor or I can crop them later to any shape we like. This is a big reason Ansel Adams so loved his HASSELBLAD: no rotating the camera and he always could crop to whatever shape he needed later. Less fiddling while shooting means more paying attention to what's actually in your picture, which results in better pictures.
You select this at MENU > PHOTO SHOOTING MENU (camera icon) > Image area > Choose image area > (choose one) > OK.
I never use the 16: 9 crop, but use whatever you want.
Since I change this all the time I set my red dot ● button (near the shutter release) so I can hold it and turn the rear dial to change the Image Area. I program this button at MENU > CUSTOM SETTING MENU (pencil icon) > f Controls > f3 Custom controls > (select red dot ● button or any other button you prefer to use) > press center button of rear controller > Choose image area > OK.
I prefer to set the cropped areas to appear in the finder as darker, fuzzier regions. I set this at MENU > PHOTO SHOOTING MENU (camera icon) > Image area > Viewfinder mask display > ON. By default the finder merely shows faint lines to mark the cropped area.
I love the square crop; here are the equivalents for HASSELBLAD lenses (or any other 6×6cm camera):
on D780 (square crop) |
|
Flash D780 review top
There is no built-in flash.
I use my old SB-400 all the time; fill-flash is critical to great pictures. The SB-400 is still Nikon's best small flash, and easy to get if you know How to Win at eBay.
Picture Controls D780 review top
Picture Controls set how the pictures look: sharpness, saturation, contrast, etc.
Set these at MENU > PHOTO SHOOTING MENU (camera icon) > Set Picture Control.
 |
 |
 |
STANDARD. Looks natural. |
STANDARD, +2 Saturation.
|
VIVID, +3 Saturation. Looks wild. |
I use VIVID for wild colors, and STANDARD for natural shots of people.
I don't use Nikon's AUTO Picture control, which does its best to guess what you're shooting and set itself accordingly.
Everyone has different tastes for people photos, so feel free to experiment with the PORTRAIT setting if you like for people. People have different tastes for everything; so just know that here is where you set how your pictures look.
More about Picture Controls (for older cameras; follow the settings here for the D780).
Saturation D780 review Picture Controls top
This is set as a tweak inside any of the main picture controls.
I set +3 for the most saturated colors of places and things.
I set +1 to get slightly more colorful shots of people in the STANDARD setting. People start looking bad with too much saturation; just as often I leave it as 0.
Sharpening D780 review Picture Controls top
This is set as a tweak inside any of the main picture controls.
I set mine to:
Quick Sharp: 0 (default).
Sharpening: +9 (maximum).
Mid-range sharpening: +2 (default).
Clarity: +1 (default).
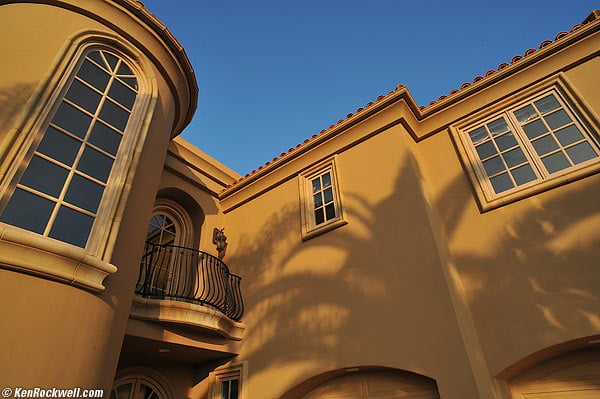
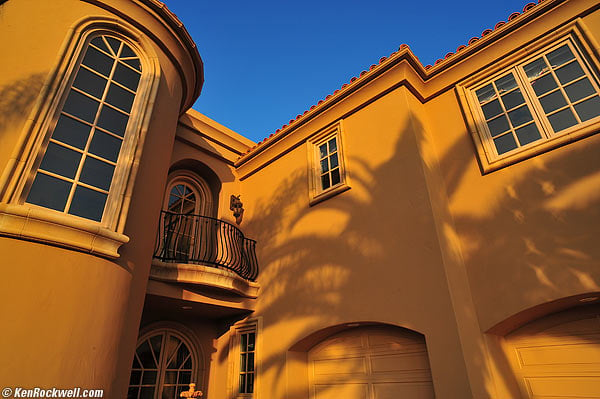
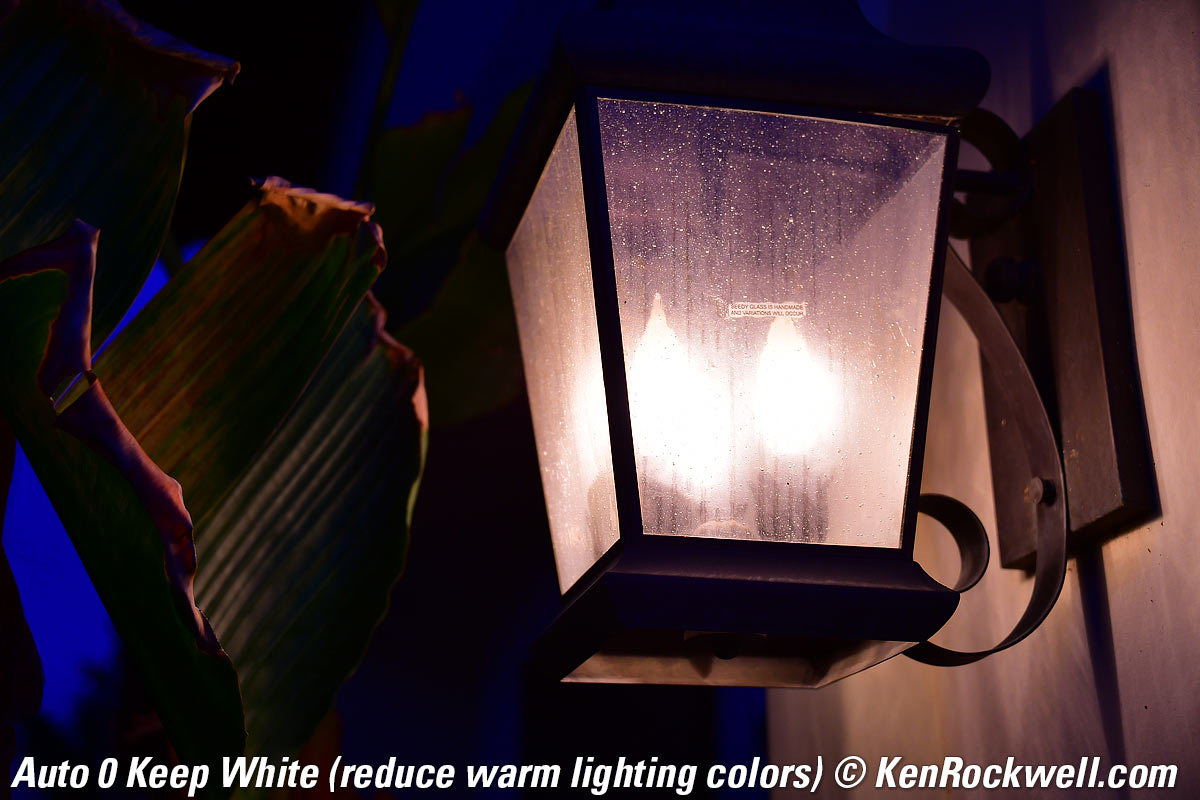
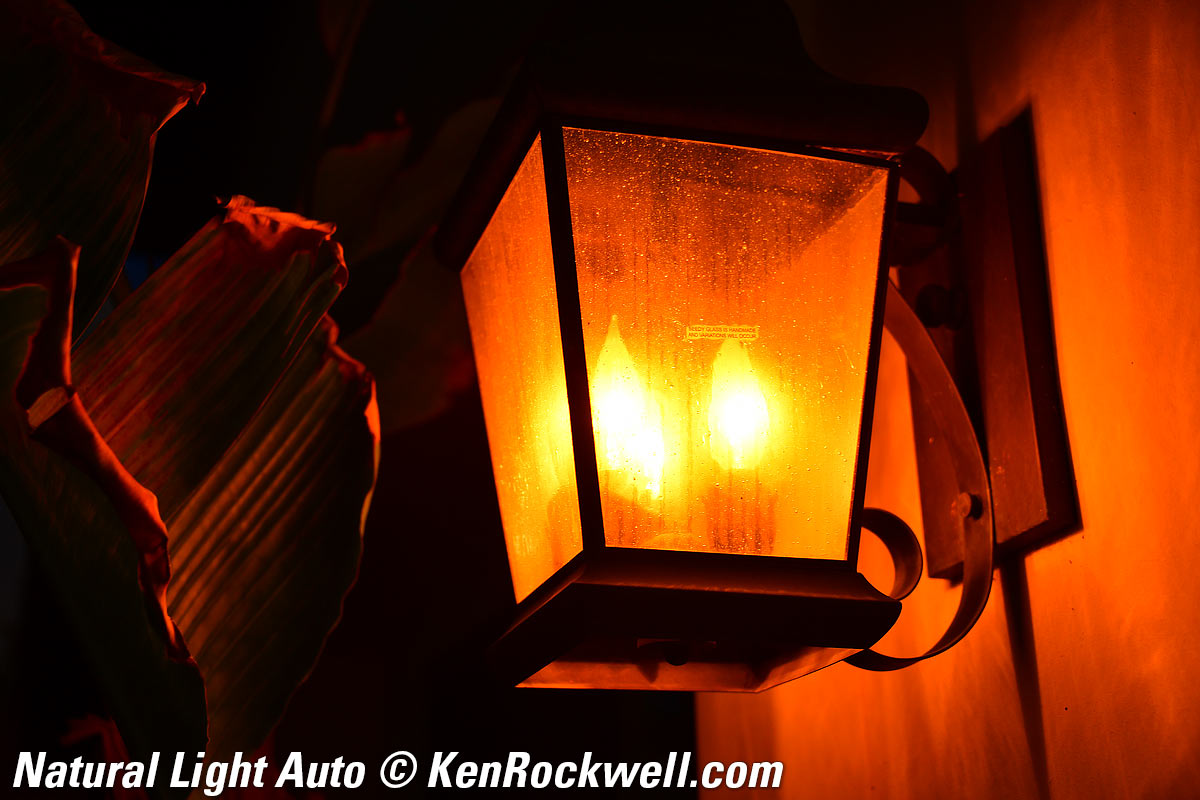
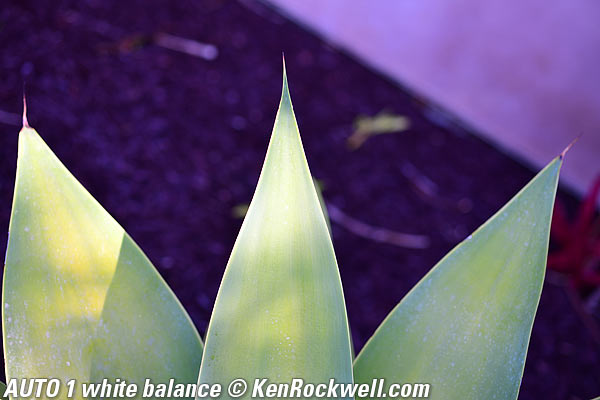
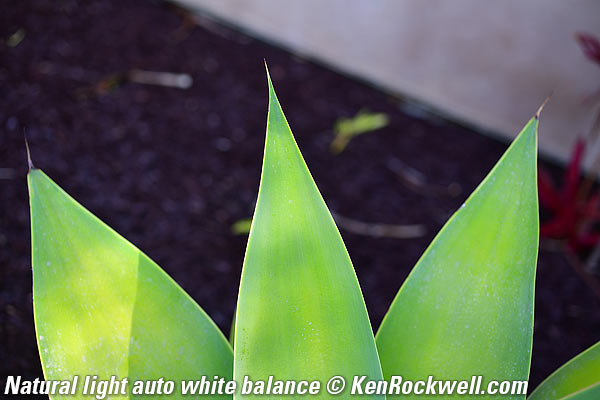
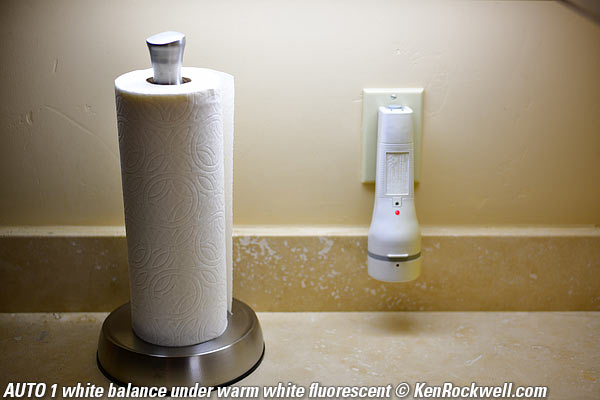
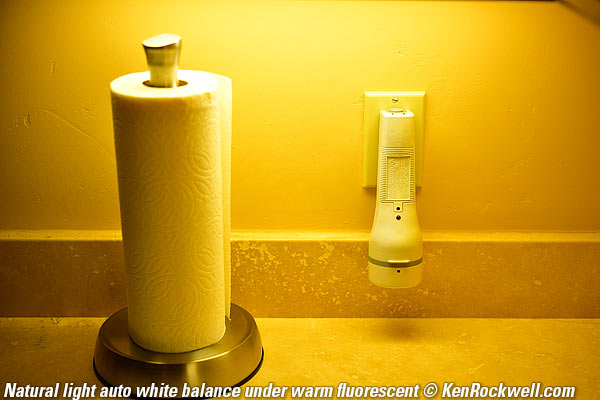
Auto White Balance D780 review top
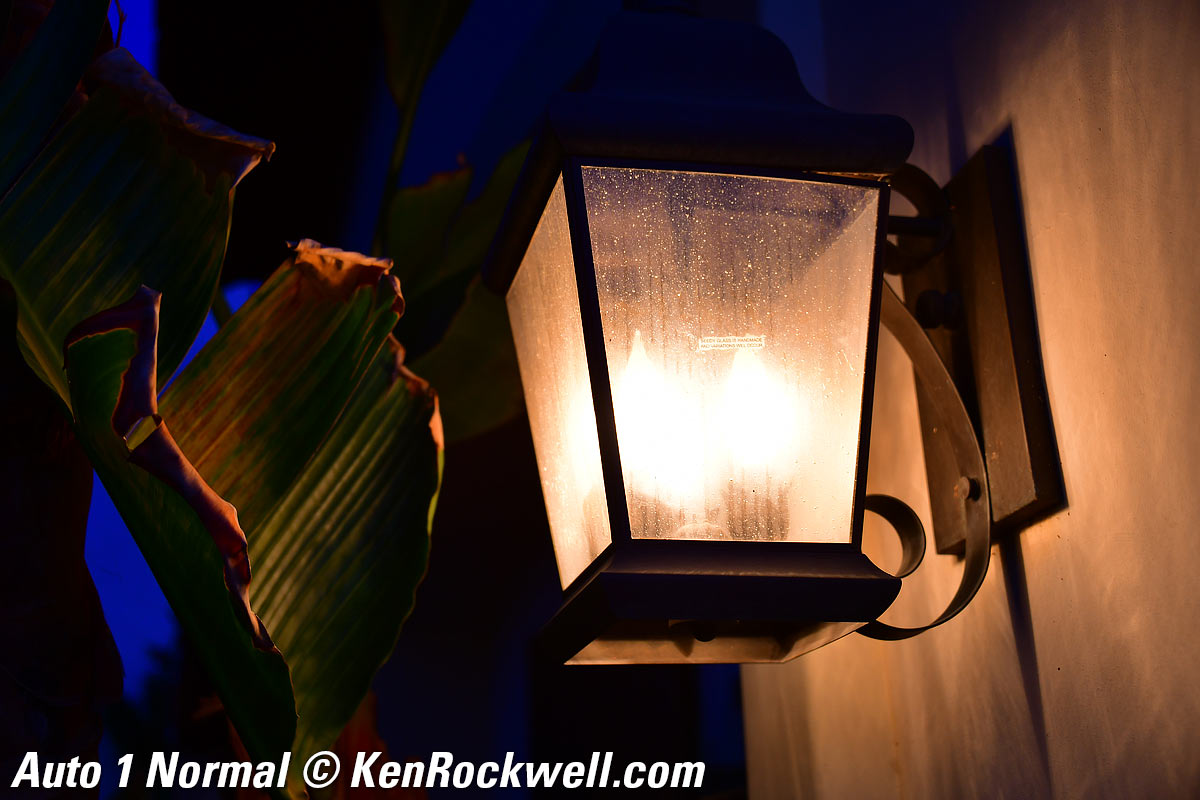
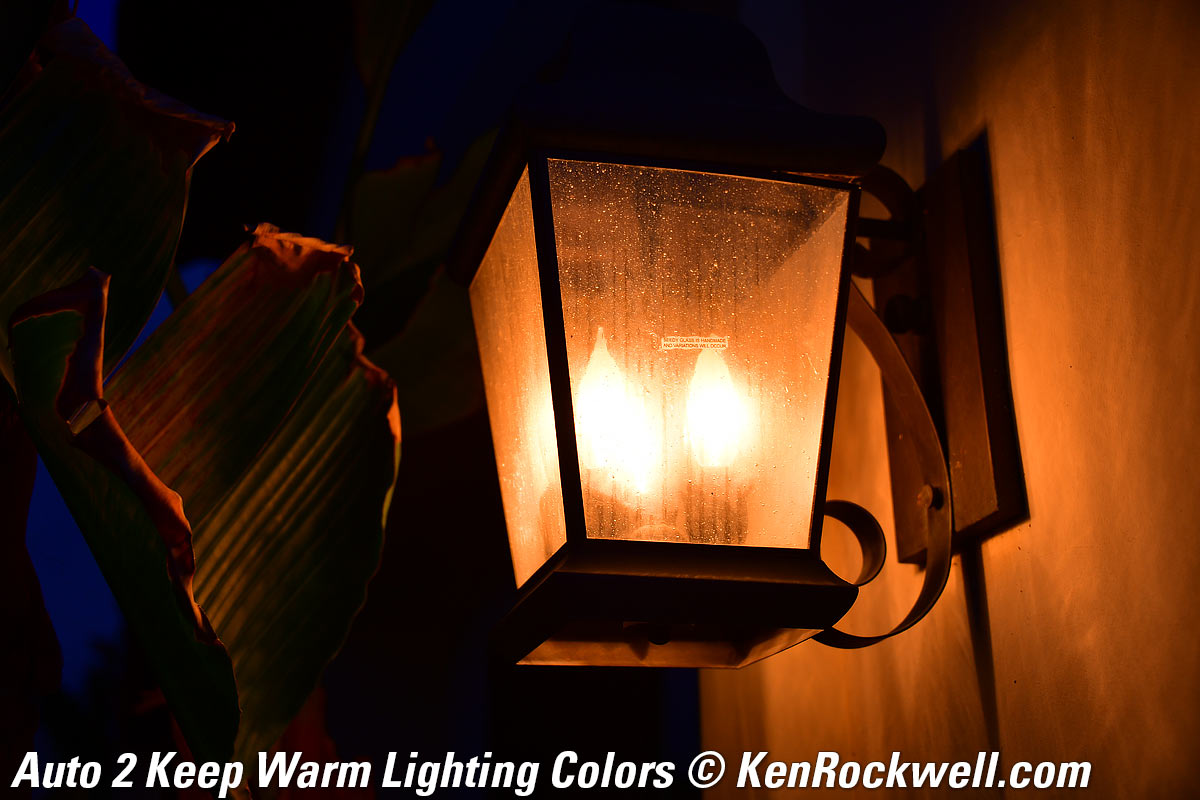
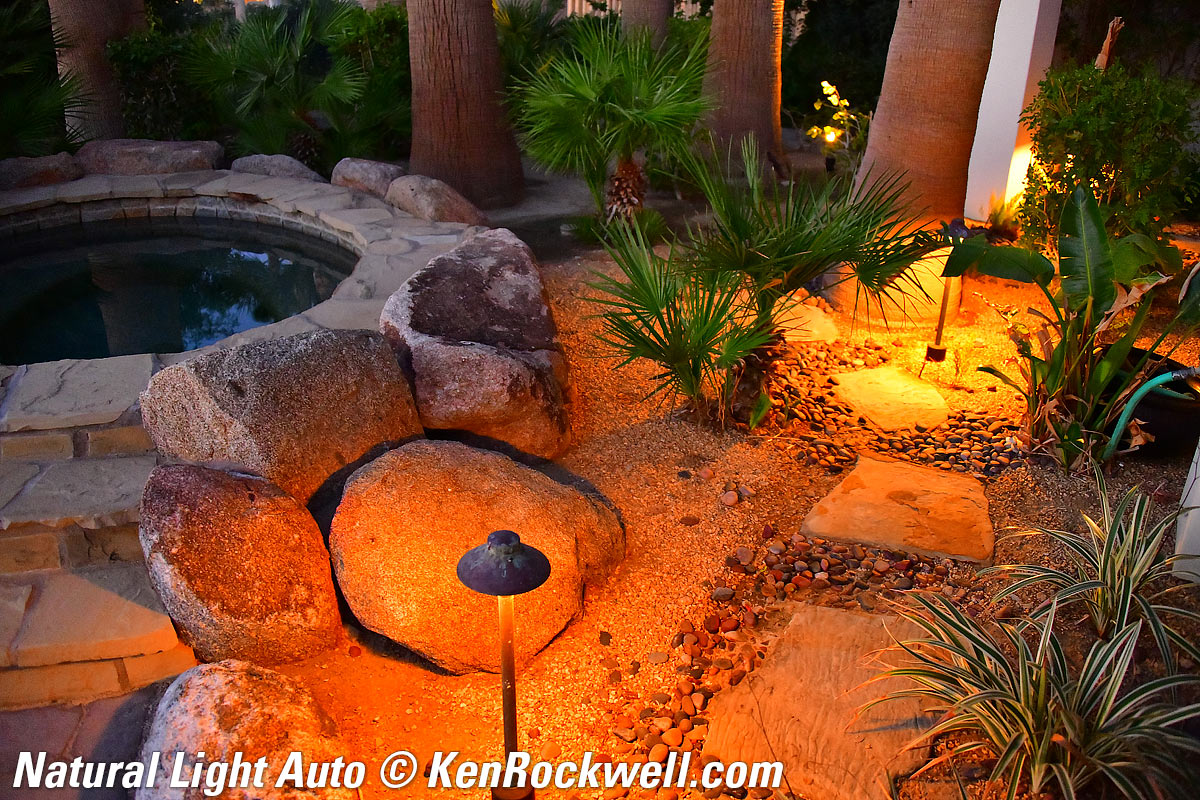
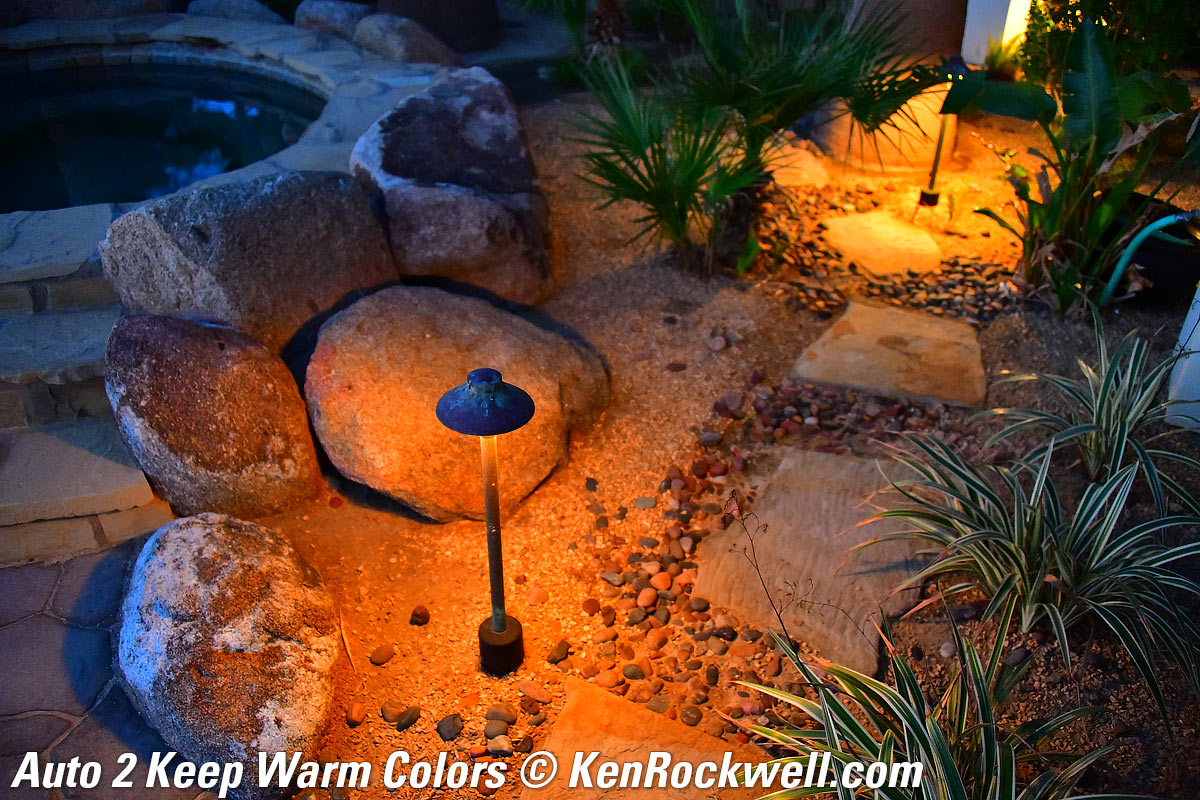
There are now four different Auto White Balance (AWB) settings. There are three of the usual AWB settings: AUTO0, AUTO1 and AUTO2, and a new Natural Light Auto setting. Use whichever looks best.
You can set these in the menus or by holding the WB button and turning the dials. Use the rear dial to select AUTO (1, 2 or 3 ) or AUTO ☀, with AUTO ☀ being Natural Light Auto. Use the front dial to select 1, 2, or 3.
They all look the same in daylight and under most conditions. They vary in what they do under tungsten, sunsets, and with green or yellow subjects or under fluorescent light.
For normal use under any sort of light, use the default AUTO1 setting.
The AUTO0 "keep white" setting allows the camera to correct more fully under tungsten light to let indoor shots look whiter (less orange).
The AUTO2 "keep warm lighting colors" limits the camera's ability to correct for tungsten light, leaving indoor shots to look warmer (more orange).
Which of these three you prefer depends on how warm you want indoor shots to look. Most people prefer the default AUTO1 setting.
The AUTO0, AUTO1 and AUTO2 settings differ only in how low they will allow the camera's automatic Kelvin color temperature compensation to drop to compensate for tungsten light. Regular AUTO lets the camera correct from a maximum of about 7,500 K and as low as about 1,500 K in AUTO0 Keep White, about 2,700 K in AUTO1 Normal and about 4,000 K in AUTO2 Keep Warm. In any of the AUTO0, AUTO1 or AUTO2 settings the camera will vary all over the green/magenta axis as needed.
The new Natural Light Auto setting is specifically for shooting under natural light, which means light from the sun either directly, under clouds or shade, or indoors as lit from a window without other lights. The Natural Light Auto setting can look better (warmer) in shade or indoors lit by window light, and also prevents the camera from confusing green subjects or plants in shade with fluorescent light so these shots stay green instead of turning too purple. It also prevents shots with pale yellows or oranges from being presumed to be under tungsten and made to look too blue. It allows the camera to correct from about 10,000 K to 5,000 K on the amber/blue axis, and doesn't let it vary much on the green/magenta axis.
Use regular AUTO1 most of the time, and especially under artificial light, and consider using Natural Light Auto in under natural light. (Invention disclosure, Friday, 20 October 2017, 2:15PM PDT: Ideally there should be an Auto Auto White Balance setting that figures out which Auto WB setting to use all by itself. A white balance system also should look for flickering light, and if it sees it, presume that it's artificial light and set itself accordingly — but if not flickering, know that it could be any kind of lighting.)
Dimmed Tungsten D780 review AWB top
Click any to enlarge:
|
|
 |
 |
This was not a regular tungsten light; it was a tungsten light deeply dimmed so it was about 1,500 K or less— and the D850 in its Keep White mode still did exactly that!
The Natural Light Auto setting is expecting light from the sun, so it doesn't correct for tungsten at all and it stays very orange. Not shown here is that for sunsets, Natural Light Auto keeps sunsets and warm afternoon light looking like sunsets and afternoon light, leaving everything in its warm brilliance.
20W halogen Malibu lights at dusk D780 review AWB top
|
|
 |
 |

Click any to enlarge.
It's similar here, but notice how Natural Light Auto didn't make the twilight turn blue on the sandstone to the left; it left it neutral as it looked at the time.
Green Agave in Shade D780 review AWB top
|
|
Click either to enlarge.
This is why Nikon added Natural Light Auto: green plants in shade are often confused with fluorescent lights, and the usual AWB will try to remove what it thinks is too much green, making greens duller and everything else too magenta (purple). When you set it to Natural Light Auto, it knows there isn't any fluorescent light, and lets the leaves look green as they should.
Warm White Fluorescent D780 review AWB top
|
|
Click either to enlarge.
In this case the AUTO1 setting expertly renders the subject naturally, while the Natural Light Auto setting is powerless to try to correct the fluorescent light.
Flickering Lights D780 review top
I enable the flicker shoot-through mode at MENU > PHOTO SHOOTING MENU (camera icon) > Flicker reduction > Flicker reduction setting and Flicker reduction indicator both ON.
This lets me shoot under flickering fluorescent, sodium, metal halide and dimmed LED lighting without the problem of random dark or off-color frames at high shutter speeds.
In this mode the D780 slightly delays the shutter by a few milliseconds if it needs to so it doesn't shoot during the instant the lighting is dark.
If you're such a clairvoyant photographer to be able to want the image at a different millisecond and would rather fix a dark or off-color image later to get the exact moment you wanted to capture, leave this off. I always leave it ON.
Vibration-Free Shutter Release D780 review top
The D780 has an optional front-curtain electronic shutter mode to eliminate vibration at MENU > CUSTOM SETTING MENU (pencil icon) > d Shooting/display > d5 Electronic front-curtain shutter.
Be sure to set the Quiet or Quiet Continuous modes on the top left dial for this to work. It works in the Mirror Up mode, but we no longer use that mode because it requires buying a cable release and the Exposure Delay Mode I explain next doesn't.
Set the Exposure Delay mode to about 2 seconds (MENU > CUSTOM SETTING MENU (pencil icon) > d Shooting/display > d4 Exposure delay mode) and you won't need a cable release or mirror lock-up for vibration-free shots with the Electronic Front Curtain mode!
Set these, tap the shutter, the mirror goes up, and the picture takes 2 seconds later. The Electronic Front Curtain is silent, so you won't hear the exposure start; there isn't even the tiny click we used to get with mirror lockup. (Why can't you hear a pterodactyl go to the bathroom? Because the "P" is silent!)
The Front-Curtain mode only shoots at up to 1/2,000, and only from ISO 50 ~ 51,200, so I don't use this mode unless I'm shooting long exposures with long lenses on a tripod.
Long Time Exposures D780 review top
There are now two ways to make long time exposures.
I don't use the LONG EXPOSURE NR (dark-frame subtraction) menu setting (MENU > PHOTO SHOOTING MENU (camera icon) > Long exposure NR). I see no need to wait around for the camera to make dark-frame exposures, at least with 4-minute exposures. It looks great without this and saves me from waiting around long periods of time while the camera makes duplicate dark-frame exposures.
Long Exposure NR has nothing to do with high ISO noise or grain. It removes purple haze and fogging, which I haven't seen in a digital camera for over 15 years. Modern cameras rarely need this.
Extended Shutter Speeds (best way) D780 review Long Exposures top
The newest and easiest way is to enable the long shutter speeds at:
MENU > CUSTOM SETTING MENU (pencil icon) > d Shooting/display > d6 Extended shutter speeds (M) > ON.
Now, set the top left dial to M (Manual exposure) mode, and you simply select whatever time you need up to 15 minutes (900 seconds) with the rear dial.
Great news is that manual exposures of 60 seconds or longer are counted-down on the top LCD! Bad news is that the LCD illuminator turns off so you can't see these unless you bring a small flashlight or are shooting long exposures in good light.
Use the Self Timer (set on the top left dial) or the Exposure Delay mode and you don't need to use a release cord.
The only weirdness is that they are displayed as seconds, not minutes, so here's a table to convert to minutes:
Indicated seconds |
Equals |
30 seconds |
½ minute |
60 seconds |
1 minute |
90 seconds |
1½ minutes |
120 seconds |
2 minutes |
180 seconds |
3 minutes |
240 seconds |
4 minutes |
300 seconds |
5 minutes |
480 seconds |
8 minutes |
600 seconds |
10 minutes |
720 seconds |
12 minutes |
900 seconds |
15 minutes |
TIME Exposure Modes (old way; only use for exposures longer than 15 minutes) D780 review Long Exposures top
The old way to do TIME exposures, meaning the shutter opens when you press it, and stays open until you press it again, is also found in the shutter speed settings in Manual exposure mode. To set these, select Manual exposure mode (M on the top left dial) and move the rear dial many clicks to the left until you see " - - " between the x200 and BULB settings.
If you use the Exposure Delay and Electronic Front Curtain tricks above, remember that the Exposure Delay means your Time exposure doesn't start until 2 seconds after you press the shutter. Either be sure to add 2 seconds to your timing, or for exposures longer than 30 seconds know that being short 2 seconds doesn't matter, and with long exposures it doesn't matter at all if you skip the no vibration modes and there is little bit of mirror-slap blur for the first fifteenth of a second.
Film Scanning (Slide & Negative Digitizer) D780 review top
Negative Digitizer is a selection in MENU > CUSTOM SETTING MENU (pencil icon) > f Controls > f2 Customize i menu.
Shoot in A mode.
You'll need a Nikon 60mm f/2.8G Macro lens and ES-2 slide copying attachment #27192,
— or for old timers —
a 55mm f/2.8 macro lens, PK-13 extension tube and Nikon ES-1 slide copying attachment.
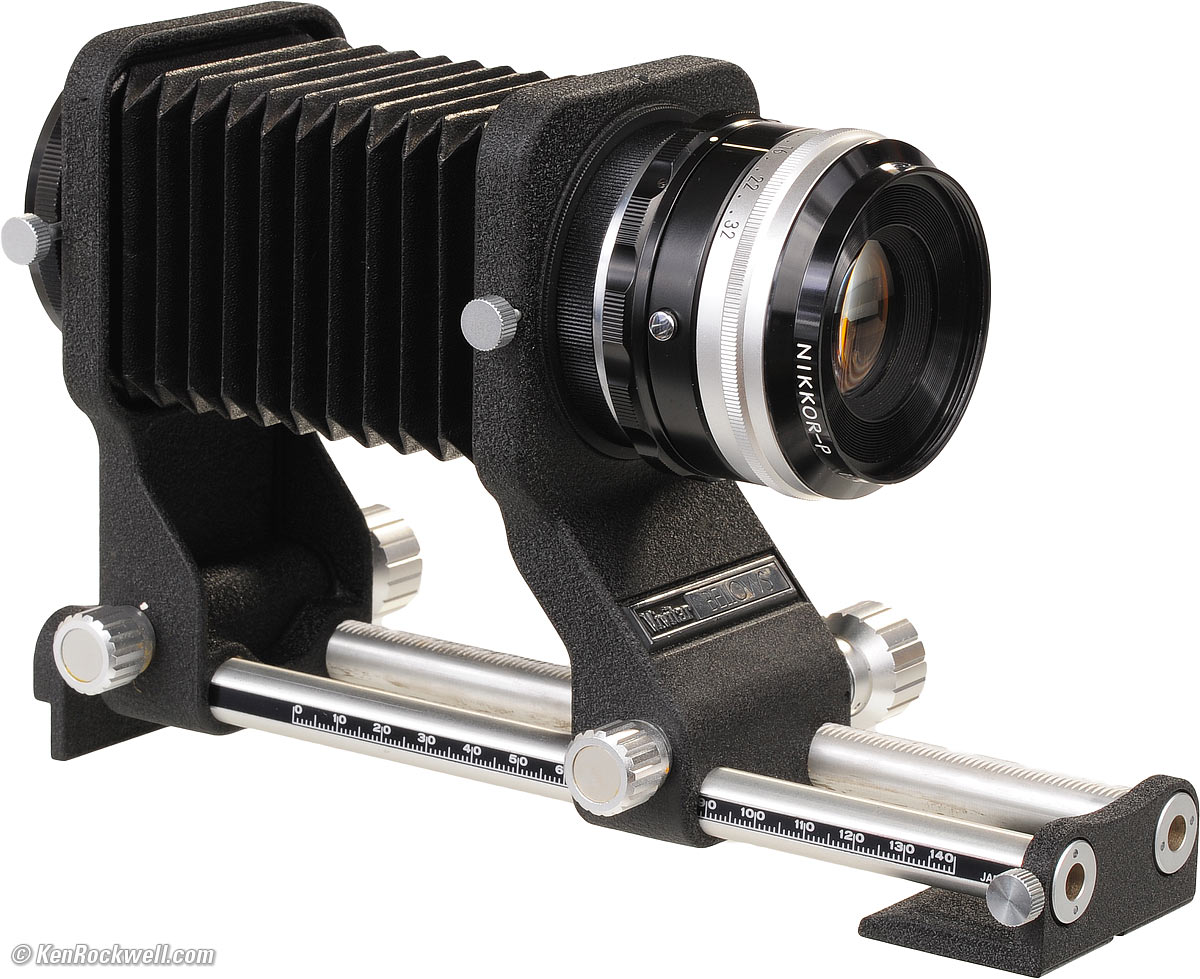
Ultimately you'll need whatever setup you prefer to rephotograph film. Personally I'd use a bellows and 105mm f/4 short-mount lens (see it on a bellows) and a film strip copying adapter so I can zoom-in if I prefer, at full resolution.
With any of these, use a flash pointed back at the white glass.
I haven't tried this myself yet, but there's how you find it. "Negative Digitizer" is for negatives, but for slides I'm unsure if there's a mode that optimizes the contrast so it doesn't build up as it can do if shot as a regular photo of a slide, or if you just skip this mode and snap the slide like a regular picture.
Playback D780 review top
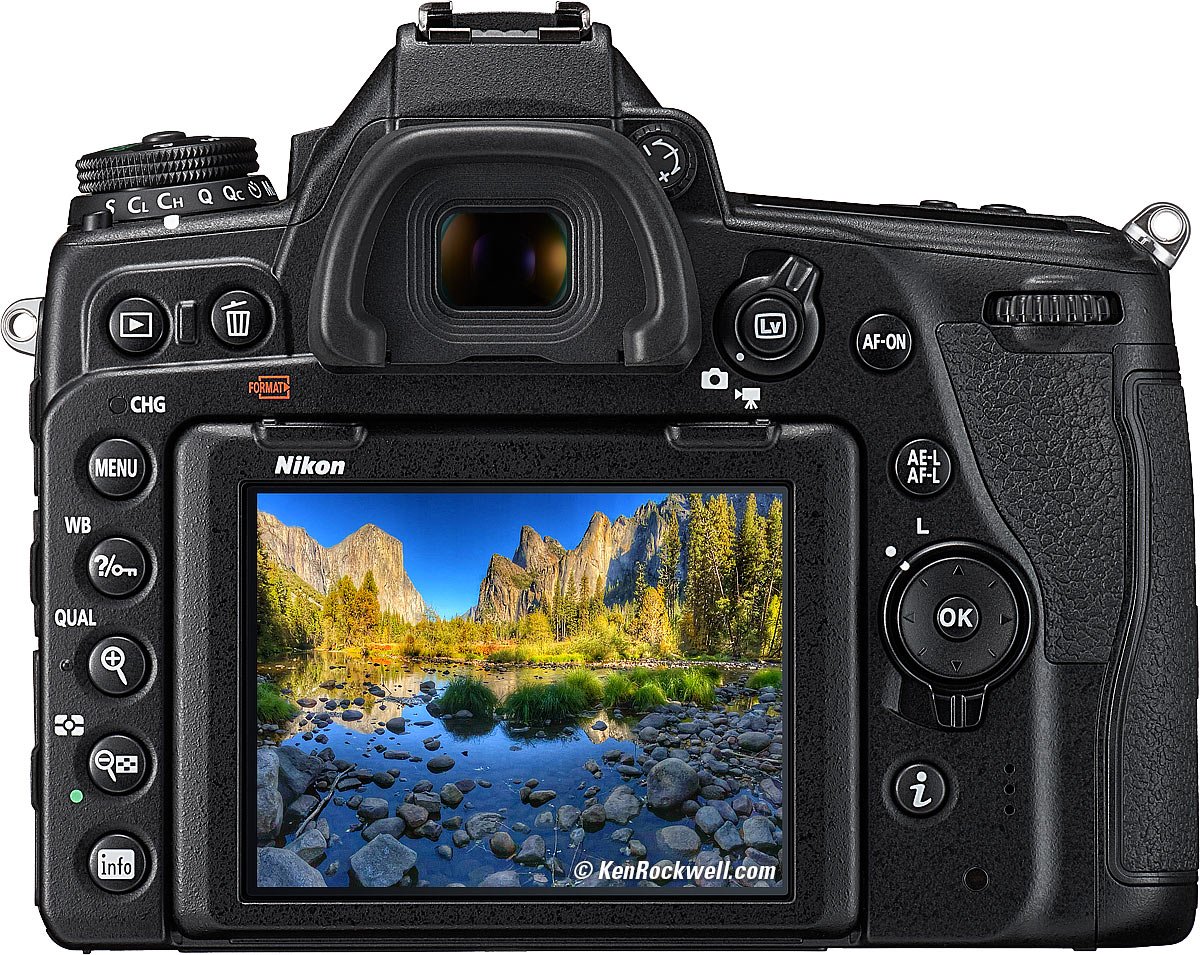
By default, the back dial moves back and forth picture by picture, while the front dial jumps ten images at a time.
Instant Playback Zoom D780 review top
Set MENU > CUSTOM SETTING MENU (pencil icon) > f Controls > f4 OK button > Playback Mode > Zoom on/off > 100%.
Now when you hit the center OK button, it zooms right in while playing in one click! Feel free to selects a different default zoom level if you prefer.
Rear LCD Brightness D780 review top
Set this at MENU > SETUP MENU (wrench icon) > Monitor Brightness.
The default of 0 is great indoors.
The brightest setting of +5 is great for use outdoors: it's bright but not washed out as in earlier cameras.
I use -5 for outdoor night shooting and astronomy. This is because when our eyes adapt to the dark, we tend to prefer images that are too dark on the LCD. They'll look great as we're shooting them in the dark, but the next day when we look at them under normal conditions, we'll ask ourselves "what were we thinking; these are way too dark!" Set -5 and you're much more likely to see the exposure properly in the dark, and more likely to make exposures that look great the next day.
My Menu D780 review top
Set up your My Menu menu at MENU > MY MENU (checkmark icon) > Add items. You may put whatever you like in it; mine has:
Battery Info: I have to go in here to read percentage; otherwise all you get is a bar icon elsewhere.
Monitor Brightness: I leave it at 0 indoors, and +5 outdoors. Sadly there is no automatic control as in almost every other modern camera, TV and iPhone.
HDR mode: This is where I turn the HDR mode on and off. I still have to go into MENU > PHOTO SHOOTING (camera icon) > HDR (high dynamic range) to set parameters like smoothing (I prefer HIGH) and Exposure differential (I prefer AUTO).
Auto Distortion Control: I usually leave his off, unless I'm shooting real estate listings.
I would put the Minimum Shutter Speed setting for Auto ISO in my My Menu, but the D780 won't let us do that.
Saving and Recalling Shooting Memories (U1 & U2) D780 review top
U1 and U2 are on the top left dial, here set to P mode. bigger.
One of my favorite features of my D780 is that I can save almost everything we just set above to the U1 and to the U2 dial settings.
Once programmed, just hold the unlock button in the middle of the dial and select either U1 or U2, and voilà, everything about the camera programmed into that position is recalled.
To save your settings, first set everything about your camera however you like it (as I've explained above), then press:
MENU > SETUP MENU (wrench icon) > Save user settings > Save to U1 (or U2) > Save settings > OK.
I set many things, but some basics are:
U1 (for places and things) D780 review U1 & U2 top
AF-A, Auto AF-Area select.
LARGE BASIC ★ (optimize quality) JPG.
VIVID Picture Control, +9 sharpening, +3 Saturation.
ISO AUTO, range 100 - 51,200, Auto ISO slowest shutter speed AUTO (or AUTO Slower with a VR lens).
U2 (for people) D780 review U1 & U2 top
AF-C, Auto-AF Area select.
LARGE BASIC ★ (optimize quality) JPG.
Standard Picture Control, +3 sharpening, ±0 Saturation.
ISO AUTO, range 100 - 51,200, Auto ISO slowest shutter speed 1/125.
Depending on what I shoot, I might set either U1 or U2 to any of these:
Sports D780 review U1 & U2 top
AF-C, Auto-AF Area select.
LARGE BASIC ★ (optimize quality) JPG.
Standard Picture Control, +3 sharpening, ±0 Saturation.
ISO AUTO, range 100 - 51,200, Auto ISO slowest shutter speed1/500 (or 1/1,000).
Studio with Strobes D780 review U1 & U2 top
You might want to set one of these for your studio setup with strobes. This is how I've shot all the product photos on this page.
Set the AF lever to Manual focus.
LARGE BASIC ★ (optimize quality) JPG.
VIVID Picture Control, +3 sharpening, ±3 Saturation.
ISO 100 (fixed).
Manual exposure: x200 (1/200 flash sync speed) and whatever aperture works well with your strobe setup, typically f/22 for my setup.
Manually-set white balance to a gray card and your strobe setup.
Here's the beauty of the U1 and U2 settings: ISO, exposure mode, white balance and more all are saved and recalled at once. If I had to reset these by had every time I walked into my studio or back out in the world, I'd forget half of them and blow the first shots I made each time.
You get the idea: set everything about your camera, then save it to U1 or U2 so you always can get right back to it in a click. As this page may have shown you, there are so many different things to set depending on what you're shooting that I'd be lost without these; I'd miss pictures if I had to reset this all manually from shot to shot. I set mine for places and for people so I can swap between shooting landscapes or photographing people in the blink of an eye.
Saving and Recalling Camera Menu Settings to & from a Card D780 review top
U1 and U2 save sets of shooting settings. This trick saves everything, including what's in the U1 and U2 memories, to a card so you can save it all to your computer or share it over the internet. This is very helpful if you get or borrow a second body, or if you send your camera out for repair, or just want to use all my settings and be done with it.
To save all of your camera settings to your card, press:
MENU > SETUP MENU (wrench icon) > Save/load menu settings (at the bottom; not "Save user settings" at the top) > Save menu settings > OK.
It saves a NCSET004.BIN file to Card 1.
You can save that file to your computer and share it as you like.
To restore your D780 to those settings, or to use the settings of anyone else who's shared this file with you, either use your card with your settings or a card to which you've copied an NCSET004.BIN file from anywhere to the root card directory (not in any folder), put it in slot 1 (it doesn't work from slot 2) then press:
MENU > SETUP MENU (wrench icon) > Save/load menu settings > Load menu settings > OK.
These only save to and recall from card 1.
My Setup File D780 review top
If you just want to set up your D780 exactly as I have mine set, simply download and copy my NCSET004.BIN file to your computer. This file is new as of 04 March 2020.
It won't do anything in your browser here and it won't open or run on your computer. You have to download it to your computer, copy it to the top directory (not in any folder) of a memory card, pop that card into your D780, then press MENU > SETUP MENU (wrench icon) > Save/load menu settings > Load menu settings > OK to replace your settings with mine.
Feel free to load them into your D780, but know that my D780 is programmed to add my name and contact information to the EXIF data of every photo. This should be an incentive to update your copyright and contact information, otherwise your photos will be marked with my information. You will need to update your information in three places: MENU > SETUP MENU (wrench icon) > Image Comment and MENU > SETUP > Copyright information for both Artist and Copyright.
If you screw up or hate my settings, you can reset your camera at:
MENU > SETUP MENU (wrench icon) > Reset all settings
or feel free to download and use my virginal NCSET004.BIN from when I first got my new D780.
That's it! Have fun!
Ken
© Ken Rockwell. All rights reserved. Tous droits réservés. Alle Rechte vorbehalten.
Help Me Help You
I support my growing family through this website, as crazy as it might seem.
The biggest help is when you use any of these links when you get anything. It costs you nothing, and is this site's, and thus my family's, biggest source of support. These places always have the best prices and service, which is why I've used them since before this website existed. I recommend them all personally.
If you find this page as helpful as a book you might have had to buy or a workshop you may have had to take, feel free to help me continue helping everyone.
If you've gotten your gear through one of my links or helped otherwise, you're family. It's great people like you who allow me to keep adding to this site full-time. Thanks!
If you haven't helped yet, please do, and consider helping me with a gift of $5.00.
As this page is copyrighted and formally registered, it is unlawful to make copies, especially in the form of printouts for personal use. If you wish to make a printout for personal use, you are granted one-time permission only if you PayPal me $5.00 per printout or part thereof. Thank you!
Thanks for reading!
Mr. & Mrs. Ken Rockwell, Ryan and Katie.