Home Search Gallery How-To Books Links Workshops About Contact
© 2007 KenRockwell.com
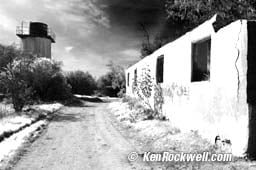
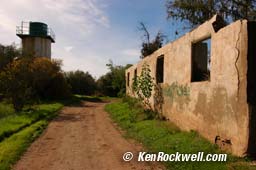
Fake this with Photoshop here I
get my goodies at Ritz, Amazon and Adorama. Also in French. INTRODUCTION Infra-red (IR) is what comes beyond the red end of the rainbow. Our eyes can't see it. IR photography is fun because green trees and plants reflect a lot of IR so they look very bright in IR. Likewise blue sky has almost no IR, so the sky looks black and clouds really stand out in IR. Haze and fog scatter blue light and have little effect in IR, so IR images cut through much haze and fog. There are many different kinds of IR. "Near" IR is IR close to red in the spectrum. This is what we photograph. Near IR is not heat. Heat is longer IR much further away from red and not photographable with ordinary equipment and film. IR photography can be a pain as I'll explain on the pages below. It gives interesting results. You also can simulate it in Photoshop using ordinary images as I also explain at the bottom. SCIENTIFIC TERMS (OK to skip this part) Scientists describe colors with wavelengths. Blue is from 400 - 500 nm (nanometers), green is from 500 - 600 nm and red is from 600-700 nm. IR starts at 700 nm and for photography extends to about 1,000 nm. 1,000 nm is called a micron. Longer wavelength IR used in systems to see heat work between 1 - 10 microns or 1,000 to 10,000 nm. FILTERS (the science above will help you understand the details) Filters are the key to IR photography. Unfortunately they are both expensive and a pain to use since they often are totally black! IR systems are also sensitive to ordinary light so filters are used to eliminate the visible light to get the IR effect. This can be a pain because "eliminate visible light" is a fancy way of saying these filters are black! If you need to focus or compose through the lens use a tripod and attach the opaque filter just before the exposure. Cameras with separate viewfinders are perfect for IR since you don't put the black filter over your finder. Some IR filters allow some dim red light to come through so you can compose with the filter attached. An ordinary red #25 or R60 (same thing) filter works fine for B/W IR film. You can get one here or just about anywhere. It lets you see what you're doing and eliminates any blue or green light to which B/W IR film might be sensitive. This gets you nowhere for digital cameras and is just an effect for color IR. Other red filters, like the deeper #29, do the same thing. The 89B (B+W 092) filter (I'd get it here) is a very dark red, allowing light redder than 650 nm and IR to pass. This is a handy filter since you can compose through the lens and can try to use a filter factor of about 20 - 40 with regular B/W film. This is probably the most practical filter for most people. The opaque #87 from Tiffen (I'd get it here) and Kodak Wratten gel (I'd get it here) is probably the most common filter used for IR photography. The RM72/R72 from Hoya (I'd get it here) and 87C / 093 from B+W (I'd get it here) and others are similar. These block visible light and pass IR longer than 720 nm and cost between $75 and $100 in 67mm screw-in. They cost less in smaller sizes and vice versa. For my money I'd go for the Hoya R72 here, since Hoya makes top notch filters and costs less than the Tiffen or B+W. You can get a gel filter for $56 here, but that's just a very delicate sheet of gelatin you have to hold over the lens. Gels are easy to damage and hard to use and ideally require a gel holder which makes it cost more than a screw-in glass filter anyway. There is a little difference between the 87 and 87C filters; next time I have my filter book handy I'll explain. Don't worry about it. The Hoya RM90 only passes longer IR below 900 nm, and the even weirder R100 only passes IR beyond 1,000 nm. These are really weird filters for hard-core IR addicts. For example, a 67mm RM90 sells for $300 here, and God only knows what an R100 costs. Don't ever dare a friend to look at the sun through one of the black filters, since of course all the IR comes through and will blind your ex-friend into seeing black forever. It's very dangerous because your eye sees black and opens wide, letting in far more dangerous heat and IR than they would if you looked stright at the sun with no filter. Likewise be careful pointing your camera at the sun since all the IR comes through even though you can't see it. B+W make an orange 099 filter for color IR film you can get here to block blue and blue-green light above 500 nm to which one usually doesn't want color IR film to be sensitive. This helps rid color IR film of a blue cast and B+W says "separates the colors more evenly." Luckily this filter is only $30. Read the film's suggestions; probably an orange filter already in your bag for B/W is as good. Kodak suggests an ordinary #12 yellow filter. DIGITAL CAMERAS (see also my Nikon D50 IR review.) Unlike film, digital cameras are all sensitive to IR. This is unfortunate for regular photography since sensitivity to IR can makes colors look unnatural. Thus all digital cameras and camcorders have an internal filter deliberately to remove IR. This is good and bad. It's good because you can do IR photography with almost any digital camera and the right filter. It's bad because the camera's internal filter lowers the sensitivity to IR so much you need long exposures and a tripod even in broad daylight. To do IR with your digital camera just attach a filter and shoot away. Watch for focus issues explained below, and you'll probably have to set your long exposures manually. Colors are going to look weird. You probably want to convert the images to B/W or play with Photoshop's channel mixer to get the best effect. Sharpness will suffer since only some of the three colors of pixels will be used. Some hackers disfigure their cameras to remove the IR blocking filter. Really clever hackers then replace the IR blocking filter with an IR pass filter so they can use the camera with no filter on the lens for IR photography! This isn't for the faint of heart and of course makes the camera useless for conventional photography. This gives the dedicated IR shooter the fantastic ability to shoot IR handheld at normal speeds. See also Lifepixel.com for more on digital infrared camera conversions. FILM Film is not naturally sensitive to IR. It has to be specially sensitized to IR, so only special IR films can be used for IR photography. BLACK AND WHITE IR FILM Black-and-white IR photography uses film that is specially sensitized to IR. Normal B/W film is not sensitive to IR. In fact, normal B/W isn't usually very sensitive to red either and usually is overly sensitive to blue and ultraviolet (UV). This is why the yellow filter is always required for conventional B/W photography. B/W IR film isn't sensitive to green. It is sensitive to blue and ultra-violet just like regular film, so IR film needs to be used with at least an orange filter to remove blue light if you want the full effect. With no filter IR film looks almost normal. You can get Kodak's HIE infrared film here. It's the standard when people mention IR film. It's sensitive out to 900 nm. Kodak suggests using a # 25 / R60 red filter and trying ISO 50 for daylight and ISO 125 for tungsten and bracketing over+/- two stops for starters. Konica made a film sensitive about halfway into IR called IR750. It came in 120 rolls and could be loaded in daylight, a big advantage. I'm unsure if it's still available. Ilford makes a special semi-IR film called SFX you can get here. It's a normal film with extended sensitivity to red out to about 740 nm. Regular B/W film usually is only sensitive to 600 to 650 nm. Used with an IR filter it also gives interesting effects. Likewise Kodak's discontinued Technical Pan also had extended red sensitivity. COLOR IR FILM Color IR film has three layers just like regular film. It loses the blue-sensitive layer and replaces it with a layer sensitive to IR instead. Thus it has a layer sensitive to green which shows up as blue, a layer sensitive to red which shows up as green and a layer sensitive to IR which shows up as red. For best results shoot it through an orange filter like B+W's 099 you can get here to block blue light to which you don't want the film to be sensitive. Since all layers of color IR film might be sensitive in small part to blue or UV it's best to filter it out. Otherwise stray blue light might give less than the best whacky colors. You can get Kodak's color IR film here. It's also sensitive out to 900 nm. Kodak suggests using it with a #12 yellow filter and trying ISO 100 or 200. Forget their suggestion about using a gel filter; that's the only kind Kodak makes. I'd use an ordinary glass filter like this one here. You can get yellow filters everywhere. LOADING FILM We have additional pains for loading film because some things we don't want to be transparent to IR unfortunately are. 120 size medium format film, like the Konica 750, loads normally in daylight. 35mm IR film needs to be loaded in a darkroom. This is a pain. This is because the 35mm plastic film base, which is slightly tinted to be opaque to visible light, is transparent to IR. IR light pipes its way up the film and into the 35mm cartridge and could fog the roll. You have to open the film can and load the camera in a totally dark room. I use a bathroom at night. Some 4 x 5" film plastic holders may or may not be transparent to IR. Check and see. FOCUSING Because IR is a longer wavelength than regular light most lenses will focus it at a different point. Most manual-focus fixed-focal-length lenses and cameras had a red dot in the depth of field scale. This was the IR index. You focused normally and then rotated the focus ring slightly to move the distance at the main index to the IR dot. Easy. Manual focus zooms sometimes included a red line weaving through the depth of field scale for this. You used it the same way depending on focal length. Autofocus lenses and zooms may have dots marked with focal lengths on the window through which you see the focus scale. In general you're usually on your own with AF zooms. You have to experiment. My 80 - 200 AFS has one index for 80mm and that's it. If in doubt, just focus a little bit closer and stop down and you should be fine. EXPOSURE All modern light meters cells are sensitive to IR. That's why all modern light meters, just like digital cameras, have filters permanently installed to remove the IR light to which normal film is insensitive. Ha ha. Therefore light meters are just guessing for IR exposure, unless you are the sort of nut who goes in and replaces these filters the hard way. I'm not that crazy. With digital just keep trying different values till it looks right on the screen. Easy. With film each manufacturer provides some guess ISO values for you to try. You usually have to guess and bracket, since only experience will tell you what works well when. In other words, your light meter reads light, not IR. Even if you find an ISO value that works well one day the ratio of IR to visible light is always changing so any ISO value won't work consistently. Sorry, now you know why some people cannibalize light meters to adapt them to IR. PROCESSING IR film is processed in the same chemicals as everything else. Be sure to tell your lab that you've sent them IR film. Most labs use IR goggles to see what their doing in the dark all day, so they need to run a special batch for IR film with all the IR turned off. YOU CAN'T USE CANON FILM CAMERAS Some cameras use a beam of IR light to see 35mm sprocket holes go by to control film advance. This is brilliant for normal film which can't see IR, but also means you can't use IR film in these cameras. Most Canon film cameras do this, sorry. SEE THROUGH CLOTHING A little known fact that the makers of longer wavelength IR vision systems used in surveillance downplay is that cotton clothing is transparent to IR. This doesn't work through polyester; just cotton. The secretaries who work where these are developed usually figure out to stay away from the lab areas. Sony's brilliant night shot camcorders, which use IR LEDs to light the subject in the dark and remove the IR sensor from the CCD, used to do this. That's why Sony very quickly modified them so that the IR sensitive mode only works at slow shutter speeds so it washes out in daylight. If I was a pervert I'd try a neutral density filter and tell my pals to hold still while I tried this. CAN'T SEE THROUGH GLASS Another little known fact is that window glass is opaque to longer wavelength IR used in surveillance. Thus don't worry about perverts peeping through your windows at night with long IR FLIR systems mounted on helicopters. This is why your car or greenhouse gets hot anytime light shines in, even on overcast days. Light shines in and warms everything it hits. This heat can't get out because the glass won't transmit this much longer wavelength IR. Window glass is transparent from about 400 nm through about 3 microns/ 3,000 nm. Heat starts at about 3 microns and longer. Photographic IR systems look through glass just fine. Professional long wavelength IR systems, like the ones on the secret military helicopters that patrol the salt mine storage areas in Kansas where the alien spacecraft that landed in Roswell, NM in 1947 is now stored, use longer wavelengths that let them see the heat generated by people snooping around. COVERT SURVEILLANCE WITH IR Use an IR light source and an IR sensitive observation system and you can observe others or animals in complete darkness, although they will look well lit to you. They won't see your IR light, but you can. In the old days people put #87 opaque gels over flashbulbs and used IR film to photograph people in dark places without their knowledge. I think Polaroid even made these filters for their flash cameras. Also one could put these gels over ordinary tungsten lamps. Today one simply uses IR LEDs and conventional CCDs. This is exactly what Sony does in their night shot camcorders and it's brilliant. Of course if the bad guys also have IR systems this is also the best way to get yourself shot, since they will see your sneaky "invisible" illuminator and try to shoot you first. That's why image intensifiers that work without active illumination are preferred by snipers. Consumer IR systems are not sensitive to the longer IR wavelengths needed to see through walls or just see heat. This is not because of a secret government mandate; it's because glass is opaque to IR. The advanced long wavelength IR systems have to use special lenses made out of bizarre materials and are way too expensive for your basic neighborhood pervert. Likewise, they won't see through glass either. WHY ARE NIGHT VISION SYSTEMS GREEN? Simple: image intensifier tubes use green phosphor. The image is input to one side of the tube, goes through some high voltage amplification and the electrons blast into green phosphor at the other end for you to see through an eyepiece. To mimic this, Japanese camcorders apply a green tint to the black-and-white IR images picked up in night shot modes. Nothing about IR is green, sorry.
Ha ha, fooled you. This shot, also used at the top of this page, was faked in Photoshop. I was too lazy to scan some film to illustrate this article. You can simulate the IR effect quite well with Photoshop's channel mixer. I explain it all here. If this gives you the results you want you can save all the hassles I just explained. Photoshop isn't cheating. If you're an artist and it gives you the results you want then it's the right way. |