Epson
1640SU Photo Scanner Test Review
Mandatory: First learn all about scanners and how to select the right scanner here Skip straight to resolution test images here. See comparative review of $1,500 Microtek Artix 1100 here. Introduction
This $399 (list) scanner is a great way to scan medium and large format film if all you have is $400 and need to scan hundreds of large format images. I paid $320 for mine; look at Amazon and just order over the Internet. Of course that was back in 2002. Today the Scanner sells for about $300 and the model 2450 is probably the way to go for not much more money. If you only work in 35mm don't even think about this or any other flatbed scanner. You should get a real 35mm film scanner like the $480 Canon FS2710. The small difference in price will get you an enormous improvement in quality for 35mm scans. If you still need the ability to scan flat art and prints, you can get a bargain scanner to do that, too. Scanning prints is easy and any cheap scanner works great. I just paid $30 (after rebate) for a UMAX 2100U scanner for scanning flat items. It works just as well, and actually far better than the $1,500 Microtek 1100. Of course if 35mm scans are just part of what you need to scan, read on. Just don't get any wild ideas about being able to use the scanned 35mm images for anything other than e-mail and web pages. The resolution is insufficient for making bigger than 3x5" prints. After using two other scanners, all of which crashed my computer, I really came to appreciate the fact that this EPSON scanner just worked the way it was supposed to. Many scanners will screw up your computer, even a Mac, and take you hours of fooling around just to get it to work. This nonsense will make Mac users recall one of the reasons the moved from Windows! Thankfully the 1640SU had no problems right out of the box, and I got one of the first units in November 2000. There are a couple of versions. The 1640SU lists for $299 and has no 'transparency adapter," which is the light box that mounts on top of the scanner to shine through the film. The 1640SU "Photo" version includes this "TPU" to allow the scanning of slides, transparencies and negatives. The 1240 series seems similar, but with less resolution. The Epson 1640XL is an entirely different professional scanner that sells for about $1,000. I'm not addressing it here. Since the real resolution of the 1640SU scanner is only about 1,000 DPI the 1240 scanner may give the same results. The only real issues I had with the 1640SU are: 1.) Poor color accuracy and consistency (should be fixable with better software costing almost as much as the scanner did) 2.) Silly film handling with those silly holders, although no cutting required for 120 which is great! 3.) Glass in the way of the scan. The glass will get dirty on the inside of the scanner, and being uncoated it does lead to shadows if you are looking for it (see grayscale test below). 4.) Some noise in shadows of Velvia. Actually the best way to scan large format film is to pay for drum scans at a print shop ($20-200 each scan) or Kodak ProPhotoCD scans at $15 each, but those get expensive after the first dozen or so. Professional drum scanners for 4x5 run around $60,000 - $100,000 and take forever to learn how to use. The best CCD based scanners for home use from Microtek, Polaroid and Imacon run around $5,000 - $16,000. A benefit of this Epson over a real film scanner is that it also scans flat art, and comes with software to turn your computer and printer into an easy-to-use color copy machine. The colorimetry is inaccurate and the scanning software is a bit primitive, however for $400 list the darn thing gives an 80% perfect scan. Unlike the $1,500 Microtek 1100 or $30 UMAX 2100, the software installed and ran the first time on my Mac dual G4. This is a very easy scanner to love and use. I'm unsure how good the colors would become when profiled properly with a few hundred dollars worth of software and color targets. For now the colors are too saturated and the oranges turn reddish from my Velvias. The contrast and saturation for Velvia scans is on the high side, and I usually love saturation. This scanner needs you to buy the Monaco EZ Color software available for half price at $150 (the promotional price once you buy the scanner) and a special test transparency called an IT8 target (another $40-$100) to attempt to get decent color from transparencies. I have not tried that. Others swear by the Lasersoft software that runs around $250. The Epson Twain scanning software is primitive but stable. It may be fine for a dull office drone or someone who doesn't even know or care what density is, but for people familiar with industry standard units for density and etc. the Epson Twain scanning software has you make adjustments using totally arbitrary units for gamma and exposure. There is no histogram or pixel sample values shown until AFTER you have made the scan and are in Photoshop. You must set the prescan parameters by eye looking at the preview window. I am scanning from transparencies or slides. I am not scanning from negatives as most amateurs are. The scanner plugs right into the wall which is good. The Canon 2400 requires an idiotic AC adaptor by comparison. Images For now have a look here and here. These were scanned from 4x5 Velvia. This was from a 35mm slide. All of these were scaled way down to much lower resolution for the Internet. Scan Times Here's what I measured on a Mac G4 450 MHz Dual-Processor, direct USB connection, scanning through Epson Twain 5.00a into Photoshop 6.0 for a 35mm transparency: 150DPI:
16 seconds For a 4x5 transparency at 1600 DPI: 5 minutes 8.5 x 11" reflective art: 72
DPI: 55 seconds (descreen [document]) 150DPI:
26 seconds Epson in California tells me that since I was using such a hot processor that going to the SCSI connection probably wouldn't speed things up much. I didn't try it. Resampling The 1640 did a swell job delivering scans at any selected resolution. There was minor aliasing as you can see in the resolution tests, but otherwise things were properly resampled. This is in contrast to the all-in-one Microtek ScanDeck, which when set to resolutions below its maximum of 300 DPI gives nasty alias images. With that stand-alone office scanner one always needs to scan at 300 DPI and do the downsampling in Photoshop, which of course wastes lots of time scanning and then having to play with it in Photoshop. Gray Scale tests The image below should look reasonably gray. If you see alternating bands of green and magenta you may not have your monitors control panel set to Millions of Colors (Mac) or video card set to 24 or 32 bit (Windows). This was scanned in color. This scan of the 21-step Kodak gray wedge made at 300DPI in 42 bit color transparency mode. The lightest square on the left is just film base, at about 0.05D, and each step becomes 0.15D darker. It was scanned with Epson Twain 5.0 directly into Photoshop 6.0 on a Mac, resized to 750 pixels wide, set back to 8 bits per channel and then "saved for web" in Adobe Image Ready 3.0 at 100% quality. The scan was made in color sync mode with the exposure determined arbitrarily by the software.
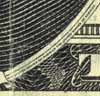
It's noisy in the dark areas of a transparency, as all modern consumer flatbed scanners are. If you copy this into your own computer and play with the levels to see the dark areas more clearly you will see that 1.) all the steps are there, clearly showing the darkest square at the right (3.05D), and that 2.) you have quite a lot of noise, too, there. Much of the noise goes away when resampled to these lower resolutions. The tan tint in the highlights is the natural tone of the film base; I have not tweaked it at all. You also will notice double peaks in the histogram. I suspect that those are some weird artifact of reflections inside the uncoated glass platen. The reflections will tend to mix together adjacent bands and make small areas that have densities that are mixes of the the adjoining areas. I suspect that those are what's causing the double peaks on the histogram. This would be more obvious to you if I included the black areas beyond the test strip that showed all these internal reflections. It probably does great for negatives. Set to the negative scan mode it had a maximum range of about 1.85D, the same as a regular negative. If you have a negative so dense the highlights block up then try scanning in the "positive" setting and use the IMAGE > ADJUST > INVERT command in Photoshop to restore your image. Now work in Photoshop and do your image manipulation. This will probably allow me to print negatives way too dense for conventional printing. Overall, it can be coaxed to make make decent scans for the Internet, however it always requires an artist's eye to tweak the scans. A decent scanner like the Nikon coolscans just give great scans 90% of the time without tweaking, but they can't do 6x6 or 4x5. Kodak PhotoCD scans are usually dead-on, too, compared to this Epson. I'm going to return the Epson in favor of a professional scanner that costs 5 times as much and probably just a few percent better, but hopefully will not require all the tweaking for each scan. The Myth of 42 Bit Scanning Even the dumpiest scanners today brag about 42 bit scanning, and so does this Epson. That means that they use an analog-to-digital convertor that just happens to have 14 bits coming out of it to digitize each of the signals from the analog outputs of the CCD preamplifier for each of three color channels (red, green and blue.) If this sounds technical, it is. If this makes no sense to you, that's my point. I used to work where we made the A/D convertors for all the world's best scanners and I can, and probably will, explain this in excruciating detail someday. What is important for you to know is that there are so many factors that relate to scanner quality that the number of bits alone is completely and totally insignificant. Skip to the end of this section for the real answer if this gets too technical. Last years models were 36 bits (12 bits per channel) and the year before that it was 24 bits (8 bits per channel). Let's explain why more bits are better, then I'll explain why this make no difference on scanners in this price range. We only can see between 6 to 8 bits per channel log (18 to 24 bits per pixel) at best. The reasons a scanner would like to have more than 8 bits per channel is that is so that one can 1.) convert digitally from linear analog input to log digital output instead of doing the process in analog (in other words, resolve fine differences in the black areas of the image) and 2.) to allow further fine-tuning of an image in the higher resolution so that one still has 8 good bits per channel (24 bits per pixel) after all the image tweaking is completed. One looses accuracy in every 8 bit Photoshop operation, even though all the bits are still there. Mathematical errors accumulate with every operation, just as you would if you always had to write down your results from balancing your checkbook with only 4 digits. You need 16 bits to represent the product of two 8 bit numbers, so when the answer has to be truncated or rounded or redithered back to to 8 bits you loose something. If you only start out with 24 bits, by the time you get done in Photoshop you have lost a few bits of accuracy due to all the small mathematical errors. By starting with and working with more buts you can easily preserve your accuracy. This becomes critical if you are playing with levels and curves. Scanning in the 42 bit mode into Photoshop lets you attempt to retain plenty of bits of accuracy even after a lot of Photoshop tweaks. This is good. Here's the problem: The noise of the CCD and it's circuitry completely cover up any of the precision the A/D convertor might have. At best the noise level of this scanner is at about 30 bits per pixel, and probably even more. ALL THE EXTRA BITS ARE DOING IS REPRESENTING NOISE. They aren't adding any noise, they are just describing it more precisely. If this were a $50,000 photo-multiplier tube (PMT) based scanner you might have enough signal-to-noise ratio coming from the image sensor (that tube) to justify a 12- or 14-bit per channel A/D convertor. These CCDs simply don't yet have the signal to noise ratio to justify the high-bit ADCs. Therefore, ignore people who work in computer stores and try to get you to believe that more bits are better, and can't even explain exactly what the extra bits do. In this case they mean nothing. Even worse, unless you are using a pretty hot version of Photoshop, very few computer programs even can read anything other than 24-bit (8 bit per channel) images. The JPEG (.jpg) format only works in 8 bit mode, for example. If this is your case, the only advantage to more real bits inside a scanner is if the scanner was doing some signal processing in the digital domain in which case more bits could be better. Hopefully by now I've convinced you that these internal details are meaningless taken outside the context of the entire system design of a scanner. I found the best way to reduce noise is to scan at the maximum claimed optical resolution (1600 or 3200 DPI) and then resample down in Photoshop to the resolution I really need. One also could try the various noise and median filters in Photoshop before resampling down to the required resolution. Scanning from transparencies is tough because of the great density of the dark parts of the transparency, typically around 3.0 D log 10 on amateur and Kodak films, and close to 4.0 D log 10 in a real film like Fuji Velvia. In the dark sections of these slides you can see noise that helps separate the $100,000 scanners from the $300 ones. Negatives get nowhere near as dark, and therefor have none of these dark noise or DMax issues. The big issues with scans from negs is just getting the right color, which can be a horrendous issue. Resolution Tests Reflective Art I only scan film, but for laughs you probably have one of the best technical reflective scanner test targets in your pocket: a new US 20 dollar bill. The US Treasury department always tries to stay ahead of counterfeiters and therefore makes US currency as hard to scan as possible. Here's the sort of thing you can see with the ridiculously high resolution of the Epson 1640SU: a section of the US Twenty scanned at 1600 DPI: (click to enlarge)
US Twenty dollar bill at about 2x or 3x magnification (213 DPI, click to enlarge) The color is deliberately hard to reproduce, but the most fun aspect here is the microprinting. There is very tiny printing on US currency that looks like a line to the eye, but actually is teensy lettering when viewed through a magnifier. This is done because color copiers simply can't resolve those. The Epson 1640 easily can, but so can most scanners nowadays. For reflected art, 300DPI is all you want, not even 600DPI. Caution: Of course the US Treasury is rightfully paranoid about this, which is what makes it a good test. Before you start scanning your own cash, please remember these rules as I recall them, otherwise you're committing a federal offense: 1.)
Don't scan the whole bill, or As far as I know it's totally illegal to scan and print a whole bill in the right size and color. That, duh, is counterfeiting. Film Here's the important part. Read the below if you like, or just see the resolution test results here. These were made by: 1.) Digging out some photos of USAF Targets made testing my 4x5 lenses. They easily go to 60 - 90 lines per mm on the Velvia originals, the limit of my vision with a 22x loupe. On the film the line pairs in the -1 group as circled are clearly resolved. All the scans you see here don't resolve anywhere near that, as expected. The target was an 8.5 x 11" target shot at 100:1
2.) Scanning them into Photoshop 6.0 on a Mac using the Epson Twain 5.00a driver at resolutions from 9600 DPI to 300 DPI on the Epson 1640SU Photo, using the 4x5 film holder. They were scanned as 42 bit color transparencies. Epson in CA confirms that the scanner resets it focus to a point slightly above the glass platen when the transparency adapter is used. The Epson film holders try to hold the film just off the glass to eliminate Newton rings. I tested resolution with film varying distances from the platen to see if focus was a factor. I saw little variation if the film was placed directly on the glass. 3.) Once in Photoshop, I resampled all the images in bicubic mode to 3200 DPI. Since I saw all the raw scans I saw that the real resolution of the Epson is about 1200 DPI regardless of the setting, so 3200 DPI was chosen so you could easily see the differences over the Internet. This uniform resampling also lets all the images appear the same size on your screen. 4.) Then they were cropped, requantized to 8 bits per channel, and "saved for web" in Adobe Image Ready 3.0 at quality 67 (that seemed to have no degradation to the image). On each of the film originals there were three targets. They all measured the same, also confirming that we are seeing the limits of the scanner and not simply the limits of the focus at one point. I've only shown one of these targets for the sake of your download time. These were all made from the same piece of film right after one another. See these resolution test images here. Home || <<Back || Gallery || Tech || Links || About || Workshops || Contact |