Home Donate New Search Gallery How-To Books Links Workshops About Contact Selecting the Sharpest Aperture
PREFACE I originally wrote this article back in 1999. If you read all of it, I'll probably lose you, so I'll summarize it all right here. Depth-of-field calculations are flawed. They calculate the largest aperture that will give barely passable sharpness. They do not calculate the aperture which will give you the sharpest photo, just the bare minimum. Depth-of-field charts and scales came from an era where film was very slow and we always needed the widest aperture possible. If you stop down more you get sharper results, but if you stop down too far, diffraction gives you softer results, just like squinting your eyes. The very best aperture is someplace between these two, and I'm going to show you how to find it exactly. If you're shooting flat subjects, the sharpest aperture is usually f/8. My lens reviews give the best apertures for each lens, but it is almost always f/8 if you need no depth of field. That's the easy part. What do we do when we do need depth of field? It's very complex if you want to read this whole thing, but for 99% of you, here's all you do. You use your existing depth-of-field scales, and simply use the apertures shown on my chart instead of those read on your lens. To use your depth of field scales, focus on the farthest thing you want sharp. Note the distance on the scale. Focus on the nearest thing, and note its distance on the scale. Turn the focus ring until each distance is equally far from the center index, and you'll see that each distance lies next to the same aperture number on different sides of the scale. As an example, let's suppose we want everything from 10 feet (3 meters) to infinity in perfect focus. Do this:
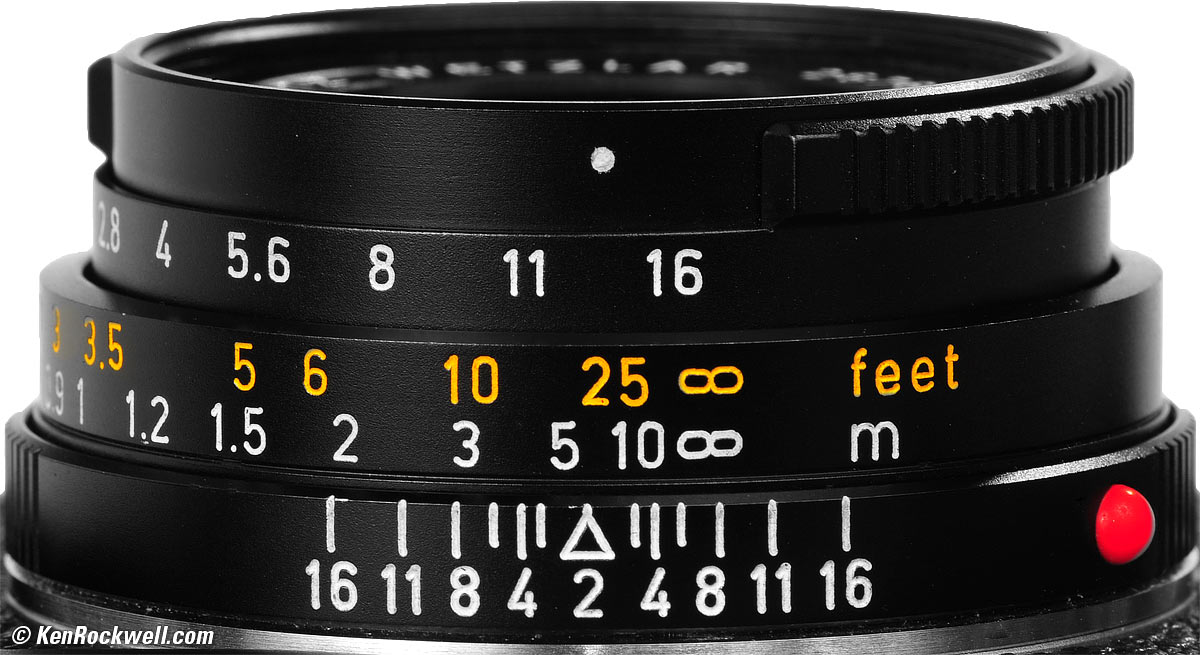
Depth-of-Field scale, Leica 40mm f/2. enlarge. And you'll read f/8: both 10 feet and ∞ are sitting above f/8 on the depth-of-field scale. You've now also focused exactly as you should for the best overall sharpness, whoo hoo! You don't have to be exact; f/8 is more than close enough. When I'm shooting, I use my thumbnails to mark each distance, making it easy to rotate the focus ring to midway between the two distances and read the f/stop. Once you've read the aperture your camera suggests, here's how to convert it into the sharpest aperture: For Nikon, Canon, Leica, Pentax and most 35mm cameras:
© 2010 KenRockwell.com You'll notice for f/8 read on the scale, I set f/13 on the aperture ring. Easy! Hint: On my cameras, I stick a tiny table that simply says f/2.8 -> f8, f/5.6 -> f/11, f/11 -> f/16 and f/22 -> f/22. That covers it! Hint: Here's a trick if you don't want to remember this table. For depth-of-field scales that read out to f/16, you can simply add 5 to the indicated f/number and be close enough! Use f/22 for an indicated f/22, and subtract 5 from an indicated f/32 to bring us to f/27! Clever, huh?
For the LEITZ SUPER-ANGULON 21mm f/4 (only):
© 2010 KenRockwell.com
For Mamiya 6 and 7 cameras and lenses
© 2009 KenRockwell.com
For Contax 645 (35mm lens)
© 2009 KenRockwell.com
Don't have depth-of-field scales on your zoom or digital lens? You're screwed, sorry. Read on and I'll show you how to calculate your own.
This article is written for the virtuoso large format photographic artist. If you are a beginner or just shooting a 35mm or digital camera then this article addresses issues which won't bother you at reasonable apertures. Just use a tripod and choose the smallest aperture you have if you need depth of field. Avoid apertures smaller than f/8 or f/11 on digital cameras. This article is for people shooting film cameras that stop down to f/32 or smaller. At this point the effects of diffraction can start to blur the image more than the effects of defocus due to limited depth of field. In this case one has a paradox, since no longer will using the smallest aperture give the best results. Determining which is the best aperture taking into account both depth of field (which gets better at small apertures) and diffraction (that gets worse at small apertures) becomes a little more involved, and has never been considered in the depth of field charts that everyone has been using for decades. See my diffraction and Sharpness by Aperture pages for examples. This has been known to photographers for a long time. "Any good modern lens is corrected for maximum definition at the larger stops. Using a small stop only increases depth; beyond a certain point definition is actually impaired" Ansel Adams, June 3, 1937, from page 244 of Ansel's autobiography. My article below will help you determine this point and get the sharpest possible images out of larger format cameras. If your work uses creative depth of field tricks and deliberate defocus and diffusion techniques then this is not for you. You already know how to get what you want. Photographers who want the sharpest possible images but are still learning basic and intermediate technique probably won't understand or appreciate this article. This article addresses some very subtle aspects of the image. Here we deal with with extracting the very last bit of sharpness from a system. Many photographers are still chasing more basic causes of unsharpness and therefore really don't need to worry about these techniques until they have mastered the others. Using this technique is as simple as using a traditional depth of field scale on a camera. Understanding this technique may be difficult for those who are ingrained in the traditional concepts of depth of field tables. This is an entirely new concept. This technique allows you to determine the aperture that gives the absolute best sharpness (smallest possible effective circle of confusion) for the situation. It is not based on fixed, arbitrary circles of confusion as used for conventional depth-of-field tables. Diffraction is an effect that makes the circles of confusion grow as one uses apertures of about f/22 and smaller. Therefore one cannot simply stop the lens down all the way as most 35mm shooters believe. At f/64 the diffraction-induced effect is greater than the circle of confusion usually used in depth-of-field calculations, and therefore at f/64 one is often dealing, at best, with an image softer than what one would consider acceptable. I'm going to show how to figure out the best aperture to use, easily, for any real situation. If you choose not to delve into this that's OK, since it turns out that the correct answer after all the math and experimentation is usually to shoot your 4x5 camera at f/16 to f/22, and if you have a very deep subject maybe stop your 4x5 down to f/32 or f/45 and no more. Just don't squeeze your 4x5 lens down to f/64 or smaller unless you know that you really have to! If you are shooting 8x10 or larger then you may want to read through all of this, since you big guys have the biggest problems. INTRODUCTION We all know one gets deeper depth of field when stopped down. Few of us understand how diffraction softens our images at smaller apertures. Diffraction is an effect that becomes important at apertures smaller than f/22, so that stopping down all the way loses sharpness on a view camera. The smaller an aperture through which an image has to pass, the softer it gets. There is only one OPTIMUM aperture to use in any given set up if you need depth of field, and I'm going to show you how to find it easily. If you wear glasses you are already familiar with this when you squint to help you see something. As you squint ("stop down") your vision gets sharper, up to a point. This is equivalent to stopping down your camera to improve the focus. If you squint too far it gets fuzzy again. This is the increasing effect of diffraction as you stop down even further. There is one amount of squinting that gives you the sharpest image. This is what we want to determine for our photography. I will show how to do all of this at full aperture so that you can see what you're doing. I will obsolete all your depth of field tables and everything you thought you knew about depth of field. You will no longer need idiotic books full of different depth of field tables and need to guess at what magnification you will be printing. A beauty of this system is that it works the same for all focal lengths, degrees of magnification and film formats. Once learned this system makes the old depth of field scales seem as primitive as the ways people guessed at exposures before electric exposure meters and the zone system were invented. This technique is not for shooting flat objects like test charts. This is for shooting real three-dimensional still subjects while using a tripod and have your choice of any aperture without worrying about the exposure time. This is all new thinking. BACKGROUND Diffraction is the same effect that makes photos shot through a stocking or screen look soft. Anything viewed or photographed through a small enough aperture will soften the image. This small hole or aperture may be a camera lens, holes in a screen or squinting through our eyelids. The reason most photographers (and camera makers) ignore diffraction is because most photographers learn on small or medium format cameras, where the smallest apertures are usually f/22. At f/22 diffraction effects are not very important. Unfortunately at the apertures common in large format photography diffraction is the largest limitation to sharpness. Diffraction at popular apertures like f/45 and f/64 is how the old wives' tale about large format lenses and film being less sharp than smaller formats started. At f/64 a perfect lens can only resolve 50 lines per millimeter (lpmm). Therefore don't stop your lens down to f/45 or smaller unless you really need to. So how do we figure out the best aperture once we're set up to photograph? Ansel Adams shrugged this off, and in his book series suggests that the photographer make tests on his lenses himself. Good advice as always, but not practical for every possible set of circumstances. Sinar's superb depth of field calculators even admit that they ignore diffraction. Too bad for Sinar, because they tend to tell one to use too small an aperture in cases that require large depth of field. Thankfully you can replace the Sinar scale with my scale and be done. The Sinars are wonderful for this since they have mechanical calculators already built in. I first solved this in 1990. Two others also solved this independently and wrote an article in the March/April 1996 issue of Photo Techniques magazine. It's encouraging that all three of us used different methods and we all got the same results. Unfortunately the Photo Techniques article left practical application to the reader. I will cover that. First off, abandon the concepts of circles of confusion. Those are for snapshooters and photojournalists who need to know the largest aperture they can get away with while still retaining acceptable definition while handheld. As a photographic artist using a tripod and still subjects, I can use any aperture I want, and I want the one that gives me the sharpest image for my three dimensional subject. That's not what a depth of field scale gives you. The engineers and mathematicians who compute depth of field tables base them on very limiting sets of presupposed print sizes and minimum acceptable levels of sharpness. They also totally ignore diffraction, which is silly because the diffraction effects at f/64 are bigger than the arbitrary circle of confusion value they usually presume in computing their tables! Depth of field tables are irrelevant if you want the best definition, and understand that diffraction makes your smallest aperture not the sharpest. Because of diffraction there is only one optimum aperture for each situation that will give the sharpest image of a subject requiring depth of field, presuming that the subject is still and the camera is on a tripod. Varying one stop either way from the optimum aperture will make little difference in practice. Shutters on most cameras except 35mm usually vary in only full stops, so use the nearest aperture to the one I'll show you how to calculate. Of course if you have an aperture-priority automatic camera by all means set the exact optimum aperture and have at it! Artists can skip these next few sections and head straight to the application section. CALCULATIONS This calculation and presumptions sections are for folks who spend more time reading than photographing. Mathematicians will want the more formal explanation in the article in Photo Techniques, as well as standard optics textbooks like "Optics" by Sidney Ray. For further study there are some advanced areas of this new method that are still unsolved and luckily irrelevant to artists. I'll cover those under "presumptions." "Optics" contains the formulae to calculate diffraction. Unfortunately its formulae only apply to analysis and not synthesis. In our case we want to arrive at (synthesize) an optimum aperture, not merely know (analyze) how bad any particular one is. I calculated all this by writing a computer program to simulate a complete optical system in three dimensions. I let the computer try all possible combinations of lenses, apertures and degrees of defocus, and hoped that I could see some sort of pattern that could be simplified into a practical solution. A practical solution is one that is easy to use in the field without a computer, charts, tables or other distraction. Doing this analysis I discovered that the sharpest aperture is the aperture at which the diameters of the Airy diffraction disc = the diameter of the defocus blur circle. I discovered this by using successive approximation and simulation, the same result would have been arrived at by using differential calculus. Luckily it turned out that there is a very simple solution. All said and done, the best aperture depends only on the depth of the image at the film plane. The depth of the image simply is how far the lens has to move in and out to get the nearest and farthest points of the image in focus. Don't confuse image and subject. Your subject is your subject at a distance in front of your camera. Your image is what is behind the lens at the film plane. Of course the image has depth, too. That's why the lens has to move in and out to focus on near and far. If you know how much the lens has to move in and out then it's simple, after all my research, to calculate the optimum aperture. The formula to determine the optimum aperture, knowing the total image depth from the front to the back of the image is: f/optimum = square root of (375 x (total defocus in mm)) Example: let's suppose our lens has to move 2 mm to focus from the nearest to the farthest points. Therefore the depth of the image is 2 mm. In this case the sharpest aperture is the square root of (375 x 2), or the square root of 750, or f/27. Set your lens at f/27, or either of f/22 or f/32 is close enough. It gets even easier once we put the right scales on our camera. PRESUMPTIONS Here's where the mathematicians can have a field day exploring "what if" these presumptions are not valid. These are for people who already understand the standard optical formulae that I don't cover here. 1.) I am presuming your lens to be perfect. At the small apertures involved this is a valid assumption. At large apertures like f/8 and larger lens performance may vary from lens to lens, but at f/16 and smaller the biggest degradation to the image is usually diffraction. 2.) I made my diffraction calculations based on green light. Diffraction varies with the color (wavelength) of light, and you will get a different result for best aperture for different colors. As an assignment you may wish to do these calculations for polychromatic light, weighting the wavelengths differently for different illuminants, or simply do calculus and integrate over the entire visible spectrum and convolve that with the eye's or film's sensitivity to the various wavelengths. 3.) I'm presuming fully corrected spherical aberration or neutral bokeh. If your lens is under or over corrected then the circles of confusion are not pure disks but have other light distributions. Some people call the effects of varying degrees of correction of spherical aberration "bokeh." You are on your own to do your own calculations doing one or two dimensional convolutions replacing my evenly illuminated disks with ones illuminated as you please. I'd rather be photographing. 4.) I calculated total system spot size due to the effects of both diffraction and defocus by simply adding the diameter of the circle of confusion to the diameter of the first dark ring of the Airy diffraction disk. I discovered the hard way (by trail and error) that the optimum aperture is the one where these two values are equal to each other. You may want to do these calculations by doing more explicit calculation of how these two patterns (Airy disk and circle of confusion) add together in space. APPLICATION Luckily it turns out that the solutions and use in the field is very simple. First I'll provide some pre-made tables, and then give you to formula if I haven't provided what you need for your camera. For Nikon, Canon, Leica and most 35mm cameras:
© 2009 KenRockwell.com
For Mamiya 6 and 7 cameras and lenses
© 2009 KenRockwell.com All you need to do is stick a removable paper label over your existing depth of field scales, or just one table on your camera body with the above information. For large format or other cameras and lenses lacking depth-of-field scales we have to do a little more work. The best aperture turns out to be dependent only on the depth of your image. Once we figure out how to measure that, which depends on your type of camera, it's simple to determine the best aperture. Once you know the image depth, which simply is how far you need to move your lens in and out to focus on the nearest and farthest parts of your image, you can read the optimum aperture right off a scale. These scales are similar to the familiar depth of field scales. Your image and subject are two entirely different things. The subject is what's in front of your camera at a distance. The image is behind your lens at your film. The image is also three dimensional, just like your subject, just smaller. That's why you have to move the lens in and out to focus for different subject distances. You are out of focus at any point if the distance between that part of the image and the exact position of your film is too large. Distances of fractions of millimeters or hundredths of an inch are important here. For those shooting with camera movements, the nearest and farthest points of the image will be different than the nearest and farthest points on the subject. This is because the view camera will have its movements adjusted to get as much in focus as possible. In other words, on the view camera you already have done your best to orient the film plane as closely as possible to the shape and orientation of the image. To use this formula all you need be concerned with is how far your lens moves in and out AFTER you've optimized your movements. If you have no depth of field scale if you use zoom lenses made for snapshooting you are going to make a completely new scale or scales put it next to your focusing scale. You will completely ignore your old depth of field scales. Try to use a good quality label that won't mess up your equipment by getting dried out or gummy. 3M floppy disk labels are pretty good. Here's the information if you need to draw new scales on other cameras: Set your lens to infinity. Draw the new f/numbers next to the distances on the focusing scale indicated by the following tables or formula. This draws one half of the scale. You draw the other half of the scale by putting the f/numbers on the other side of the scale at equal distances. You can do that by setting the lens to the indicated distance and marking the new f/stop on your scale next to where the infinity mark is. Of course you need to move the focus ring to find where to mark each f/number. focal length = 5.6mm
focal length = 7.5mm
focal length = 8mm
focal length = 10.5mm
focal length = 14mm
focal length = 15mm
focal length = 16mm
focal length = 18mm
focal length = 20 mm
focal length = 21 mm
focal length = 24 mm
focal length = 28 mm
focal length = 35 mm
focal length = 40 mm
focal length = 45 mm
focal length = 50 mm
focal length = 65 mm
focal length = 75 mm
focal length = 80 mm
focal length = 85 mm
focal length = 90 mm
Focal length = 140 mm
Focal length = 150 mm
focal length = 200 mm
If you don't find your lens on the table here's the formula. It can run on any calculator if you're good at calculators. Remember that you only have to do this once for each lens. Also here is a program for Windows that calculates this for you. Here are the formulae:
True hyperfocal distance = D = 1/(((1/F) - (1/(F+((f x f)/750)))) x K) example: if you have a 50mm lens and want to learn where to mark f/11 on your new scale: D
= what you want to learn, in feet Therefore, if D = 1/(((1/F) - (1/(F+((f x f)/750)))) x K) then D = 1/(((1/50)- (1/(50+((11.3 x 11.3)/750)))) x 304.8) or D = 1/(( 0.02 - (1/(50+( 128 /750)))) x 304.8) or D = 1/(( 0.02 - (1/(50+ 0.171 ))) x 304.8) or D = 1/(( 0.02 - ( 1/50.171 )) x 304.8) or D = 1/(( 0.02 - 0.019932 ) x 304.8) or D = 1/( 0.000068 x 304.8) or D = 1/ 0.0207 and therefore D = 48.2 feet. 50 feet is close enough. Mark "f/11" next to the 50 foot mark with the lens focused at infinity. Here's a program in BASIC that will print out these tables for you: (link soon to be here) VIEW CAMERA SCALES There are three ways to make these scales. I show how to use them after I show all the ways to make them. 1.) Just kludge a direct reading scale anyplace near your bed or monorail. Make an index mark at the start of the scale and then mark these f/stops at the indicated distances. You also could just mark them on a ruler. Image Depth Table. Mark these apertures at these distances along the table (I need to put one up here for you to print out from your computer printer) Put
a "zero" index (a bold line) at 0.0 mm As you can see in practical photography one is rarely going to have to use f/64 or smaller simply because the amount of lens movement required to justify that small an aperture is uncommon. 2.) It's far more precise to make a scale that attaches to a focusing knob if you can, simply because the same gear drive that allows you to focus carefully also allows a longer, more precise scale along the outside edge of the focus knob. The outside of the knob moves more than the bed of the camera, making the scale enlarged and easier to see. The hard parts are figuring out the scale factor (how much further the focus knob moves compared to the lens or back itself) and how to mount a cardboard scale on your particular camera. To figure the focus scale factor: A.)
Use a tape to measure the circumference of your focusing knob. Now just multiply the image depth distances from the image depth table above by the scale factor you just calculated to tell you where to mark the f/numbers on a scale for your view camera. If your camera has a captive focus knob, as metal drop-bed cameras like the Linhof Technika and the Wista, Graflex and Toyo copies do, then attach this scale as a band around the focus knob. (Illustration coming to make this obvious) If the knob is open, as on most wooden field cameras like the Canham, Tachihara, Calumet wood field, and Wisner, then attach it on a flat sticker on the side of the camera. (see photos coming; heck; I'll post the darn scales themselves if I can figure out a way to publish them in a way that the size is preserved) Here are some examples: Linhof Technika IV (scale factor 5.27): Mark Position Index
0 mm
Tachihara/Osaka/Calumet
Wood Field XM (scale factor 2.91):Mark Position
Sinar F (just pop this scale over their scale, it works for all formats!) (Scale factor 8.3) Mark
Position Here's
a GIF of a scale for a Wista 45D from Roberto Manderioli of
|


|
FINALLY, ACTUAL PHOTOGRAPHY! Now that we have our scales installed the photography is easy. The steps are the same that you've used for depth of field scales all along, except the new scales give the optimum, not merely "OK," f/stop. You'll notice that the f/stop markings of the new scales get more spread out at the small aperture end of the scale and closer together at the large aperture end. This is because we are aiming for optimum definition (smallest spot size), so at large apertures where diffraction is not a problem my scales have you use a much smaller aperture than standard depth of field scales would have. Because we are also considering diffraction at small apertures the scale gets extended at the teeny aperture end so that you'll probably never need to use f/90. For cameras with focusing scales (most SLRs and rangefinders; this is a review of hyperfocal technique): 1.) Focus on the nearest point of your subject that you want rendered with optimum sharpness. 2.) Either remember that point on the scale or put your thumbnail there to mark it. 3.) Focus on the farthest point that you want rendered as sharply as possible. Note that point or put your other thumb on it. 4.) Move the focus ring until it is in the middle of these two points. 5.) Look at the f/stop indicated next to either of your thumbnails. It will be the same f/stop at each if you've done this correctly. 6.) Set that f/stop and shoot. If you are metering manually use whatever f/stop is closest, remembering that your shutter probably only works in full stops. Even if you are off a stop one way or the other from optimum it won't make much difference. If using Aperture Priority automatic exposure then set the exact f/stop on your lens and the camera will set the appropriate intermediate shutter speed. If using program or shutter priority, shift them until you get the indicated aperture. You'll find the aperture priority or manual modes easier for this. For large format cameras with fixed scales and open focus knobs (most view cameras): 1.) Optimize your movements the usual way. 2.) Crank in the lens (or rear standard) as far as possible until the last object you want to render in optimum sharpness is in focus on the ground glass. 3.) Put your thumbnail on the focus knob at the index point of the scale and crank out the focus adjustment until the last part of the image you need rendered in optimum sharpness is in focus. 4.) Look at the f/stop indicated next to your thumbnail. That's your shooting f/stop. Since your shutter probably only sets to full stops use whatever's closest. It's not critical. 5.) Crank the focus adjustment back in halfway between the two points we just set. This will also just happen to be the point indicated on the new f/stop scale at exactly one stop wider than the f/stop you just read. Lock your focus, stop down your lens and make your photo. For large format cameras with rotating scales on captive focus knobs (like the Sinars): 1.) Optimize your movements the usual way. 2.) Crank in the focus adjustment as far as possible until the last object you want to render in optimum sharpness is in focus on the ground glass. 3.) Rotate the scale only (not focus knob) until the index on the scale is aligned with the fixed mark on the camera. You need to use any fixed part of the camera near the knob or just make your own reference mark. 4.) Grab the scale and move both it and the focus knob together and crank out the focus adjustment until the last part of the image you need rendered in optimum sharpness is in focus. 5.) Look at the f/stop indicated on the scale next to the fixed mark on the camera. That's your shooting f/stop. Since your shutter probably only sets to full stops use whatever's closest. It's not critical. 6.) Hold the scale and focus knob together and rotate the knob back until it's halfway between the two spots we just noted. This just happens to be the point indicated on the scale at exactly one stop more open than the f/stop you just read. Lock your focus, stop down your lens and make your photo. HYPERFOCAL DISTANCES This works the same as it does on conventional depth of field scales. The hyperfocal distance is the same as the result from the formula or the tables for any given f/stop and focal length. PACKET FILM SYSTEMS I'm presuming your film to be flat, which is a valid assumption for roll film and conventional film holders. If you have a sloppy film holder, misaligned camera or use any of the packeted film systems (Polaroid, Mido, Kodak Readyload or Fuji Quickload) then just add whatever unflatness (peak-to-peak) you have before you calculate optimum aperture. Of course you don't know the measurement for how unflat the film is, unless you spend way too much time fooling around with your camera and calipers. I've found that using at least f/32 covers me fine. In other words, I don't trust these systems enough to use anything larger than f/32. If the scales indicate I ought to use a smaller aperture than f/32 I do; otherwise I don't open any wider than f/32. If you think that these packet systems hold your film flat than you are either lucky or have been shooting at apertures so small that you missed it. I have found the packet systems to be variable in performance, and to be honest, stopping down too far is good insurance with these. After applying my techniques you probably will be using larger apertures than you have been and may start to notice that the focus on your film is not where you thought it should have been with these systems. Watch out. I have had no problems even at f/5.6 with ordinary Fidelity and Lisco plastic 4x5 holders. MACRO WORK The above calculations are based on image depth at the film plane. At infinity the lens displacement required to focus from far to near equals the image depth needed by my formula. This makes it easy. At macro ranges lens motion is no longer equal to the image motion because the lens-to-subject distance changes significantly as the lens moves in and out. In this case you'll be better off with a camera that focuses by moving the rear standard instead of the lens. The Sinars work this way. Otherwise with front standard focusing at 1:1 you'll discover that you have bigger problems. Also remember that at macro the marked f/stop is actually smaller (larger number) than marked. In other words, at 1:1 magnification f/32 on the lens is effectively is f/64. That's why your exposure compensation is 2 stops. The optimum aperture indicated by the formula is the effective f/stop. For practical use open the lens from the calculated value by the same number of stops as your exposure compensation. In other words, if you have to add 1-1/3 stops of exposure compensation, set your lens 1-1/3 stops more open than you are directed by my scales. For example, let's say you have to rack the camera back in and out by 10mm to focus on the farthest and nearest points. If you made the calculator scales I suggested you just would have read f/64 off your scale. If you were an idiot, you'd use this formula while you were trying to concentrate on photography: f/optimum = square root of (375 x 10) = square root of (3,750) = f/64 (effective). Adding 1-1/3 stops says therefore set f/32 and 2/3 on your lens for best sharpness. Your method of exposure calculation does not change; expose as if you are at f/64, or add 1-1/3 stops to your exposure at f/32 and 2/3. SHARPNESS MANAGEMENT You now have the most powerful tool there is for technical image sharpness. What are you going to do with it as an artist? This technique optimizes sharpness at each end of your range of interest. It just so happens that the optical sharpness in the middle of your range is exactly twice what it is at the ends of the range, but with the finite resolution of film and the printing process this will be invisible, especially if the scale tells you that apertures like f/11 and f/16 are needed at which point the definition throughout the image is very high. If you have a very deep subject and your scales tell you to use teeny apertures like f/64, then the optical image is not too sharp anywhere, but is still the best you can get. Remember that at smaller apertures diffraction limits the image sharpness, even if it is in perfect focus. At small apertures like f/64 you may start to note that the image at the center of the range is twice as sharp as the image at the endpoints of the range. This is because at f/64 the best sharpness is low enough potentially to be visibly degraded and allow you to see the differences in sharpness throughout the image. If you are photographing a flat enough image to allow f/stops in the f/16 range then everything is so sharp that you won't notice this delineation. If you would prefer to have the center of the distances in your photo rendered a bit more sharply than the far and near points, then you may want to open a stop. If you do you'll lose some sharpness at the far and near points and gain a bit in the middle. This is probably a hard concept to grasp and to see, however for the technically fluent photographer this is a tool to fine tune the distribution of critical sharpness. If one's setup dictates a small aperture one may want to forgo optimum sharpness over the entire scene and use a wider aperture to allow a main part of the subject to be rendered more sharply, if there is a main subject. Here's where you are back to artistic experimentation to get the look you want. Remember that these effects will only be obvious once you have seen just how sharp the sharp parts of your images are at apertures like f/16 as opposed to the diffraction limited ones made at f/64.
PLUG I support my growing family through this website. If you find this as helpful as a book you might have had to buy or a workshop you may have had to take, feel free to help me continue helping everyone. If you've gotten your gear through one of my links or helped otherwise, you're family. It's great people like you who allow me to keep adding to this site full-time. Thanks! If you haven't helped yet, please do, and consider helping me with a gift of $5.00. The biggest help is when you use any of these links when you get anything. It costs you nothing, and is this site's, and thus my family's, biggest source of support. These places always have the best prices and service, which is why I've used them since before this website existed. I recommend them all personally. Thanks for reading!
Ken Home New Search Gallery How-To Books Links Workshops About Contact |
06 January 2016, 2006