Home Donate New Search Gallery Reviews How-To Books Links Workshops About Contact
Nikon
D5200 Controls
© 2013 KenRockwell.com. All rights reserved.

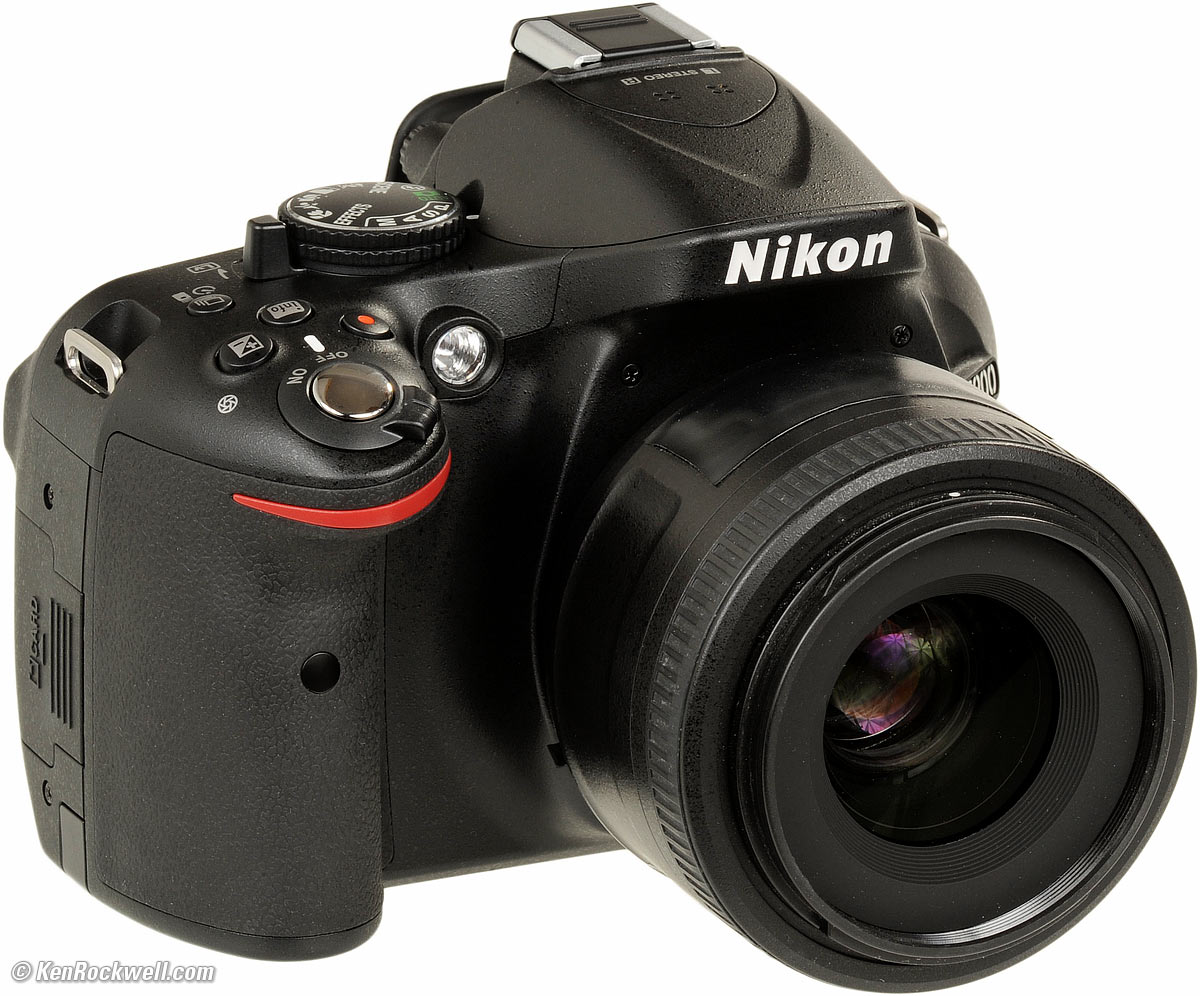
Nikon D5200 and 35mm f/1.8 DX (body weighs 19.6 oz./555 g with battery and card, about $800, or $900 with 18-55mm lens). enlarge. My biggest source of support is when you use any of these links, especially this link directly to it at Adorama or directly to it at Amazon, when you get anything, regardless of the country in which you live. Thank you! Ken.
December 2013 Nikon D5200 Review Nikon Reviews Nikon Lens Reviews
NEW: Nikon D5200 iPhone/iPod/iPad App 16 December 2013
How to Set and Use the D5200's Autofocus System
Help me help you top
I support my growing family through this website, as crazy as it might seem.
The biggest help is when you use any of these links when you get anything, regardless of the country in which you live. It costs you nothing, and is this site's, and thus my family's, biggest source of support. These places have the best prices and service, which is why I've used them since before this website existed. I recommend them all personally.
If you find this page as helpful as a book you might have had to buy or a workshop you may have had to take, feel free to help me continue helping everyone.
If you've gotten your gear through one of my links or helped otherwise, you're family. It's great people like you who allow me to keep adding to this site full-time. Thanks!
If you haven't helped yet, please do, and consider helping me with a gift of $5.00.
As this page is copyrighted and formally registered, it is unlawful to make copies, especially in the form of printouts for personal use. If you wish to make a printout for personal use, you are granted one-time permission only if you PayPal me $5.00 per printout or part thereof. Thank you!
Thanks for reading!
Mr. & Mrs. Ken Rockwell, Ryan and Katie.

Adorama pays top dollar for your used gear.
I use these stores. I can't vouch for ads below.
|
Free Live Help (USA only)
Want free live phone support?
In the USA, call (800) NIKON-UX, 24 hours a day, 365 days a year.
Top Controls top of page
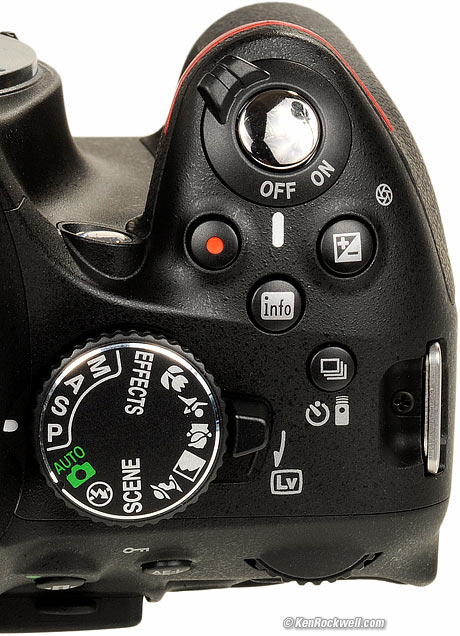
Top, Nikon D5200.
OFF, ON and Shutter Release Button
Leave it ON unless you're putting it away. It draws no more power in ON than OFF. OFF is a lock to prevent accidental operation.
• Red Dot top
This starts and stops movies, when you're in Live View.
This button is to the lower right of the shutter button.
In manual exposure mode, hold this and turn the rear dial to change the aperture.
In every other mode, hold it and turn the rear dial to change the brightness ("exposure compensation") of the next pictures you take.
This exposure compensation button is very important. This button makes the photos lighter or darker. + is lighter, and - is darker.
This only affects photos as you take them. Use whatever setting looks best to you; there is no correct setting, although 0 is usually the best.
The exposure compensation button varies the exposure of everything. Nikon's flash exposure is usually perfect. If you want to change the brightness of just the flash alone, press and hold the flash button (on the left side of the flash hump) and the exposure compensation button at the same time as you spin the rear dial.
HINT: You can see the + or minus value displayed in the finder as well as the rear LCD, so you can adjust this without taking your eye from the finder. The finder display only reads the value when the button is pressed, otherwise those digits read something else.
INFO Button top
If the D5200 is resting (LCD off), the INFO button wakes up the LCD and shows you the shooting info.
To change these settings, use the < i > button.
If the LCD is showing Info (shutter speeds, etc.), the INFO button turns off the display. By comparison, the < i > button also wakes the Info screen, but if the Info screen is on, the < i > button allows you to change settings.
Advance Mode Button (bearded rectangle) top
New in the D5200 from the D5100 is a button on top, next to the Live View lever below, with which we set the advance mode. It looks like a bearded rectangle, with a clock and a remote control icon next to it.
Hold this, look at the LCD and turn the rear dial to select the modes I explained at the beginning.
Live View [LV] Lever top
Live View lets the rear LCD show images before you shoot them, and is also the mode from which we can shoot movies.
Pull this lever towards you to enter Live View mode.
Press the Red Dot Button to start and stop movies.
Exposure Mode Selector Knob top
Spin it to select among P, S, A and M exposure modes.
I use mostly the P (Professional) mode, and rarely the S, A and M Modes.
I ignore the green AUTO and all the other fluff modes. They are fluff and will not be discussed here. The fluff modes are for people not willing to read this guide as you are. The AUTO mode can be useful if you get flustered and just need a picture fast.
Many of the menu options of which I speak elsewhere are only available in the P, S, A and M exposure modes.
P: Professional Automatic Exposure Mode
I use "P," Professional, automatic exposure mode, formerly called "program" in the 1980s. In this mode the camera chooses the f/stop and shutter speed for you. Done.
The standard combinations are f/4 at 1/60, f/5.6 @ 1/125, f/8 @ 1/250, f/11 @ 1/500, and so forth.
It's easy to get to any aperture or shutter speed you prefer in this mode: simply move the rear dial to shift them! This selects alternate combinations of f/stops and shutter speeds, all of which give exactly the same exposure. Nikon calls this "Program Shift." A *P symbol appears on the bottom left of the viewfinder, to the left of the shutter speed.
A shifted set might use f/4 @ 1/1,000, f/5.6 @ 1/500, or might use f/4 @ 1/2, f/5.6 @ 1 sec, etc. Don't worry, just flick the rear dial until you get the combination you prefer.
Three easy ways to return to the standard program combination are to:
1.) flip to a different mode and back to P, or
2.) turn the D5200 off and back on, or
3.) Flick the rear dial until the viewfinder's P* symbol goes away.
A, S and M Modes
These modes let you choose a deliberate aperture or shutter speed, or both. I rarely, if ever use these older modes. A and S modes date from the 1970s, and the M mode dates from Nikon's first cameras or the 1940s.
In A (Aperture-preferred) or S (shutter-prefered), you pick that value, and the camera will automatically pick the other value. I never use these; I shift the program instead.
If you want to set both the hard way, use M, manual, mode. The bes tuse of Manual mode is for when you want to be sure that the camera uses the same exposure for each of several shots, for instance, for snapping a series of shots to be stitched into a panorama later.
In A or S mode you can only set one of the two values, because the camera is setting the other one for you.
A Mode: Aperture Priority
In A mode you choose the Aperture, and the D5200 chooses the shutter speed.
S Mode: Shutter Priority
In S mode you set the Shutter, and the D5200 sets the aperture.
If the D5200 runs out of available apertures, you easily can get under or over exposure in S mode: watch that the D5200 can select a correct aperture for your lighting.
M Mode: Manual Exposure
In Manual mode, you have to set everything the hard way.
No one uses this mode except in complex conditions. Ignore old-timers who tell you you need Manual mode; they say that because that's the only mode cameras had back in the 1950s.
I look at the LCD to check exposure after I shoot a picture. You can use the bar graph in the finder - but why? If you wanted to do that, use another mode and let the D5200 do the setting for you.
The rear dial sets the shutter speed in manual exposure. To set the aperture, hold the +/- (*) (diaphragm) button near the shutter while turning the rear dial.
Firmware Defect: When turned ON, Auto ISO remains active in Manual mode. I always turn off AUTO ISO when I enter Manual Mode, otherwise Auto ISO changes the ISO and ruins whatever you were hoping to accomplish with manual exposure mode.
Rear Controls top
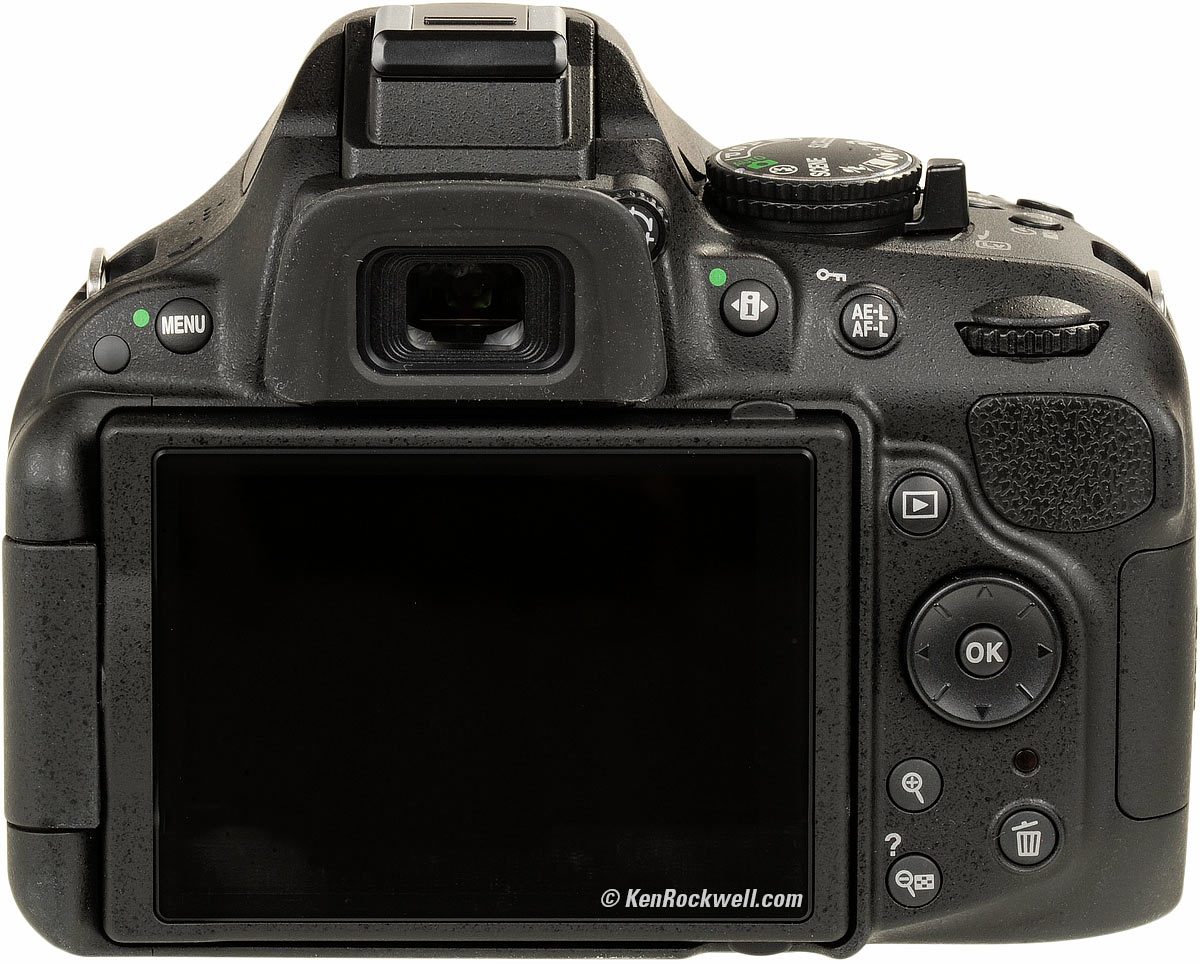
Rear Multi-Selector: the ring around "OK." enlarge.
From top left to bottom right:
• MENU Button
This gets you into the menus, as explained at the many menu pages below.
You also can set many shooting parameters with the < i > Button or Fn Button. They are different ways of setting exactly the same things; use whichever you prefer.
- <—> + Dial (hidden behind rubber eyepiece cup)
This adjusts the viewfinder to accommodate it to each person's eyesight.
Adjust it until your finder looks as sharp as possible to you. Each person may need a different setting.
• < i > Button top

< i > Button. enlarge.
If the D5200 is resting (LCD off), the < i > button wakes up the LCD and shows you the shooting info, called the INFO screen.
If the LCD is in the INFO mode (showing shutter speeds, etc.), press the < i > button again to change the settings along the right side and bottom of the screen. Use the Up/Down/Left/Right/OK buttons.
RESET Function ( • • ) top
If you hold down the • MENU and • INFO buttons (the two with the green dots) at the same time for a few seconds, you can quickly reset your D5200 to its basic settings. This is a big help if you've messed with a bunch of settings, and just want to get it back to normal the next day.
Learn how your preferred settings vary from the default green-button reset values, and in just a few presses you will always be able to get your D5200 back to normal.
I usually do this every morning. This prevents me from shooting all morning at last-night's tungsten white balance and ISO 6,400 settings that I may have used.
AE-L AF-L (Key) Button top
Shooting: AE-L AF-L. This can lock the focus and/or exposure or turn on the autofocus.
You may set the precise function of this button by:
MENU > CUSTOM (pencil) > f2 Assign AE-L/AF-L button.
I set mine to AE lock only.
Playback: Key. Press it to protect an image from deletion. I don't do this: formatting still erases everything anyway, and if "protected" images make it to your computer, you'll have a bear of a time ever deleting them, or emptying them from your trash.
Rear Dial top
Spin this left or right to control most of the D5200's functions.
While shooting, it usually shifts the program.
If you've hit the PLAY button, it steps forward or back through the images.
If an image pops on the screen right after shooting, a firmware defect prevents this dial from changing to different images until after you're pressed either the left or right button.
This dial does nothing while in the menus.
[>] (Play) Button top
This plays an image, or stops playing an image.
You don't need this often, since the LCD turns off the instant you tap the shutter button, and if you set Image Review ON (MENU > PLAY > Image review > ON > OK) it plays automatically after each shot.
With Image Review ON, you can do anything and everything to the image immediately after shooting without having to press Play. Want to zoom, scroll, or see other images? Just move the appropriate controls.
The D5200 has a defect where the dial is ignored during review. If you want to change t other images right after taking one, first tap the left or right button, then the dial works to let you move to other images.
Rear Multi-Selector: the ring around "OK." enlarge
This is the big round five-way thumb switch with OK in the middle.
While playing, this moves among your images (left/right) and the data for them (up/down). I find it more convenient to spin the rear dial to go forward and back; try it.
When playing a zoomed image, it scrolls around the image, even diagonally.
While shooting, it selects among the AF areas if you're in a mode which allows you to select an AF area.
In the menus, it moves around your selections.
Almost Invisible (when off) Green Light top
This light should be red, because it means the D5200 is talking to the SD memory card and you must not remove it. If you're dumb enough to yank out the card with the light on, you not only will lose some photos, you may destroy your SD card.
This normally blinks when the D5200 is turned on or off or wakes up to shoot. It blinks for a moment after each shot to record it to the card. It blinks as you select different playback images as it reads them from the card.
It can stay lit for a minute or more while data gets written, if you insist on shooting a lot of fast sequences in raw.
You may ignore it while shooting. You don't have to wait for it, except to pull out your SD card. The D5200 has a fat buffer to let you shot as fast as you want without having to wait for this light.
Zoom (+) Button top
This button zooms-in when playing an image. Use the up/down/left/right button to scroll around.
TRICK: When zoomed in, flicking the rear dial will go forward/back among other images, all at the same zoom and location. (The Left/Right/Up/Down key still moves around inside the zoomed images.) This makes it easy to see which shots in a sequence are sharp or not. The bad news is that when you delete one that the monitor returns to the default full-image view, and worse, you can't use the dial when the image first pops up after taking a shot.
If you want to select between images as they are zoomed-in right after taking a picture, first press the left or right button to get the D5200 in the mood.
Trash Can Button top
This is the D5200's flush lever.
Press it while a photo is displayed to erase that photo. You'll get an "are you sure?" screen, and press it again to dump that shot.
Meatheads like me get used to double pressing it every time out of habit, which means I accidentally erase some shots. Serves me right.
It doesn't do anything else. It ignores you if pressed without an image displayed.
(—) / ? / Checkerboard Button top
If playing, it reduces the images to fit 2 x 2, 3 x 3, or a bunchload of images on the screen. If the image was zoomed, it zooms out.
If working in the menus, often this button will give more information about the setting at hand.
If the "?" is flashing in the bottom right of the viewfinder, that means you have a message waiting from your D5200. Press the "?" button and your D5200 will tell you what's on its mind! It's usually telling you to turn on the flash.
Side Controls top
+/- Lighting Bolt (Flash Mode) Button

Flash Mode Button. enlarge
This button does three things:
1.) Press once to pop up the built-in flash.
2.) Hold it and the +/- (*) diaphragm button at the same time, and then spin the rear dial to alter the brightness of the flash for the next shot.
This is much easier to do than it sounds; it's quite natural.
0.0 is normal. I've never adjusted the flash separately from the main exposure. Minus makes the flash darker, and plus side makes the flash lighter for the next shot.
3.) Hold it and spin the rear dial to select the flash sync mode. The sync mode is displayed on the lower left of the rear LCD.
Here are the flash modes and what they do:
Normal (a lightning bolt, which is the default):
In Program and A exposure modes, the shutter won't stay open longer than 1/60 second.
I always use Normal mode and it looks great.
In this mode you won't get blur indoors, but you may get black backgrounds. The best way to avoid dark backgrounds with the D5200 is to use an external flash like the SB-400 and bounce it off the ceiling (flip it up). I love the look of the bounced SB-400 external flash; you can see a zillion examples at my baby Ryan Rockwell's website.
Unlike other Nikons, the D5200 doesn't have a custom function to choose a longer speed, like 1/8, in P and A exposure modes to lighten backgrounds indoors. You'll have to use S or M mode which takes more work to setup. You can use the Slow Sync mode below, but indoors or at night it often results in foolishly long speeds of up to 30 seconds, which lead to blur.
Red-Eye (bolt and eyeball icon)
I never use this.
It shines an obnoxious light in your subject's eyes for a couple of seconds and then releases the shutter.
If I set this mode by accident it bugs the heck out of me, because the camera doesn't go off until several seconds after I've pressed the shutter, but I have no idea why because I've set no self timer!
It doesn't do much to reduce redeye anyway. Skip this mode.
Red-Eye SLOW (bolt, eye and SLOW icon)
This is the SLOW mode and redeye. I don't use it for the same reason I don't use Redeye.
SLOW unlocks the camera in P and A exposure modes to allow it to make exposures as long as it wants to in dim light. This way the backgrounds look natural instead of inky black.
This mode can be very useful. It lets the shutter stay open as long as it needs to so dim ambient light can expose properly with flash. Of course if it's dark these exposure times can get long. You can get blur from subject motion and camera shake.
In daylight, exposure times are less than 1/60 of a second anyway, so SLOW does the same thing as NORMAL.
Most issues of National Geographic show many indoor shots made in this mode. The background exposes correctly, people may be blurred, and a burst of flash freezes them along with the blurry ghost images.
Normal and SLOW do the same thing in S and M exposure modes, since you or the camera may select any shutter speed in these modes regardless of flash sync.
I usually prefer to choose an exact slowest shutter speed in the M or S exposure modes, because the SLOW flash mode in P or A exposure modes can allow shutter speeds to become too long for comfort.
Normally the flash goes off the instant the shutter opens. With long exposures and blurred ghost images you ordinarily get the ghost streaming out in front of the subject. Think about it: if a car is driving, the flash goers off and freezes it, then the car moves forward. You'll have a ghost image ahead of the car, which usually looks stupid.
Select REAR mode to have the flash go off instead when the shutter closes. Now you'll have motion blurring behind the frozen flash image.
REAR doesn't do anything noticeably different with short exposures.
Fn (Function) Button top
Self Timer and Function Button. enlarge.
By default, press this to set the self timer.
You can set this to do other things instead.
I prefer to set it for direct access to White Balance.
To change what it does, press:
MENU > CUSTOM (pencil) > f1 Assign ( `\ ) / Fn button > select your choice > OK.
More at the CUSTOM SETTINGS menu.
Lens Release Button top
Lens Release Button. enlarge.
This unlocks the bayonet-mount lens.
Push this straight in and rotate the lens to remove it.
back to top of page back to top of Nikon D5200 User's Guide
MENUS
PLAYBACK MENU < NEXT
Home Donate New Search Gallery Reviews How-To Books Links Workshops About Contact