Home Donate New Search Gallery Reviews How-To Books Links Workshops About Contact
Fuji X100 User's Guide
© 2011 KenRockwell.com. All rights reserved.
Intro Cards Batteries and Power Straps Filters Hoods Caps
SET UP Menu Auto ISO SHOOTING Menu PLAYBACK Menu
Buttons & Controls Finders Focus Macro Meters Low Light
Exposure Modes Shutter, Self-Timer & Remote Aperture Bracketing
Silent Mode Panoramas Video Rapid Shooting Playback Firmware


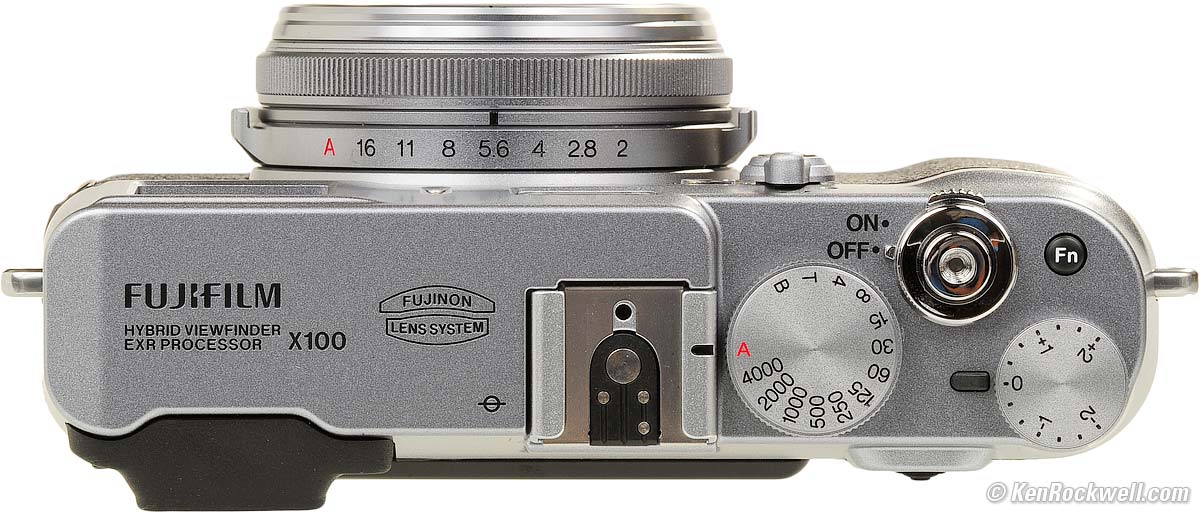
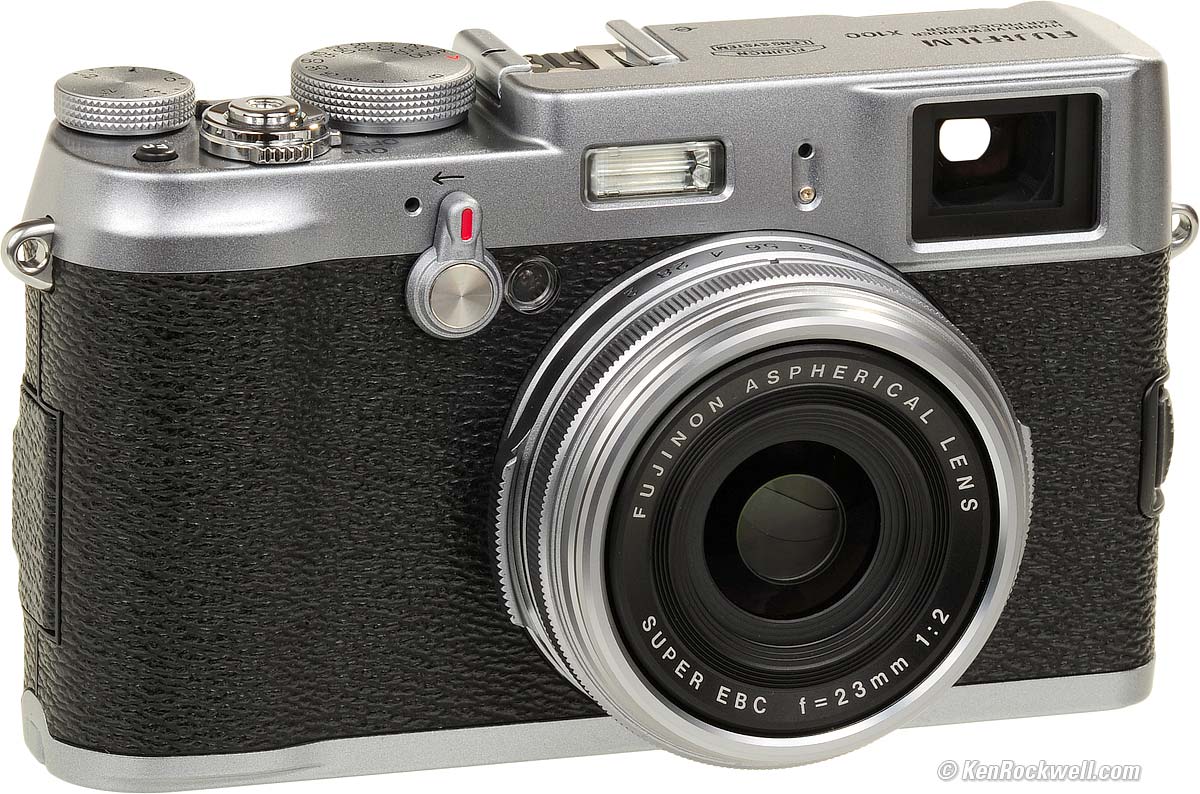
Fuji X100 (15.5 oz./440g with fixed lens, battery and card, about $1,200). enlarge. This free website's biggest source of support is when you use these links, especially these directly to it at Adorama, at Amazon, or at eBay (see How to Win at eBay) when you get anything, regardless of the country in which you live. Thanks for helping me help you! Ken.
May 2012 Fuji X100 Review More Fuji Reviews All Reviews
see also Fujifilm's printed X100 Owner's Manual
Latest Firmware. You can check your version by holding DISP BACK as you turn it on.
I use Adorama, Amazon, Ritz, B&H, Calumet, J&R and ScanCafe. I can't vouch for ads below.
|


Introduction top
I start with the battery and power, then mechanical items like straps, filters, hoods and caps, then cover the menu system and lastly how I shoot my Fuji X100.
Fuji recommends only SanDisk and Fuji memory cards. Use any other brand and Fuji warrants nothing.
As I write this in July 2011, this is for the Fuji X100 with firmware version 1.10.
Memory Cards top
Use no more than a 16 GB card. Larger cards can take very long — like 20 seconds — for the X100 to recognize every time it wakes up.
Use only SanDisk or Lexar cards. Any other brand is taking chances I can't afford, even if your local camera store pushes them because he buys them for less.
Battery and Power top
WARNING: The battery goes in four ways, but only one way works!
WARNING: There is a spare piece of plastic on the charger, marked "A7002" on its inside. This easily-lost piece is required for the battery to fit and to charge. Lose it, and you can't charge. I taped mine on.
Battery Charger
The charger has but one light:
GREEN LIGHT ON means charging.
LIGHT OFF means done — or disconnected, your guess!
Fuji specifies, and I confirmed, about a 3 to 3.2 hour charge time for a mostly dead battery.
Basics
The Fuji X100 works fine with the battery door open.
The flash and EVF suck more battery power than the optical finder.
The X100 finishes writing a file if the power is turned off.
The OVF Power Save mode seems no slower, so I use it. Fuji warns that the maximum exposure time in this mode is 1/4s. I have not tried the fast wake-up mode.
The battery meter is of little to no use, but no big deal: I always carry a spare battery in my pocket and swap them as needed.
To Wake the Camera
The Fuji X100 takes a few seconds to wake after it's gone to sleep. Tap the shutter, and wait a few seconds, same as if you turn it off and back on. (The first version of firmware required you hold the shutter down for a second to wake; as of version 1.10 you only need to tap, but you still need for it to wake.)
Straps top
Fuji includes a plastic strap-clip tool to attach the supplied split-ring strap without marring the Fuji X100. Forget it; just like any other fine camera, do not use anything with split rings.
I use a real LEICA strap instead. Not only is it perfectly designed for a camera this size, it's comfortable to wear, comfortable when shooting, has no flying strap ends and attaches and removes easily without tools. Keep your original, inferior X100 strap in the box for the collector to whom you'll sell your X100 in later years.
I put a small piece of plastic electrical tape on the left side of my X100 to keep the plastic finish preserver of the LEICA strap from marring the softer finish of the X100. The X100's painted-silver finish is easy to mar — its not chrome.
Filters top
As shipped, there is no way to protect the front of the lens. This is dangerous because the glass is not recessed. The glass sits almost flush with the lens barrel, so it's easy to damage and smudge. Bang the lens glass on anything, and your Fuji X100 is now worthless. (No one uses lens caps in the field; they are only for storing the camera.)
You could buy Fuji's $50 AR-X100 adapter ring and use a 49mm UV filter, or buy the $140 AR-X100 adapter and LF-X100 hood kit, except that they are rarely available. Here's a 3rd-party version at Amazon.
No problem. American ingenuity lets us work around Fuji's preference to provide its investors with a revenue opportunity they want instead of providing us with the filter thread we need.
If we unscrew the front trim ring, there is a male 49mm thread!
A 49mm filter would fit backwards, except that the X100's lens would be damaged as it attempts to move forward to focus more closely. The lens would hit the filter — oops.
The solution is to use something more deeply threaded to allow us to mount a filter far enough away from the moving lens.
The answer is to take a standard Tiffen 49mm filter from my junk collection, unscrew its retaining ring and remove the glass to use it as an empty 49mm filter ring. Now I have 49mm threads deep enough for the X100 to focus through its entire range, and can screw any other 49mm filter backwards on the projecting male threads of the empty filter ring.
Now we have a filter over our lens, but sharp male threads from the reversed filter on the front of our camera. Solution? Easy: put the X100's trim ring back over this filter, and we're done.
Here's how we do this:
1.) Obtain at 49mm filter. Unscrew its retaining ring and remove the glass.
Note: we need a filter with a screw-in retaining ring, which will have two small slots at 180º to allow a spanner wrench to tighten and remove it. Some filters use a circlip or are forged in such a way that the glass won't remove; we can't use those.
2.) Unscrew front trim ring from Fuji X100.
3.) Screw empty 49mm filter ring over X100.
4.) Attach filters of your choice over the exposed threads of the 49mm filter ring.
5.) Re-attach the X100's trim ring over the exposed 49mm threads.
Use a multicoated filter. If you point a plain glass filter into a light source, the X100 creates a faint mirror-image ghost. No worries, I use a plain filter, and simply pull it off when shooting directly into light sources.
The Step-Down Ring Trick
Another common solution that will damage an X100 is to use a step-down to 49mm ring, for instance, one that steps-down a 52mm-threaded lens to accept 49mm filters. The logic behind these is that they are internally female threaded at 49mm, so using the right kind of this ring will let one use normal 49mm filters mounted the usual way — except that they aren't long enough to prevent damage when the X100 attempts to focus at the closest macro distance!
The X100's lens pokes out quite a bit as focussed more closely, and depending on what kind of 49mm filter you attempt to mount, you'll need an adapter ring at least 7.25mm (or more) deep. Most rings, like this one, are only 6mm thick, meaning that they'll work great most of the time, but when you go to focus on something very close, bingo, jammed lens.
Measurements
The moving inner part of the lens is 43.25mm in diameter.
When focused at infinity, it is recessed by 1.99mm inside the front trim ring, or recessed 1.00mm inside the front of the threads left exposed when the trim ring is removed.
Here's the catch: when focussed at the closest distance, the lens now extends (pokes out by) 2.83mm in front of the the trim ring, and with the trim ring removed, extends 6.25mm from the bottom of the 49mm male-threaded seating surface.
Beware: filter glass often comes a millimeter or more closer to a lens than the flange that mates with the lens.
The Use of the Polarizing Filter
1.) Use a standard linear polarizer.
2.) Avoid circularly-polarized filters because they don't polarize when facing backwards. The front of a circularly-polarized filter has to face forwards. Use a regular polarizer.
3.) When you attach the filter via its front threads, most rotating polarizers won't rotate. No big deal; just don't screw them in all the way.
4.) Unlike any real LEICA, the Fuji X100 provides through-the-lens viewing with polarizers, grads, and any kind of filter. No longer do we have to sight through the filter, and then be sure to maintain the same alignment when we attach it over the lens.
Hoods top
Forget hoods.
They can block the flash and make the camera bigger.
The lens has no problem with flare or ghosts, and if you have a problem, use your hand to block the sun.
If you insist, order the $140 AR-X100 adapter and LF-X100 hood kit.
Lens Caps top
The Fuji X100 uses a PF08327-100 or BF08327-100 dedicated metal lens cap. Nothing else fits over the front of the lens.
I don't see it sold separately except as a special-order part, so once lost, you'll have to buy another X100 camera to replace it.
Even if the cap is available separately, seeing how Fuji sells the filter adapter you don't need for $50, don't even ask what they might charge for the cap for which there is no other replacement.
Lose the cap, lose the camera.
This isn't a problem, since photographers don't use lens caps.
I leave my cap in the X100's original box. My filter protects my lens.
SET UP Menu top
The MENU button always starts in the SHOOTING or PLAYBACK menu.
You always have to click left and down to get to the SET UP menu.
I'll skip the obvious settings, like DATE and TIME.
SILENT MODE
See my section on the Silent Mode. I prefer to turn this ON and OFF by holding the DISP BACK button instead of jockeying with it in the menus.
FORMAT
Do this every time you put a card in the camera. It's not mandatory, but does eliminate several sources of potential data errors and loss.
This sets whether or not, and for how long, the image plays back right after it's shot. I set 1.5 seconds.
FRAME NO
Leave this at CONTINUOUS. When set to RENEW, it restarts the frame numbers at 0000 each time, which makes it Hell to try to organize and use images in a while when you've got 37 images all named DSCF0003.JPG.
OPERATION VOL
Set this to OFF, unless you want to annoy people around you and make the Fuji X100 sound like a video game. Silent Mode hushes this, too.
SHUTTER VOL
Set this to OFF, unless you want to annoy people around you and make the X100 sound like a toy. Silent Mode hushes this, too.
SHUTTER SOUND
This selects the sound of the fake shutter sound. Even with the SHUTTER VOL turned off, you can select this, but of course it doesn't play.
Fake Shutter Sound 1 sounds like a sticky leaf shutter that doesn't open, but buzzes and closes. It double clicks at slow speeds, with no intermediate buzz.
Fake Shutter Sound 2 sounds like a sticky leaf shutter with no escapement that doesn't open, but closes. It double clicks at slow speeds, with no intermediate buzz.
Fake Shutter Sound 3 sounds like a Pac-Man chomp. Slow speeds get a double-chomp.
PLAYBACK VOLUME
This sets the speaker's level for playing movie files.
AUTO POWER OFF
This sets the time-out for turning off the Fuji X100.
OFF means that the X100 runs its batteries down of you forget and leave the power on, or the switch gets knocked.
I set mine to 2 MIN.
This turns off the sensor when used with the optical viewfinder, except when your finger is on the shutter.
This mode saves power because normally the sensor is running all the time. Fuji tells us that autofocus will be a little slower since the sensor has to restart each time, but I haven't noticed this. I set mine to ON. Fuji cautions that the longest exposure time available in this mode is 1/4 second.
The real gotcha with this mode is that the histogram is not active in the OVF; there is merely a blank rectangle! Turn this off to let the sensor keep running if you need the histogram in the optical finder.
QUICK START MODE
This leaves the Fuji X100 in a more ready state when it's sleeping. It supposedly lets the X100 restart in 0.7s instead of 2.7s each time you tap the shutter to wake it. It sucks more battery power.
I haven't tried this and set mine to OFF.
This option sets the function of the little black Fn button next to the shutter button. The bad news is that the SELECT CUSTOM SETTINGS feature is almost useless because it only stores some very limited image settings, not the entire camera's state for every setting. Therefore, I prefer to set mine to IMAGE SIZE. I wish the custom settings worked as do Canon's C1, C2 and C3 settings or Nikon's U1 and U2 settings and save and recall everything about the camera's setup, but since the Fuji X100's custom settings don't save and recall what I need, I can't use them. Poo.
This lets us define how, or if, we wish our Fuji X100 to optimize its sensitivity as the light changes.
By default this is OFF, so ISO stays fixed as set — just like film.
I set mine to ON, which lets my Fuji X100 change its ISO exactly as I would set it myself, but the X100 sets itself instantly as the light or subject changes. AUTO ISO doesn't change the ISO unless the light gets so dim that the X100's shutter speed would drop below your preselected speed.
AUTO Dynamic Range will often bump the ISO to 400 or 800, even in broad daylight. This is how the X100 reduces exposure to retain highlight detail.
MAX SENSITIVITY selects the maximum ISO to which we want to allow our X100 to set itself. Default is ISO 800, and I set mine to ISO 3,200. This means that the X100 can run up to ISO 3,200 all by itself as the light gets dimmer. ISO 3,200 looks great, and looks a whole lot better than a blurry ISO 1,600 image.
MIN SHUTTER SPEED selects the shutter speed at which the X100 starts to increase its ISO before it allows itself to go to slower speeds. I set mine to 1/125 to stop action. For still subjects, choose the slowest speed at which you almost always get sharp hand-held shots.
RED EYE REMOVAL
This lets the X100's onboard computer remove red-eye caused by the flash before the image is recorded to the card. It only works for JPGs.
I never get red-eye in my photos, so I leave this at its default of OFF. Try it if you get red-eye.
This selects whether the AFL-AEL button has to be held, or if one tap activates it until tapped again.
I select P, meaning that I have to keep it held, and that it cancels as soon as released.
This selects this button's function: Auto Exposure lock, Auto Focus Lock, or both.
I set AF LOCK ONLY, since the shutter button locks exposure.
This magnifies the selected focus area when you press the rear control lever in manual focus mode.
I set this to ON. It's a huge help; in fact, I wish the X100 had the option of automatically doing this any time the AFL/AEL button is pressed (or the foolish focus ring turned) in Manual Focus as the camera focuses.
FOCUS RING
This reverses the focus ring's rotation.
I ignore this because I ignore the focus ring: it's useless.
FOCUS SCALE UNITS
This selects the scale for the focus bar at the bottom of the finder or rear LCD.
FRAMING GUIDELINE
This defines the junk written over the finder in the Custom Finder mode, which is selected by hitting the DISP BACK button.
GRID 9 is a coarse graticule. I use this, the default.
GRID 24 is a finer graticule.
HD FRAMING puts up a 16:9 graticule. Sadly, if you're shooting in the 16:9 crop mode, the X100 isn't smart enough to choose this automatically and expects you to come here and do it yourself.
COLOR SPACE
This allows people to screw up the colors and make them duller.
I use the correct default of sRGB. The option of Adobe RGB usually makes the colors duller and introduces the potential for more color banding. See sRGB versus Adobe RGB.
LONG EXPOSURE NR
This lets the X100 make a second blank long exposure and subtract it from the image to reduce noise.
I leave this ON, its default.
OFF will let you shoot more quickly when your exposures are several seconds or more; I haven't tried to see the relative results.
SAVE ORG IMAGE
This saves the original image when you've selected RED EYE REMOVAL. This way you'll have both the processed image and the original, in case you dislike the way the Fuji X100 removed red eye.
AUTOROTATE PB
This rotates vertical images on the LCD on playback.
A defect in the X100's firmware, even in version 1.10, prevents vertical images from expanding past their narrow vertical borders even when zoomed, so I set this to OFF, in which case vertical images aren't rotated, but fill my LCD as best they can.
BACKGROUND COLOR
This selects the highlight color for menus, both in the menu system and as making screen selections while shooting or playing back.
GUIDANCE DISPLAY
This selects whether to display added information about whatever you're doing. I don't see that it makes any difference.
Fuji made the mistake of not moving the optical finder's AF frame with the rest of the frame for parallax correction at closer distances.
As of firmware version 1.10, you may set this to ON, and a second AF frame appears to show the real location of the AF area in the optical finder.
I set this to ON. If you're freaked out by two AF frames in your optical finder, which grow to three at most distances as the camera focuses, leave this OFF and just use your intuition.
SHOOTING Menu top
SELF TIMER
Yes, the only way to set the self timer is in this menu!
ISO
I leave this set at ISO 200, and let AUTO ISO bump it up automatically as needed.
Auto DR often bumps ISO to 400 or 800 as needed to retain highlight detail; this is normal.
IMAGE SIZE
I use L (large) 3:2 for anything I might need printed billboard-sized, and M (medium) 3:2 for normal snaps.
The 16:9 options throw away the tops and bottoms of your photos.
IMAGE QUALITY
I use NORMAL.
FINE doesn't look any different, but wastes about 50% more data.
This menu option is also where we set the Fuji X100 to store raw RAF files.
Here is where we set the Fuji X100 to capture great highlights.
The X100 defaults to a normal 100% setting, but I never use it.
The Fuji X100 expands its dynamic range in the 200% and 400% modes by reducing exposure a stop or two to retain highlight detail, and then increases the effective ISO only in the other parts of the image as needed.
I use the AUTO setting, which lets the Fuji X100 select the appropriate dynamic range for each shot, based on the X100's 256-segment light meter.
AUTO works great; I set it and forget it, and every shot looks perfect.
This works with JPG images. I don't know if raw files benefit from this.
This has four choices: STD (standard, or Provia film), V (vivid, or Velvia film), S (soft, or Astia film) and B (black and white).
I use STD.
If the Velvia mode really looked like Velvia, I'd use it, but it doesn't. All it does is clip the shadows to black removing most of the shadow detail, and bumps saturation a little.
A much better way to get Vivid without losing the shadow detail is to shoot in Standard, and then in Photoshop, add 30% saturation, and use a curves layer to pull down the shadows a bit at around 25%, but leave the darkest part of the curve alone. This give the same increased color and contrast as Vivid, while preserving shadow detail.
Firmware version 1.10 slightly lessened the loss of shadows, but not enough.
Oddly, the Soft setting also clips the shadows a little and is more vivid than the STD setting! I don't use it either.
The B&W setting offers the additional choices of a yellow, red or green filter. These change the way in which colors are rendered in black-and-white, for instance, the Red option lightens red and darkens other colors. I'd try the Red outdoors to keep the skies from washing out.
The Sepia option adds a sepia tone to black-and-white. There's no control of the filter applied.
The extra black and white modes are hidden just under the first four STD, V, S and B options; click down further to see them.
These work with JPG images. I don't know if raw files benefit from this.
You might want to set Shadow Tone to SOFT or MEDIUM SOFT to help ease the shadow clipping in the Velvia or Astia modes, but it's still better to do this later in Photoshop for the best looking images.
ND FILTER
This is a 3-stop neutral-density filter that can be moved into place when this is set ON. I only use this if I want to shoot at f/2 in daylight.
WB SHIFT
This lets us alter the color balance precisely. The adjustments go to ±9.
Unfortunately it works in Red/Cyan and Blue/Yellow instead of the Amber/Blue and Green/Magenta we need, so we usually have to move both adjustments to make what ought to be just one adjustment. The good news is that I love the colors I get at default 0/0, and if you want it warmer, try setting Red to a + value, and Blue to a negative number one-half that. For instance, try Red +2 and Blue -1.
COLOR
This adjusts color saturation.
I set mine to HIGH, and its still not much.
SHARPNESS
This sets the sharpening.
I'd set any of STANDARD, MEDIUM HARD or HARD.
CONTRAST
There is no Contrast adjustment or menu item. The Fuji X100 instead splits this into two separate highlight and shadow settings:
HIGHLIGHT TONE
This sets the look of our highlights.
I leave mine at STANDARD.
This sets the look of shadows.
I leave mine at STANDARD.
Because the Film Simulation modes clip the shadows, you may wish to set this to MEDIUM SOFT or SOFT to compensate in either of the Vivid or Soft modes.
NOISE REDUCTION
This sets the strength of the image smudging used to smooth grain at higher ISOs.
I leave mine at STANDARD.
HIGH will reduce noise, but reduce detail, too.
LOW lets more detail come through, along with more noise.
This chooses either automatic or manual AF area selection.
Fuji should have named these AUTO and MANUAL, but instead named them MULTI and AREA.
I use AREA, which means that the AF area is selected manually.
MULTI lets the camera try to guess which sensor you wanted, but it often guesses wrong.
FLASH
This sets flash brightness (flash exposure compensation).
My flash shots always look great, so I leave mine at ±0.
EXTERNAL FLASH
This has to be set to ON to use other brands of flash.
Fuji cautions not to use any flashes dedicated to other cameras, which means this setting is for your old Vivitar 283 or new Vivitar 285.
The dedicated Fuji EF-20 and EF-42 flashes work fine with this left at its default of OFF.
SELECT CUSTOM SETTING
This lets us recall one of three saved combinations of camera adjustments.
Sadly, these combinations of adjustments, called Custom Settings, don't remember enough settings to be useful.
We set these in the next menu item:
EDIT/SAVE CUSTOM SETTING
This chooses the settings we want, and where we save and change them.
You can see exactly the few settings saved, which are merely some of the image settings, but no AUTO ISO, not Image Size, not White Balance, and not much of anything.
This selects how much junk to show in the viewfinders or rear LCD in the Custom display mode.
Each display has two modes, the normal display and the "custom" display which displays all the stuff selected in this menu. I list the options in Specifications.
We can set the OVF's Custom Display differently from the EVF and LCD, which use the same Custom display settings.
We swap between these by pressing the DISP BACK button. I leave all the selections checked, as they are by default, so when I press my DISP BACK button I swap between a normal display the the display with everything in it.
PLAYBACK Menu top
I don't use any of these. These are trick play modes popular I suppose in Japan.
Buttons and Controls top

VIEWFINDER MODE LEVER
This lever swaps between the optical viewfinder (OVF) and electronic viewfinder (EVF).
More at Finders.
FOCUS MODE SWITCH
This selects among Manual Focus (MF), one-time locking autofocus (AF-S, single), or continuous focusing (AF-C, continuous).
I explain these at Focus.
Power Switch and Shutter is obvious.
Fn button works as selected in the menu system.
Aperture Ring
This controls the f/stop.
Set it to A as I do, and the aperture sets itself automatically.
If you also set the shutter dial to A, they both set themselves.
Front Red-Lined Lever
This swaps between the optical and electronic viewfinders.
Shutter Dial
This sets the shutter speed.
Set it to A as I do, and the shutter sets itself automatically.
If you also set the aperture ring to A, they both set themselves.
Exposure Compensation Dial
This makes the next pictures you take either lighter (+) or darker (-).
Be careful, it's easy to knock this dial accidentally and spoil pictures.
The X100 is so good that I rarely need to move this. The only time I use this is for subjects with a lot of dark areas, in which case I set it to -2/3.
This knob gets knocked by accident far more often than I need to use it. I wish it had a lock.

Left side, top to bottom:
PLAY >
Plays.
AE - (+)
Zooms playback.
When shooting, hold it and press the big dial left and right to change the type of exposure meter used, called PHOTOMETRY by the X100.
AF - (-)
Unzooms playback, or hold it and press the big dial while shooting to move the AF area.
VIEW MODE
Alternates among three different ways to run the displays:, eye-control switching between rear LCD and viewfinder, viewfinder only, or rear LCD only.
Right side, top to bottom:
Rear Control Lever
This is only a lever, not a control dial, and doesn't do much.
If you've set FOCUS CHECK ON, pressing the tip of this lever enlarges the focus area in manual focus mode.
In some focus modes, holding the rear AF button and flicking it left or right will change the size of the AF area.
In Manual Exposure Mode, flicking it left or right increments the aperture setting by one or two thirds of a stop. Oddly, it doesn't do this in aperture priority mode.
AFL AEL
This locks focus and/or exposure as set at AE/AF-LOCK MODE and AE/AF-LOCK BUTTON in the SET UP Menu.
TRICK: In manual focus, hold this to auto focus, and then focus locks when you remove your finger.
WARNING: My X100 usually crashes, requiring I remove the battery, if I set this to AFL and hold it for a few shots.
TRASH/DRIVE
Besides the obvious delete function in playback, this is how we get to Bracketing, Movies and Panorama modes, as well as the high-speed mode.
MACRO FLOWER
This button turns the Macro mode on and off.
HINT: Forget this button; I prefer to slide the focus switch to MF and press the AFL AEL button to spot-focus instead.
The X100 focuses over the complete range, including macro, in MF mode.
MENU OK
This does the obvious.
Fuji was first to figure out that these two functions could be put on the same button.
FLASH BOLT
This sets the flash modes.
WB
This is the only way to set White Balance.
This alternates between the normal or Custom displays.
It also goes backwards or cancels operations in the menus.
HINT: Hold DISP BACK a few seconds to swap in and out of Silent Mode.
VIEW MODE
This alternates among three different ways to run the displays:, eye-control switching between rear LCD and viewfinder, viewfinder only, or rear LCD only.
RAW
If shooting JPG, this lets the Fuji X100 record the next shot in both JPG and RAF formats. "RAF" is Fuji's name for their raw files.
If shooting RAF or RAF+JPG, it records only a JPG and not the raw file.
Finders top
The Fuji X100 has three finders: the optical finder (OVF), the electronic finder (EVF), and the rear LCD.
The VIEW MODE button selects the rear LCD or viewfinder, or if they select themselves with the X100's eye control.
For each display, the rear DISP BACK button to swap between the normal and Custom displays.
The optical finder brighter in daylight, and the electronic finder is brighter at night.
It's difficult to get a finder that's completely clear of in-image distractions. The only clean finder for shooting is the optical finder. The EVF never clears the compensation scale out of the frame.
The optical finder is of course live, however there is still a slight delay when the actual image is captured.
There is a 1/12 second (80ms) delay for the playback image to pop-up on the EVF, presuming you have IMAGE DISPLAY enabled in the SHOOTING menu. Instant playback can be dim in daylight; the EVF is only so bright.
Here are crummy snapshots, made with my iPod Touch, of the view through the optical finder. The real finder is very sharp, bright and clear, unlike the iPod Touch camera.
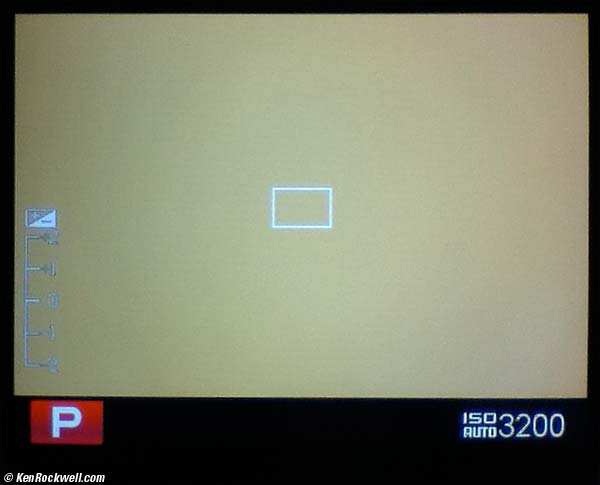
Here's the view with your finger off the shutter:
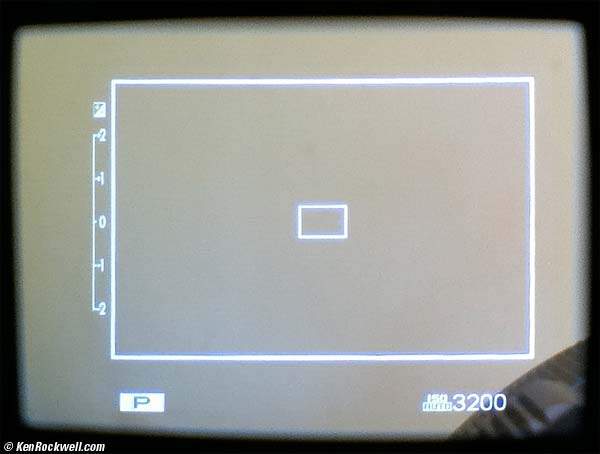
Fuji X100 Optical Viewfinder, idle (firmware 1.01).
ISO AUTO 3,200 at the bottom isn't the shooting ISO; its letting you know the maximum that might be set by Auto ISO if needed.
With firmware version 1.10, it now shows the lowest Auto ISO ISO, not the highest as seen here in version 1.01.
If you have CORRECTED AF FRAME set to ON, you'll see a second phantom AF area a bit to the left and below the one AF box seen above.
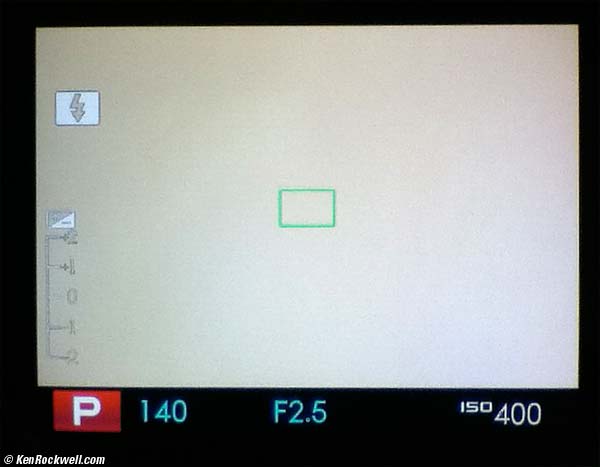
When you half-press the shutter, the focus locks, the flash icon at top tells us that the flash is going to fire, the AF spot goes green, and the actual shooting ISO shows at the bottom along with the exposure:
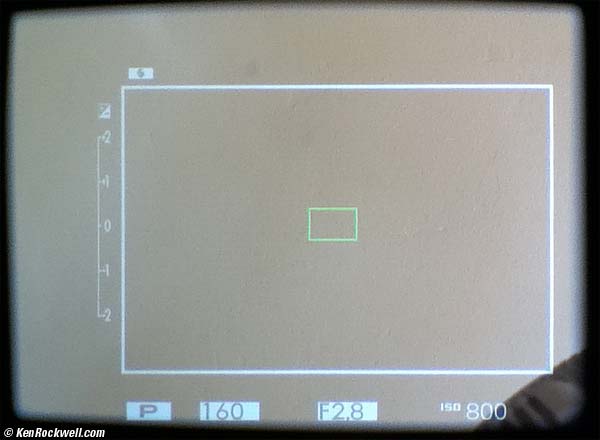
Fuji X100 Optical Viewfinder, shutter half-pressed and ready to fire.
If you have CORRECTED AF FRAME set to ON, you'll see a second, and possibly a third, phantom AF area a bit to the left and below the one AF box seen above.
Press the DISP BACK button and you'll get whatever other items are selected in the Custom display section of the SHOOTING menu.
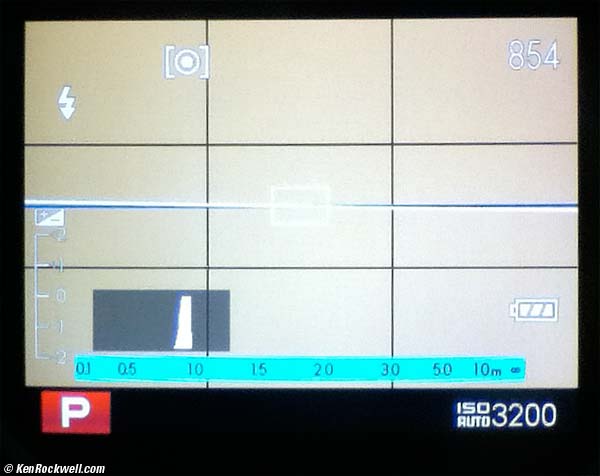
The line across the middle is the fake horizon. It's slightly off in this example, so the reference line is blue and your attitude is shown by the white line:
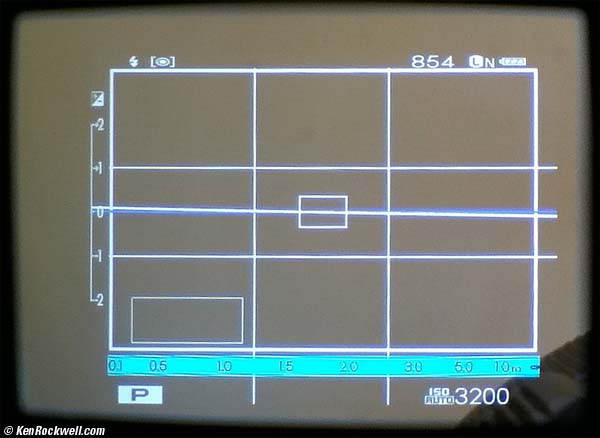
Fuji X100 Optical Viewfinder, Custom mode, idle.
The empty box at the lower left is just to let you know where the histogram would be, if you didn't have the OVF POWER SAVE option enabled as I do.
If you have CORRECTED AF FRAME set to ON, you'll see a second, and possibly a third, phantom AF area a bit to the left and below the one AF box shown above.
When you have the shutter half-pressed and the focus locks, the AF rectangle goes green. (With CORRECTED AF FRAME set to ON, one of the two or three frames turns green.) The flash bolt shows us the flash will fire, and the virtual horizon is active.
The focus scale's red line is the focused distance, and the white zone is the depth-of-field at the taking aperture:
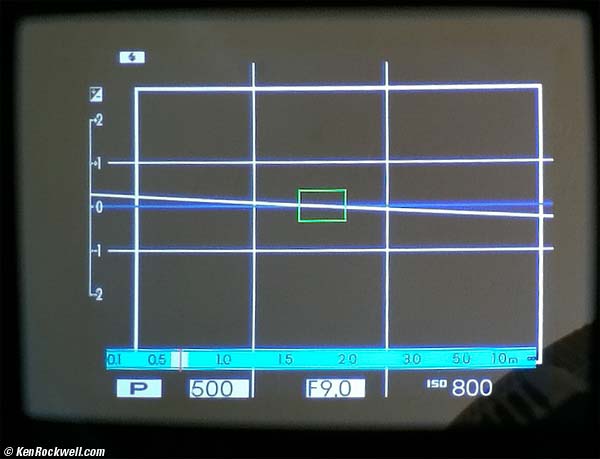
Fuji X100 Optical Viewfinder, Custom mode, ready to fire.
The histogram goes away with the shutter half-pressed.
This is all through the optical viewfinder!
The electronic viewfinder matches the rear LCD, and does the same things as the optical finder.
With a half-pressed shutter, the EVF works at taking aperture, giving always-on depth-of-field preview. (With no finger on the shutter, the EVF & LCD usually aren't at the taking apertures.)
Use the EVF in the dark to work without disturbing others; the EVF does everything the rear LCD does.
The EVF is delayed by about 1/12 second (80ms). It updates faster with a half press of the shutter, and more slowly when left alone. It runs at about 24 FPS at idle and 48FPS with the shutter held.
The EVF preview won't necessarily match the playback color; the X100 does some auto white balance and other magic after the image is captured.
Here's the EVF at idle, without pressing the shutter:
Fuji X100 Electronic Viewfinder, idle.
This is with firmware version 1.01, which shows the maximum ISO to which Auto ISO may climb. As of version 1.10, this shows the minimum Auto ISO.
Press the shutter halfway to lock focus, the AF rectangle goes green, the ISO updates to the actual ISO, and flash and exposure info appear just as they will through the optical finder:
Fuji X100 Electronic Viewfinder, shutter half-pressed and ready to fire.
Press the DISP BACK button and you'll get whatever other items are selected in the Custom Display section of the SHOOTING menu for the EVF.
Here's what you get with no finger on the shutter. As before, we're not quite level:
Fuji X100 Electronic Viewfinder, Custom mode, idle.
This is with firmware version 1.01, which shows the maximum ISO to which Auto ISO may climb. As of version 1.10, this shows the minimum Auto ISO.
Press the shutter halfway, and we see this. In this example, we're level, so the fake horizon turns green:
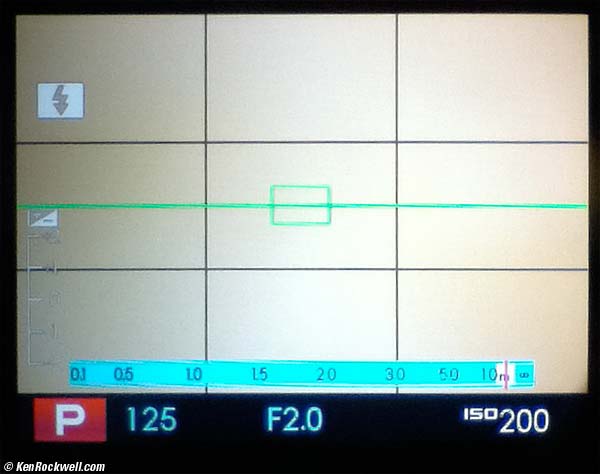
Fuji X100 Electronic Viewfinder, Custom mode, ready to fire.
When the cyan focus scale is shown, the red line is the focused distance, and the white region is the depth of field.
Focus top
Unlike either DSLRs and rangefinders, the X100 easily focuses on repeating patterns like fences, screens and fabrics.
Focus Mode Switch
The Focus Mode Switch selects the three focus modes:
MF
AF-S
Single autofocus and lock.
The Fuji X100 focuses on the selected AF area, and holds it.
AF-C
Continuous autofocusing.
The X100 desperately tries to keep focusing on whatever's in the center of the image, but its not fast enough.
This doesn't work well; I never use it, and it also sucks a lot of battery power.
Even if it worked, AFC stops focusing with a half-press of shutter — oops!
Selecting AF Areas
Only one AF area works at a time, and you may move it around in manual and AF-S modes. The AF-C mode only works in the center.
To move the AF area, be sure "AREA" is selected as the AF MODE in the SHOOTING menu, then hold the rear AF button and press the four sides of the rear control dial. It only goes up-down and left-right, not diagonally.
To return to the center AF area, hold the AF button and press the center MENU OK button.
To let the Fuji X100 choose the AF area for you, select AF "MULTI" as the AF MODE in the SHOOTING menu, This doesn't work very well, so I don't use it.
In the Focus Mode Switch's AF-S mode, the finder's AF area turns green when you've got good focus locked.
Changing the size of the AF Area
Only with the EVF or rear LCD, hold the rear AF button, and move the rear control lever left or right to make it smaller or larger.
It doesn't change size in the optical finder.
Actual Position of the AF Area
Oddly, the X100's optical finder usually doesn't move the position of the displayed AF area as one focuses more closely. This is because when Fuji tried to copy a LEICA, they forgot that while a rangefinder camera focuses through the finder and need not move the focus spot to compensate for parallax, the Fuji X100 focuses through the lens, and must move the AF spot along with the frame lines. Oops!
At close distances, the OVF shows the wrong position, and will focus on the wrong thing. If this is a problem for you, tap the front lever and use the EVF, which doesn't have this problem. To try to see the errors in the OVF, you can swap between the finders, noting the correct location in the EVF.
As of firmware version 1.10, there is a CORRECTED AF FRAME option which when set ON, throws up a second AF area in the optical finder, and often a third at the correct position when focussed.
AFL AEL (AF LOCK) BUTTON
Presuming you haven't disabled it, this button holds focus in most modes. You also can set if the button to have to be held, or if it stays locked after being tapped just once.
TIP: In manual focus mode, tap this button just once, and the AF system wakes up, comes into action, and keeps focusing all by itself until it acquires and locks the focus for you.
TIP: Just slide the AF switch from AF-S to MF to lock a focused distance. The Fuji X100 holds the focus setting.
The manual focus ring is bogus. It's slow and balky. Forget about it.
The correct way to focus manually is to select MF with the slide switch, then just tap the rear AFL-AEL button to spot-focus. You don't need to hold it; one tap and the X100 does the rest! It's just like the smart ignition switches on better cars: one short tap and the car starts itself without having to hold it.
To zoom the selected focus area to full-screen, tap the center of the rear control lever. Even using the optical finder, this automatically swaps to the EVF and lets you see exactly what's in focus!
Another way to set and hold a manual focus is to use AF-S mode, and slide the switch to MF to lock at that distance.
Macro top
Use the flower/macro icon on the rear control dial to get into Macro mode. If you were using the optical finder, the Fuji X100 pops up the EVF instead to eliminate parallax
Macro takes a long time to rack focus in and out, and it takes a while to fiddle with setting the macro mode switch as you're trying to shoot in the field.
The Macro mode cancels after power off, exposure mode change, or hitting playback.
TRICK: In Manual Focus, unlike autofocus, the Fuji X100 focuses seamlessly throughout its entire range! Therefore, instead of screwing with the macro mode menus, simply slide the focus mode switch to MF, and hold the AFL AEL button to focus. Press the rear control lever to enlarge the central focus area. Bingo!
Exposure Meters top
Hold the rear AE button to select any of the 256-zone "MULTI," SPOT or AVERAGE meters.
The Fuji X100 calls these "Photometry," while we call them meter patterns.
I always use MULTI, the default. It always gets the right exposure.
Exposure Compensation
The compensation dial is easy to knock, and there's no extra "0" indentation or lock.
There is no obvious warning in the finder that it's been set, so be careful as you shoot to look at it now and then.
I rarely need any compensation. If I do, it's usually -2/3 of a light subject is against a very dark background.
Low Light top
Set to AUTO ISO and Program Exposure, the X100 shoots down to very dim light, including outdoors at night. I let AUTO ISO climb to ISO 3,200, so at f/2, there isn't anything that you can see that you can't photograph just by pointing and shooting.
As I set it, either in Program or in OVF POWER SAVE, the X100 limits the longest exposure time to 1/4 second.
If you need a longer exposure time, you must both deactivate OVF POWER SAVE and also must not shoot in Program mode.
For me, I never need to do this with ISO 3,200 being so clean, but if I do, I have to use the menu to deactivate OVF POWER SAVE and I have to flick the aperture ring to any position other than A.
Exposure Modes top
There is no need for an exposure-mode knob; the X100 figures out what we want by how we set its aperture and shutter controls!
If either shutter or aperture is set to A, that value is controlled automatically for Aperture-preferred (A or Av) or Shutter-preferred (S or Tv) modes. If both are set to A, both are set automatically for professional (P or Program) mode.
The Fuji X100 only gives program shift with flash OFF and with Auto ISO auto OFF. This isn't a problem, as it's easier to move one of the aperture or shutter controls to a different value than it would be to twiddle with an electronic program shift knob.
Select a value for both shutter and for aperture, and bingo, you're in manual.
TIP: Don't use the EVF for gauging exposure in manual mode. It varies its brightness based on the subject, and not on your exposure setting!
In Shutter-priority and Manual modes, it's easy to knock the rear dial by accident and bump the shutter speed by up to ± 2/3 of a stop.
The X100 has the same design flaw as Nikon, and leaves Auto ISO running when you drop into manual. When I go to manual, I do it to get the same exposure for a bunch of shots, so leaving Auto ISO running means I have to stop what I'm doing and go disable Auto ISO.
Shutter Speeds top
The shutter dial only covers full stops from 1/4,000 to 1/4 second.
To set the shutter up to ± 2/3 of a stop from the shutter dial's setting, spin the rear dial.
To set speeds slower than 1/4, use the T setting on the top shutter dial and spin the rear dial. "Time" mode is only a way to set shutter speeds from 1/4 to 30 seconds.
The shutter's range is:
1/4 - 1/1,000 in Program mode.
To 30 seconds in other modes.
To 60 minutes (3,600 seconds) in Bulb.
To 1/2,000 only at f/4 and smaller.
To 1/4,000 only at f/8 and smaller.
Remote Release
Standard threaded cable release!
Self Timer
The self timer is only found as a SHOOTING menu option.
To stop it once started, tap the shutter halfway or hit DISP-BACK.
Aperture top
The aperture ring only sets in full stops. To adjust up to ±2/3 stop in third stops, flick the rear control lever.
Bracketing top
Bracketing is hidden as a drive option set with the rear DRIVE button.
You may have the Fuji X100 bracket by:
Auto Exposure (±1/3EV, ±2/3EV or ±1EV).
ISO (±1/3EV, ±2/3EV or ±1EV).
Record the same image three times, each with a different Film Simulation mode.
Record the same image three times, each with a different Dynamic Range mode.
Silent Mode top
The Silent Mode merely turns off all the speakers, flash and AF illuminator.
The Fuji X100 isn't any quieter, unless you forgot to turn off the fake shutter sounds in the first place.
The hard way to get in and out of this mode is using the SET UP menu.
The easy way to get in or out of SILENT MODE is to hold the rear DISP BACK button a few seconds.
Swung Panorama Mode top
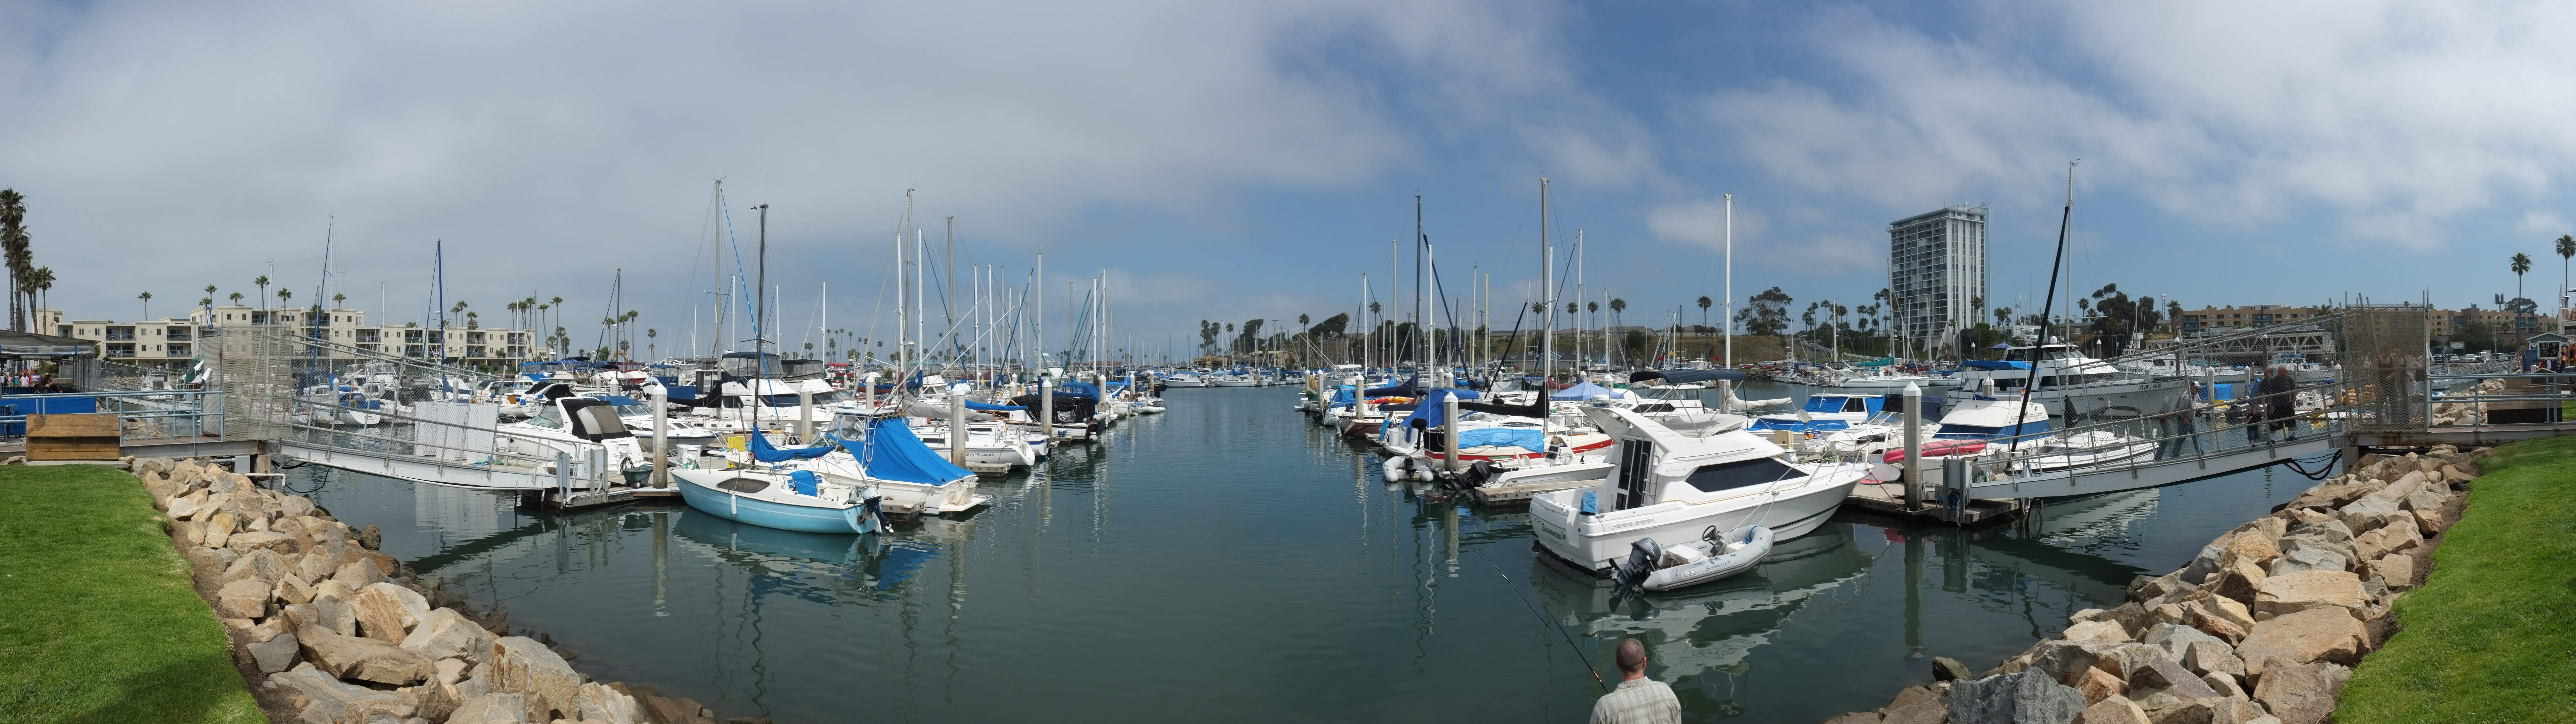
Oceanside Harbor, 10:34 AM 25 June 2011. 180º panorama mode, hand-held, Auto ISO 200/Auto DR 100%, 1/240 second at f/14.) Camera-original © JPG (3MB).
The Fuji X100 can create a complete 120º or 180º panoramic JPG image simply by swinging the camera in an arc.
It's amazing how easy it is to set and shoot panoramas along with normal photos without ever having to take the X100 away from my eye.
Set this mode with the rear DRIVE button. It's second from the bottom, just above MOVIES. You can get there quicker by clicking up twice.
Follow the screen to select the direction in which you'd like to sweep.
Once set, press the shutter, and start moving the X100 at a speed that's close to the progress guide bar at the bottom.
Hint: Hold the X100 vertically for horizontal panoramas and the final images will be taller.
Hint: It's perfectly OK to tilt the X100 up or down to frame the panorama better! Unlike a $2,500 Noblex, you don't need to keep the horizon stuck in the middle of the image; just keep it in the same place for the entire sweep!
Hint: No need for a tripod; the X100 corrects for a reasonable amount of hand-held wiggle automatically!
Hint: Preset the focus and exposure by pointing the X100 at something representing the brightness and distance of most of the image, press and hold the shutter halfway, point the X100 to the beginning of the panorama, and only then press the shutter all the way to start the panorama.
Hint: Regardless of your image settings, the panorama will always shoot at the same resolution. The panorama has a separate and more limited set of image settings.
Hint: Shoot your panoramas from a position about the same distance from everything. Stand in the middle of everything; don't just shoot a panorama from one side of a room, unless you mean it.
Video top
Set this mode with the rear DRIVE button. It's at the bottom, which you can reach directly by clicking up. There are no other options to set, except focus and film modes, and a 3x digital zoom.
White Balance will vary as you shoot.
Autofocus isn't fast enough for movies, so I'd suggest using manual focus.
Once set, press the shutter to start and stop rolling, 10 minutes maximum.
Rapid Shooting top
Set this mode with the rear DRIVE button. You have your choice or 5 FPS or 3 FPS.
It lets the Fuji X100 free-run with a fixed exposure and focus setting. It will run for a maximum of a few seconds as you hold down the shutter button.
A huge advantage of the X100 is that its finder never blacks-out as do SLRs.
When you let go, the Fuji X100 locks-up for a while while it processes and writes all the images to the card.
Therefore this mode is great for shooting things that repeat or have a known time, like my son diving into the pool, but poor for random events like ice hockey.
The Fuji X100 prefaces all the file names with "S" so they won't fit in your usual file sorting with the rest of your shots. Fuji did this to let them add a cute mode that can play the images in fast succession to look like a flip-card movie.
Playback top
Press the center of the top rear control lever to zoom-in to the focus point.
To see more photo info, move the rear control lever left and right.
For blinking highlights and histograms, go to the 4th playback screen by hitting DISP BACK four times.
To change movie playback speed, press the dial left or right.
The histogram reads the entire image, even when zoomed.
There's no RGB histogram, so let me know if you find one. It's not needed, as the superior highlight rendition of the Fuji X100 eliminates the need for the RGB histogram.
If you see a thermometer icon, the camera is overheating.
The LCD never fills during zoom.
If AUTOROTATE PB is left at its default of ON in the setup menu, vertical images play back in a small vertical window with large black areas on the left and right as expected, but these black bars remain even when zoomed! Therefore, set this to MENU > SET-UP > AUTOROTATE PB > OFF.
If you play files from other cameras, you'll see a little package icon, which Fuji calls "Gift Image." You've got to love the Japanese.
As of firmware 1.10, playback restarts at the last image seen. Version 1.01 and before always reset to show the last image shot, not the image at which you were last looking.
In firmware version 1.01 and before, you couldn't zoom from the detailed playback screen. You can as of version 1.10.
Firmware top
To see what firmware you're running, hold down DISP BACK and turn on the camera.
NEWS: Fuji X100 Firmware v. 1.10 24 June 2011
It was easy to update, and I didn't have to install any of Fuji's software on my Mac, as the instructions implied.
The upgrade process bombs all your settings back to the factory settings. Not only do you need to reset all your menu settings, you even have to reset the date, clock and languages as if you got a brand-new camera! Nikon and Canon, as I recall, are smart enough only to update the firmware, not brainwash your entire camera.
More Information top
Fujifilm's Fuji X100 Owner's Manual
(Fujifilm's older Fuji X100 Owner's Manual)
Fuji X100 Compared to Other Cameras
Help me help you top
I support my growing family through this website, as crazy as it might seem.
The biggest help is when you use any of these links to Adorama, Amazon, eBay, B&H, Ritz, Calumet, J&R and ScanCafe when you get anything, regardless of the country in which you live. It costs you nothing, and is this site's, and thus my family's, biggest source of support. These places have the best prices and service, which is why I've used them since before this website existed. I recommend them all personally.
If you find this page as helpful as a book you might have had to buy or a workshop you may have had to take, feel free to help me continue helping everyone.
If you've gotten your gear through one of my links or helped otherwise, you're family. It's great people like you who allow me to keep adding to this site full-time. Thanks!
If you haven't helped yet, please do, and consider helping me with a gift of $5.00.
As this page is copyrighted and formally registered, it is unlawful to make copies, especially in the form of printouts for personal use. If you wish to make a printout for personal use, you are granted one-time permission only if you PayPal me $5.00 per printout or part thereof. Thank you!
Thanks for reading!
Mr. & Mrs. Ken Rockwell, Ryan and Katie.
Home Donate New Search Gallery Reviews How-To Books Links Workshops About Contact