Home Donate New Search Gallery How-To Books Links Workshops About Contact
Nikon Picture Controls
© 2007-2014 KenRockwell.com. All rights reserved.

Introduced with the Nikon D3 and D300 in Fall 2007, "Picture Controls" is Nikon's term for how we set color saturation and contrast in those and all newer Nikon DSLRs.
Thankfully, any two Nikons with these controls set alike will produce images whose colors match.
January 2008 Nikon Reviews Nikon Lenses All Reviews
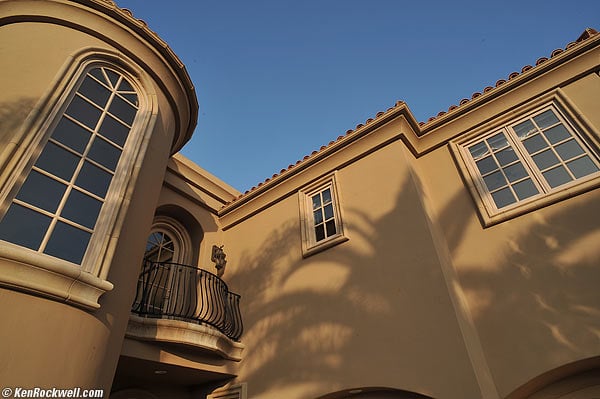
Picture Control: STANDARD.
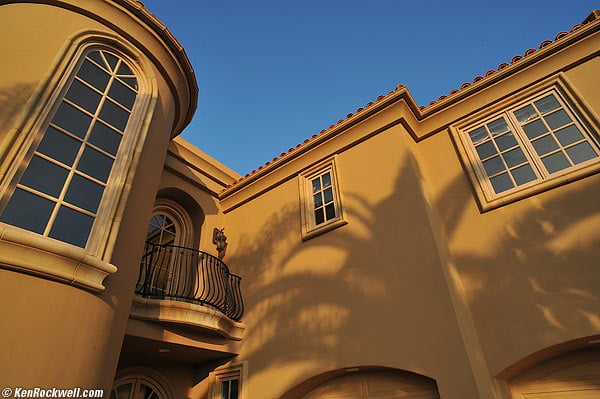
Picture Control: STANDARD, +2 Saturation.
This was about as far as any previous Nikon could go.
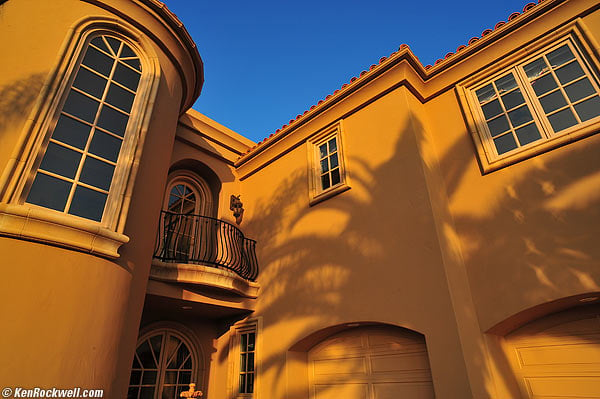
Picture Control: VIVID, +3 Saturation.
Whoo hoo! This hotel and sky didn't look this good in person.
See why I love to crank my colors?
The Nikon D3, D700, D300, D90 and D5000 let me get wilder colors than any previous Nikon, including film cameras loaded with Fuji Velvia 50.
Not that you want colors this wild, but I do. Art is the expression of imagination, and I dream in very vivid colors.
You probably prefer more a polite color rendition.
For people, I turn it down and get creamy smooth skin.
This will show you how to set your camera as you like.
Wording
Back in Nikon's first generation digital cameras, Nikon called the settings for saturation, contrast and sharpness "Optimize Image."
As of late 2007, Nikon's second generation cameras now call these settings "Picture Control."
Don't let Nikon's typical lack of clarity confuse you. Picture Controls are simply the settings for contrast, sharpness, saturation and etc.
Canon also calls them something else each year, like User Defined (2002-2006) and now Picture Styles (2007).
Press MENU.
Select SHOOTING MENU (camera icon on left).
Go right (into the menu selections) and go down to the next page to SET PICTURE CONTROL.
Go right to the four standard options, and click two down to VIVID.
VIVID is a good option. VIVID is similar to the wildest way I could set earlier first-generation Nikons.
Since I want colors loud enough to deafen a heavy-metal drummer, I crank it up from VIVID.
Once at VIVID, click right to the menu with the sub-options of Saturation and Contrast.
Click down to Saturation, and peg it three clicks to the right.
Hit OK, otherwise your modification isn't remembered.
You now have altered the VIVID setting to its maximum. In the menus you'll now see it called VI*, the * signifying that you've messed with Nikon's default for VIVID.
I always set Adaptive Dynamic Range (ADR, mislabeled as Adaptive D-Lighting by Nikon in the menus) to AUTO (or NORMAL in the D3 and D300). This sets the contrast and brightness automatically based on the Zone System, removing those choices from your menu options.
My Favorite Settings
I always shoot with ADR at NORMAL on the D3 and D300, or AUTO on the D700 and D90. This eliminates the ability to control the brightness (gamma) and contrast settings, since they are optimized automatically by the ADR system.
For Things
I set the sharpening to 5.
For photos of things, I usually start at VIVID and crank the saturation all the way up to +3. This gives me the psychedelic look I love.
For Accurate Product Colors in the Studio
I use STANDARD.
I prefer sharpenng set to 5.
I honestly have no idea if Nikon's ADR can work with studio strobes, so I turn it off and set contrast down to -1.
For People
For photos of people, I use NEUTRAL and set the saturation to +1. I prefer sharpenng set to 5.
STANDARD is less wild then VIVID, and NEUTRAL has even lower contrast.
You may prefer STANDARD and +1 or +2 Saturation.
Play with this: we all will prefer something different.
How to Save Settings (Picture Controls)
Press MENU.
Select SHOOTING MENU (camera icon on left).
Go right (into the menu selections) and go down to the next page to MANAGE PICTURE CONTROL (one below Set Picture Control).
It's obvious from here. I name my favorite wild setting as BOLD, and it recalls as C-1 (for custom-1) in the menus.
Switching Between Picture Controls
I bounce back and forth between picture controls depending on the subject. If I make a snap of my kid and then turn to photograph a building, I have to change Picture Controls.
A photo of my kid looks nasty made at VIVID +3, and and a photo of a thing looks boring at NEUTRAL and +1.
The only way to swap among these on the old Nikon D300 and Nikon D3 is to save these preferred Picture Control settings in the Manage Picture Controls menu, and select one or the other through the menu system. It takes too many clicks for fast photography.
This is why I suggested Nikon add an easy, direct way to swap among these as Canon has done for the past few years. Most recent Canons allow you to program the central SET button to call up Canon's Picture Styles, which works great since you hit SET, spin the knob, and hit SET again.
Nikon listened, and the D90 and D700 are the first Nikons to allow fast changing between Picture Controls. You have to set them up as I outline in my D90 Users Guide and D700 User's Guide, which is to put Manage Picture Controls at the top of the My Menu menu, and program the FUNC button to call up the top item in My Menu. Now you tap one button at any time, click up or down to your Picture Control, hit OK, and you're there.
This is critical if you photograph different sorts of things from shot to shot, and an important reason to buy a D90 over a D300, and to buy the D700 over the D3. (Nikon's not stupid, which is why Nikon introduced the D300 and D3 first, so I bought both of them a year ago instead of the newer, smarter and less expensive D90 and D700 today).
Even before I before I had kids, I used Canon's ability to swap among these controls to select different contrast settings as scenes changed. Nikon is superior to Canon in that Nikons have adjusted themselves to different contrasts automatically for quite a few years, eliminating the need for this selection on previous Nikons that didn't offer much in the way of color settings.
Now that every day I'm photographing my kids and turning to shoot every other crazy thing that catches my eye, this fast-change ability is crucial.
Even with the old D3 and D300, it's faster for me to select these in the menus than to jerk it around in raw. I never shoot raw, except once every six months to remind myself of what a pain it is, and how it looks the same or worse than JPG.
If I'm outdoors in direct sunlight light, I often also have to change exposure compensation between 0 in NEUTRAL, and to -0.7 in the contrastier VIVID and +3 saturation setting. Nikon's Matrix meter still isn't smart enough to read the effects of Picture Control settings, nor do the saved Picture Controls recall the compensation settings; that will have to wait for newer cameras.
Weirdnesses of Picture Controls
The image also depends on the basic setting, STANDARD, NEUTRAL, VIVID and MONOCHROME, from which you make your settings.
VIVID at it's 0 saturation setting is far more saturated than STANDARD at its 0 saturation setting.
Set +3 (maximum) saturation in the STANDARD setting and it's nothing special. Set +3 saturation in the VIVID preset and it's wild.
Nikon should have done as Canon does, which is to let every setting have numeric values which always give the same results, and give us access to all the values in each menu. Nikon has chosen to keep this complex enough that people who don't read me will probably never figure it out.
How to Copy and Share Settings
Using MENU > Shooting Menu > Manage Picture Control > Load/save, you can store, recall and share these settings via CF cards.
I saved my wild setting using the SAVE option. I renamed it KenRockwell.com and put it here for you to try.
Copy this PICCON01.NCP Nikon Picture Setting File to your computer. It's a tiny 52 Byte file that downloads instantly.
After you copy it, be sure it's named "PICCON01.NCP" Rename it if your computer renamed it something else. My Mac (OS 10.4.11) didn't recognize the file type and appended .txt to it, for instance. My wife's iMac (OS 10.5.1) worked fine.
Create a new folder called NIKON at the top level of your CF card.
Create a new folder called CUSTOMPC in this new NIKON folder.
Put the PICCON01.NCP file in the CUSTOMPC folder. Computer hackers would call this directory structure something like NIKON D300/NIKON/CUSTOMPC/PICCON01.NCP.
Nikon uses all capital letters, so I'd use the same.
Put the CF card in your camera.
Load it into your camera's memory using MENU > Shooting Menu > Manage Picture Control > Load/save > Copy to Camera.
You now can use the same exact setting I use in my D300 into your D300, big deal.
Shortcomings of Saving and Sharing Picture Controls
Now that Nikons can make wild colors just as Canon has done these past few years, it would be nice if Nikon had a way for direct access to various "picture styles." Since I have my colors cranked, I need to tone them down for people shots, which requires resorting to menus. On my Canons, I program the SET button to let me choose among my presets with the Canon big rear dial.
None of the Picture Control settings are complex enough to warrant saving them to a CF card. They are just a few simple parameters.
I find it easier to change them in-camera than to fiddle with jamming cards in and out of cameras.
These settings don't remember the critical settings for Active D-Lighting (ADL aka ADR), Nikon's great new dynamic-range management system. You need to set or unset these manually since they are not saved or recalled as picture styles.
From what I read in Nikon's D300 Users Manual (page 160 et seq.), Nikon only intends for these settings to be transferred on memory cards, not via computers or the Internet as I've done here.
Since the PICCON01.NCP files aren't file types recognized by computer operating systems, weird things can happen when transferring them. Sometimes punctuation in the preset names don't get recalled, your computer may rename the file, or the camera may not recognize the file after it's been through your computer.
I was able to recall my PICCON01.NCP file from the Internet and restore it in to my D300 via my Mac, but it took me a few tries on OS 10.4.11. It worked the first time on OS 10.5.1. Good luck!
Using the two-button reset
When you use reset, each Picture Control is reset back to its default, and each of your saved Picture Controls is reset back to the way in which it was saved.
If you changed anything about any picture control, like Contrast or Sharpening, and want to save that, save it as a new, named Picture Control.
PLUG top
I support my growing family through this website, as crazy as it might seem.
If you find this as helpful as a book you might have had to buy or a workshop you may have had to take, feel free to help me continue helping everyone.
If you've gotten your gear through one of my links or helped otherwise, you're family. It's great people like you who allow me to keep adding to this site full-time. Thanks!
If you haven't helped yet, please do, and consider helping me with a gift of $5.00.
The biggest help is to use these links to Adorama, Amazon, B&H, Calumet, Ritz and J&R when you get your goodies. It costs you nothing and is a huge help. These places have the best prices and service, which is why I've used them since before this website existed. I recommend them all personally.
Thanks for reading!
Ken
Home Donate New Search Gallery How-To Books Links Workshops About Contact