Home Search Gallery How-To Books Links Workshops About Contact
The
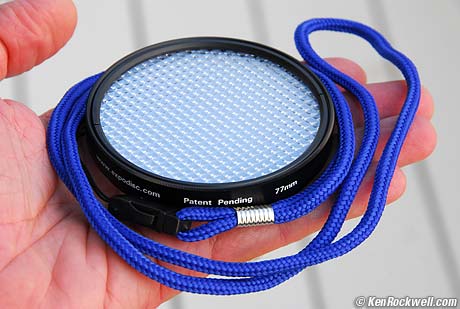
Expodisc 
Comes with clever neck strap. Get it here or here (comes in other sizes, too) INTRODUCTION The Expodisc is used in place of a white card to set manual white balance. It looks like a fat filter with a fluorescent light fixture diffuser on top and white plastic on the bottom. It costs about $120. You don't photograph through it. You put it over your lens and put your camera in the same position as your subject. Point the camera back to your shooting position. Set the camera's white balance while it measures the same light that will fall on the subject. Once set, put away the Expodisc and shoot from your original position. You don't shoot through the Expodisc, except to set the WB. It turns your camera into an incident meter. Incident meters measure the light falling on (incident to) the subject. They don't measure light reflected from the subject, as most meters do. Better than a flat white or gray card, the Expodisc lets you measure and compensate for light coming from all angles. A white card is directional and is best for copying flat art. An Expodisc is much better for three-dimensional subjects. I use it to set white balance in weird light. It also can be used to set manual exposure as an incident meter. Incident metering isn't affected by the lightness or darkness of the subject.
Naked lens. Roll your mouse over the image to see how to mount the Expodisc. Unlike a filter, you don't have to screw it on or off. It press-fits inside the filter threads. It's easy to pop on and off. It's not as delicate as a filter and doesn't care much if it gets scratched or dirty. Feel free to jam it in your pocket naked. I keep mine in my filter wallet.
One of three tiny, spring loaded ball bearings that let you pop the Expodisc on and off your lenses without threading. I have a separate page explaining White Balance. White balance is how you set the camera to give you perfect colors, not too red or blue or green or purple. I explain the process for setting manual WB on Nikon SLRs at the bottom, below the examples. HISTORY and BACKGROUND (optional reading) The phrase "White Balance" comes from color television. It is how we set a color TV camera to give accurate color in any kind of light. In Hollywood we also speak of gray and black balance and have controls for these, but not in consumer video or still cameras. We set white balance while pointing a video camera at a white card. In the 1950s we adjusted the gains of the three Red, Green and Blue tubes with screwdrivers until we got equal levels (balance) on a component waveform monitor or a dot in the middle of a vectorscope. Today we just press the WB button while pointed at a white card. We use white cards, pieces of paper, backs of business cards or even white T-shirts. It's no big deal, so long as it's white or neutral. Whites are easy to find in the field; we never trust grays. Of course the Expodisc works for video, too. WHY THE EXPODISC We've used white cards for decades in television. They're great if you're in a controlled studio environment, or on a set outdoors with three truckloads of special, color-corrected ARRI lighting. Cards work well because the color of light doesn't vary with the angle of the card. The lights all match. If they don't, we gel (filter) each of them until they do match. In the real world, light sources come from all directions with different colors. The sky is blue, the sun is warm, and the grass is green. It's worse indoors, where light coming in each window may be bouncing off a neighbor's purple house or a red car, or usually both! Change the angle a white or gray card just a little bit and you'll get a very different reading! That's the weakness of using cards for setting color and exposure. The angle changes everything! The Expodisc is helpful because it integrates light sources from all angles, just like an incident light meter. Slight variations of angle won't affect the color balance as it will with a card. That's why I use an Expodisc. It's easier to carry and more durable than a white card. An Expodisc is helpful for use indoors and in weird light. It's not needed for direct sunlight, studios and places where you have light sources that match. In controlled conditions I leave my WB set to AUTO or dial it to TUNGSTEN, SHADE, or whatever. 99% of the time I don't use the Expodisc. The Expodisc is for that last 1% where the light is weird. EXAMPLES Roll your mouse over each "before" image to see the results with the Expodisc. Sorry for the dull examples. I was waiting until I made some interesting photos with the Expodisc, but these crappy images demonstrate far better than interesting subjects would.
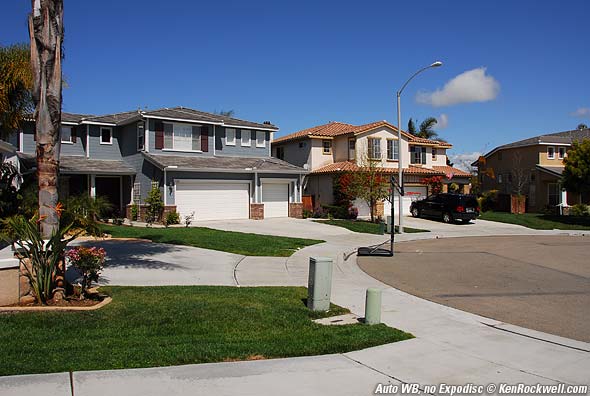
Boring Direct Daylight: I don't see any significant difference, and don't want to. (move your mouse over the image to see the Expodisc version.) This is good: it means the Expodisc and my camera's auto WB are all calibrated and neutral. If you really cross your eyes you'll see a tiny difference in magenta-green, but less than the typical shot-to-shot variation in AUTO WB. Results in the DAYLIGHT preset are similar.
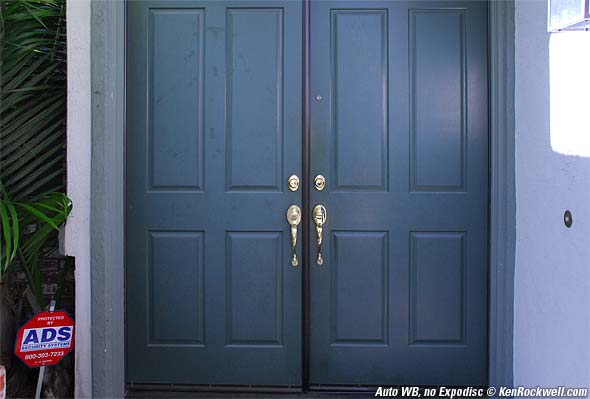
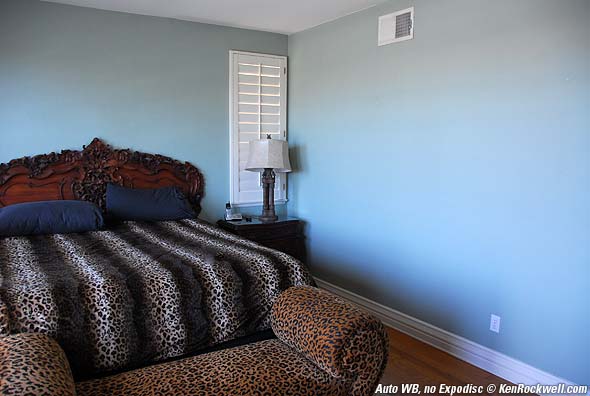
Weird (but typical) combination of shade, skylight, bushlight and reflected daylight. Auto WB gave a cool image. The Expodisc (mouse over the image) made it look as it did to my eye. This door is green, and so are the walls. In this case the WB with the expodisc restored the green.
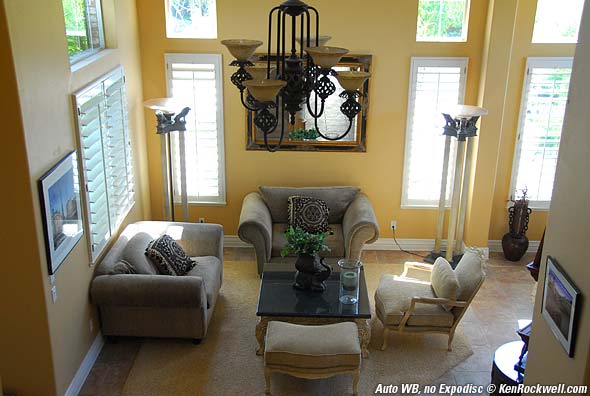
Indoors, daytime, some sunlight, no flash. This is a tough scene to balance. The light comes from every possible source except the sun or sky. The light is coming mostly from bouncing off the outside greenery, or bouncing off the walls or furniture. The AUTO WB version looks OK, but not like the scene did to my eye. This home has a marvelous, radiant warm color on the walls. Using the Expodisc I got the second image (roll your mouse over it to see) which matches this home. I'm impressed! There is no white in this scene onto which the auto WB can lock. Of course I had to walk down the stairs, set the WB with the Expodisc, and walk back up to make the photo. Once set for the scene I can make as many images as I want, and even change lenses, without having to repeat.
Indoors, daytime, no sunlight, no flash. The first shot looks fine and the whites are nice and clean, even without using the Expodisc to set the WB. The only problem is that the walls are green, not blue! Lo and behold, using the Expodisc to set WB matched what I saw. (move your mouse over the image to see the Expodisc version.) The light is coming through a balcony window to the left. The light source is the sky, and light reflected from a dark tan patio below. You can see this, in reverse, on the right wall, almost like a camera obscura. The bottom is brighter and bluer, lit from the sky, and the top is darker and tanner, lit by the reflection from the patio.
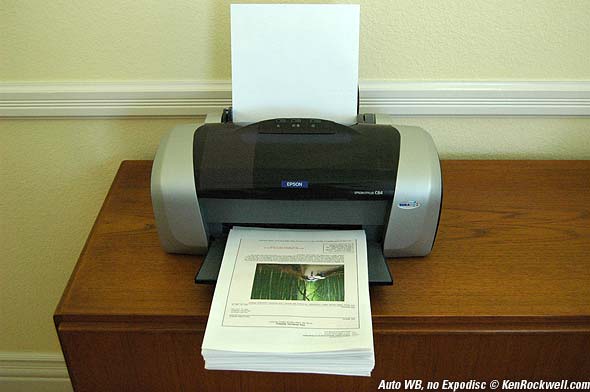
Indoors, daytime, no flash: This printer was lit by window light. That window light was coming from the sky and from my neighbor's green tree. Auto WB on my D200 rendered it too cool and green. Setting WB with the Expodisc (mouse over) made it look like it did to my eye, which took out green. I probably could have cheated and set WB from white paper with similar results.
Indoors, Daytime, Mixed Tungsten and Skylight, no flash: Don't do this, since this crappy light is almost guaranteed to make crappy images like this. There's a halogen torchiere to the left, and the rest of the wall is lit by light coming through the window behind you. The window light is a 50-50 mix of blue skylight and sunlight reflected from green trees. What was AUTO WB thinking? The walls are a light yellow, not purple! Mouse over the image to see the result setting WB with the Expodisc. I was impressed that the walls in the image matched the walls, a light yellow. This is the same room and similar light as the printer shot above. Note that the AUTO WB dialed in too much green for the printer, but took out green (added purple) for this shot. Auto WB goes bananas in crappy light like this, where you should be paying more attention to improving the light in the first place than trying to adapt to it. VERSUS PHOTOSHOP Another way to set WB is to use the white or gray eyedropper in Photoshop. I explain this on my Photoshop page. This works great, if and only if you have a neutral gray or white in your image. Leaving a white card in the image isn't as good as an Expodisc, since the expodisc integrates light from all angles better than a flat card. Flat cards and Photoshop are great for copying flat art. The Expodisc is better for 3-D subjects. SETTING WB MANUALLY ON NIKON SLRs Cameras will differ. On Nikon SLRs: 1.) Hold WB and spin the knob until PRESET or PRE is selected. 2.) Take your finger off the WB button. 3.) Hold down the WB button again for several seconds until PRE blinks. 4.) Release the button again. 5.) Point the camera at your neutral reference in the same light as the subject. Your neutral reference is an Expodisc over your lens, or a white or gray card. 6.) Press the shutter. 7.) If Good or Gd blinks, you're done. If NG or No Good blinks, try again from step 3. On the D200 and D2X you can save and name several different white card settings. I save different ones for inside my house, mercury light, etc. RECOMMENDATIONS The Expodisc is special purpose tool. I don't recommend anyone buy one unless they are already using white cards and want something easier. In normal lighting it doesn't have much benefit as you see in the top daylight example. For 99% of my shots I get great results in Auto WB or with manual settings like SHADE or Kelvin settings. A less expensive version is the Expocap, which you can get here or here. It doesn't work as well for light coming from varied angles, which is the whole point of these over a white card or my white sock, but it does work. If you get stuck in weird light you always can use a white card or the back of an illegal print-out of this page (this site is all ©). I'll pull up a pant leg and shoot a WB off my sock! The Expodisc is faster and easier than a white card or sock, and you pay for that. It's like an exotic camera or lens: the end result is the same. The more expensive product just makes it faster or easier. The Expodisc is very helpful for getting accurate colors in crappy light. It doesn't do much under decent, uniform light. It's easier to use and potentially more accurate than a white or gray card. If you use white or gray cards often I'd suggest getting an Expodisc. If you always use AUTO WB or the various presets like DAY and SHADE and are happy, then don't worry about it. I rarely use my Expodisc. The Expodisc isn't cheap. It's about $120 for the standard 77mm size here or here. Smaller ones are cheaper, but not if you upgrade later to a professional lens and have to buy the 77mm size anyway. Most pro lenses are 77mm. The 58mm Expodisc is about $80. Two Versions There are two versions of Expodisc: regular and warm. I have the standard one. It works great with my D200. D200s already have a warmer color balance which I love. There is also one with a cooling filter built in. That's the warm one. When you use this to set your WB, your camera compensates for the cooling (blue) filter, and your resulting images are warmer (oranger.) I'd suggest this version for most digital cameras, like the D70 and D50. Cheapskates If you're even cheaper than I am (not likely) you can use a stepping ring and a smaller, less expensive version. It works fine, except that you'll lose the easy pop-on, pop-off feature since you'll be attaching your stepping ring, not the Expodisc, to the lens. Real cheapskates could use a piece of cardboard, which ought to work fine if you can plug up any light leaks. This is stupid. Just get the right size. More intelligently, you only need one Expodisc for every size lens. Get the biggest size you plan to be using in the future, which is probably 77mm. It works great held over a smaller lens. This way you won't have to throw away a smaller one and buy the bigger one as you get better lenses. Shameless Request If you find this as helpful as a book you might have had to buy or a workshop you may have had to take, feel free to help me write more with a donation. Thanks! Ken. |


Home Search Gallery How-To Books Links Workshops About Contact