Home Search Gallery How-To Books Links Workshops About Contact
Adding
Dynamic Range to Any Digital Camera  I
get my goodies at Amazon
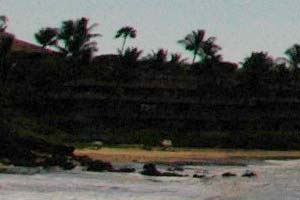
and Adorama. Invention Disclosure: This patentable and novel process is first published December 21st, 2005. Feel free to use this technique today for your own photography, but camera designers should contact me before implementing it in firmware. Thanks! INTRODUCTION The biggest technical limitation to today's digital and video cameras is their horrible highlight overload characteristics. I get a little technical in the nest section. If you'd rather not bother with the math then skip ahead to the examples and solution further down. Caveat: You're always better off to fix your lighting than to try to work around bad lighting as I'll show below. It's much better to add fill light than to pull these tricks. The shot always looks better with good light than with bad light massaged in Photoshop. Use these tricks only if you can't improve the lighting with fill light, scrims or graduated neutral-density filters. THE PROBLEM Film overloads gracefully. It's natural. We're used to the way highlights look on film. This graceful overload curve is called a shoulder. Even several stops above white film is still getting just a little bit whiter as you add more and more light to it. If you look at a histogram of a properly scanned film image you'll see it go back down to zero as it approaches 255 white. Color objects merely get less saturated as they gradually wash out to white. Digital, including your point-and-shoot to DSLRs to $250,000 digital cinema cameras, are completely different. The highlights on digital head towards white (255) and simply clip as soon as they get there. Digital has no shoulder and there is no gradual overload. $250,000 digital cinema and video cameras sometimes have shoulder adjustments, but they don't do what film does. Every slightly overexposed digital shot shows a spike on the right (white or 255) side of the histogram. This spike counts all the pixels that pegged at 255. It gets worse. The R, G and B channels are independent. They overload one by one. Unless your subject is perfectly neutral, one channel will overload before the others. That's why single channel histograms in most cameras are useless, since they usually ignore the red channel which is usually the first to go. When one channel has clipped at 255 the other channels are still showing a lot of contrast as they head towards 255. This causes great differences between the three R, G and B channels which is what causes nasty hue shifts when digital overloads. This is what causes the sick colors and rings around the sun in digital sunset photos. Film has no hue shifts as it overloads because of film's flatter highlight overload (shoulder) characteristics. Even if the three film channels are of different brightnesses coming into the lens, all three colors are still in the film's shoulder where the resulting image shows little difference between the three. This eliminates hue shifts, and allows for simple desaturation as a highlight washes out. EXAMPLES Straight shot into sun, Po'olenalena Park, Maui, Hawaii. Nikon D70, 12-24 mm lens at 12 mm. ISO 200, f/11 @ 1/500. Note complete loss of detail around the sun and on the rim of the clouds in the center top. Also note a slight magenta tinge on the lightest parts of the clouds just before they wash out to pure white.
Deliberately
underexposed by 2 stops and lightened with curves in PhotoShop. THE SOLUTION Easy! Just set your exposure compensation to -2 stops and then lighten the image later. This way you retain two more stops of highlights. I do this on JPGs. Hackers probably would mess with RAW. I used Photoshop's Curves command and jiggled my mouse till it looked right. The two points I used to create that curve are input/output 22/72 and 170/238. You get to the curves command with CMD+M or IMAGE > ADJUSTMENTS > CURVES. Better still, create an adjustable, editable, nondestructive curve adjustment layer by clicking the half white/black circle at the bottom of the layers palette and select CURVES. Fool around with this. I find two stops works well; you might prefer other values. You also can create a custom curve to do the same thing either in-camera or in subsequent RAW processing. BUT WHAT ABOUT SHADOW DETAIL? No problem:
It's the same. You can see a hotel in the shadows even with the sun screaming straight into your lens. You cant' even see anything in the shadows when looking at the complete full-size images above. Digital has enormous reserves of shadow detail. These are 100% crops from the left edge of the shots above. The sharpness difference is due to diffraction at the smaller f/16 aperture. if I was planning this science article when I was shooting in Hawaii I would have used the shutter only to change exposure. SO WHAT DO I LOSE DOING THIS? Your in-camera previews are too dark. Here's what the corrected image looked like before I applied the curves to lighten it:
Deliberately underexposed by 2 stops and not lightened in PhotoShop. You also gain noise similar to shooting at two stops higher ISO. WHAT ELSE DO YOU GAIN? Two stops of effective speed from setting the compensation to -2! WHY DO WE HAVE THIS PROBLEM IN THE FIRST PLACE? Camera makers throw away highlights to get cleaner images, less noise and more details in the shadows. Digital cameras have far more shadow detail than film at the expense of clipping the important highlights. Camera makers aim to please the most people possible when they set up their analog gain budgets and curves. Few shots need this treatment of the highlights. WHY DON'T CAMERA MAKERS JUST FIX THIS IN-CAMERA? They could. All it takes is a firmware rev to change the exposures and curves. They could eliminate the noise penalty by dropping the analog gain before the ADC, which also would eliminate the speed gain at the same time. Doing this without dropping the gain adds a little noise in exchange for fantastic highlights. I don't see any objectionable noise in the corrected image, but there is more if you waste your time looking. You have to be an artist to appreciate your own judgment looking at images. Amateurs only have enough confidence to believe the meaningless noise numbers published elsewhere. A camera that did this would probably never sell enough for anyone to notice. Another explanation is that camera makers are complacent. Engineers don't see a problem. Only photographic artists notice these things. Cinematographers I've met who belong to Hollywood's American Society of Cinematographers (ASC) hate the digital cinema cameras, which cost $250,000 each, because of their lack of highlight capture ability. You've seen ASC after cinematographer movie credits. ASC membership is by peer invitation only. I asked one ASC member why the lack of highlight range concerns them, since in Hollywood we spend three days lighting a set exactly the way we want it. We can control the highlights to match the camera. The answer is cinematographers can get more done in less time shooting on film. They can get away with less setup time taming lighting ratios. Today's digital cinema cameras require them to spend more time getting the lighting right, like by attaching orange-gray filters over windows so the outdoors don't wash out during interior shots. Today's films are so good that they have been able to skip that step recently. SUMMARY Don't do this all the time, but try this trick when you have tough subjects with wild highlights like the shot above. Have fun! Ken |