Home Search Gallery How-To Books Links Workshops About Contact
|
Creating Great Black-and-White
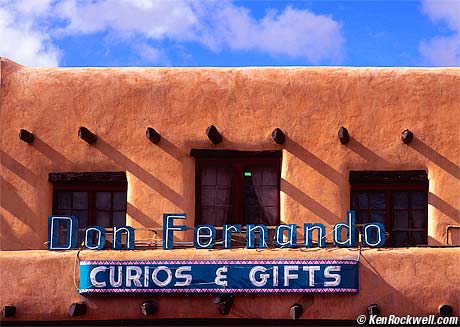
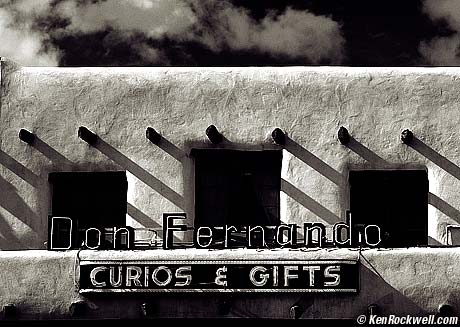
Original Color Image (scanned from 6x7 film) I
get my goodies at Ritz, Amazon and Adorama. Caveat: not all of these tricks work with weird, high-bit-depth images. If something won't go, be sure to have done IMAGE > MODE > 8 BITS. Ideally photographers use 8 bit images and then use masks for adjustments. High-bit-depth files are only used when making catastrophic changes to defective images right after import. As soon as you make the big changes to gross levels, get them back to 8-bits.
INTRODUCTION
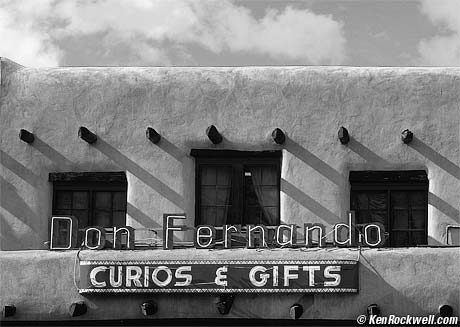
Photoshop's usual "convert to B/W" modes are designed to give you the worst possible look. Flick the Saturation slider to zero and you get this:
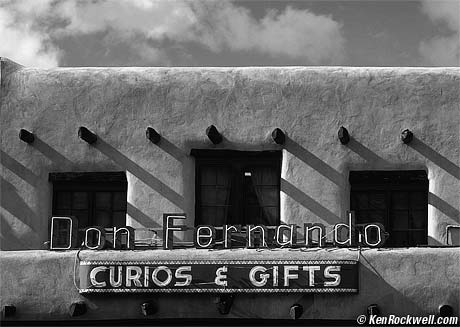
0% Saturation. Dull and boring. You smarty-pants might prefer to use the Convert to Grayscale trick (IMAGE > MODE > CONVERT TO GRAYSCALE.) That gives you this:
Color converted directly to grayscale. Still dull.
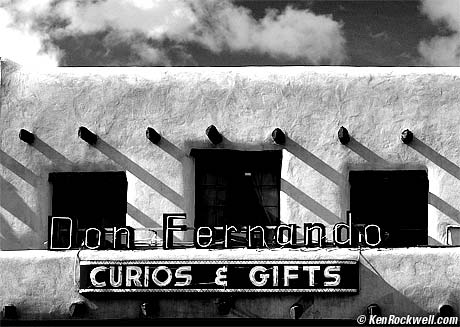
ONE WAY: THE CHANNEL MIXER The channel mixer lets you choose the equivalent of going back in time and choosing the colored filters used over the lens for the original photography. This is why it's more flexible to shoot in color and convert later. Film is one thing, but it's a given to shoot in color with digital cameras since those cameras only shoot in color. The B/W modes of digital cameras use one technique to convert, which may or may not be what you want or appropriate to the subject. If the in-camera effects give you what you want then great, if not, use these tricks later. use the Channel Mixer by: IMAGE > ADJUSTMENTS > CHANNEL MIXER. Check Monochrome. Set the sliders to taste. This is with 100% Red 100%, 50% Green, 0% Blue and -28% constant. Click OK:
Channel Mixer at 100% / 50% / 0% and -28% constant. Not bad! I had some white clipping, but sliding the "constant" slider left made the image too dark. You can season to taste.
ANOTHER WAY: CALCULATIONS Choose IMAGE > CALCULATIONS. Experiment with the choices. I like Background-Red, Background-Red, Multiply, New Channel. Just as often I may prefer to use Background -Red, Background-Green and Overlay. Play around to your heart's content. Hit OK. This gives you:
Calculations: Red, Red and Multiply. I like this the best. We have lots of contrast, and none of the washing out.
TONING See my article on Toning to get this:
Toned version of Calculation version above.
RECOMMENDATIONS These are the crudest, sloppiest ways to show you how to do this. You should do this on duplicate layers and masks to do these conversions nondestructively.
PLUG If you find this as helpful as a book you might have had to buy or a workshop you may have had to take, feel free to help me write more with a donation. Thanks for reading! Ken |


Home Search Gallery How-To Books Links Workshops About Contact