Home Donate New Search Gallery Reviews How-To Books Links Workshops About Contact
LEICA M9 User's Guide
(same for LEICA M-E)
© 2011 KenRockwell.com. This page best with Corporate S regular and bold activated.

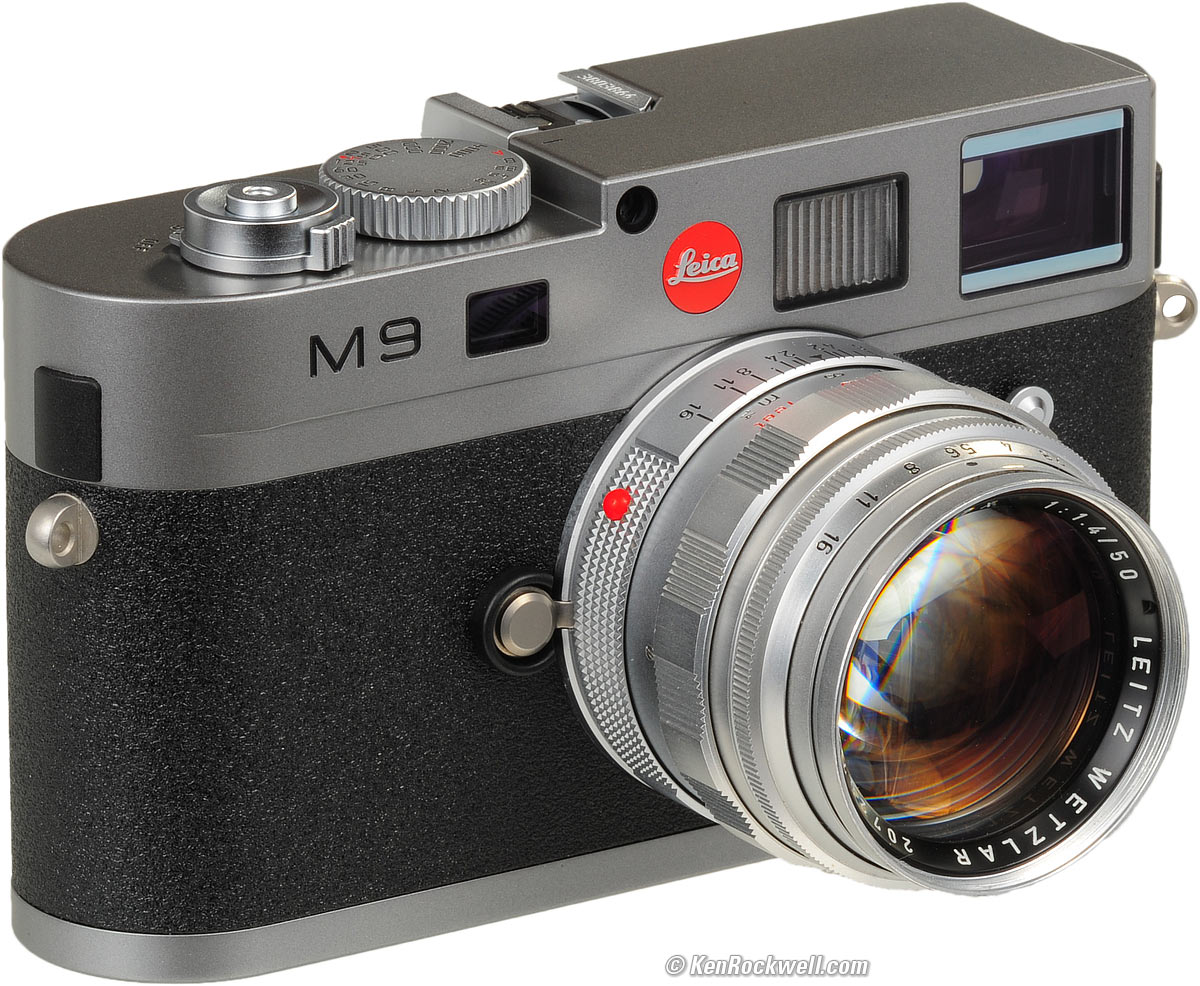
LEICA M9 (2009) with Leica SUMMILUX 50mm f/1.4 (1964). enlarge.
This all-content, junk-free website's biggest source of support is when you use those or any of these links to approved sources when you get anything, regardless of the country in which you live. Thanks for helping me help you! Ken.
August 2011 Rangefinder vs. SLR cameras
Leica Camera Reviews Leica Lens Reviews
Recommended Leica Lenses How to Afford Anything
I personally buy from Adorama, Amazon, Ritz, B&H, Calumet and J&R. I can't vouch for ads below.
|


Formats, Image and Color
see also LEICA M9 Color Rendition.
Shot as JPGs, or as DNGs opened with most software, the LEICA M9's color rendition is horrible.
There is only one way I've discovered to get good color from an M9, and it gives great color when done this way:
1.) Shoot DNG only. The M9 works slowly and poorly when you ask it to save JPGs alone or with DNGs. The processing required to create JPGs bungs-up the M9; it works much faster and more reliably shooting DNG-only.
I'm serious: my M9 works slowly and will lose and corrupt files when shot as JPG or JPG + DNG. I now shoot only DNG. See Frame Buffer and On-Board Computer.
2.) I set White Balance to 6,000 K for most conditions. Sometimes I'll set a higher Kelvin number in shade, or set Auto White Balance under mixed artificial lighting. Auto WB works poorly most of the time. Yes, in DNG we can reset this when processed, and 6,000 K gets me where I need to be most of the time.
3.) Process the DNG files in Apple Aperture 3. Every raw software reads files differently. Only Aperture gives me great colors, Photoshop CS5 ACR and others look crummy to me.
4.) In Aperture, I set Saturation to 1.2 most of the time, except with people, where I set Saturation to 1.0 and Vibrancy to 0.2.
5.) I also let Aperture auto-enhance the levels with Auto-luminance, and edge sharpen with 0.5 Intensity, 0.22 Edges, and 0.69 falloff.
Even if all I need are JPGs, running the DNGs through Aperture and Exporting Versions as JPGs gives results night-and-day different from the crummy JPGs created inside the M9.
See LEICA M9 Color Rendition for the full story, as well as white-balance presets for use with DNG files.
Menus
I set my menus thusly:
Lens Detection
Manual (default is AUTO).
I set this because most of my lenses haven't been cut-up with those silly black and white dots on their mounts.
With some of the very newest lenses, of course I have to use Auto and let it read the lens itself.
Save User Profile
I save four profiles, one each for each manually-coded lens, and name the profile for that lens.
Advance
Standard.
Self Timer
2 seconds (default is 12 seconds).
Auto ISO
Slowest speed: Lens Dependant. (Default of 1/60 isn't optimum for shorter or longer lenses.)
Max ISO: Default is 800.
Sharpening, Color und Contrast
I never can get a good picture out of the M9 as JPG, so I only shoot DNG, under which these cannot be adjusted. They only affect with JPGs.
Bracketing
Who cares?
People don't buy LEICAs to guess.
Exposure Compensation Setup
Setting Ring und Shutter Release. (Default is SET menu only.)
In my preferred setting, I can change compensation by turning the rear ring at the same time as holding the shutter partway down.
Monitor Brightness
Standard.
Histogram
RGB.
The default of Standard is useless, except when shooting B/W JPGs.
Folder Management
LEICA (default).
Auto Review
5 seconds (1s is default).
Histogram OFF (default).
Auto Power Off
2 minutes, which is default.
Flash Sync
2nd curtain, also known as rear sync.
(1st curtain is default).
Auto Slow Sync
Lens Dependant (default).
Otherwise, try 1/30 for most use, and 1/8 to let backgrounds fill in, with some risk of blurry ghosts.
Color Management
This is the color space for JPG images. I use the default of sRGB.
DNG Setup
Compressed, which is the default.
Reset
No; this would set all this back to defaults.
Sensor cleaning
No; I leave this to LEICA.
Date
Setting is where you set the time.
Time Format is how you would like the time displayed.
As of Firmware 1.138, it's still wrong in 12 Ur. format: 2:37 PM displays as 02:37 PM.
Time
Setting is where you set the date.
Sequence is how you would like the date displayed.
Acoustic Signal
Volume: Off, which thankfully is the default for all the options.
Language
I often leave mine in German, which gives the highest image quality.
Slick is that as you spin the knob towards selecting each language, everything on-screen changes instantly to that language!
USB
Mass storage, which lets the M9 pop up as a drive when connected to a computer.
The default of PTP only works with dedicated software.
This doesn't really matter, I have yet to find a USB cord which fits my M9 anyway.
Format SD Card
Yes!
Do this every time you insert a card to wipe it clean and start fresh.
Hit YES. Don't bother with Overwrite Data, which takes forever re-writing the entire card.
Firmware
Simply reads the version of firmware; mine was at 1.138 as I write this in August 2010.
Format
To format your card, press:
MENU > FORMAT SD CARD > SET > YES > SET.
Easy Manual Exposure Conversions
Want to lock in a manual exposure based on another shot you just made in Auto? Easy! Look at the shutter speed shown top-center on playback, and set it on the top dial. Done; and the shutter speed dial of the M9 clicks in delicious half-stops!
Even if you're in Auto ISO, Auto ISO won't darken an image, but it will lighten them.
Time Exposures
In the TIME setting, the shutter stays open until you press it again. You can make very long exposure and not have to hang around holding the shutter release.
To get TIME, set the power switch to Self-Timer and the shutter to Bulb.
ISO
ISO 160 is the lowest standard ISO , and suggested by Leica as the best. ISO 80 is merely pulled down from ISO 160.
To set ISO, press and hold the ISO button while pressing the arrow buttons or spinning the knob.
You're done. You don't have press OK; just take your picture.
If you forget to hold the ISO button, it ignores you.
Auto ISO
To shoot with AUTO ISO, select AUTO ISO as one of the ISO settings above. It's the top left setting.
To define how AUTO ISO selects the ISO, select:
MENU > AUTO ISO setup (the fifth menu item from the top) > SET > choose either SLOWEST SPEED or MAX ISO > SET.
In SLOWEST SPEED, choose your speed or allow the M9 to set it based on the lens focal length. Press SET to lock it in, otherwise the setting won't be remembered.
In MAX ISO, chose the highest ISO to which you want the M9 to go. ISO 800 is suggested; it gets noisier above that. Once selected, hit SET to lock in your choice.
When bracketing with Auto ISO, the automatically chosen ISO value stays the same throughout the bracket set.
White Balance
I prefer warm images. I get the best results set 6,000K.
SET > WHITE BALANCE > SET > (select with arrows or dial) > SET.
If you forget to hit SET, it doesn't change the setting.
Auto
Auto WB works poorly. Only use it under mixed indoor lighting where nothing else works.
Auto WB sees right through any color conversion filters, thus any effects of an 81A are removed.
Manual
If you chose MANUAL, you are directed to click the camera at whatever you want to define as neutral. Do so, and you'll see a screen showing what you set to neutral, along with a message that you're done.
If you've previously defined the manual position and want to return to it from another WB setting, hit SET when you see the ATTENTION message and you're ready to shoot with the previous setting. If instead you press the shutter again as directed, you just took a new manual WB reading.
The Expodisc works great with the LEICA M9.
Kelvin
I shoot in this setting, at 6,000. Higher numbers, like 8,000, make the image warmer (more orange), while lower numbers, like 5,000, make images cooler (more blue).
When you chose Kelvin, you get another screen in which you may select the Kelvin setting. Spin the dial or press the arrows to change to this setting, and hit SET to remember it. If you forget SET, you're back at whatever previous WB you were using.
If you've already set the Kelvin as you want it, just hit SET to select it again.
Kelvin Equivalents
THese are the Kelvin settings which match the preset settings.
This is not a measurement of actual Kelvin calibration; its letting you know where each of the presets lie in the M9's own kelvin setting scale.
THis is useful if you make a shot at the Cloudy setting, and want to know which Kelvin setting will be just a little warmer or cooler.
It is interesting that the Flash setting is so warm. In Oriental cameras, Flash is usually almost the same or just a little warmer than Daylight, but in the M9, Flash is almost as warm as Shade.
This Kelvin setting* |
Looks the same as this setting |
Magenta shift in named setting |
2,850K |
Tungsten |
|
3,500K |
Fluorescent 1 |
More magenta |
5,500K |
Daylight |
|
5,800K |
Fluorescent 2 |
much more magenta |
6,500K |
Cloudy |
|
7,400K |
Shade |
|
7,400K |
Flash |
very slightly more magenta |
* Tungsten is between 2,800K and 2,900K; daylight is between 5,400K and 5,600K.
ISO, DNG and JPG
JPGs shot at ISO 80 have more highlight contrast and better (less green) color rendition than JPGs shot at ISO 160 and above. DNGs look the same, regardless of ISO.
Sharpening, Saturation and Contrast
If you have Compression set to DNG (its default), the Sharpening, Saturation and Contrast settings are grayed-out.
You only may set these if you've set compression (SET > COMPRESSION) to any of the JPG settings.
Exposure
The M9 always gives a neutral exposure, so for light objects, open one stop, for pure white, open two stops. For a dark subject, close a stop, and for black, close two stops. Easy. You are in control — not the camera.
For instance, if the subject is pure, bright yellow, hold the shutter halfway to lock the shutter speed, and open the lens 2/3 of a stop. Easy. You make the image as light or as dark as you want it, so you always get what you want.
If you're shooting into the sun, block it with your hand, lock exposure, and shoot.
I never have to dial-in or change compensation as conditions change to get the right results, as I do in Nikon and Canon.
If in Auto ISO and manual exposure, the > arrow stays dim to let you know Auto ISO is working, and > blinks when you've hit the top speed of Auto ISO and are dropping into underexposure.
File Formats top
I can't see any difference between JPG Fein and JPG Normal (Fine and Basic in English).
DNG is sharper.
See Leica M9 Example Images for more.
Filters top
General
Use any clear or UV filter for protection.
Throw away any of the UV/IR filters you may have from the M8.
Polarizers
You can use any regular polarizer, circular or normal.
The M9's meter reads right through it.
Hold the filter to your eye to gauge the best angle, and put it over the lens at the same angle. For maximum effect, often all you need to do is align the dot with the sun.
The M9's finder is slightly polarized, so just hold the filter to your eye.
Likewise, the M9 reads the correct exposure through the filter.
Look at the filter from the front of the camera to align it properly.
FLASH
Setting exposure compensation on the M9 only affects the ambient exposure. To change the flash exposure, set it on the flash.
If the finder bolt stays on after the picture is taken, your exposure was good and you're ready to shoot the next picture.
If the bolt flashes at 4 cps after your picture, the exposure is OK, but the flash isn't ready yet for the next picture.
If the bolt goes away after your shot, you fired at full power and may have gotten underexposure.
Annoying Beeps
As a professional camera, the beeps default to OFF.
They can be turned on for use by amateurs.
As a LEICA, the annoying beeps are called an "acoustic signal" or "signal tones."
As a LEICA, you have separate options for the annoying beeps: you may choose or refuse them for each of key clicks and a CARD FULL DUMMY warning.
Save and Recall Settings
The M9 lets you save and recall settings properly.
When you save or recall a setting, you save the entire camera state, even including your single manually-set lens identification. Everything is saved, and recalled when you recall a setting.
UNlike Nikon, everything is saved in one place.
There are four memories for you to program as you like, and one fixed SNAPSHOT setting that puts everything on automatic.
Save a setting
Save a setting by pressing:
MENU> SAVE USER PROFILE > (choose 1, 2, 3 or 4) > SET > (name it by spinning the wheel and clicking left and right to select which character to change > SET.
Recall a setting
To recall this ort any of the other programmable settings, press:
SET > SET USER PROFILE > SET > (select one) > SET.
Change a setting
To change a setting, simply recall it (SET button), make whatever changes you want, and save it again. You may leave the name the sam, or rename it in the course of saving it again.
To change the name of a setting, recall it (SET button), then save it again (MENU button). When you're asked for the name, change it as you wish.
If you are stupid, you may change all the profiles to the same name, like Profile 2. The M9 doesn't care, since it lists all five when you go to recall them.
Reset
Watch out for the Reset Camera command, found by pressing:
MENU > RESET (towards the bottom of the menu) > SET > (yes or no) > SET.
If you reset this, you don't simply reset one Profile; you erase everything in the M9!
Data
Leica calls the gamma-corrected DNGs "compressed," but all they do is reduce invisibly the unneeded highlight precision while retaining all the shadow precision. Linear data is a highly inefficient way to store visual data; there is no way our eyes can see a 1 part in 65,536 variation in the highlight intensity of one color component of one pixel at 18MP; heck, the eye barely can recognize 1 part in 100 for large areas.
DNG is the best raw format because anything that can open raw can open it. You don't have to wait for software updates, and you don't have to buy new version of Photoshop or Lightroom every time you buy a new camera.
The DNG files open just fine in Photoshop CS2 (2006) and newer programs that I tried.
Folders (page 156, English Leica manual)
There is only one folder on your card unless you create more.
The M9 works in only one folder at a time. The M9 saves all images to that folder, plays only from that folder, and when you DELETE ALL, deletes only from that folder.
It's as if the other folders don't exist.
Create New Folder
To create a new folder, press
MENU > FOLDER MANAGEMENT (about halfway down) > SET > CREATE NEW > SET.
You now have to pick a new name. Use the wheel to selects characters, and the arrows to move among them. When you have a good name, press SET and you're now working in that folder.
I also can add new folders on the SD card when connected to my Mac, and the M9 works with them.
Select Among Folders
Presuming you've created new folders, press
MENU > FOLDER MANAGEMENT (about halfway down) > SET (defaults to select folder > SET(it may take a moment) > choose your folder > SET.
You are now writing to and playing and deleting from the folder you just selected.
Leica says that RESET FOLDER NUMBER resets folders like 249LEICA to 100LEICA, but I've not seen it work.
Resetting File Numbering
TO start counting from where you left off, put an SD card in a card reader, and change the file name to where you want to be.
It's OK to change just one of a pair of DNG+JPG files, if you do, the M9 simply plays each as if it's a different file.
Playback
Delete
To delete all the images in a folder, while playing one, press DELETE and select ALL.
Exposure compensation, White Balance, file type, size and compression, bracketing and four programmable photographer profiles are set by hitting the SET button, just like a Canon Powershot.
No LEICA photographer uses a menu for exposure compensation. We hold the shutter to lock AE exposure (or shoot in manual) and rotate the aperture ring as needed by feel, never removing our attention from our subject.
If you must use electronic compensation, the M9 displays it on your finder LEDs.
Four photographer profiles store everything about the camera and shooting settings, and can be renamed and recalled as you like them.
There is a fifth, fixed, profile which is is a preset "snapshot" profile for the less experienced, or those who get caught off-guard. The snapshot mode just shoots. In this setting, there are only five menu settings: date, time, language, format and color saturation. What more would you need to set? Even in this basic mode of this professional camera, Leica graciously has defaulted the beeper to off.
The INFO button shows a screen with all the important basics like battery charge, shots left and shutter speed. In playback, the INFO button scrolls through different screens and zooming by turning the ring.
Photographers don't use menus. Photography is not a video game. The MENU button calls up but one single menu, not a menu of even more menus that no one can understand. The Leica man commands his camera to do his bidding; he does not play "twenty questions" with his camera. If your help must use the MENU button to set your camera for you, they will appreciate that the rear dial allows them to buzz up and down the menu quickly.
The LEICA is a tool to be used. If it will not be used, donate it to charity, or Leica suggests firing the shutter a few times every three months, along with all the other controls and the frame line selector. If you store a spare battery, it is best to store it in a partially charged state, and to charge it about 15 minutes twice a year.
Leica suggests you caution your help be careful not to scratch the 6-bit reader in the lens mount when cleaning your M9.
To set the self timer, chose that option on the shutter release switch. Once started, press SET to cancel. There is no AE lock in self timer.
In playback, the scroll wheel changes zoom. Use the left and right buttons to move forward and back. To move quickly, keep holding the arrow buttons.
To swap to a different image while zoomed, hold PLAY while pressing the left or right button.
As you go back and forth it will take a while to read each image, and once it does, you'll be able to click back and forth quickly.
Even better, release the PLAY button and use the arrows to scroll around to different zoomed areas in each image, and now you can zoom-compare between two different areas in each image. You can't do that on Nikon or Canon!
Bottom Cover
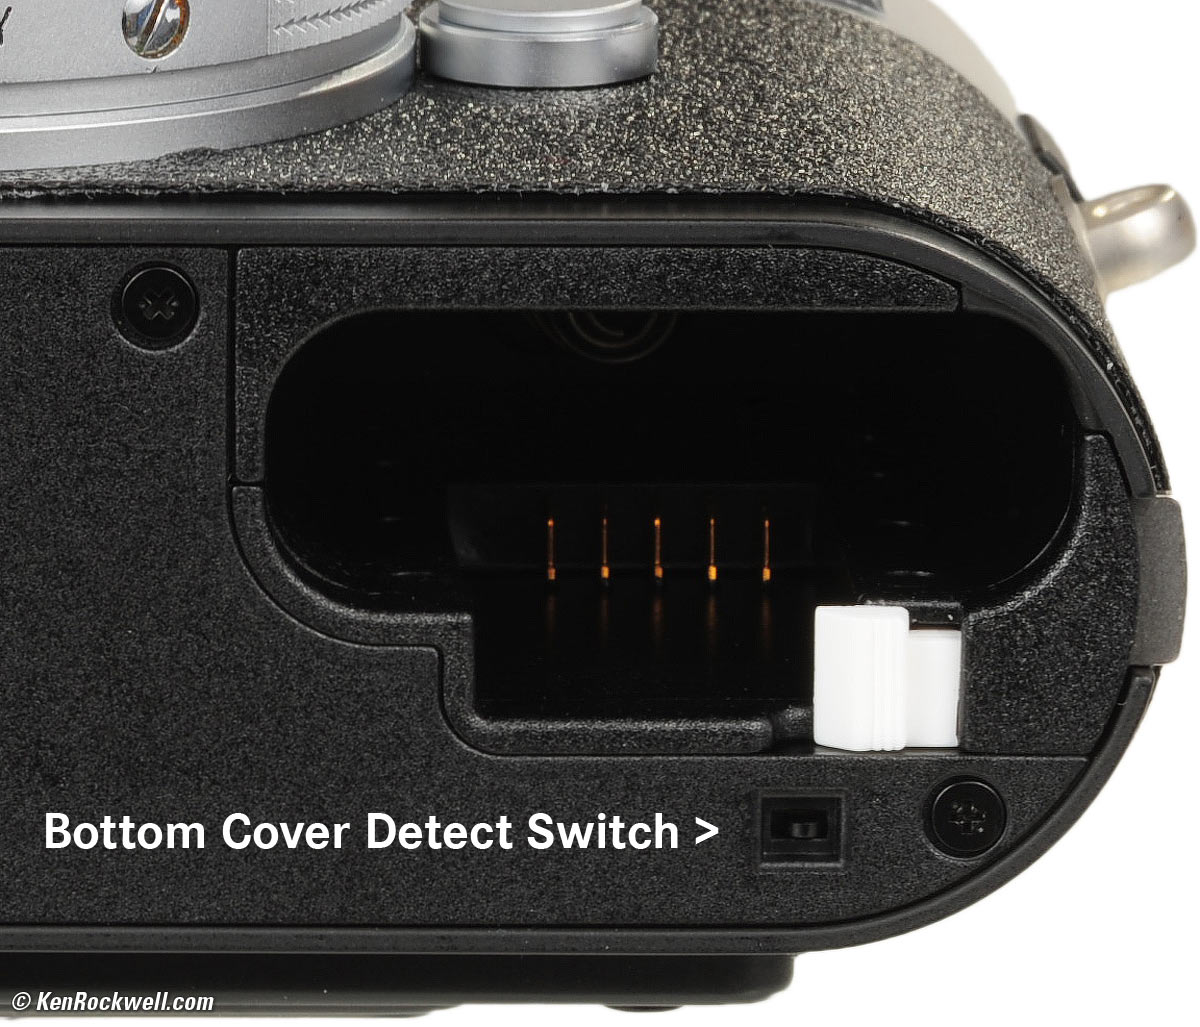
M9 Bottom Cover Detect Switch. enlarge.
The M9 has a switch to detect if the bottom cover is missing, and if it is, it won't work. It will tell you that the bottom cover is removed.
If you drop your bottom plate down a ravine, find some way to poke in the little recessed switch near the white battery catch and you'll be up and running.
Leica, like Canon, uses this switch to try to prevent the M9 from writing to the card if some bozo tries to pull it out while the camera is operating.
Battery Charging
The green CHARGE light blinks while charging.
The amber 80% light comes on steadily at 80%.
Both lights are steady at 100%.
![]()
More notes, unedited
Leica M9 Instruction Manual (177 pages), also in Dutch, Español, and Russian. Note: page 138 of English manual has the two images reversed.
---------
Use profiles to save manual lens
Shutter blinks at auto iso
Easy to name the user profiles
It saves the Manual WB shot.
Use profiles for lenses
Crashes when I turned it off in the middle of an Exposure
On my first charge, oddly the M9 died right after the meter said 25%.
EZ to go to manual after having seen playback from auto
To cancel choosing a profile, tap shutter
Profile for kids- lens, higher speed and pivot in auto iso, file size,
etc.
10% battery OK
9%, 5% battery "attention, Battery Low" on switch on
At 3%, info display wouldn't d
Go away, but when I got it to turn off, it never came back up- no low
bat message
At 3% did come back up, saying low.
Played back a little. Then got the switch off notice. Last image on
this molded bert: 1422.
Yesterday's charged battery back in charger: charges as if it's dead;
no 80% light even though M9 reads it as 99%.
Silver btty is the weaker one. 360 shots at 30%. molded battery lasted
1000 shots, rapid fire
1822 is 20% on chrome btty
1902 12%
9% 1928 (bat low if powered on)
3% 1957 sez batt low as it wakes up
1962 chrome dies, put in black.
2423 black does, put in chrome (461)
black goes in at 2921 (498)
3441 put in silver (520)
Can pause a second if gone to sleep before taking
battery comes flying out with a spring when I hit the white catch
21/4 Voigtlander: zonaly soft, color shitfts, focus OK
21/2.8 ASPH: Great! Perfect at f/4. OK Focus.
28/2 OK to a little close
28/2.8 ASPH: OK
35/1.4 ASPH: OK. sharp everywhere.
35/2 ASPH OK, rarely. Zonal softness.
35/2 8-element: a little close, but OK. Zonal softness.
35/2.8: Perfect focus! lower contrast at sides till optimukm f/8-11.
40/2: a little close, softer wide open.
50/2 OK
90 TELE M OK, softer sides til f/5.6
90/2 APO: a little close
90/2.8 ELMARIT: close, but never really that sharp at 2.8
90/2.8 Elmarit-M 382: close
90/2.8 Elmarit-M 394: perferct
90/4 collapsibe: close
90/4 screw: close
135/4: OK, sometimes close.
135/4 TELE 39mm: a hair close
135/4 TELE-M 46mm: always way close, except at 20 feet (not 15 or 25 feet) where it is perfect.
Help me help you top
I support my growing family through this website, as crazy as it might seem.
The biggest help is when you use any of these links to Adorama, Amazon, eBay, B&H, Ritz, Calumet and J&R and when you get your goodies. It costs you nothing, and is this site's, and thus my family's, biggest source of support. eBay is always a gamble, but all the other places always have the best prices and service, which is why I've used them since before this website existed. I recommend them all personally.
If you find this page as helpful as a book you might have had to buy or a workshop you may have had to take, feel free to help me continue helping everyone.
If you've gotten your gear through one of my links or helped otherwise, you're family. It's great people like you who allow me to keep adding to this site full-time. Thanks!
If you haven't helped yet, please do, and consider helping me with a gift of $5.00.
As this page is copyrighted and formally registered, it is unlawful to make copies, especially in the form of printouts for personal use. If you wish to make a printout for personal use, you are granted one-time permission only if you PayPal me $5.00 per printout or part thereof. Thank you!
Thanks for reading!
Mr. & Mrs. Ken Rockwell, Ryan and Katie.
Home Donate New Search Gallery Reviews How-To Books Links Workshops About Contact