Home Donate New Search Gallery Reviews How-To Books Links Workshops About Contact
Apple Aperture 3
© 2011 KenRockwell.com. All rights reserved.

This free website's biggest source of support is when you use these links, especially these directly to it at Adorama or at Amazon, when you get anything, regardless of the country in which you live. Thank you! Ken.
November 2011 More Apple Reviews Other Reviews
Sample Images:
San Diego June 2011
Yosemite in Springtime May 2011
California's Central Coast April 2011
Yosemite in Winter February 2011
Route 66 February 2011
Introduction top
I use Adorama, Amazon, Ritz, B&H, Calumet, J&R and ScanCafe. I can't vouch for ads below.
|


I am totally digging Aperture. It's faster and easier than what I've been doing for general photo selection and editing. With Aperture, everything I need is all on the same screen; there's no need to twiddle with panels, menus or layers as I'm trying to work.
I get more done faster with Aperture than I ever did in Photoshop, and its a lot more fun.
For instance, if I need to do something complex, like lighten shadows, I do it with one slider in one click, no menus or tabs needed, and it looks great! Straighten a horizon? Tap "G," and slide the mouse: a grid pops up only as you're adjusting, and you're done. Voilà!
Aperture gives me one-handed editing! Everything I need is already up on my screen, nothing is hidden behind multiple clicks. All the things I do, including highlights, colors, contrasts, sharpening, rotation, exposure and etc. are always available on the same screen at the same time.
Aperture 3 lets me work with big DNG (raw) files as fast and easy as JPGs, and gives the best color — by far — I've ever gotten from a LEICA M9.
Aperture does all its dirty work in the background, so it works fast regardless of the complexity of the task to which you've assigned it.
Aperture 3 is the only way I've ever been able to get good color out of an M9. I have sample images in my 2011 Route 66 Gallery an in my Zeiss 50mm f/1.5 Sonnar ZM Review.
The M9 has awful color in its JPGs, and Photoshop CS5 ACR and Capture One both give about the same crummy colors from LEICA DNGs. Only Aperture seems to have a special sauce (algorithms, transfer functions and color matrices) to make good colors out of what's in the LEICA DNGs. Of course if you shoot a more advanced camera like a Nikon or Canon, these cameras make fantastic color right in-camera, unlike LEICA.
For me, Aperture is the only software with which I can create what I consider to be usable images out of a LEICA M9. That's important to me.
If I want to ditch the DNGs and convert immediately to JPGs, it's so easy it makes my head spin:
1.) Put card in reader.
2.) Import to Aperture, in Aperture itself.
3.) When import is complete (takes as long as a simple copy), click OK to eject card and/or delete files from card.
4.) Do any tweaks, if desired.
5.) File > Export > Versions, point to where you want them, and you're done.
6.) Feel free to delete the DNGs from the Aperture Library (File > Delete > Masters and Versions).
This is even faster than iView can do lossless rotation, which is done for free when Aperture creates JPGs from DNGs.
How to use Aperture without copying everything to an Aperture Library
To use Aperture with your own files in your own folders without having to duplicate your entire library, simply select "in their current location" under Store Files, under Aperture Library, under Import Settings.
In other words, click the IMPORT arrow at the top left of your screen, next to the Inspector icon.
Select your hard drive at the top left in the dark gray Import bar, and select a folder to import in the gray-and-black area along the bottom of the Aperture screen. Everything in that folder will be checked and imported unless your change the check marks.
Look for the Store Files drop-down a few lines under the Import Settings drop-down at the top right. Select "in their current locations" for Store Files.
Click Import Checked at the bottom right, and it all imports, and a lot faster than if Aperture had to copy everything, as it does by default.
How to Auto-Enhance everything as it's imported
If you want to auto-adjust everything as it's imported (I do), do what I describe under Using Aperture with your Own Folder System above to get you to the area I'm going to describe setting.
Select Adjustment Presets in the Import Settings drop-down at the top right.
You'll see an Adjustment Presets line appear a few lines below this.
Select Quick Fixes > Auto Enhance.
Now Aperture will apply the Auto Enhancements at the same time as it imports, which if you're not copying to an Aperture Library, works very quickly. In just moments all your files are looking great, and it's easy to go though and re-correct anything that needs it.
All of Aperture's adjustments and corrections are simply instructions to Aperture of how to process your images when you export them as final versions from Aperture.
Applying the same adjustments to other images
Adjust the first image.
Select it, right-click, and select "Lift Adjustments."
Select the images to which you want to apply these same adjustments, right click, and select "Stamp Adjustments."
Aperture copies everything adjusted in the first image to the other images.
If you don't want to copy every adjustment, a window appears that lets you deselect any of the multiple adjustments.
Selecting the best images from a group
Select several images. (You may wish to make them a "stack" by pressing CMD+K.)
Double-click, and they enlarge to tile your screen.
CMD+Click on an image to remove it from the selection.
As you unselect images, the remaining shots enlarge to fill your tiled screen.
Keep culling, and you'll be left with the best one elected and filling the whole screen.
Fixing dust spots on multiple images
Press "X" and spot out the dust on your first image.
Now right-click Lift Adjustments from that image as described above, select all the other similar images, and right-click Stamp them.
Aperture copies everything adjusted in the first image, even the precise repairs to the dust you manually spotted out, to the other selected images!
Wire Removal
The "X" tool wipes away wires and other junk quite well. Just try it!
Hint: Don't use the ingenious DETECT EDGES option described below under burning and dodging, which makes the X (repair) tool not work for wire removal.
Graduated Filters
Graduated filters have been used for centuries over camera lenses to darken light areas, like the sky. These work great, except when we have anything other than a straight horizon. Add anything, like a tree or a window frame, and the grad filter becomes very limited.
Grad filters are provided in some primitive software, but again they are useless as soon as anything other than a flat horizon is present.
Far more useful are Aperture's burn and dodge tools, which do the same thing as grad filters, and allow the regions of lightening and/or darkening to be "painted" on the image regardless of the shapes of the areas needing lightening or darkening.
Burning and Dodging (selective lightening and darkening)
For Burning and Dodging, click the Brushes tool icon on the bottom left of the main image in the Split View mode. You'll get a drop-down. Select Burn or Dodge, and go to town on your image.
You can change the strength of the effect under the new Burn or Dodge adjustment panel that appears in your Adjustments bar.
Here's what makes this smarter than Photoshop: when you do this, check the secret "Detect Edges" box. Holy cow: for the first time in the history of photography, this program makes it trivial to burn or dodge what we want, and not have watch out for the edges!
Ever since the 1800's, what took most of our time trying to do this in the darkroom or in Photoshop has been trying to stay within the lines of whatever we're trying to burn or dodge, and now Aperture keeps us where we need to be by magic!
Brush Size Changes
Just flick the mouse's scroll doo-dad up and down, and the brush changes size!
Cropping
Thank goodness, Aperture has a clear aperture through which one can see the prospective crop.
Photoshop CS5 is so bad that it now draws four extra lines across the image you're attempting to crop, making it difficult to see what you're doing.
I suspect these lines were added to Photoshop CS5 to make it appeal to beginners who heard the bogus "rule of thirds" from a teacher, not a working pro photographer, but now, I have never been able to figure out how to make them go away.
Thankfully, Aperture doesn't have this problem, and Aperture's crops are non-commital: they don't take effect until you generate new files on Export, even though you see them while working with them. I don't know how many times I've forgotten and cropped in Photoshop, made edits, and then had to go back and repeat 27 steps to change the crop. This is no problem in Aperture!
Shadows, Highlights and free HDR
Just slide the Highlights and the Shadows sliders.
If you push them too far, you get the same effects as HDR: ugly, with everything gray and detailed.
I prefer to increase the saturation of the lifted shadows, so I hit the Advanced tab and slam the Color Correction slider to 100.0.
Like everything, use these controls delicately and infrequently. Values of about 5 are usually more than enough, even though they go to 100. Remember, shadows are supposed to be dark, and highlights are supposed to be light.
No dadblasted layers!
Those of us who know how to use adjustment layer masks consider them to be the basics of what makes Photoshop Photoshop. We who know how to use them are pretty smug about it, and secretly poke fun of the great masses who have no idea how to unlock 95% of the power of Photoshop with layer masks.
Aperture comes along, and throws all this out the window: there are no layers!
This is great, because half the time I spend in Photoshop is selecting layers, Half the time when I apply a tool, it's on the wrong layer until I define the correct layer.
With Aperture, it's all good. If I'm tweaking a level, and want to spot a piece of dust, no problem; it just works. In Photoshop, I have to mouse over to my pallets and reselect layers each time I do something different on the same image.
Sharpness of Viewer images
There are three levels of redraw.
The instant you flick to a new image, the viewer image is blurry.
A moment later, as the "loading" spinner spins, you get a much sharper image.
But wait!
After several more seconds of spinning, you'll get the third and final super-sharp version.
Fast Previewing
If you don't want to wait for your full-screen images to redraw, hit "P," for fast Preview mode.
In Preview mode, the "LOADING..." icon goes away and you can zip through your adjusted images fast.
In this mode, everything pops up instantly, however you cannot make or see your adjustments or their palettes.
In Preview, resolution is only half of the original image, which is usually still much more than your screen's resolution. If you need to see something zoomed in to 100%, instead of 50%, just hit P again.
Working on Everything Full-Screen
You may edit images even when they are full-screen (tap "F").
For instance, to rotate, hit G, and move the mouse.
To make other changes, hit H (for "Head-Up Display," or HUD) and a pallet well appears with all the other adjustments. You may leave this to hover over your full-screen image, or simply drag it to your second display.
Exporting Final Edited Images
Select what you want, and hit File > Export > Versions.
Aperture will process everything for the first time from your virginal originals, and output these files as you desire. It can take a while for it to process a lot of images at the same time.
Changing the file size of exported JPGs
The JPGs exported above at Aperture's default settings are at a high quality level (10 out of 12), and therefore are large JPG file sizes.
If you'd like smaller (or larger) JPG file sizes in trade for slightly higher (or lower) levels of JPG artifacts, simply:
Aperture > Preferences > Export > Email Photo Export Preset > (drop down selection list to Edit) > move Image Quality Slider > OK.
I find Quality 5 is a great compromise between quality and size.
Exported JPG file size depends on image complexity.
Artistic Quality: how do the pictures look?
As above, the reason I started to use Aperture was precisely because it gave the best images I've ever seen from LEICA M9 DNG files.
Less important, the adjustments are great. When I optimize all my shots, shots made a stop or two apart in exposure wind up looking the same: Aperture is good enough to track and match over a large range.
I find it easy to adjust images to get exactly the look I want.
Technical Supremacy
Rich guys think they're cool when they open a raw file in Photoshop's Adobe Camera Raw (ACR), and spend a day jacking it in Photoshop with layers and masks.
We can do the same thing faster in Aperture, and there's a secret. I knew all this, but is became apparent why Aperture is technically better when I jammed the Shadows slider and was able to pull up black shadows that were 8 stops underexposed, with vivid detail.
When we open something in ACR, it's converting the raw data into a raster image that is then processed in Photoshop. If we open the file in 16-bits, all is well. All our adjustments made in ACR are done once, and then we have our 16-bit file to tweak in Photoshop to our heart's content.
By comparison, Aperture never makes any final conversions from the raw data until we do a final export of an edited version. Every adjustment and brush is applied to the virginal raw information just once.
When a raw file is opened in Photoshop's ACR, ACR applies all our white balance, exposure, contrast, black-clip and every setting to the data, and produces a big file from it. Here's the problem with this: we always lose something in this process. Add exposure, and we lose some highlights. Open with whatever black-clip setting, and we lose some shadows.
No matter how much we screw with something in Photoshop with what started off as a raw file, we're losing information as soon as we've converted the raw data into a raster image in ACR. Photoshop can't process raw data: it needs the raster data from ACR, and ACR does all sorts of curve shaping, truncation, redithering, rounding and you name it to convert the 14-bit linear raw data into 16-bit log z-axis data. Photoshop asks you to make final decisions in ACR before you even get to start working in Photoshop with a raw file!
Contrast this to Aperture, which is always working directly from the original raw data. All the settings we apply in Aperture are calculated directly from the raw data, so if we need to add black clipping, highlight compression, sharpening, severe white balance shifts, and add strong shadow recovery as well as burn and dodge, these are all calculated from the original raw data. There is no raw-conversion happening a la ACR before Aperture can read the file; the only conversion from raw happens in Aperture only on export.
Here's an example: we sharpen in ACR as part of the demosaicing, but do arbitrary rotations later Photoshop to fix an unlevel camera. ACR does all sorts of inter-pixel interpolation to demosaic and sharpen our image, and we lose more sharpness when re-interpolating again performing the arbitrary rotate later in Photoshop. With Aperture, the raw data is never touched, so the demosaicing, rotation and sharpening are all calculated in the same conversion sequence from the original data, only on final export.
Aha!
Shadow and Highlight Tweaks from Raw Files
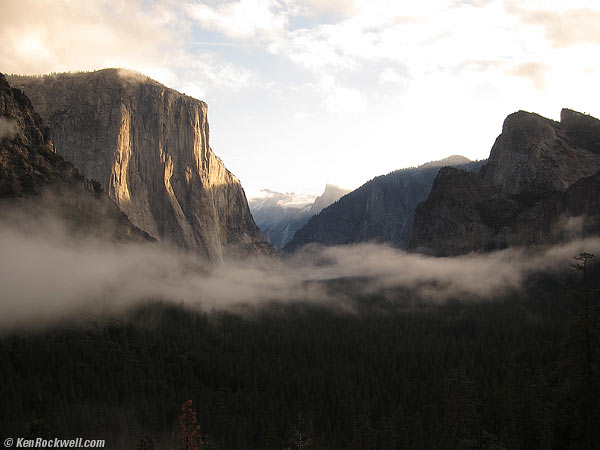
Yosemite in unfavorable light, in-camera Canon S95 JPG. Roll mouse over to see the CR2 file after processing in Apple Aperture.
For those of you on iPad, here's the "after" image after processing the CR2 file in Apple Aperture:
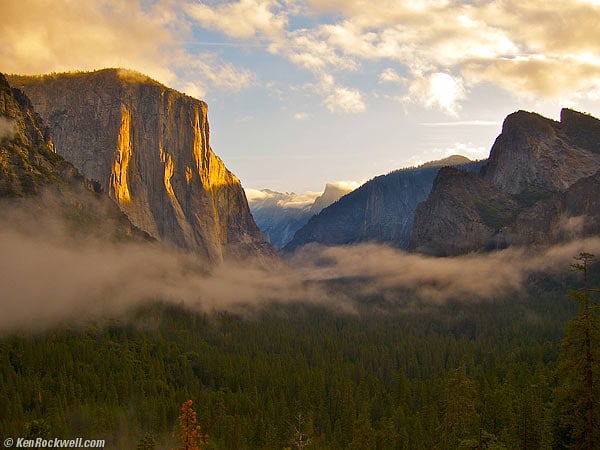
Same shot after creative input in Apple Aperture.
How to get your image files out of an Aperture Library
Aperture makes its own huge library file. Normally, you can't see what's in there or screw with it. In this huge file are copies of all your original images, and depending on how you use Aperture, possibly your only copies of your images.
Of course the whole point of Aperture is to edit and output optimized, final images, but what if you're like me and need to know how to get the original files out of Aperture, even if in 10 years from today we don't even have a working copy of Aperture any more? How can we get these original images out of the big Aperture Library file?
Easy!
Go to MacIntosh HD > Users > (you) > Pictures > Aperture Library.
Normally, all you see is one fat file, your multi-gigabyte "Library."
To see or get your image files out of there, simply right-click the Aperture Library, and select "Show Package Contents." Now you can see what's in there!
Your originals are in the "Masters" folder. The Previews folder has additional half-resolution JPGs of everything.
Installation
If bought online, it is a 700MB download. Worse, it expands to a Gigabyte of mung on my hard drive. A Gigabyte? Photoshop is down to about 80MB last I looked; Photoshop has efficient code, but apparently not Aperture. I downloaded just the trial for Aperture, which excludes the image samples contained in the pay-for version.
In spite of my whining, Aperture runs GREAT on my 2010 hex-processor 3.33GHz, 8GB RAM Mac Pro. It just flies through my DNGs as if they're JPGs, and 1GB of code is only a fraction of the data I shoot in a day in DNG.
The download was an older version; running a Software Update for my system, my Mac found an update to the version I had just downloaded.
Importing from an iPad
There is a rare problem where Aperture 3.1.1 can't read M9 DNGs if they are imported via an iPad. It works great imported from a card, and if you do import via an iPad, simply reimport them back into aperture on your Mac and it can read them.
Dock Icon
The icon is the same as Phase One's Capture One: the front of a lens. Even the lettering is in the same spots.
I'm unsure who did it first. The only difference is a dim "1" in the slightly blue Capture One icon, or the slightly multi-colored reflections in the Aperture icon.
As of 08 February 2011, I'm only starting to play in Aperture, and I love it. It's so much easier to learn than Photoshop, which has taken me decades. The rest of the words below are old fluff.
Old Apple Aperture 1 preview (2006)
Help me help you top
I support my growing family through this website, as crazy as it might seem.
The biggest help is when you use any of these links to Adorama, Amazon, eBay, B&H, Ritz, Calumet, J&R and ScanCafe when you get anything. It costs you nothing, and is this site's, and thus my family's, biggest source of support. eBay is always a gamble, but all the other places always have the best prices and service, which is why I've used them since before this website existed. I recommend them all personally.
If you find this page as helpful as a book you might have had to buy or a workshop you may have had to take, feel free to help me continue helping everyone.
If you've gotten your gear through one of my links or helped otherwise, you're family. It's great people like you who allow me to keep adding to this site full-time. Thanks!
If you haven't helped yet, please do, and consider helping me with a gift of $5.00.
As this page is copyrighted and formally registered, it is unlawful to make copies, especially in the form of printouts for personal use. If you wish to make a printout for personal use, you are granted one-time permission only if you PayPal me $5.00 per printout or part thereof. Thank you!
Thanks for reading!
Mr. & Mrs. Ken Rockwell, Ryan and Katie.
Home Donate New Search Gallery Reviews How-To Books Links Workshops About Contact