OM SYSTEM OM-1 User's Guide
<— back to OM-1 Review & Sample Images
Intro Charging & Power Super Control Panel
Image Sizes & Qualities Picture & ART Modes
ART Bracketing Crazier ART Mode Options
Flicker Scan Silent Electronic Shutter Flash
Remote Control Metering Modes & Exposure
Auto ISO Button, Dial & Lever Programing
Fn Lever AUTOFOCUS Starry Sky AF
AF-ON Button in Manual Focus Focus Stacking
HDR Electronic "Live" ND Filter
Long Night Exposures (Live Comp, Bulb & Time)
My Personal C1, C2, C3 & C4 Settings
My Menu Histograms Playback Image Review
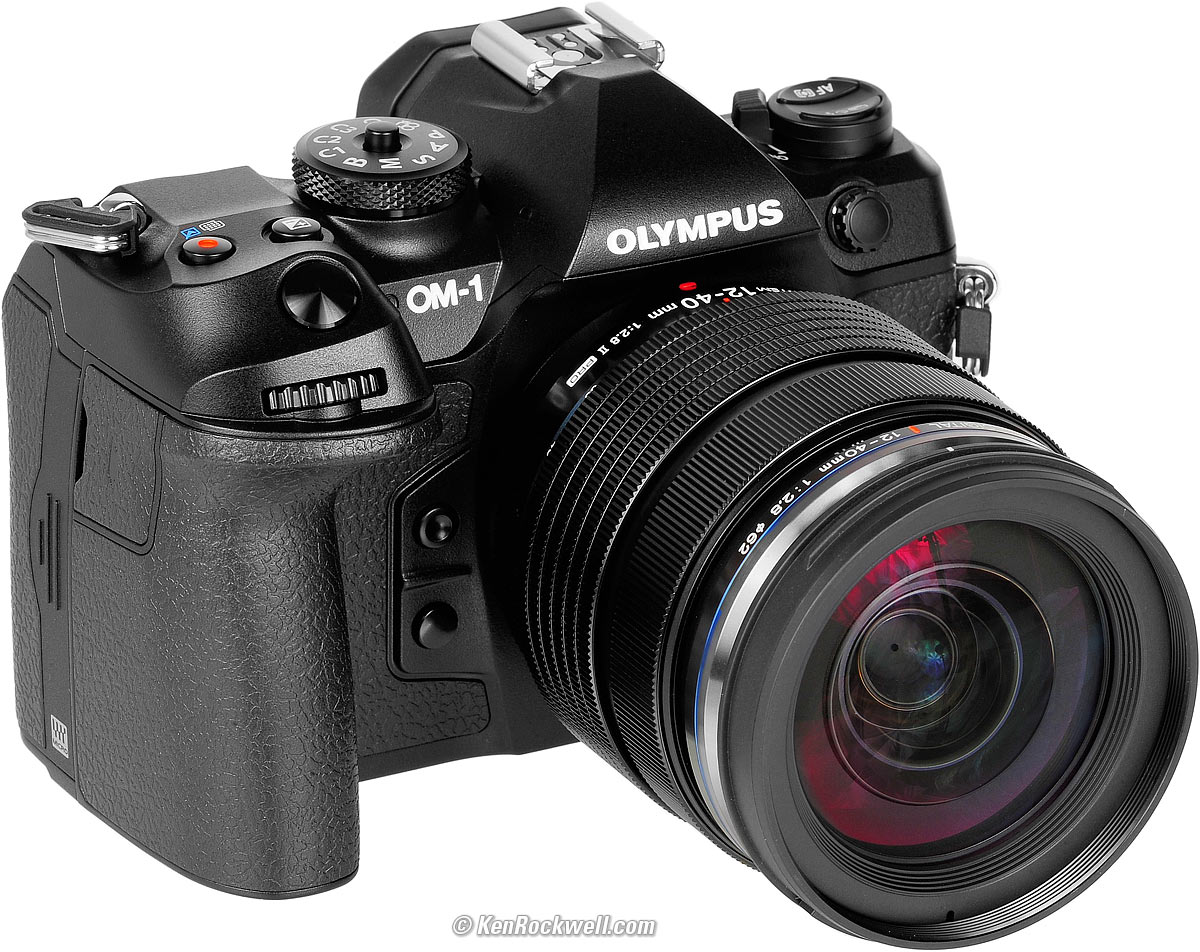
OM SYSTEM OM-1 (21.2 oz./602g with battery and one SD card, has two SD slots, about $1,100 used if you know How to Win at eBay) and M.Zuiko 12-40mm f/2.8 II. bigger.
This 100% all-content, junk-free website's biggest source of support is when you use those or any of these links to my personally approved sources I've used myself for way over 100 combined years when you get anything, regardless of the country in which you live — but I receive nothing for my efforts if you take the chance of getting it elsewhere. OM SYSTEM does not seal its boxes in any way, so never buy at retail or any other source not on my personally approved list since you'll have no way of knowing if you're missing accessories, getting a defective, damaged, returned, dropped, incomplete, gray-market, store demo or used OM-1 — and my personally approved sources allow for 100% cash-back returns for at least 30 days if you don't love your new OM-1. I've used many of these sources since the 1970s because I can try it in my own hands and return it if I don't love it, and because they ship from secure remote warehouses where no one gets to touch your new OM-1 before you do. Buy only from the approved sources I've used myself for decades for the best prices, service, return policies and selection.
December 2024 Better Pictures OM SYSTEM Canon Nikon Sony Fuji LEICA Zeiss HASSELBLAD All Reviews
OM SYSTEM OM-1. bigger.
OM SYSTEM OM-1. bigger.
OM SYSTEM OM-1. bigger.

Introduction top of OM-1 User's Guide back to OM-1 Review

|


I got my OM-1 through B&H. I'd also get it at Adorama or at Amazon, or used at eBay if you know How to Win at eBay.
Body-only: $1,999.99 at B&H, at Adorama and at Amazon.
OM-1 and M.Zuiko 12-40mm f/2.8 II: $2,599.99 at B&H, at Adorama and at Amazon.
OM-1 and M.Zuiko ED 90mm f/3.5 IS: $3,499 at Adorama.
OM-1, 12-40mm f/2.8 II and 90mm f/3.5 IS: $4,099.98 at Adorama and at Amazon.
Body-only about $1,700 used if you know How to Win at eBay.
This guide will make you a master at operating the OM SYSTEM OM-1.
Being an expert camera operator is a prerequisite to taking great pictures, but far more important is to have the vision to see the picture in the first place. See How to Take Great Pictures for help with taking great pictures; this guide simply teaches how to operate the camera.
This is current as of Firmware 1.3 in May 2023. As the years roll on things may move around in the menu system or be renamed.
Hint: There is no "?" button to learn what menu items do. Instead, use the INFO button for more information about most menu items. Don't laugh, it took me a few weeks to figure this out!
Charging & Power top of OM-1 User's Guide back to OM-1 Review
The OM SYSTEM OM-1 charges over USB-C, and also charges from older USB-A ports with any USB-A to USB-C cable. You don't have to use the latest USB-C PD chargers, although a very nice one comes with the OM-1. It charges or runs just fine from my old USB-A power banks and solar panels as well as USB-C PD power banks, USB-C PD solar panels or car USB-C and USB-C ports. The OM-1 charges from anything, bravo!
There's an ORANGE LED on the back that lights while charging. It draws about 9W (9V at 1A).
The only advantage I see to using a modern USB-C charger (like the one that comes with the camera or a USB-C power bank) is that you can charge at the same time as shooting. Connected to USB-A sources with a USB-A to USB-C cable it only charges (power switch OFF) or runs the camera (power switch ON) at any one time due to power limitations. It won't do both at the same time unless you use a USB-C source rated at least 18 W or so. I have power measurements at Power & Battery.
It can run indefinitely powered by USB and will charge the battery at the same time (but more slowly), however you do need to have a battery installed for it to run.
Hint: When plugged into a USB-C power source with the power switch ON, it charges the battery at the same time as you're shooting. Cool. However, when plugged into my Mac and I select USB-PD as the option, the camera is powered from my Mac, but doesn't charge its battery. To charge from my Mac I need to turn OFF the OM-1. There are no mysteries here: the orange LED on the back lights when you're charging and it's off when you're not.
Hint: Once it goes to sleep it doesn't draw any significant power. I set mine to go to sleep after a minute, and just pick it up and shoot and never use the power switch unless I jam it in a backpack where the shutter might get pressed by accident. If its been several hours, the sensor self-cleans as it wakes-up just as if it was a new power-on. I don't use the optional Power Off timer, because when it turns itself off (as opposed to going to sleep) I have to flip the power switch to off before it will turn back on.
Hint: Power times-out when carried around my neck, so unlike Sony which doesn't go to sleep held around my neck, I always leave my OM-1 power ON and it just deals with it and I can shoot all day, just tapping the shutter to wake it up as needed.
Hint: I don't use any of the Bluetooth or Wi-Fi features, so I use the Airplane mode to turn these off at MENU > 🔧 WRENCH page 4 > Airplane Mode > ON which might save a little power.
Hint: The battery icons in menu titles at MENU > 🔧 WRENCH page 5 incorrectly always imply about an 80% state of charge. Those icons are static artwork and aren't the actual state of charge. Don't get tricked into thinking you have lots of battery charge because you might not.
FYI: Page 290 of the User's Manual suggests pulling the battery if you're not going to shoot for a month, while page 307 cautions that the clock will die after a day without the battery.
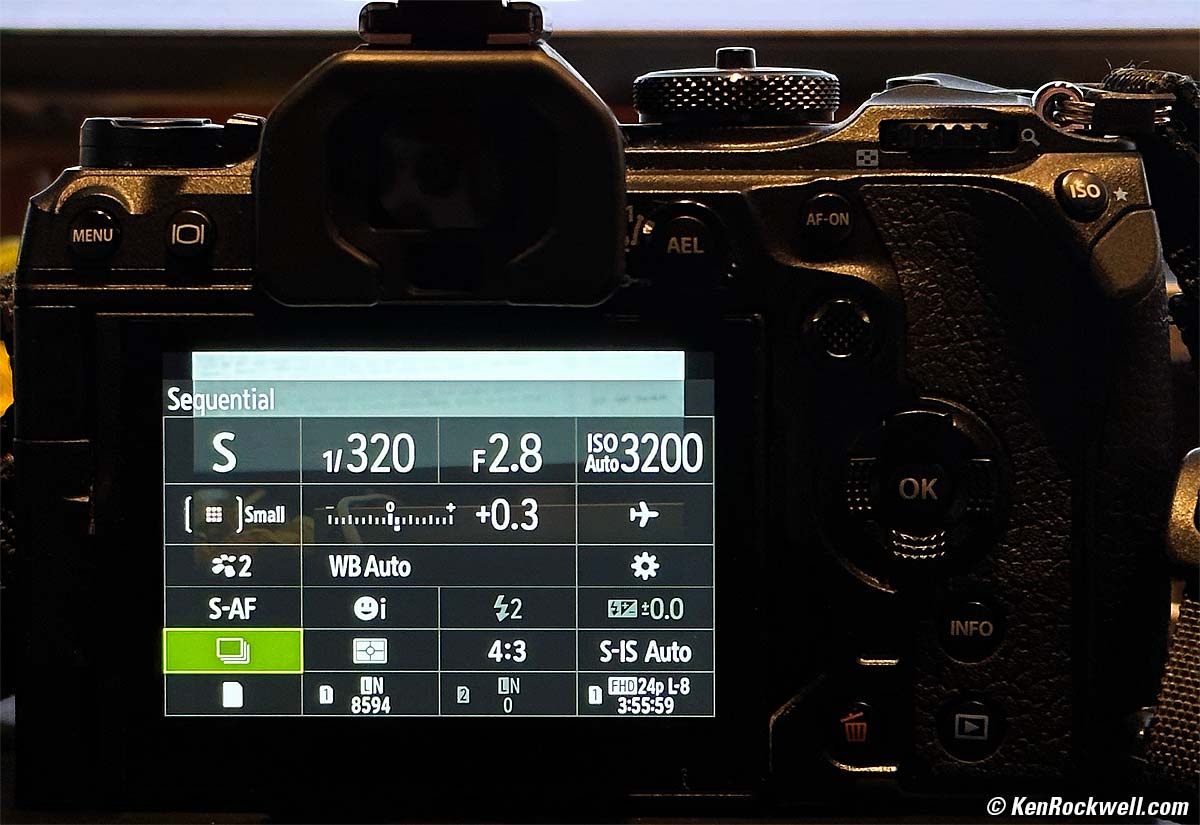
Super Control Panel top of OM-1 User's Guide back to OM-1 Review
Press OK while in the shooting mode and up pops this panel with a zillion things you can control. Click over to any one of them or tap the touch screen to select an item, and then just turn the dials or press OK to set each one:
The Super Control Panel. bigger.
Hint: If you try to set something that can't be set, like the aperture while in S exposure mode, it simply ignores you.
Hint: The ⚙ gear icon lets you program control button functions.
Hint: You can't rearrange these. What you see is what you get.
Image Sizes & Qualities top of OM-1 User's Guide back to OM-1 Review
Oddly the settings at the Super Control Panel screen (press OK) and at MENU > CAMERA 1 > page 1 > (second item with a camera and a fading diamond icon) only offer a few preset options for image size and quality.
Even more oddly you have to use the next menu option with the same two icons and "Detailed Settings" at MENU > CAMERA 1 > page 1 to select which of the many available settings appear in spots two through five in the above menu (or the Super Control Panel).
By default you have options of LARGE at three levels of compression and a fourth at M1 (3,200 × 2,400) and Normal compression.
To get smaller sizes (M2, S1 or S2) or milder compression options (F or SF) for M1, select these first at "Detailed Settings" above, and only then will they will be available to you in the usual spots.
It's easier to do than to explain. The only reason I can fathom OM SYSTEM hid these other options is to make it less likely you'd make a mistake and shoot a whole job at 1,024 × 768 by accident.
JPG files are tagged as 300 DPI by default. You can set your desired DPI from 1 to 9,999 at MENU > 🔧 WRENCH page 2 > dpi Settings. I set mine to 72 DPI.
DPI settings don't matter unless you're a graphic designer dropping text onto your images as I do, in which case the DPI setting affects the size of the text.
Setting Picture Modes top of OM-1 User's Guide back to OM-1 Review
Set the picture modes either from the Super Control Panel, or at
MENU > CAMERA 1 > page 2 > Picture Mode.
You can use the ART BKT feature to let the camera record separate images with each of whichever Picture Modes you prefer to learn how each looks.
"ART Bracketing" top of OM-1 User's Guide back to OM-1 Review
This option makes the camera save multiple files for each shot, each with a different Picture Mode (Natural, Vivid, Portrait, Cross-Process, etc.).
The ART Picture Modes have no sharpness, contrast or sharpening settings as the main Picture Modes do, but many of them have other crazy settings instead.
Enable this at MENU > CAMERA 2 > page 3 > ART BKT > ART BKT > ON
and then select which of the zillion Picture Modes you'd like it to save for every shot at
Set this at MENU > CAMERA 2 > page 3 > ART BKT > ART BKT Setting > and check all you'd like it to save.
Hint: It saves an image at the camera's current Picture Mode setting without needing to select it, and if you do select it no harm, as it still saves just one file for that particular Picture Mode.
Hint: The OM-1 is so smart that the "remaining pictures" counter knows how many images get saved each time you press the shutter, and aptly decreases as you select more and more Picture Mode versions to save for each shot.
Hint: I use this so much I program my bottom front Fn button to select ART BKT, so one tap brings me in and out of ART BKT!
Hint: HDR cancels ART BKT. If you want a one-tap return to ART BKT after using HDR, I program my bottom front Fn button to select ART BKT, so one tap brings me out of HDR and back to ART BKT! Cool, huh?
Crazy ART Picture Options top of OM-1 User's Guide back to OM-1 Review
Once you've digested all the nutty ART picture modes, there's even more!
Popular in Japan are even more ways to have the camera do crazy things to your pictures, like add 4-pointed starbursts on points of light, soft focus, vignetting, borders, and I have no idea what else.
To see these, select any of the ART picture modes either from the Super Control Panel or at
MENU > CAMERA 1 > page 2 > Picture Mode,
and you'll see an Effect OFF option right below the ART option listed at the top left of the screen. Select the Effects option on the left, and now you'll see a plethora of nutty options along the bottom of the screen you can add!
The options are different for each ART mode. Be a kid, explore and have fun!
Flicker Scan top of OM-1 User's Guide back to OM-1 Review
To preview the effects of flicker and banding to select an optimum electronic shutter speed, choose M or S exposure mode, be sure you're set to the electronic shutter [♥] and set:
MENU > CAMERA 1 > page 4 > Flicker Scan
See page 108 in OM SYSTEM's User's Manual for more details.
Silent Electronic Shutter top of OM-1 User's Guide back to OM-1 Review
The Silent Electronic shutter is set among the Advance Mode options, which you can find at the Super Control Panel or at MENU > CAMERA 1 > page 7 Drive Mode > Drive.
It's hidden as the ♥ heart icon next to the various advance mode icons. For instance,♥ ▭ is the single-frame electronic (silent) shutter mode.
To get flash to work in this mode, see:
Flash top of OM-1 User's Guide back to OM-1 Review
It comes included with a tiny FL-LM3 flash:

OM SYSTEM OM-1, M.Zuiko 12-40mm f/2.8 II and included FL-LM3 flash. bigger.
This flash is powered from the camera via the hot shoe; no extra batteries are required.
Flash with Electronic Shutter
To get the flash to work with the silent electronic shutter, set:
MENU > CAMERA 1> page 7 > Drive Mode > Silent [♥] Settings > Flash Mode > Allow.
Fill Flash Outdoors
I always use flash with the mechanical shutter for fill flash when photographing people in strong direct sunlight.
Fill Flash Indoors
If you use supplemental flash indoors, be sure to gel (filter) the flash orange (CTO) to match tungsten or green to match fluorescent lighting and then set the camera to that same manual white balance.
Studio Strobes & Flash as the Only Source of Light top of OM-1 User's Guide back to OM-1 Review
I use a custom white balance with my Novatron studio strobes, which reads as 5700K. Additionally I dial-in A2 G1 WB shift.
If flash or studio strobes are the primary source of light (very little contribution from ambient light), use the "Optical Viewfinder" mode, explained next:
Finder Modes top of OM-1 User's Guide back to OM-1 Review
Hint: The finder so bright and sharp that it can make your pictures look better and brighter than they will on a regular monitor or anywhere else. Experience will teach you what to expect compared to what you see in your finder, especially in daylight where it is exceptionally brilliant.
Optical Finder Mode
MENU > ⚙ GEAR page 3 > LV Mode > S-OVF ("Simulated Optical ViewFinder").
If you don't set this, the default STANDARD mode shows the effects of exposure and other camera settings in the finder, so with the camera set for a flash exposure, the ambient light is so relatively dim that the finder will be just about black in STANDARD mode. S-OVF (Simulated Optical ViewFinder) mode lets us see, even though our exposure is probably set to f/22 and 1/250 at ISO 200 for the strobes.
EVF Styles
There are three finder styles selected at:
MENU > ⚙ GEAR page 4 > EVF Style.
I use Style 2, which puts most of the data displays below the active image.
Style 1 is the same, except the data below the image is put in a dark blue, rather than black, box.
Style 3 fills the EVF with the active image and the data is drawn over it. It's the same size as the playback image, however I don't use it because while the compensation bar graph becomes a level with a half-press of the shutter in Style 1 and Style 2, it doesn't in Style 3.
Night Vision
This makes the finder image more visible in very dim light.
Set this at:
MENU > ⚙ GEAR page 4 >
If you use this a lot you can set a function button to toggle this on and off.
Magnification Modes or "LV Closeup Mode"
There are a lot of ways to program buttons to magnify. That's normal.
What's interesting about the OM-1 is that when magnifying a live image, we can program what it does when you tap the shutter. We can set it either to return to the normal view (mode 1, my preference), or stay magnified when the shutter is tapped. Select this at:
MENU > ⚙ GEAR page 2 > LV Close Up Mode > Mode 1 (return to normal view) or Mode 2 (stay magnified).
Advance Modes & Frame Rates top of OM-1 User's Guide back to OM-1 Review
Select these either from the Super Control Panel, from the button on the top left of the camera, or from inside the menu system at:
MENU > CAMERA 1> page 7 Drive Mode > Drive.
To see and set the frame rates for any of the continuous modes (as well as setting the preshot capture "ProCap2" frame counts), set:
MENU > CAMERA 1> page 7 Drive Mode > Sequential Shooting Settings.
All the modes track autofocus and auto exposure, except for SH 1, which locks focus and exposure for 60, 100 or 120 FPS shooting. OM SYSTEM reversed the functions of SH 1 and SH 2. It makes more sense the other way around where SH 2 would be faster than SH 1, but they didn't ask me. Sorry.
Top FPS |
Other Rates |
Track AF & AE? |
Slowest shutter speed |
Flicker Fix |
Finder blackout |
|
Single Frame Std. |
n/a |
n/a |
YES |
YES |
YES1 |
|
Single Frame Silent Elec. |
n/a |
n/a |
YES |
YES |
YES1 |
|
Continuous Std. |
10 FPS |
1, 2, 3, 4, 5, 6, 7, 8 or 9 FPS |
YES |
YES |
YES1 |
|
♥ Continuous Silent Elec. |
20 FPS |
5, 10 or 15 FPS |
YES |
YES |
YES1 |
|
ProCap2 |
20 FPS |
5, 10 or 15 FPS |
YES |
1/20 |
NO4 |
YES1 |
♥ SH 1 |
120 FPS |
60 or 100 FPS |
NO |
1/15 |
YES |
NO |
ProCap SH 12 |
120 FPS |
60 or 100 FPS |
NO |
1/15 |
NO4 |
NO |
♥ SH 23 |
50 FPS3 |
25 FPS |
YES |
1/640 |
NO |
NO |
ProCap SH 22, 3 |
50 FPS3 |
25 FPS |
YES |
1/640 |
NO4 |
NO |
1.) This isn't necessarily bad; it's just like a DSLR and lets us know the camera fired, however at frame rates between about 10 to 20 FPS it can be disorienting.
2.) ProCap (Professional Capture) electronic (♥) shutter modes are precapture modes. While it's limited to 99 frames total per burst, up to 70 of these frames can be selected to record from before the full pressing of the shutter! In the ProCap mode the OM-1 starts capturing 20 MP (or whatever you want) stills at the set frame rate as soon as the shutter is half pressed, and then saves the number of precaptured frames you've selected in MENU > CAMERA 1> page 7 Drive Mode > Sequential Shooting Settings from before you pressed the shutter, as well as the ones after!
3.) Only works at up to at 50 FPS in SH2 with these lenses as of May 2023:
- M.ZUIKO DIGITAL ED 12-40mm F2.8 PRO
- M.ZUIKO DIGITAL ED 12-40mm F2.8 PRO Ⅱ
- M.ZUIKO DIGITAL ED 12-100mm F4.0 IS PRO
- M.ZUIKO DIGITAL ED 40-150mm F2.8 PRO
- M.ZUIKO DIGITAL ED 150-400mm F4.5 TC 1.25× IS PRO
- M.ZUIKO DIGITAL ED 300mm F4.0 IS PRO
4.) Flicker reduction doesn't work in any ProCap mode.
Remote Control top of OM-1 User's Guide back to OM-1 Review
Cords
Use a 2.5mm remote cord.
App
The OI.Share app, like all camera apps I've tried, is a pain to set up the first time, and takes at least 30 seconds to reconnect each next time — if you're paying attention to click JOIN when it asks 15 seconds after you first tried to reconnect, and generally runs slowly.
If you are connected, it seems to keep the camera awake forever, or for at least the half hour I waited to see if it would turn off.
You can't take control back at the camera by tapping the shutter button, which is ignored.
To take back local control and disconnect, turn off the OM-1 or tap its MENU button.
Weird is that it never seems to disconnect unless I do it deliberately. I'm unsure if this could run down the battery if I forget. I watched it sit in Live View for at least 30 minutes and it kept on going with the camera's rear LCD lit.
Metering Modes & Exposure top of OM-1 User's Guide back to OM-1 Review
I only use the ESP multipattern meter. If I don't get the exposure I need, I simply use exposure compensation until it looks right. All the other metering modes date from before the 1980s when Matrix metering was invented.
AEL can be programmed to use a different metering mode than the shutter-activated meter. Set this at:
MENU > CAMERA 1 > page 5 > Metering during AEL.
Default is AUTO, meaning AEL uses the same metering as you already have selected. The other options let you force AEL to use other metering modes like spot in AEL, while the non-AEL exposures are set with your usual choice. Clever!
Reset Exposure Compensation
Just hold OK a few seconds, and Bingo!, you're back to ±0.0.
Auto ISO top of OM-1 User's Guide back to OM-1 Review
Adjust this at MENU > CAMERA 1 > page 3 > ISO-Auto.
Here we can select it working in all exposure modes, or just P, A and A modes.
I use it only in P, S and A modes.
There are manual and Auto settings for the slowest shutter speed, but oddly no way to shift the auto-selected minimum shutter speeds. They're always about 1/(twice the focal length).
Button, Dial & Lever Programming top of OM-1 User's Guide back to OM-1 Review
Set these at:
MENU > ⚙ GEAR page 1 > etc.
Even easier, you can program button functions with the ⚙ GEAR Icon at the Super Control Panel.
For setting what these do during playback, go to MENU > [▶] PLAY page 2.
Fn Lever top of OM-1 User's Guide back to OM-1 Review
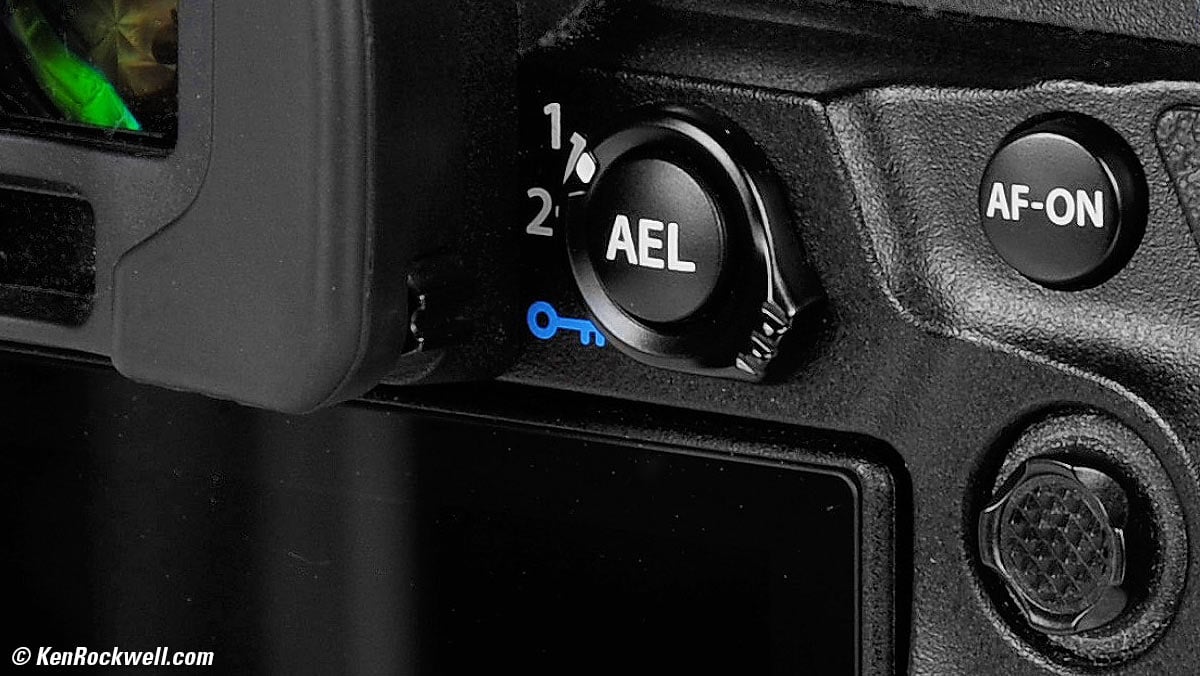
Fn Lever around the AEL button. bigger.
The Function Lever allows us to select between two different AF mode settings with one click, or works as a Movie mode or Power lever. Set it at:
MENU > ⚙ GEAR page 1 > Fn Lever Settings
I use (camera icon) Fn Lever Function Mode 2, which makes Fn1 and Fn2 positions remember different AF system settings.
Now it sets by itself. The lever simply recalls the settings of the AF system from when you last used that lever position. To set it, just set the lever in one of the two positions, set your AF system as you want it, and the next time you return to that position the settings are recalled. It's easier to do than explain.
I set Fn1 (down) to SMALL AF area, AF-S, and set Fn2 (up) to AF-C+Tracking. Easy, and more direct (one flick) than any other current camera.
You also can program it to select the movie mode, disable it, or make it a power lever that overrides the main power switch at:
MENU > ⚙ GEAR page 1 > Fn Lever Settings.
Autofocus top of OM-1 User's Guide back to OM-1 Review
I've never found the All Area AF mode to work well. I only use "Small."
I remove the numerous other AF Area modes from cluttering my settings by deactivating the unused ones at:
MENU > AF page 5 > AF Target Mode Settings > (check or uncheck what modes you want to use or not).
I uncheck every one of the modes. Single is the default mode and appears even when all the others are deselected.
AF areas disappear by default. To keep the green boxes visible after focus is locked or while tracking, set:
MENU > AF page 2 > AF Area Pointer > On2.
I use S-AF (Single AutoFocus and lock) most of the time. I set this at the Super Control Panel, and you can set this with the top left AF button or at MENU > AF page 1 > AF Mode.
For moving objects, I set C-AF+TR (Continuous AutoFocus with Tracking) at the Super Control Panel, and you can set this with the top left AF button or at MENU > AF page 1 > AF Mode.
I program my Fn Lever to select between these two AF system settings with just a flick!
Hint: I never move my AF area; I always leave it in the center. If I want to focus on something to the side, I use C-AF+TR (Continuous AutoFocus with Tracking), point the camera at the desired object, half-press the shutter to focus and track that stable object back to the corner as I recompose!
You have to enable Face and Eye AF manually in the menus; they're not on by default. I enable them at:
MENU > AF page 2 > Face & Eye Detection > Focus on the Face or eyes detected.
I boycott manual subject identification because it is the camera's duty, not mine, to identify objects. If your photos are more important than my ideological hangups, you can get better results than I do by letting the camera know what you're shooting at:
MENU > AF page 2 > Subject Detection > choose one of:
- OFF
- Birds
- Dogs & cats
- Aircraft, including helicopters
- Trains
- Cars & motorcycles
I leave mine at OFF in protest. When it sees eyes and faces it seems to do OK, while smarter people will set it when shooting these other things. If these settings are important to you, you can use the Fn lever to select between two of them or the C1, C2, C3 and C4 modes to select among four.
"Starry Sky AF" top of OM-1 User's Guide back to OM-1 Review
Want to autofocus directly on stars for astrophotography? Easy! It's one of the modes set in the same places as the usual Single and Continuous AF modes. Its icon is [★] (get it: "star?") and you can set its particulars at:
MENU > AF page 1 > Starry Sky AF Setting.
This is really important for shooting the Milky Way; without this feature I used to have to focus my other cameras on a distant city light and hope I didn't jar the focus setting — and if I did or thought I did, I had to pull my camera off the tripod and refocus on that city light again!
Use AF-ON Button in Manual Focus Mode top of OM-1 User's Guide back to OM-1 Review
If you want AF-ON to make a spot focus while in the manual focus mode, set MF in the menu system while leaving the lens set to AF, and then activate this feature in the menu system:
Set Manual Focus mode at:
MENU > AF page 1 > AF Mode > MF (leave the lens set to AF)
and then set:
MENU > AF page 1 > AF-ON in MF mode > yes.
Now you're in manual focus. Turn the lens ring to focus with the ring slid forward to the AF position. If you press AF-ON, it autofocuses and locks until you move the ring or press the button again.
Focus Stacking top of OM-1 User's Guide back to OM-1 Review
Set Focus Stacking at MENU > CAMERA 2 > page 1 > Focus Stacking > ON.
It works great, even hand-held.
Focus Stacking cancels any Picture Modes, always recording in Picture Mode #3 (Natural).
Hint: I find it runs from about my initially chosen focus distance on out, so I set my focus manually towards the closest end of the field I wish to keep in focus, press the shutter and voilà!, the OM-1 shoots a sequence, composites the frames and saves the final result.
It saves all the original images as well as the stacked composite. I delete the originals later.
Bravo!
As of April 2023, the Manual says it only works with:
- M.ZUIKO DIGITAL ED 7-14mm F2.8 PRO
- M.ZUIKO DIGITAL ED 8-25mm F4.0 PRO
- M.ZUIKO DIGITAL ED 12-40mm F2.8 PRO
- M.ZUIKO DIGITAL ED 12-40mm F2.8 PRO Ⅱ
- M.ZUIKO DIGITAL ED 12-45mm F4 PRO
- M.ZUIKO DIGITAL ED 12-100mm F4.0 IS PRO
- M.ZUIKO DIGITAL ED 40-150mm F2.8 PRO
- M.ZUIKO DIGITAL ED 40-150mm F4.0 PRO
- M.ZUIKO DIGITAL ED 100-400mm F5.0-6.3 IS
- M.ZUIKO DIGITAL ED 150-400mm F4.5 TC 1.25× IS PRO
- M.ZUIKO DIGITAL ED 8mm F1.8 Fisheye PRO
- M.ZUIKO DIGITAL ED 30mm F3.5 Macro
- M.ZUIKO DIGITAL ED 60mm F2.8 Macro
- M.ZUIKO DIGITAL ED 300mm F4.0 IS PRO
- M.ZUIKO DIGITAL 1.4× Teleconverter MC-14
- M.ZUIKO DIGITAL 2× Teleconverter MC-20
Gray-Card White Balance top of OM-1 User's Guide back to OM-1 Review
To set white balance manually to a white or gray card (I use this in my studio with my studio strobes):
Press OK to get to the Super Control Panel.
Select WB and press OK.
Click left or right to get to any of the four Custom Presets, ◺▢◿1, ◺▢◿2, ◺▢◿3 or ◺▢◿4.
Click down to the xxxxK option along the upper left of the screen.
Point your OM-1 at your card (fill the frame) and press INFO. The OM-1 shoots a picture, with or without flash or strobes as you have it set, and sets the white balance to make whatever was in the frame neutral.
HDR top of OM-1 User's Guide back to OM-1 Review
Set HDR at MENU > CAMERA 2 > page 1 > HDR > ON. That's the hard way.
Hint: If you want one-tap swapping to and from HDR, I program my top Exposure Compensation button to HDR. Now one tap gets me in or out of HDR! Not to worry; I have my rear dial set to control exposure compensation so I never use the button.
HDR cancels ART BKT, and setting ART BKT cancels HDR.
Hint: If you want a one-tap return to ART BKT from HDR, I program my bottom front Fn button to select ART BKT, so one tap brings me out of HDR and back to ART BKT!
It only shoots in Natural Picture Mode in HDR. Tough.
"Live ND" for Long Exposures in Bright Light top of OM-1 User's Guide back to OM-1 Review
The Live ND electronic neutral density filter allows longer exposures for motion effects like blurring water when otherwise it's too bright. It's not for low light, in which case you don't need this feature to make long exposures.
It collects multiple shorter exposures and averages them into one equivalent long exposure.
Live ND only works in S or M exposure modes, only with a maximum shutter speed of 1/60 and only up to ISO 800 (duh, use lower ISOs for long exposures)
Set it at:
MENU > CAMERA 2 > page 1 > Live ND Shooting > ON.
Here you also can set the depth of the simulated ND filter (ND 2× to ND 64×, a.k.a. one to six stops or ND 0.310 to ND 1.810).
You may not notice it, but your preset shutter speed magically drops as many stops as you just set. For instance, if you're at 1/30 and then engage the 3-stop LiveND, your indicated (and effective) shutter speed magically drops to 1/4 while giving the same exposure.
In daylight you can get exposures as long as a couple of seconds at f/22 at ISO L80, with no conventional ND filter needed.
If you need even longer exposures in bright light, you'll still need a very deep conventional ND filter, like an ND 10 (1,000× or ND 310), ND 12 (4,000× or ND 3.610) or ND 15 (32,000× or ND 4.510) filter. I'm wary of variable ND filters; they sound convenient but I suspect they'll have color shifts.
Of course you can use a regular filter on the lens at the same time as the LiveND electronic filter.
A huge advantage of the LiveND electronic filter is that it's genuinely neutral, while glass ND filters often aren't and lead to color casts.
Hint: Stabilization works in this mode. It should be turned off if you're on a good tripod. Sadly we can't set stabilization to turn off in this mode but work in other modes, so we run the risk of leaving it on for long exposures or forgetting to turn it back on when done here.
Long Night Exposures top of OM-1 User's Guide back to OM-1 Review
The OM-1 has some very different ways of making long exposures, including three different "Live" modes that let us watch the exposure accumulate, with a live histogram, so we can stop the exposure when it looks good.
We get to these modes at the B setting of the top mode dial, and then use the rear dial to select among the various Bulb, Time and "Comp" options.
We select the "Live" options (or not) for these modes in the menus, which then control what options we have with the rear dial.
By default it selects the newer "Live" modes, so it takes a few settings to set it back to the traditional Bulb and Time modes.
In B, pressing MENU takes a shortcut and opens at MENU > CAMERA 2 > page 2 > BULB/TIME/COMP. > Composite Settings. Press MENU to pull out of this to upper levels of the menu system from which to select other things. It's confusing because pressing MENU simply opens at "Composite Settings," which means nothing when you first get your OM-1.
We choose between the traditional or the "Live" modes at MENU > CAMERA 2 > page 2 > BULB/TIME/COMP.:
Leave MENU > CAMERA 2 > page 2 > BULB/TIME/COMP. > Live Bulb or Live Time at their defaults of 0.5sec. and you get LiveTime or LiveBulb, which let you watch the exposure accumulate.
Set MENU > CAMERA 2 > page 2 > BULB/TIME/COMP. > Live Bulb or Live Time to OFF and you get old-fashioned Time or Bulb.
These modes work with all the Picture Modes and even ART BKT, but only with manual ISOs set from ISO L80 to ISO 6,400.
Hint: By default the OM-1 usually makes an equally-long dark-frame exposure for noise reduction. That's swell, but means you may stand around for an extra hour after an hour-long exposure for this to go on. To turn this off, set MENU > CAMERA 1 > page 3 > Noise Reduction > OFF. This saves time, but if you get purple haze around the frame edges or other noise, consider turning it back on. Sadly you need this more as times get longer, where it wastes even more of your time. Sorry, that's physics for you.
Hint: These modes work only in the single-shot mechanical shutter setting, so you can't change that or use the self timer, even though they're often doing all sorts of electronic shutter magic in the background.
Hint: You don't need a remote release in the Time or Comp modes. A trick from the dawn of photography is to cover your lens with a hat or your hand (without touching the lens), press the shutter, and then uncover your lens to start the exposure. Cover the lens again to end the exposure without vibration and then press the shutter button to close the shutter.
Hint: Stabilization works in these modes. It should be turned off if you're on a good tripod. Sadly we can't set stabilization to turn off in Bulb but work in other exposure modes, so we run the risk of leaving it on for time exposures or forgetting to turn it back on the next day for handheld shooting.
Hint: Once started, the only way I've found to abort a long-timed exposure is to turn off the camera. Of course the modes below are usually ended with the shutter button, but otherwise start a long exposure and the OM-1 seems to ignore every input other than the power switch if attempting to stop it early. Using the power switch does not record the aborted image; the OM-1 throws it away.
Finder & LCD Settings for Night Shooting
By default the rear LCD dims when set to the B exposure mode. You can set how dim at
MENU (> CAMERA 2 > page 2) > BULB/TIME/COMP. > Bulb/Time Monitor > (set brightness). By default it's at the dimmest setting: -7.
Hint: Even at their dimmest settings, images on LCDs and EVFs seem brighter and more vivid when standing outside in the dark than they will look played during the day. Experiment and you'll discover that you usually need an image that looks a stop or two overexposed while you're shooting in the dark to look properly exposed later.
Bulb or Time
Bulb opens the shutter for as long as you hold a remote release or the shutter button.
Time opens the shutter when you first press it, and stays open until you press it again.
Set the top mode dial to B.
Press MENU (> CAMERA 2 > page 2) > BULB/TIME/COMP. > Live Time or Live Bulb > and set it to OFF for regular Time or Bulb.
Now spin the rear dial to select Bulb or Time.
Easy.
Hint: Since the timer set at MENU > CAMERA 2 > page 2 > BULB/TIME/COMP. > Bulb/Time Timer can't be set to longer than 30 minutes, you can't make a traditional Time or Bulb exposure longer than 30 minutes.
LiveBulb and LiveTime
These let us see our exposure accumulate LIVE so we can stop it when it looks done. This beats making an hour-long exposure, playing it back, and realizing we really only needed a half hour (or an hour and a half) and have to start over again.
Be sure MENU > CAMERA 2 > page 2 > BULB/TIME/COMP. > Live Bulb or Live Time is set to a time (default is 0.5sec.; use any value except OFF) to get LiveTime or LiveBulb. If it's set to OFF, you get regular Time or Bulb as explained immediately above, with no live accumulating preview.
Hint: There is a timer set at MENU > CAMERA 2 > page 2 > BULB/TIME/COMP. > Bulb/Time Timer which stops the exposure after 1 to 30 minutes. You can use this to time Time exposures (good), and be sure it's set to at least as long as the longest exposure you intend to make. If you leave it set to 8 minutes, it will stop exposures after 8 minutes even if you think you're making an hour exposure.
Hint: Since the timer set at MENU > CAMERA 2 > page 2 > BULB/TIME/COMP. > Bulb/Time Timer can't be set to longer than 30 minutes, you can't make a LiveTime or LiveBulb exposure longer than 30 minutes.
More starting at pages 51 and 173 in the printed manual.
LiveComp: "Live Composite" Lighten Blending (Peak Accumulation) for Lightning and Star Trails
This feature is for night scenes that change over time, especially star trails, bursts of lightning or office windows lighting up. You need a tripod for this, and it also lets us see our image develop as time goes on.
This is the same as LiveTime, except that instead of accumulating exposure everywhere as long as an exposure goes on, it simply records the peak (maximum) value of each pixel during many shorter exposures. This means that the background won't get lighter after a very long exposure, while the path of every star or burst of lightning will be super bright and stand out because it's not averaged over the total exposure time as it is with simple long exposures.
Exactly as it emphasizes brighter things that are transient because it holds the peak brightness of each pixel, this mode also makes dark things that move disappear! Since it's accumulating the peak brightness of each pixel, it ignores anything darker. If a person is wearing black and moves, he'll completely disappear because this mode will fill-in the lighter background as soon as he moves away! I want to try this in Manhattan in winter where it seems everyone walks around in long black coats.
Playing with this handheld indoors you'll see nothing happen as you hold the camera still, and if you pan the camera around you'll see light things like lamps and windows smear themselves across the darker areas.
A nifty feature is that there is a bar graph and digital indication of the exposure at the bottom of the screen so you can change your ISO, aperture or the time for each exposure it uses to give a perfect overall exposure.
We set the aperture and ISO directly for this, but to set the time used for each of the exposures, set it at
MENU > CAMERA 2 > page 2 > BULB/TIME/COMP. > Composite Settings > (default is 1/2 second).
Even if you deactivated the dark-frame subtraction noise reduction for Bulb and Time exposures at MENU > CAMERA 1 > page 3 > Noise Reduction > OFF, the OM-1 still makes them for LiveComp exposures. This is fine, because the LiveComp exposure is what you just set in the line above, which is only a fraction of the total time you stood around.
Hint: If you leave this on a tripod exposing overnight and forget to stop it before dawn, your image will be washed out as the sun rises. Set the timer at MENU > CAMERA 2 > page 2 > BULB/TIME/COMP. > Live Composite Timer to stop the exposure before dawn in case you fall asleep. It's set to 3 hours by default and goes to a maximum of 6 hours, the maximum time of a Live Composite image. If you need longer, make more exposures and pop them in your computer to blend the old fashioned way for Lighten Blending.
More starting at pages 54 and 173 in the printed manual.
C1, C2, C3 & C4 top of OM-1 User's Guide back to OM-1 Review
Now that we have everything set, we can save and recall everything about our camera's settings we just made into four different spots on our mode dial.
When I say everything, I mean everything: every focus setting, exposure mode and compensation, ISO and Auto settings, computational modes, white balance, advance modes, screen brightnesses, button functions — everything. These save setup time immensely as I change assignments.
These are our four dial presets, C1, C2, C3 & C4:

Mode Dial Set to C1. bigger.
To save something into one of these, first set your camera as you'd like it, then hit:
MENU > CAMERA 1 > page 1 > Custom Mode > (select one) > Assign > Set.
To update or change the settings, change them on your camera, then either save them into one of the settings, or use the "Hold" option at
MENU > CAMERA 1 > page 1 > Custom Mode > (select one) > Save Settings > Hold, so that any changes you make in any of C1, C2, C3 or C4 are saved.
While exposure compensations are saved and recalled, a shifted Program mode isn't. Shifted Program resets each time you return to any of C1, C2, C3 or C4.
If you prefer that the settings don't change after you save them, use
MENU > CAMERA 1 > page 1 > Custom Mode > (select one) > Save Settings > Reset, then every time you return to C1, C2, C3 or C4 it recalls the original settings you saved, not how you had it set when you last left the setting.
You can't spin the exposure mode dial to change the exposure mode for one of your presets because you lose the preset settings when you turn the dial (P, A, S, M and B use a different set of the same settings among all five of them), but you can change the exposure mode dial and then recall your desired preset back into the P, S, A or M setting with:
MENU > CAMERA 1 > page 1 > Custom Mode > (select one) > Recall.
Now your settings from C1, C2, C3 or C4 are active in your dial-selected different exposure mode - and you can resave this into the original preset if you want this new exposure mode saved. Clever!
My Personal C1, C2, C3 & C4 Settings top of OM-1 User's Guide back to OM-1 Review
I haven't figured out how to pull and share these for you from within the OI.Share app, but I will share some basic settings for each.
Note how many different very involved things I set very differently for each situation. When I shoot Nikon, half of these things need to be reset manually every time I swap assignments. These C1, C2, C3 and C4 settings are HUGE time savers and thus money-makers for a guy like me who has to shoot many kinds of different things on very short notice:
C1 |
C2 |
C3 |
(C3 alternate) |
C4 |
|
Used for |
Everything that holds reasonably still, from people to places to things. | Aperture-Priority mode for specific defocus effects (when shifting Program exposure isn't definite enough) | Focus Stacking (set MENU > CAMERA 2 > page 1 > Focus Stacking > ON) |
Sports & Action |
In-studio product photography with dedicated studio strobes |
Exposure mode |
P |
A |
A, typ f/4 to 5.6 |
P |
M: f/18 at 1/250 sync |
ISO |
Auto |
Auto |
Auto |
Auto |
Manual ISO L100 |
Auto ISO Minimum Shutter Speed |
1/8 (1/125 if photographing people moving or talking for things other than sports) |
1/8 |
1/100, or whatever it takes to stop any blur handheld. Use fixed ISO 100 on a tripod. |
1/500 to 1/1,000, whatever it takes to stop the action |
n/a |
| Usually VIVID with +2 Saturation and +2 Sharpening, or Pop ART I, with ART BKT also saving i-Enhance (automatic optimization) and Color Create (with Vivid set to +3) also selected, so for each shot I get four JPG files saved, each with different colors so I can pick the best later depending on what I shot. This way I don't have to change settings for people (typically i-Enhance) and things (typically ART POP I or VIVID) so I can shoot faster. | Same as C1. |
i-Enhance automatic optimization, Picture Mode #1. |
i-Enhance automatic optimization |
Same as C1. |
|
White Balance |
Auto, Keep Warm Color |
Same as C1 |
Same as C1 |
Same as C1 |
Manually preset to a gray card with my studio strobes, which in my case reads 5700 K |
Small Area, S-AF (single focus and lock) |
Same as C1 |
Small Area, C-AF (continuous focus) |
Small Area, C-AF+TR continuous tracking |
Manual, usually set by sliding lens focus ring towards camera | |
Flash Mode (set at the flash section of the Super Control Panel) |
Second Curtain, Balanced Flash Metering (MENU > CAMERA 1 > page 6 > Balanced Flash Metering > ON) | Same as C1 |
usually OFF. |
Same as C1 |
Manual 1/8 power to trigger my studio strobes with a Wein trigger, or 1/32 if I'm using a Godox studio strobe. |
Continuous Standard set to 3 FPS |
Same as C1 |
||||
JPG Large (20MP) NORMAL |
Same as C1 |
JPG Large (20MP) NORMAL |
JPG M1 (3,200 × 2,400) NORMAL* |
JPG M1 (3,200 × 2,400) NORMAL* |
|
Normal |
Normal |
Normal |
Normal |
S-OVF (optical finder simulation because the image will be lit entirely by my studio strobes) |
|
Auto [▶] |
Off |
Auto [▶] |
Off |
Auto [▶] |
* I shoot at 3,200 × 2,400 for sports so the images are faster and easier to transfer, sort, store and forward, and I also use this resolution for product shots unless someone needs to make a print mural-sized, which no one ever does for small products.
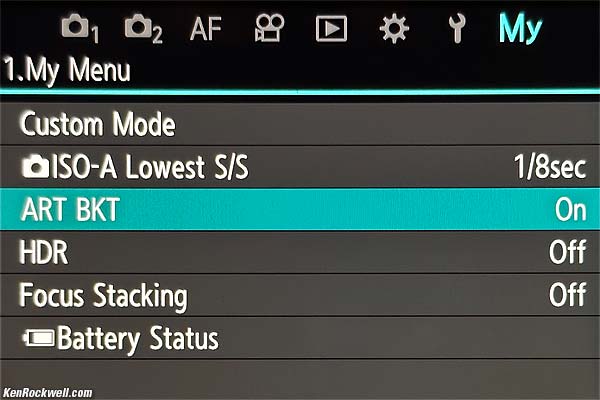
My Menu Menu top of OM-1 User's Guide back to OM-1 Review
The My Menu menu stays the same for all settings of the mode dial; they don't vary with C1, C2, C3 or C4.
The My Menu Menu. bigger.
To add items to the My Menu menu; simply hold the red button by the shutter a few seconds while you're in that menu.
To edit the My Menu menu, just hold that same red button again while you have a My Menu item selected. Easy!
Histograms top of OM-1 User's Guide back to OM-1 Review
The live histogram displayed while shooting is a color display of monochrome (luminance only) data, which isn't that helpful when shooting in color where we need an RGB histogram so we can see if the red or blue channels are overloaded.
The while-shooting histogram shows the darkest samples as blue and the highest as red, and here's a cool part: there is a green overlay that shows you the monochrome histogram for just what's inside the spot metering area — but it's more fun than useful.
Playback top of OM-1 User's Guide back to OM-1 Review
Press INFO to swap through three different kinds of playback screens.
You can choose or refuse which of these screens appear when you tap INFO at
MENU > [▶] PLAY page 3 > [▶] Info Settings.
Hint: It won't let you unselect the screen style you last used at PLAY, and will gray-out that option. In order to uncheck that screen style's option, select another playback screen by hitting INFO while you're in PLAY, and then the other screen will be available to unselect.
Thank goodness we get a very useful Color YRGB histogram on playback, it's too bad we can't see this while we're shooting.
Image Review top of OM-1 User's Guide back to OM-1 Review
Set whether or not the image plays back right after shooting it at
MENU > CAMERA 1 > page 1 > Image Review.
I usually use Auto [▶] , which means the picture pops up and you can control it exactly as if you hit the PLAY [▶] button.
Audio Notes top of OM-1 User's Guide back to OM-1 Review
To record a stereo .WAV audio file of up to 30 seconds along with an image:
- Play the image
- Press OK
- Click down to the Mic icon
- Select START
- Hold OK for as long as you'd like to record.
- Playback is automatic each time you swap to that image. Press the up or down keys to change the volume.
It's pretty easy, but I haven't found a way to program a button to record just by holding it down as on a pro camera.
The sample rate and bit depth are the same as you set for movie recording at:
MENU > MOVIE page 5 > Sound Recording Settings > Recording Rate. The lowest 16 bit 48 ksps is ultra-high quality and uncompressed and more than enough for anything. No one needs the 24-bit 96 ksps setting for voice notes.
Downloading top of OM-1 User's Guide back to OM-1 Review
While I usually use a card reader, if I plug the OM-1 into my 2017 13″ MacBook Pro running High Sierra with a USB-C cord and turn on the OM-1's power, I'm presented with a few options of what I want to do on the OM-1's screen.
Select STORAGE and Bingo!, my card(s) pop up in my finder as if I'm using a card reader. If I have two cards installed, two cards pop up as separate drives in my Mac's Finder. Cool.
Using the Blackmagic Design speed tester app on my Mac I measure 147 MB/s writing to the camera and 181 MB/s reading from the camera. This is with a card rated 300 MB/s which actually measures 194 MB/s write and 246 MB/s read in a dedicated card reader. In other words, connecting the camera works fast for reading cards, and has the advantage that if I have two cards they both pop up from the camera connection. I don't have a two-slot reader, and with the OM-1, now I do.
Also nice is that a blinking warm red card icon appears at the top left of the LCD as either card is transferring data. Even if a card is still mounted as a drive on your Mac, the card icon goes away when it's not transferring data. Good practice is to be sure you eject it from your Mac before disconnecting it. Turning off the OM-1 also disconnects the card reader; the power has to be ON to read cards, but if you don't first eject them from your Mac finder, you'll get a warning on your Mac that you didn't eject them properly.
Power drain is about 2.8 W used as a card reader over USB-C.
Hint: You have to use a high-speed 10 Gb/s USB-C to USB-C cable, like the ones the come with portable SSDs, if you want high-speed (100 MB/s +) data transfer. If you use a generic slow (USB-2 480 Mb/s) USB-C to USB-C cord, like the white charging cords that come with Apple products, you'll only get 30 MB/s speeds.
Hint: I set MENU > 🔧 WRENCH page 3 > USB Settings > USB Mode > Storage, so it just pops up in my finder as a card reader rather than asking each time what I want to do. Set this way it charges from my Mac (or dock) when OFF and reads cards when ON, no questions asked. If you want to be asked what you want to do when the OM-1 is plugged into your Mac, leave this setting at its default of Select.
Hint: The orange LED on the back lights when you're charging and it's off when you're not, so no mystery.
Secret Shutter Counter top of OM-1 User's Guide back to OM-1 Review
There is no official way to check the shutter counter, however there is a secret method that takes a few clicks. This is secret, so don't blame me if it deactivates your camera if you hit something wrong. It works fine for me; good luck.
- Turn OFF.
- Hold MENU while turning ON.
- Release MENU.
- Press and release MENU again.
- Select 🔧 WRENCH page 3 > Monitor Adjust > OK to where you would adjust the screen brightness.
- Press INFO. A box appears for adjusting screen color balance.
- Press OK. You'll see OM SYSTEM OM-1 02 01 01 01.
- Press UP, press DOWN, press LEFT, press RIGHT, and then press and release the shutter all the way.
- Press RIGHT and another page of code appears with your counts:
MS: Mechanical Shutter count (electronic shutter firings aren't counted).
S: Shots made with external flash.
U: Power-on sensor cleanings.
Tap UP, DOWN, LEFT or RIGHT to swap among four mystery pages; page 2 (right) has the shutter count and page 3 (DOWN) has serial numbers.
Turn off to get out of the secret area.
More Information top of OM-1 User's Guide back to OM-1 Review
I got my OM-1 through B&H. I'd also get it at Adorama or at Amazon, or used at eBay if you know How to Win at eBay.
Body-only: $1,999.99 at B&H, at Adorama and at Amazon.
OM-1 and M.Zuiko 12-40mm f/2.8 II: $2,599.99 at B&H, at Adorama and at Amazon.
OM-1 and M.Zuiko ED 90mm f/3.5 IS: $3,499 at Adorama.
OM-1, 12-40mm f/2.8 II and 90mm f/3.5 IS: $4,099.98 at Adorama and at Amazon.
Body-only about $1,700 used if you know How to Win at eBay.
OM SYSTEM's Printed User's Manuals
OM SYSTEM's OM-1 User's Manual from B&H.
OM SYSTEM's OM-1 User's Manual from Olympus, Japan.
© Ken Rockwell. All rights reserved. Tous droits réservés. Alle Rechte vorbehalten. Alla rättigheter förbehållna. Toate drepturile rezervate. Ken Rockwell® is a registered trademark.
Help Me Help You top
I support my growing family through this website, as crazy as it might seem.
The biggest help is when you use any of these links when you get anything. It costs you nothing, and is this site's, and thus my family's, biggest source of support. These places always have the best prices and service, which is why I've used them since before this website existed. I recommend them all personally.
If you find this page as helpful as a book you might have had to buy or a workshop you may have had to take, feel free to help me continue helping everyone.
If you've gotten your gear through one of my links or helped otherwise, you're family. It's great people like you who allow me to keep adding to this site full-time. Thanks!
If you haven't helped yet, please do, and consider helping me with a gift of $5.00.
As this page is copyrighted and formally registered, it is unlawful to make copies, especially in the form of printouts for personal use. If you wish to make a printout for personal use, you are granted one-time permission only if you PayPal me $5.00 per printout or part thereof. Thank you!
Thanks for reading!
Ken.