Home Donate New Search Gallery Reviews How-To Books Links Workshops About Contact
20x30" Print Comparison
© 2008 KenRockwell.com. All rights reserved.

I get my goodies at Ritz, Amazon and Adorama. It helps me keep adding to this site when you get yours from those links, too.
June 2008
I sent off three files, one from the 6MP Nikon D40 ($480 with lens), one from the 12MP Nikon D3 ($6,800 with the lens I used) and one from the 12MP Canon 5D ( $3,100 with the lens I used) to Costco for 20x30" (50x75cm) prints to see what happens.
Original Image Files
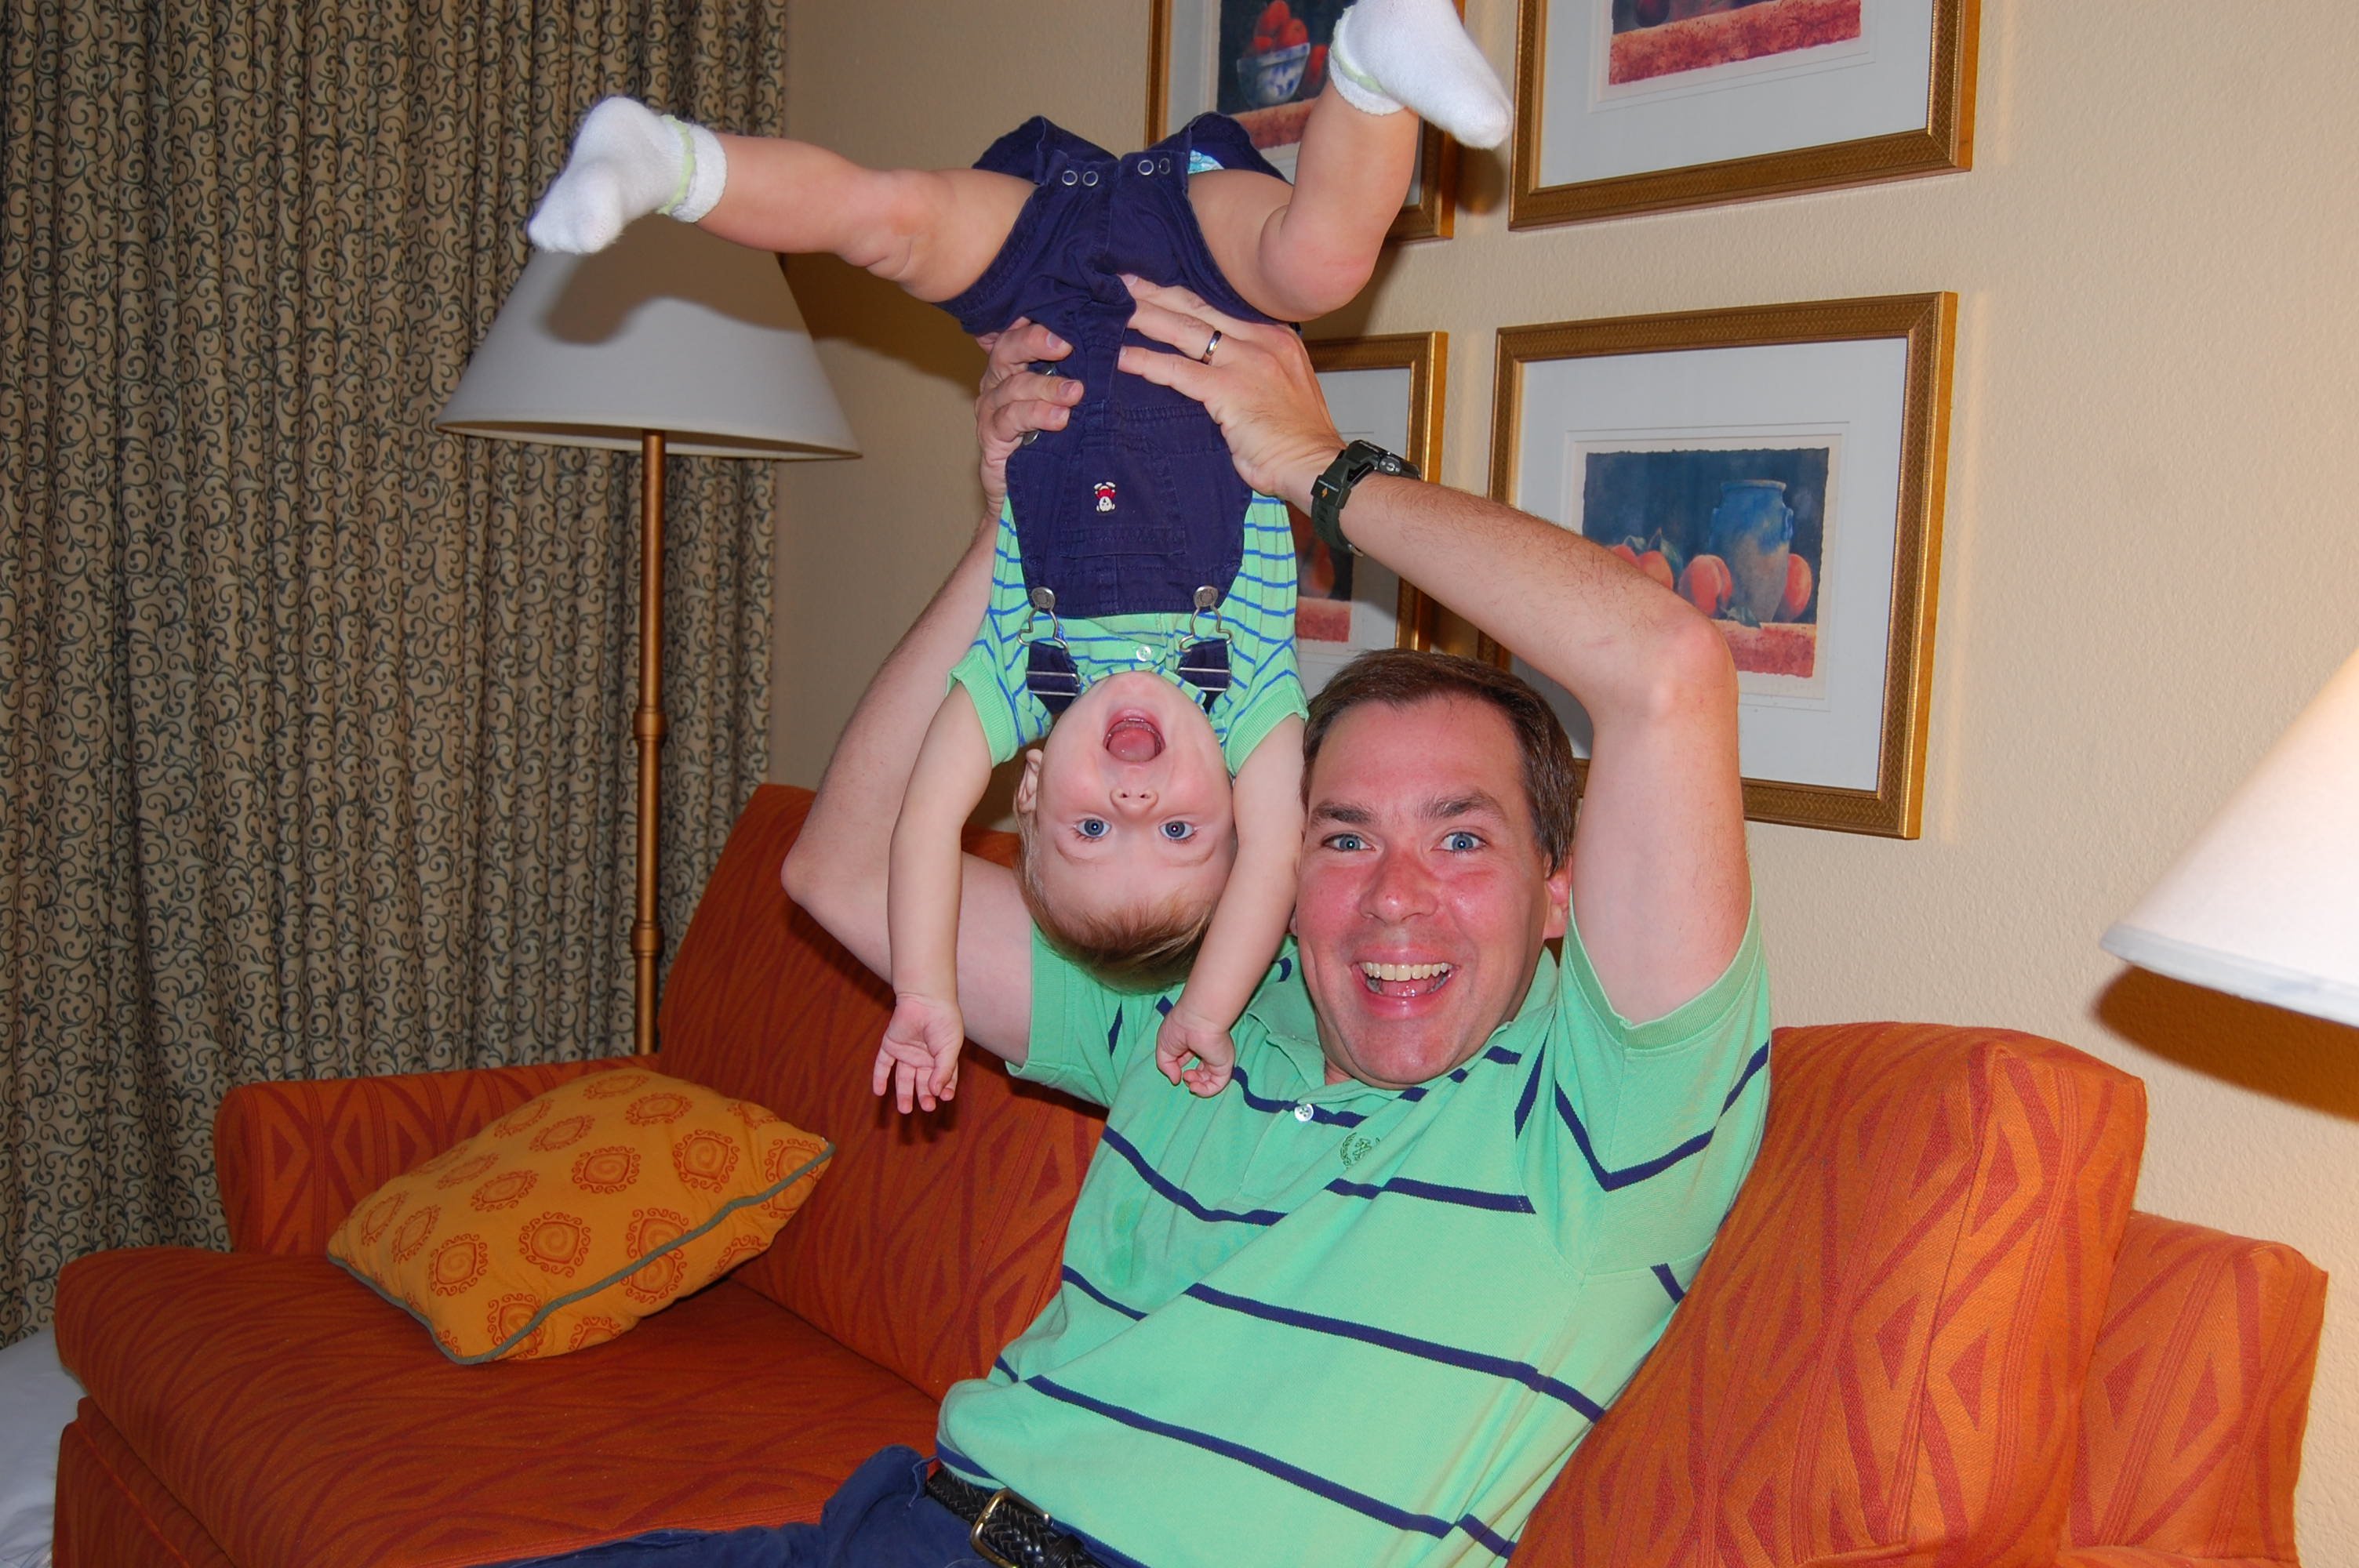
Ryan and Dad, November 2007. © original file (700kB). D40, 18-55mm II at 26mm, f/4.2 @ 1/60, flash. This is Nikon's cheapest DX lens, shot wide-open.
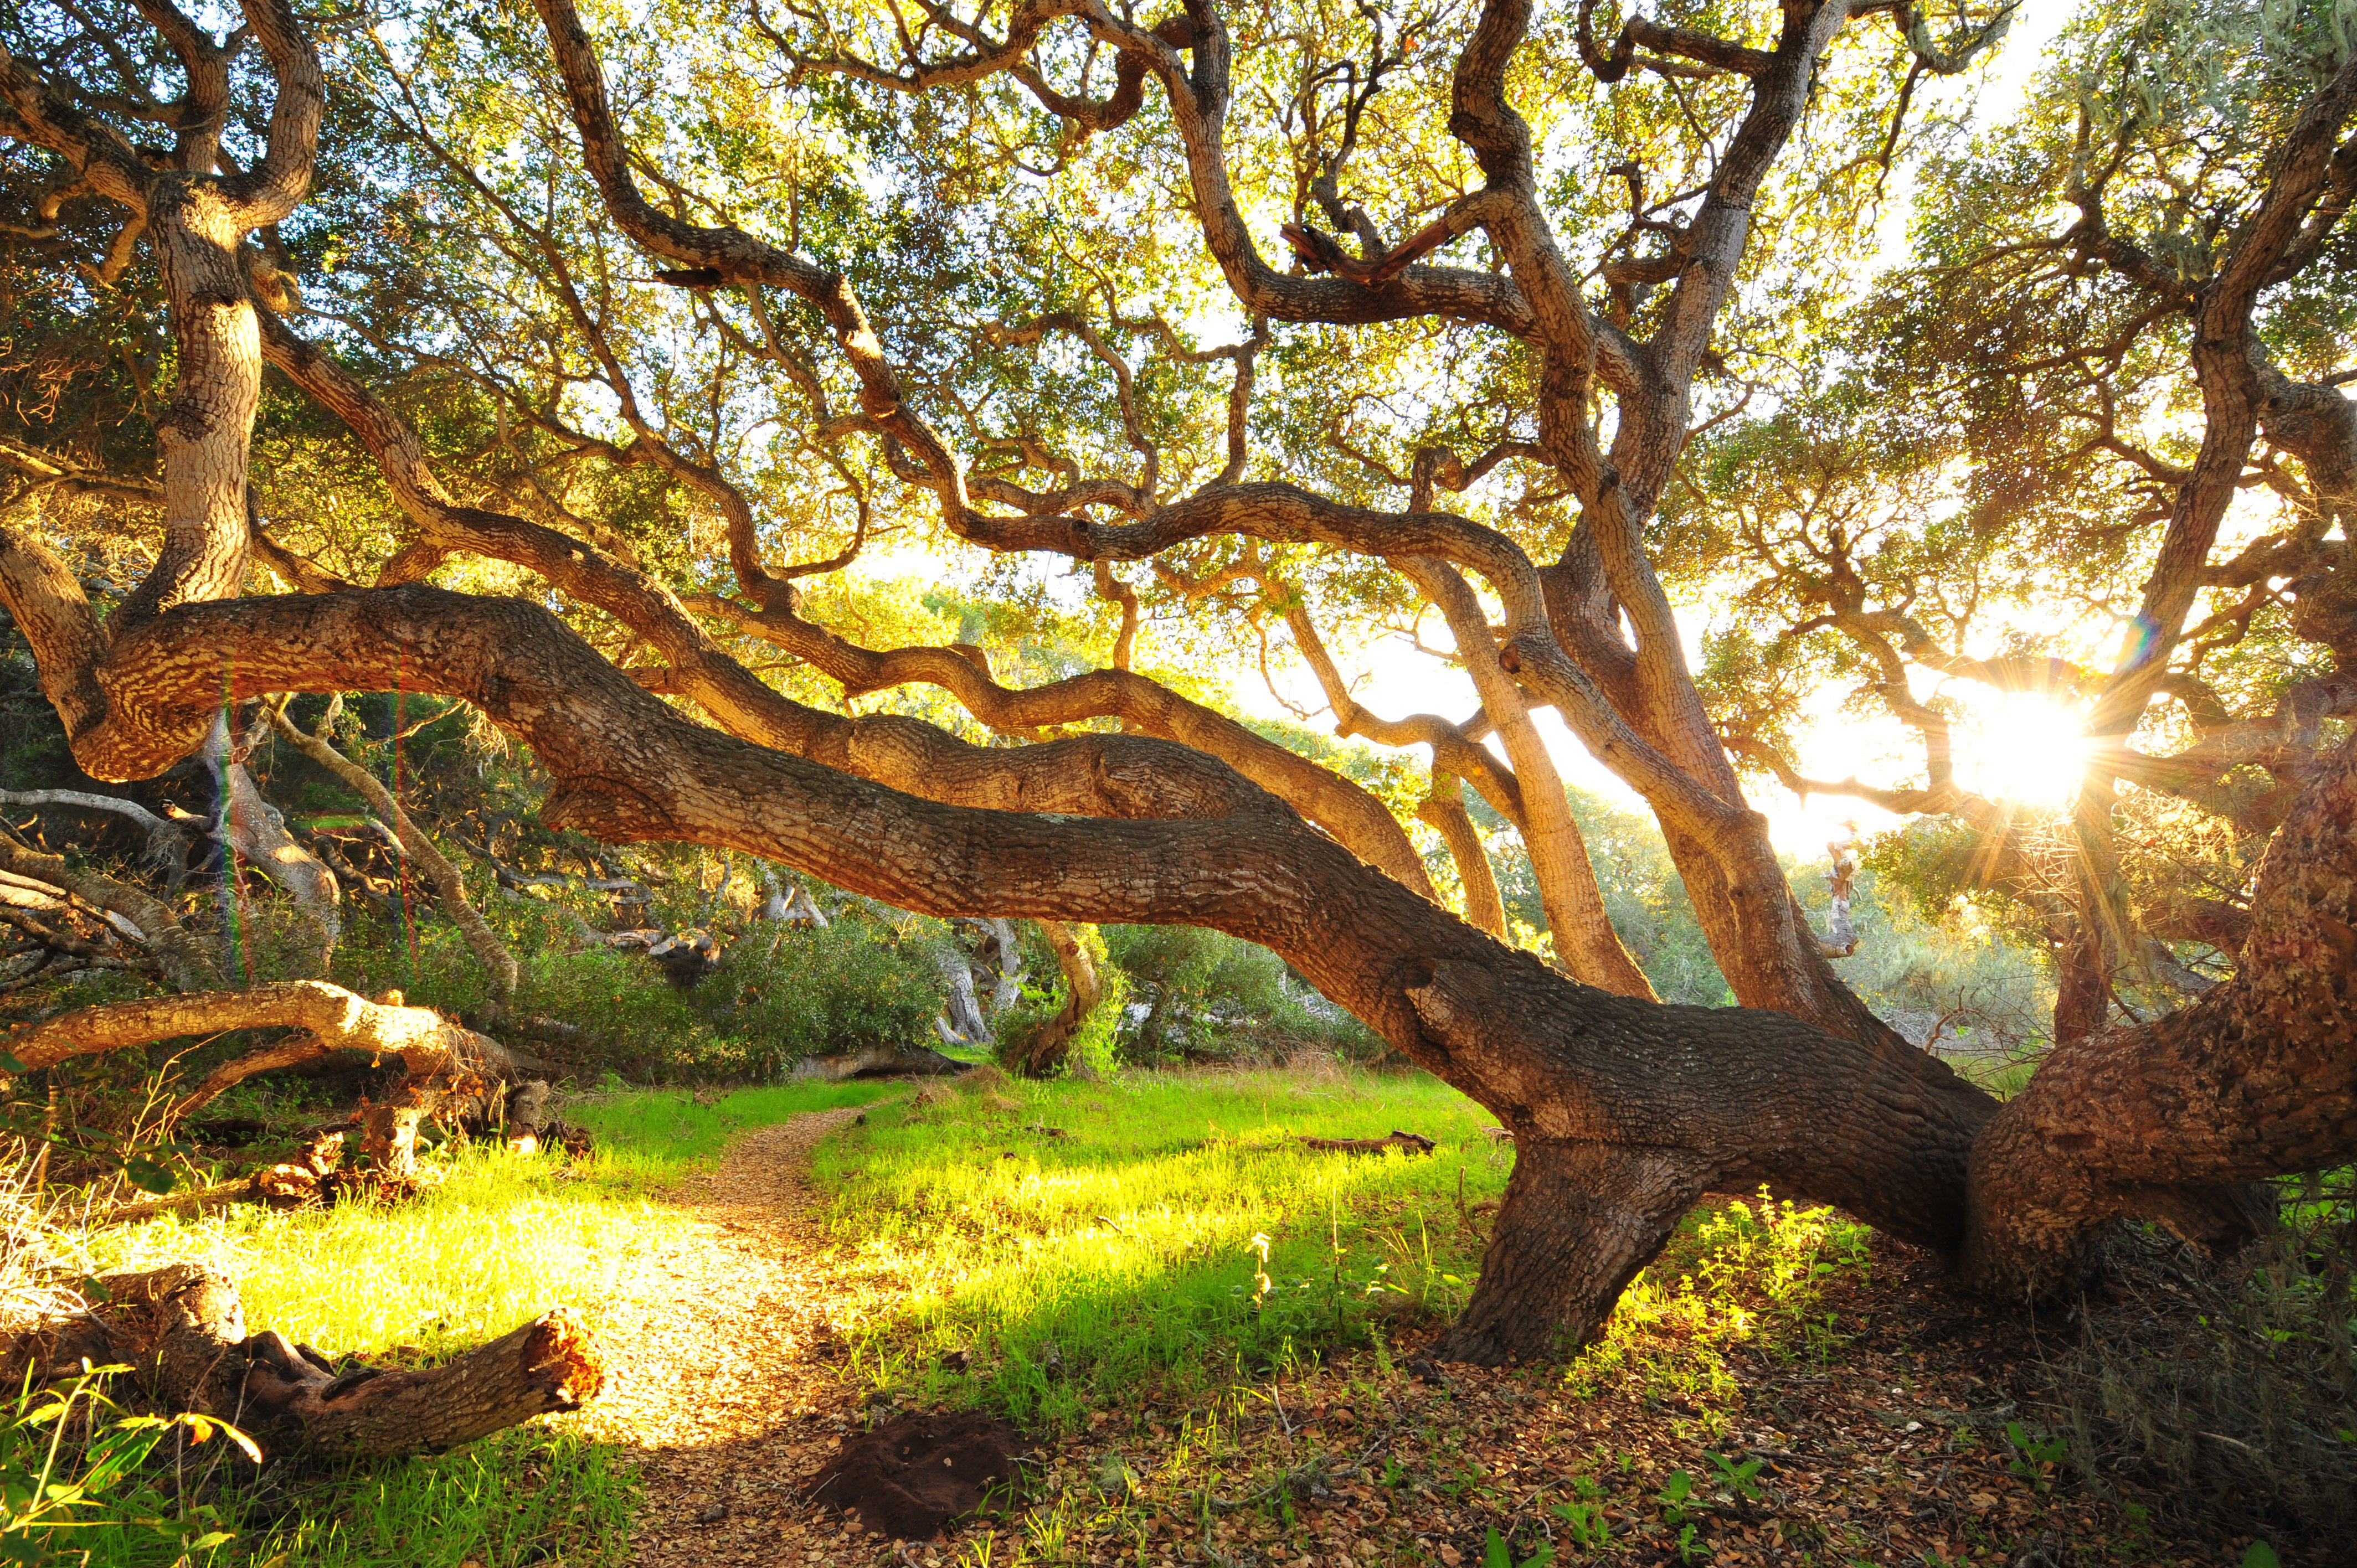
Oaks, California, May 2008. © original file (5MB). Nikon D3, 14-24mm f/2.8 at 14mm, f/11 at 1/8, ISO 200.
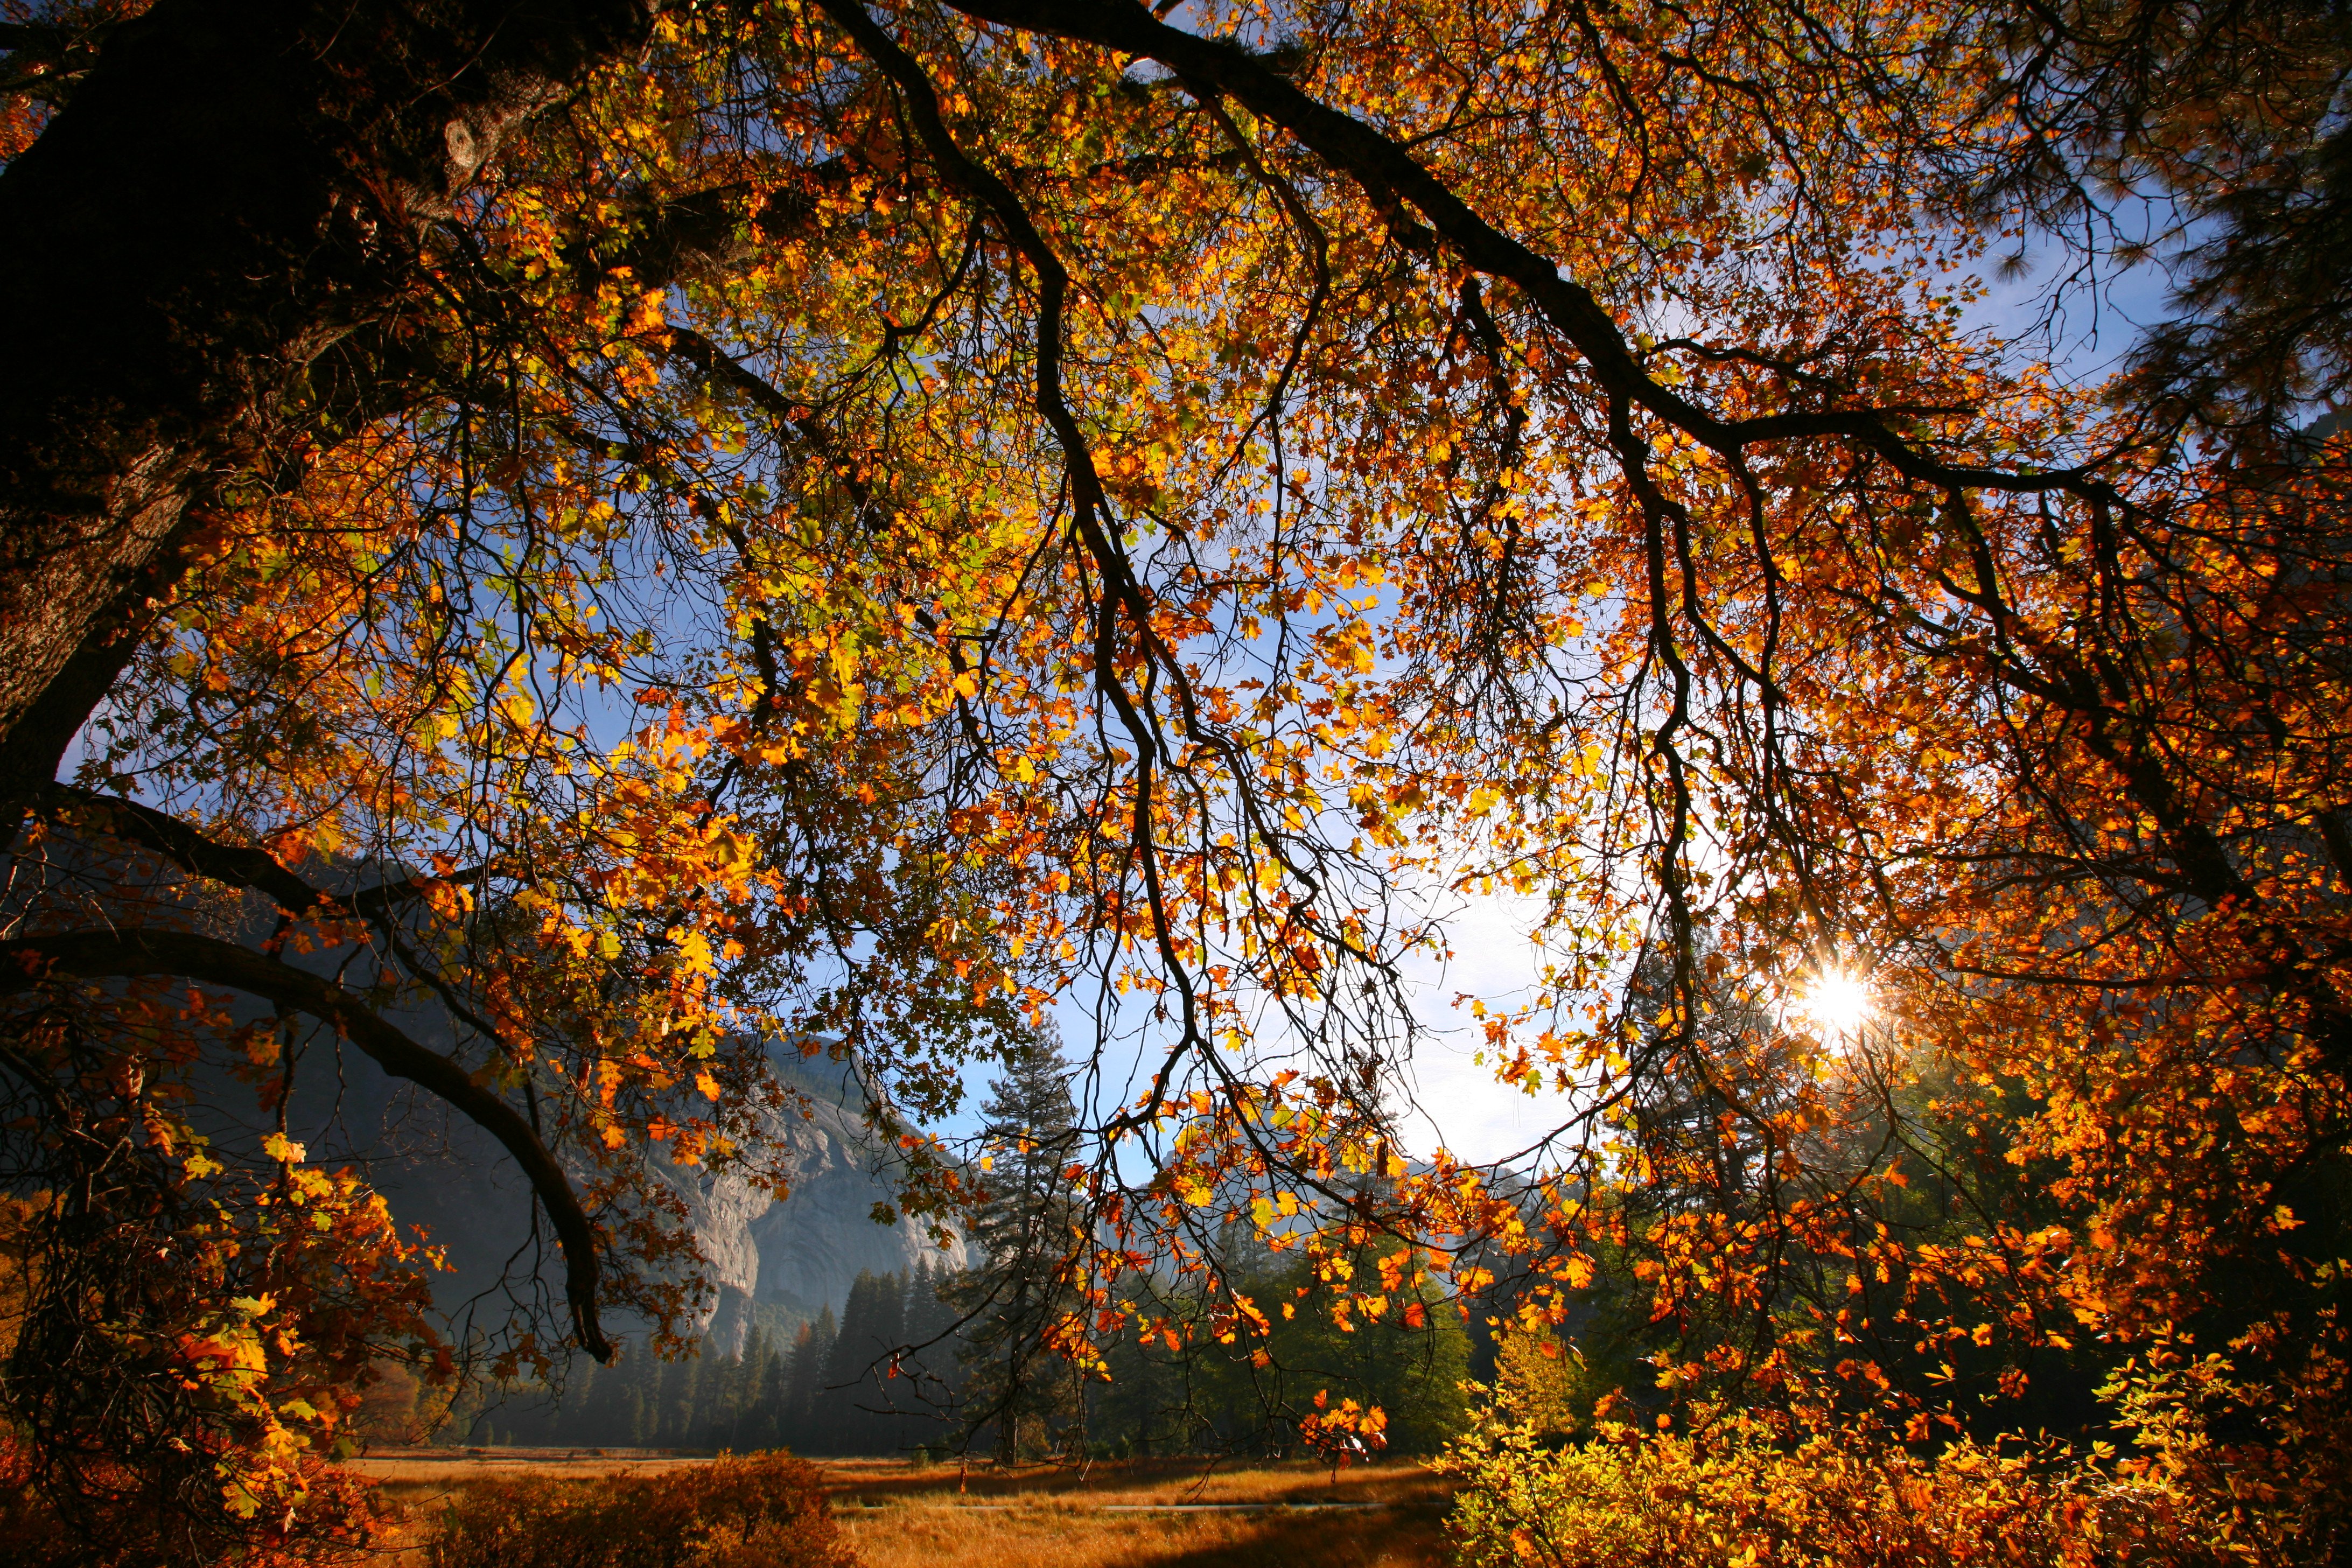
Yosemite Valley, October 2007. Canon 5D, 16-35mm f/2.8 L II with Tiffen 812 warming filter at 16mm, f/11 @ 1/80 (Av mode), -0.3 exposure compensation, ISO 100, hand-held (tech details). Exactly as shot in JPG. © original file (6MB).
Discussion
I personally buy from Ritz, Adorama and Amazon. I can't vouch for any other ads.
|


Everyone talks a blue steak about this and has no problem spending thousands on high-rez cameras, but no one seems to want to fork over $10 to see how they really look on paper.
The 6MP D40 BASIC JPG file looks great. I made the shot with the 18-55mm kit lens. Sure, if you get too close you can see it's not as sharp as the D3, but so what — don't get that close. It's super sharp up to about two feet (60cm) away.
The 12 MP D3 looks even better if you're getting closer than two feet (60cm).
I didn't expect such an obvious difference, but if you're too close, the Canon 5D is clearly superior to the D3. I shot the world's best 14-24mm on the D3, and Canon's not-as good (in the lab) 16-35mm L II on the 5D, and the 5D shot still smokes the D3 in sharpness. I shot the D3 on a tripod, and shot the 5D freehand. Both files were the same size.
The 5D image is much better, but does show some lateral color fringes which the D3 corrects itself. If I had used the NEF from the D3 (shot but not shared here), many raw converters don't remove the fringes as does the D3 in its own JPGs.
The on-print results are more striking than the differences seen on-screen at my sharpness comparison.
Oddly, I clicked for glossy prints, but Costco sent me matte. Sure, I could have sent these to Calypso to be done right on SuperGloss, but the Costco prints are showing me everything that's in my files.
Then I looked at the 20x30" framed prints on my wall that were printed optically from 6x7cm medium format and 4x5" large format film back in the 1990s.
The 20x30" film prints are far beyond the clarity from the prints from digital when you look too close.
This shot was made on a broken 6x7cm camera nearly wide-open at f/4, and its 20x30" print is still perfectly sharp as close as you dare stick your nose. The prints from digital capture still look like they are from digital capture, while the darkroom prints have no such artifacts.
The artifacts of which I speak are those relating to spatial resolution and transfer functions, ringing and color. There weren't any visible JPG, resampling or other math artifacts in any of these.
The artifacts I see are the same seen in comparing motion picture film to digital capture. The issue is that digital capture has an MTF curve that stays flat to a point, and then drops precipitously. IN English, this means all detail finer than the pixel pitch suddenly evaporates. Optical prints from film look better because they have on-print detail that has no such sharp cut-off of finer details. Optical prints have fine details which very gradually become less visible as they get finer, never with a sharp cutoff above a certain lever of fineness.
The prints from the digital cameras look fantastic, until I looked on my wall to see what I did with far cheaper cameras almost 20 years ago. The prints from 4x5" Velvia are still three-dimensional as close as you can get your eye, while the prints from digital capture are still "settle for" quality if you look too close.
The problems are that the prints from digital cameras, seen up close, show sharpening artifacts and then no detail at on-paper resolutions above the camera's resolution. Genuine Fractals wouldn't have helped because all it does is keep lines sharp; GF can't create fine detail or texture.
I thought about jamming the huge prints in my scanner to share with you, until I realized that even if I felt like disassembling frames and glass, that I'd have to start moving furniture around to be able to put the huge mounted prints on the scanner.
Summary
If you're shooting landscapes digitally for large prints, use the Canon 5D.
If you're serious, shoot film like the pros. It costs a lot less, too. You can get a complete 4x5" setup for under $2,000 brand new, and even a $350 Yashica-MAT 124 G can outrun today's best DSLRs with one lens capped!
Help me help you top
I support my growing family through this website, as crazy as it might seem.
The biggest help is when you use any of these links to Adorama, Amazon, eBay, Ritz and Calumet when you get anything. It costs you nothing, and is this site's, and thus my family's, biggest source of support. eBay is always a gamble, but all the other places always have the best prices and service, which is why I've used them since before this website existed. I recommend them all personally.
If you find this page as helpful as a book you might have had to buy or a workshop you may have had to take, feel free to help me continue helping everyone.
If you've gotten your gear through one of my links or helped otherwise, you're family. It's great people like you who allow me to keep adding to this site full-time. Thanks!
If you haven't helped yet, please do, and consider helping me with a gift of $5.00.
As this page is copyrighted and formally registered, it is unlawful to make copies, especially in the form of printouts for personal use. If you wish to make a printout for personal use, you are granted one-time permission only if you PayPal me $5.00 per printout or part thereof. Thank you!
Thanks for reading!
Mr. & Mrs. Ken Rockwell, Ryan and Katie.
Home Donate New Search Gallery Reviews How-To Books Links Workshops About Contact