Home Search Gallery How-To Books Links Workshops About Contact
|
How
to Use Histograms  I
get my gear at Amazon
and Adorama. INTRODUCTION The best way to evaluate exposure is to look at the picture, not a histogram. Histograms are a way to measure exposure more objectively for those who can't see very well. Histograms don't replace your eyes and experience. Histograms are helpful in sunlight where it's hard to see an LCD, or in the shop if setting something exactly. Your eyes are always the final judge. A histogram is just a guide. Worry about your image more than the histogram. HISTOGRAM BASICS A histogram is a graph counting how many pixels are at each level between black and white. Black is on the left. White is on the right. The height of the graph at each point depends on how many pixels are that bright. Lighter images move the graph to the right. Darker ones move it to the left. Easy!
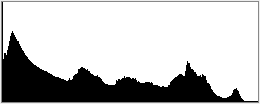
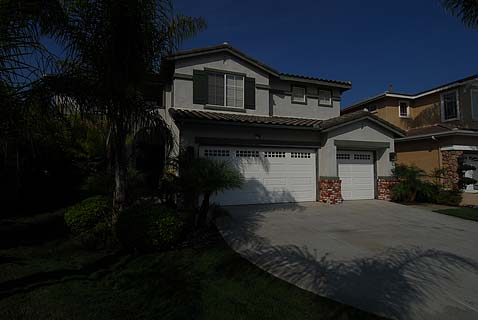
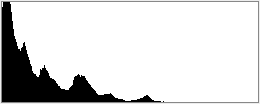
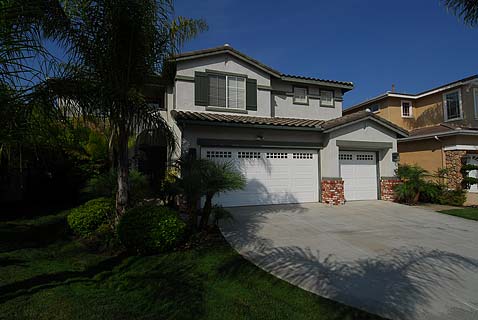
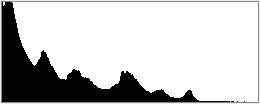
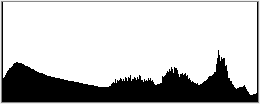
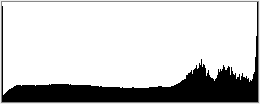
A good image often, but not always, has a histogram spread all over. HISTOGRAM HISTORY Histograms are rocket science. Histograms have been used for automated image evaluation and optimization in self guided missiles for decades. When Tomahawk missiles share America's freedom with millimeter precision, you can thank histograms. Raytheon calls this "Digital Scene Matching Area Correlation," or DSMAC. This all used to be classified. You are smarter than a histogram. Use them as guides, not Gods. COLOR HISTOGRAMS Color histograms are required for color digital photography. Many cameras lack these. I cover this later. If your camera only has a single histogram, like the Nikon D70s, D1X or Canon 20D, ignore the histogram! Single histograms are dangerously misleading. I use a single histogram as a simplified example. DON'T use a histogram to set exposure unless you have a color (RGB) histogram! SETTING EXPOSURE Warning: I show a single histogram to simplify. DON'T use a single histogram to set exposure! You need a color histogram, otherwise you may overexpose colored areas and not know it. Read on to Color Histograms after you read this. Contrary to your camera manual, the histogram doesn't have to be in the middle. Black cats in coal mines may only use the left half. Snow scenes may only use the right half. The critical thing for which a histogram is helpful is to determine if any highlights have been clipped and washed out. Overexposure is death for a digital image. Histograms make this easy to check. If you have washed-out areas of 100% white (digital value 255) you'll see a tall vertical line at the far right of the histogram. If you blow an image to smithereens you'll see more than just one line peaked on the right. You may see a train wreck!
Reduce exposure if you see clipping. Try to get the histogram as close to the right side as possible without touching it. If your scene looks too dark when you do this there is no correct exposure: the scene's dynamic range (lighting ratio) is too great. In these cases professionals will correct the lighting by adding fill light to the shadows and/ or using scrims to dim the highlights. Amateurs scramble to attempt to increase the dynamic range of their cameras using hocus pocus like my increasing dynamic range trick. A little bit of clipping is OK on things like the highlights of sun dancing on water or the disk of the sun. Clipping broad areas like someone's forehead looks awful and often shifts colors. This is art and you'll have to learn what looks good to you. There is no law, so don't worry about being scientifically correct. Look closely and you'll see a peak on the left at 100% black, even when overexposed. This is the dark shadow on the left of the photo. This shows that the camera's contrast needs to be lowered, or better still, add fill light in the shadows. This is why you would see three huge trucks full of electric generators and lighting equipment if this was a Hollywood movie shoot. It takes a lot of artificial lighting to make a scene look natural on camera. Cameras respond very differently than our eyes. Usually an image is underexposed if no channel of the histogram goes all the way to the right. Images that are too dark are easy to correct later; just drag the right slider in Photoshop's Levels command to the left to meet the edge of the histogram. Overexposed digital images are almost useless. Anything that washes out to white is gone forever. There is no way to drag Photoshop's Level slider to the right of the right side because there's no data out there beyond 255. NEXT: COLOR HISTOGRAMS (click) PLUG If you find this as helpful as a book you might have had to buy or a workshop you may have had to take, feel free to help me write more with a donation. Thanks for reading! Ken |