Home Donate New Search Gallery How-To Books Links Workshops About Contact
Nikon
D5000 User's Guide
© 2009 KenRockwell.com. All rights reserved.

June 2009 User's Guide Page Index D5000 Review More Nikon Reviews
NEW: Nikon D5000 Users Guide for iPhone and iPod 23 December 2009
Nikon D5000 AF Settings 03 June 2009
Want free live phone support? In the USA, call (800) NIKON-UX, 24 hours a day, 365 days a year.
This will make you to an expert on using the Nikon D5000, but this alone won't get great pictures.
To get great photos you still need to get yourself to the right place and point the camera in the right direction at the right time, which is a lot harder than mastering the D5000. Technically, lighting and the use or disuse of flash is far more important to artistic synthesis than your choice of camera.
Right out of the box at default settings the D5000 does a great job, but you need an eye to "see" the photos before you take them. The D5000 is easy to master, but knowing how to make a great picture can take a lifetime. See all the previous links and How to Create a Masterpiece for more.
Once you get the right photo framed in your finder, there are two absolutely critical basic settings, which if set correctly, will give you extraordinary photos. Most people skip this, and are forever cursed with the same results regardless of how much they spend on new cameras.
Getting great photos out of the D5000, or any other camera, really only takes these settings and a good eye:
1.) Take a picture. Look at the rear LCD. Is it OK? If so, you're done! If not:
2.) Too light or dark? Change the Lighten-Darken control and shoot again. OK? You're done! If not:
3.) Colors not right? Adjust White Balance and try again. OK? You're done! If not:
4.) Contrast, saturation or other fine points not right? Adjust the Picture Controls. OK? GREAT! If not, you're either not at the right place, not at the right time, or looking in the wrong direction. It's never your camera's fault, but most people blame it anyway.
For more examples of why you'd want to change what settings and why, see my the "teaching" galleries on my Gallery page.
Making a great photo involves knowing what makes a great photo, knowing how to get great exposure, knowing when to use the D5000's adjustments, knowing how to get great color, locations, timing, patience and a whole lot more. I cover general photography issues here.
Looking for a specific control? Use my Search page. Be sure to mention the D5000 in your search.
Want free live phone support? In the USA, call (800) NIKON-UX, 24 hours a day, 365 days a year.
Below are the basics. Explicit details follow in later pages linked at the bottom.
Most of the settings I'll discuss are locked out in the green AUTO position on the top left mode knob. I don't use this position.
Some of my favorite secrets, which I cover in detail throughout these pages, are:
How to make the D5000 quieter than any other SLR or film camera
Inserting your © and contact info automatically into every file
How to ensure all your images have different sequential file numbers
Camera Settings top
I leave most settings at their defaults. Here's how I prefer to set my D5000.
Format
Always format your card after you put it in any camera, or if you've connected your camera to a computer.
Formatting your card(s) ensures any folder or file corruption acquired anywhere goes away.
You can shoot without doing this, however constant formatting is good practice and should eliminate ever having any card errors. Be sure you've downloaded and backed up all the files in two different physical locations before formatting.
You format in the Setup (Wrench) Menu.
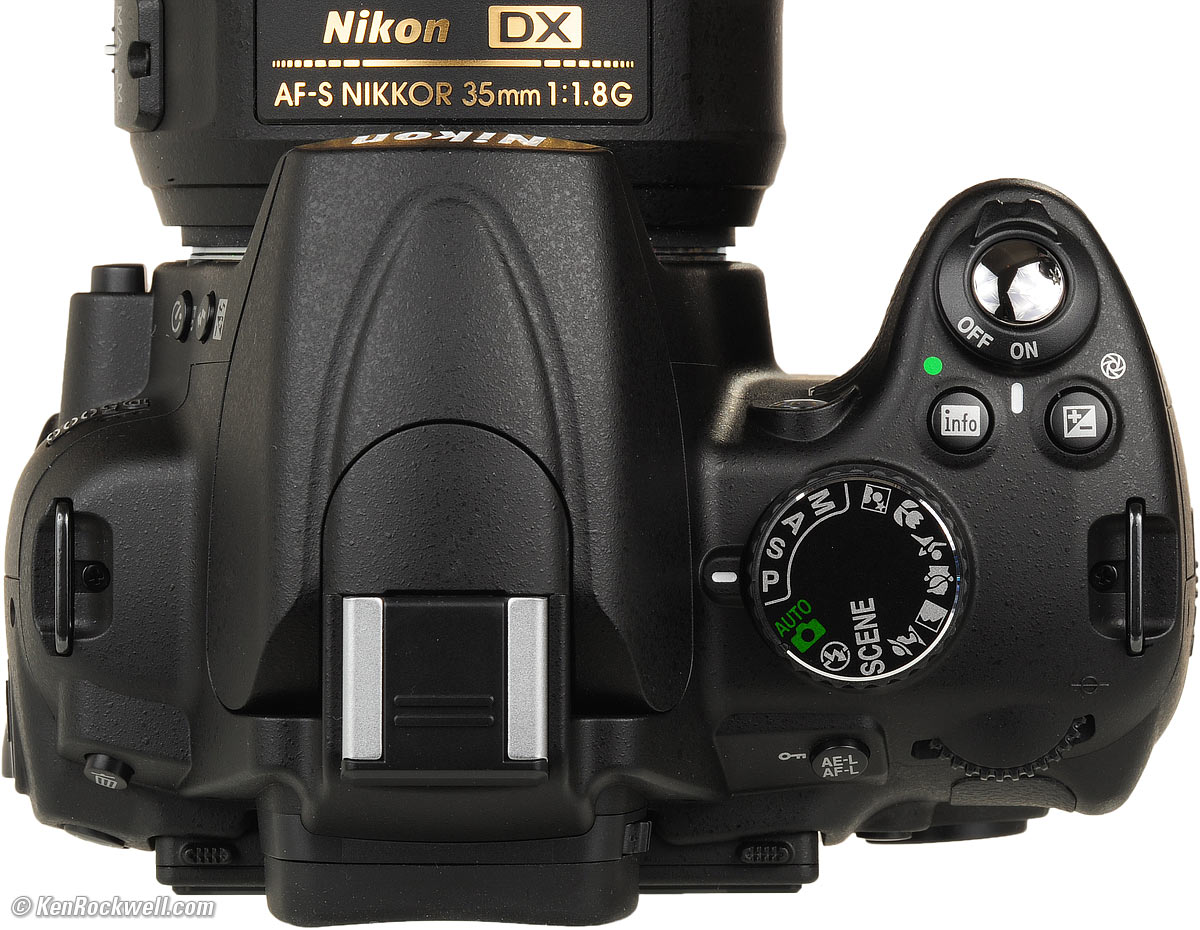
Top Exposure Mode Dial and INFO button, Nikon D5000. enlarge.
Lighten/Darken Control [+/-] top
See the little [+/-] button next to the shutter button?
This is the most important control on the camera. That's why its next to the power switch and shutter buttons.
If you want your pictures lighter or darker, hold this and turn the rear dial. You'll see + or - numbers displayed both in the finder and on the read LCD.
+ makes the next picture lighter, and - makes the next picture darker.
Look at your LCD after you take a picture. If you want it lighter or darker, adjust this, and take another picture.
Exposure Mode top
I almost always shoot in Professional exposure mode, which is the "P" on the top dial. Back in the 1970s old-timers called this "program" mode.
The green AUTO mode is for people who don't read this guide. AUTO is a perfectly swell mode, however it locks out many of the settings I'll be showing you how to adjust.
The INFO Screen top
The D5000 lets us set just about anything worth setting on its INFO screen.
Press either the top INFO [i] button near the shutter release, or the bottom left rear INFO [i] button to display the INFO screen.
Press the bottom left rear INFO [i] button again to change any of the settings below.
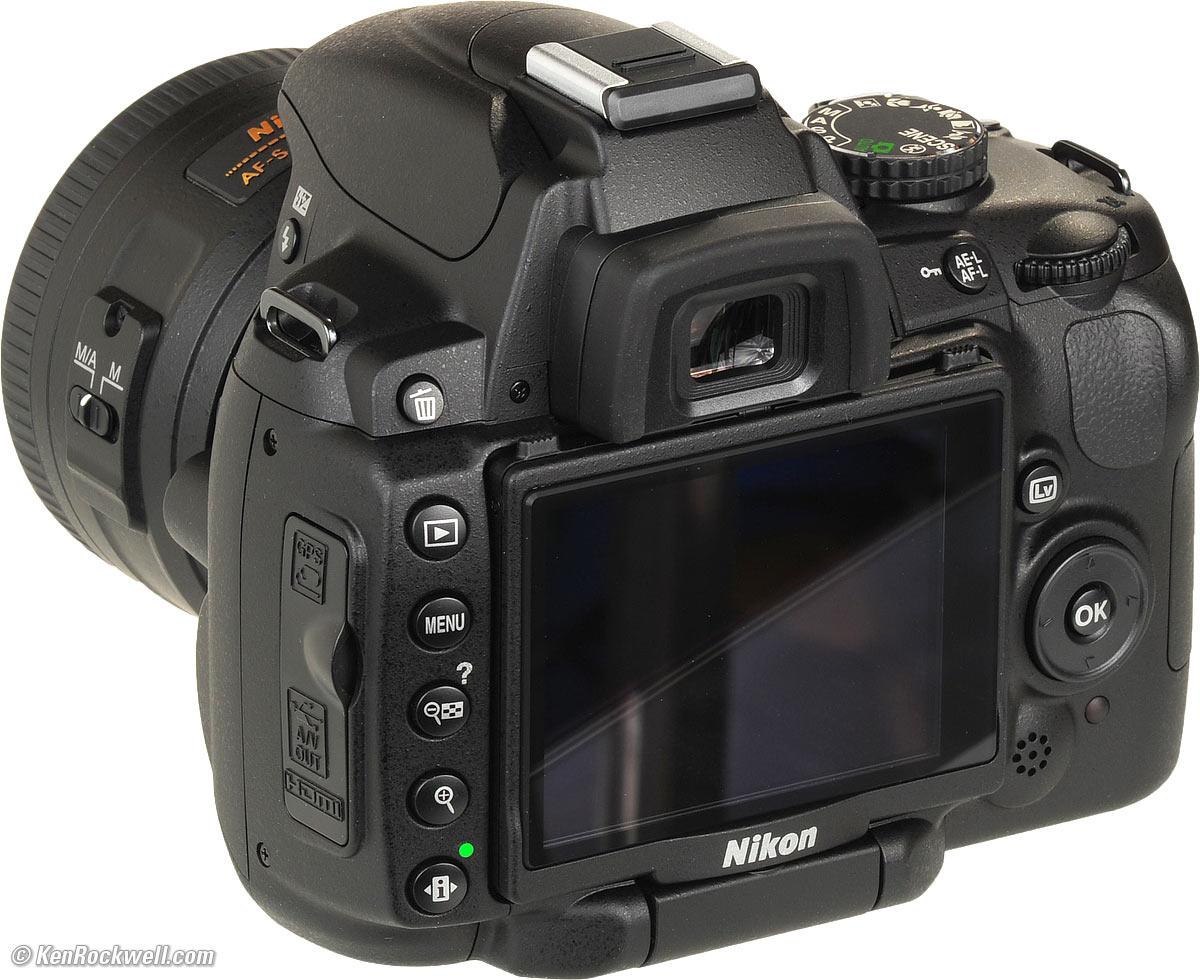
Rear, Nikon D5000, with INFO [i] button on lower left. enlarge.
Quality top
I use Large (or Medium), JPG and BASIC.
For most people and family pictures, 12MP (Large) is way too much. Medium, 7MP, still makes great 20 x 30" (50x75cm) prints and takes up a lot less room everywhere you store and transfer photos.
You can check your D5000's current setting by pressing either INFO button (one is right by the shutter button on the top of the D5000) and looking along the right side of the screen.
You set this by pressing the INFO button on the back bottom left of the D5000 a second time, or in the Shooting Menu.
White Balance (WB) top
This is critical to getting the photos you want right out of your D5000.
White balance is how you set your overall color balance. Color is critical to every image. See examples of WB settings and more details about White Balance.
You can check your D5000's current setting by pressing either INFO button (one is right by the shutter button on the top of the D5000) and looking along the right side of the screen.
You set this by pressing the INFO button on the back bottom left of the D5000 a second time, or set it in the Shooting Menu.
I use AUTO White Balance, the default. I only change the setting if AUTO WB doesn't get me what I want as seen on the LCD during playback.
I prefer warmer images, so I set AUTO WB towards Amber (more orange) by adjusting the AUTO WB to A3 in the Shooting Menu.
You can select among the basic settings from the INFO panel. You need to use the Shooting Menu to fine-tune any of these settings.
There are no rules, use whatever looks best to you.
Here is a run down of the individual settings.
Auto
I use this all the time. It makes its best guess for WB. It's usually very good.
Tungsten (hanging light bulb icon that's easy to confuse with the sun)
This makes the picture very blue. Use this only for deliberate Arctic effects, or under conventional indoor tungsten light bulbs.
Fluorescent (glowing tube icon with a number)
Used to make crappy fluorescent light look less crappy. These settings rarely work; use the preset setting below for better results.
Those nasty "compact fluorescent" bulbs pushed by greedy utility companies under the guise of saving the planet are also fluorescent They will give pictures that are green and nasty. We don't allow these nasty lights, with their awful color rendition, along with their lead, mercury, EMI, EMF and RFI, into my home.
Direct Sunlight (sun icon)
This is for use outdoors with the midday sun shining directly on the subject.
I never use this, I use Auto.
Flash (lightning bolt icon)
I never use this. It's warmer (more orange) than the direct sun setting.
The reason to use this is if you use a different trim value for your strobes than you do for sunlight. I'll get to trims in a bit.
Cloudy (cloud icon)
Warmer (more orange) than the sunlight position. I use this in shade, too.
Shade (house casting a shadow icon)
Very warm. Adds orange to your photo. Use this for sunset shots, or shots in open shade lit by the sky.
Use this setting to make dull fall colors more orange. I often use this setting, hee hee.
Preset (PRE)
Use this as a last resort in difficult lighting where none of the other easy settings give you what you want.
This setting presets the D5000 to render whatever you want as a neutral color. By pointing the D5000 at something white or gray as you set this, you set the D5000 to render the subject without any color casts.
To set the PREset setting to match any lighting:
1.) Ensure your white object is in the same sort of light as your subject. Changing the angle of the object often will favor one kind of a light or another in mixed light, which will greatly affect your result. Avoid gray items, since items other than formal gray cards usually aren't really neutral.
2.) Select PREset in whichever way you prefer (INFO panel or Shooting Menu).
3.) Press and hold the button again until PRE starts to blink. Release the button and PRE continues to flash.
4.) Point your D5000 at the white object and press the shutter.
5.) If the display flashes "gd" (good) you're all set.
6.) If the display flashes "ng" then repeat from step 3.)
Trick: when setting a PREset WB, since the D5000 forces whatever it sees to become neutral, point it at something colored and the D5000 will tint everything to an opposite color! Set a PREset WB on a bluish sky to make everything more orange, or set it on something orange to tint everything more blue.
I never use an actual card. I always grab a napkin, t-shirt, back of a menu or other piece of white. Black text makes no difference, so long as the background is white. If you choose a bluish piece of paper (like a glossy printed piece), your results will be warmer (more orange), and if you use a more orange piece of paper (like a cheap paper napkin), your results will be more blue.
ISO (pronounced Eye-Ess-Oh, not "eyeso.") top
I use the default of ISO 200.
You can check your D5000's current setting by pressing either INFO button (one is right by the shutter button on the top of the D5000) and looking along the right side of the screen.
You set this by pressing the INFO button on the back bottom left of the D5000 a second time, or in the Shooting Menu.
I set Auto ISO to chose ISOs for me automatically. Auto ISO selects ISOs exactly the same way I would, except that now I don't have to.
Auto ISO increases the ISO automatically as it gets dark. It shoots at ISO 200 in good light, and starts ramping it up in lower light to a maximum of ISO 3,200. Only if it gets still darker will it let the shutter speed go below the preset speed. We'll set this slowest speed and maximum ISO to fit our tastes later in the Shooting Menu.
Advance (Shutter Release) Mode top
You can check your D5000's current setting by pressing either INFO button (one is right by the shutter button on the top of the D5000) and looking along the right side of the screen.
You set this by pressing the INFO button on the back bottom left of the D5000 a second time and then clicking up and down.
Single [S]
Default; press the shutter and you take a picture.
Continuous [ ]]] (bearded rectangle)
The D5000 shoots pictures continuously for as long as you hold down the shutter button.
I prefer the Continuous mode, since it shoots one photo if you press the shutter just once, or many photos for as long as you hold down the shutter button. The default Single mode shoots just one picture, regardless of how long you hold the shutter.
Self Timer ( \ )
The shutter goes off some seconds after you press the shutter button.
You set how many seconds in Custom Settings menu c3.
Delayed Remote Control [^] 2s
The shutter goes off 2 seconds after you press the optional $18 ML-L3 infra-red remote control.
The D5000 stays on waiting for you to press the remote control for a minute after you set this. You can set the D5000 to stay awake longer in Custom Settings menu c4.
Remote Control [^]
The shutter goes off when you press the optional $18 ML-L3 infra-red remote control.
The D5000 stays on waiting for you to press the remote control for a minute after you set this. You can set the D5000 to stay awake longer in Custom Settings menu c4.
Quiet Mode [Q]
This is one of the nicest features of the D5000.
In Quiet Mode, the D5000 is as quiet as a Leica M7 cloth-shuttered rangefinder camera.
The $4,400 Leica M7 is the camera journalists use when they need a quiet camera for sensitive applications, and now, the D5000 can do the same thing for cheap.
See my D5000 review for more about how quiet it is.
Autofocus Settings top
I have an entire page on how to set the Nikon D5000 AF System.
Metering top
You can check your D5000's current setting by pressing either INFO button (one is right by the shutter button on the top of the D5000) and looking along the right side of the screen. Look for a cryptic symbol just above "ADL."
The setting with the moist junk in the symbol (the top one if you go to select it) is Matrix. I've used Matrix, the D5000's default, for everything since I got my first Nikon FA back in 1992.
The other choices are a circle in the middle of a rectangle, which is much less intelligent center-weighted metering, or a smaller dot in the rectangle, which is the spot meter.
I only use Matrix and use the Lighten-Darken control if I need to lighten or darken the pictures. See Modern Exposure for details on getting perfect exposures, but all you need to know is to set the compensation control to whatever looks good to you on the rear LCD.
If you insist on using the spot meter (I don't) see Spot Metering with Nikon Cameras.
ADR (automatic dynamic range a.k.a. ADL) top
Nikon mislabels ADR as ADL. In any case, leave ADR in its default of A (Auto).
If you do, the D5000 magically alters its ISO, exposure time and applies very intelligent image processing to make al your pictures look great.
If you screw with it, you might get dark shadows or washed-out highlights if you turn it off, or a nasty HDR look if you turn it too high.
BKT (bracketing) top
The last setting on the right side of the INFO screen is for bracketing. I never use bracketing.
Picture Controls top
This is one click clockwise from BKT along the bottom right of the INFO screen.
This is how you get your choice of wild colors or creamy skin tones. I have a whole page about this at Nikon Picture Controls. They work the same way for the D3, D700, D300, D90 and D5000.
I usually use VIVID and +3 Saturation for crazy things, NEUTRAL and +1 Saturation for people, and STANDARD if I'm trying to match colors in studio product shots.
There is no "right" way to set it. Photography is an art, so whatever looks good to you is right.
Picture Controls are how you set your D5000 to give you the pictures you want right out of your camera. Learn these, and you'll never have to waste your day screwing with raw files.
Flash Lighten/Darken Control [bolt +/-] top
One more clockwise in the bottom center is this setting. This controls the brightness of the flash for the next picture.
You can set it via the info panel, or even easier, hold the top Lighten/Darken Control [+/-] and the flash bolt button on the front left of the D5000 at the same time, and spin the rear knob. You can do this without taking your eye from the finder.
I leave this at 0. It rarely needs tweaking.
Lighten/Darken Control [+/-] top
This is just another way to set the lighten/darken control on the top of the camera that I mentioned at the top of the page.
It's much easier to use the button on the top of the D5000. This display on the INFO panel is more useful as where you can look without needing to hold the D5000 to your eye to preset this control with the top button.
Flash Mode Control [bolt] top
This is the last setting on the INFO panel. It's on the lower left. You also can set it by holding the bolt button on the side of the flash hump and spinning the rear dial. Your selection is shown on the rear LCD, and also if if you hit INFO.
Bolt (normal)
This is the default position.
In Program and A exposure modes, the shutter won't stay open longer than about 1/60 second.
I usually use Normal mode, since if I don't I can get some scary long exposures if I'm not expecting them in the dark.
Bolt and Eyeball (redeye)
I never use this. It shines an obnoxious light in your subject's eyes for a couple of seconds and then releases the shutter after you've already missed the picture. Use this only if you have some people you want to get rid of at a party.
Warning: If I set the Red Eye mode by accident it bugs the heck out of me, because the camera doesn't go off until several seconds after I've pressed the shutter, but I've set no self timer! It doesn't do much to reduce redeye anyway. Skip this mode. You won't know you've set it, since there is no in-camera indication. If for some reason the shutter seems to have a weird delay, check this!
Bolt, Eyeball and SLOW (slow redeye)
This is the SLOW mode and redeye. I don't use it for the same reason I don't use Redeye mode.
Bolt and SLOW (SLOW)
This mode lets the shutter stay open as long as it needs to so dim ambient light can expose properly with flash. These exposure times can get stupid long, in which case you want to use the setting I covered under Normal.
In daylight, SLOW is the same as NORMAL, since exposure times are short. SLOW unlocks the camera in P and A exposure modes to make exposures as long as it wants to in dim light.
Have a look at most issues of National Geographic and you'll see many indoor shots made in this mode. The background exposes correctly, people may be blurred, and a burst of flash freezes them along with the blurry ghost images.
Normal and SLOW do the same thing in S and M exposure modes, since you or the camera may select any shutter speed in these modes regardless of flash sync.
The default combinations of apertures and shutter speeds do not change in Program mode (they do on some older cameras).
Bolt and REAR (REAR)
When you're shooting with flash and long exposures, this makes the blur come from behind moving subjects.
Normally the flash goes off the instant the shutter opens. This makes sense, but looks stupid if you have motion blur because the blurs will be in front of the moving subject. Select REAR mode to have the flash go off as the shutter closes. Now you'll have motion blurring from behind the frozen flash image, which looks great.
Another reason to select REAR is because people presume photos are made the instant a flash fires, then they leave. This wreaks havoc with long exposures, since people will leave at the beginning of the exposure! Use the REAR mode and the flash doesn't go off until the end of the exposure.
REAR doesn't do anything with short exposures. REAR also engages SLOW, but SLOW doesn't light up on the LCD until you take your finger off the flash mode button.
Lens Settings top
If the switch says "M/A - M " then use M/A. This gives autofocus, and if I grab the focus ring it instantly lets me make manual corrections. As soon as I tap the shutter button again I get autofocus. This M/A setting, if the lens has it, provides both kinds of focus without ever having to move any switches. It's the best.
Older lenses may have an "A - M" switch. Leave those at "A." To get manual focus you must move the switch on the lens, and/or the switch on the camera. It's not automatic. Different lenses require different settings on the camera and lens to get manual.
Non-G lenses will have an aperture ring on the base of the lens where it's attached to the camera. Set this this ring to the smallest aperture (largest number), usually in orange and 16, 22 or 32. There usually is a lock to keep this ring set there, since if it comes off that setting you'll get an error message (fEE) from most cameras.
My D5000 User's Guide continues below.
I support my growing family through this website.
This guide is free to read online, but copyrighted and formally registered. If you haven't helped yet and would like to save or make a printed copy of this article for your camera bag, please send me $5.00 for each complete or partial copy that you print or save, for personal use only. Others charge $29.99 for crappier information, and with your honesty I can continue to offer these guides online for less.
If you bought your D5000 by clicking through my links, then you've saved money and also helped me write this guide. Thank you and please enjoy it. It's great people like you, and those who help me otherwise, who allow me to keep adding to this site for everyone's benefit.
The biggest help is to use these links to Adorama, Amazon, B&H, Ritz and J&R when you get your goodies. It costs you nothing and is a huge help to me. These places have the best prices and service, which is why I've used them since before this website existed. I recommend them all personally.
Thanks for reading!
Ken
Page Index top
Back to Top of D5000 User's Guide or Top of Nikon D5000 Review
These were the basics. Keep reading for explicit details.
KNOBS and BUTTONS
FRONT < < NEXT
MENUS
RECENT ITEMS (or MY MENU) MENU
Home Donate New Search Gallery How-To Books Links Workshops About Contact