Ken Rockwell's Nikon Zf User's Guide
<— back to Nikon Zf Review
Z9 Z8 Z7 II Z6 III Z6 II Z5 II Zƒ Z7 Z6 Z5
DX (APS-C): Zƒc Z50 II Z50 Z30
Z System Z Lenses All Nikon Lenses Flash
Introduction Firmware Charging & Power
AF Settings Using the LCD to Select AF Areas
Getting Green for Go Flash Finder Size
Release Displays Level Displays HLG Format
Customizing Controls ISO Settings
Setting Exposure Modes Auto Dynamic Range
Picture Controls B&W Auto WB VR Settings
Long Time Exposures Astro Night Vision
Starlight View Delete from Both Cards
Front Dial Playback Settings Image Review
Voice Recorder My Personal Setup Files

Nikon Zf ($1,797, 25.1 oz./710g with battery and one SD card, also has a second micro SD slot) and Nikon Z 40mm f/2 Special Edition. bigger. I got my Zf at B&H:
Zf body-only: $1,797 at B&H, at Adorama, at Amazon and at Crutchfield.
NEW: Zf in tan fake leather: $2,097 at B&H.
NEW: Zf in blue fake leather: $2,097 at B&H.
Zf with discounted Z 40mm f/2 Special Edition as shown above: $2,037 at B&H, at Adorama, at Amazon and at Crutchfield.
Zf with discounted Z 24-70mm f/4: $2,397 at B&H, at Adorama, at Amazon and at Crutchfield.
About $1,540 used if you know How to Win at eBay.
This 100% all-content, junk-free website's biggest source of support is when you use those or any of these links to my personally approved sources I've used myself for way over 100 combined years when you get anything, regardless of the country in which you live. Nikon does not seal its boxes in any way, so never buy at retail or any other source not on my personally approved list since you'll have no way of knowing if you're missing accessories, getting a defective, damaged, returned, non-USA, store demo or used camera — and all of my personally approved sources allow for 100% cash-back returns for at least 30 days if you don't love your new camera. I've used many of these sources since the 1970s because I can try it in my own hands and return it if I don't love it, and because they ship from secure remote warehouses where no one gets to touch your new camera before you do. Buy only from the approved sources I've used myself for decades for the best prices, service, return policies and selection.
November 2024 Nikon Mirrorless Mirrorless Lenses All Nikon Lenses Nikon Flash All Reviews

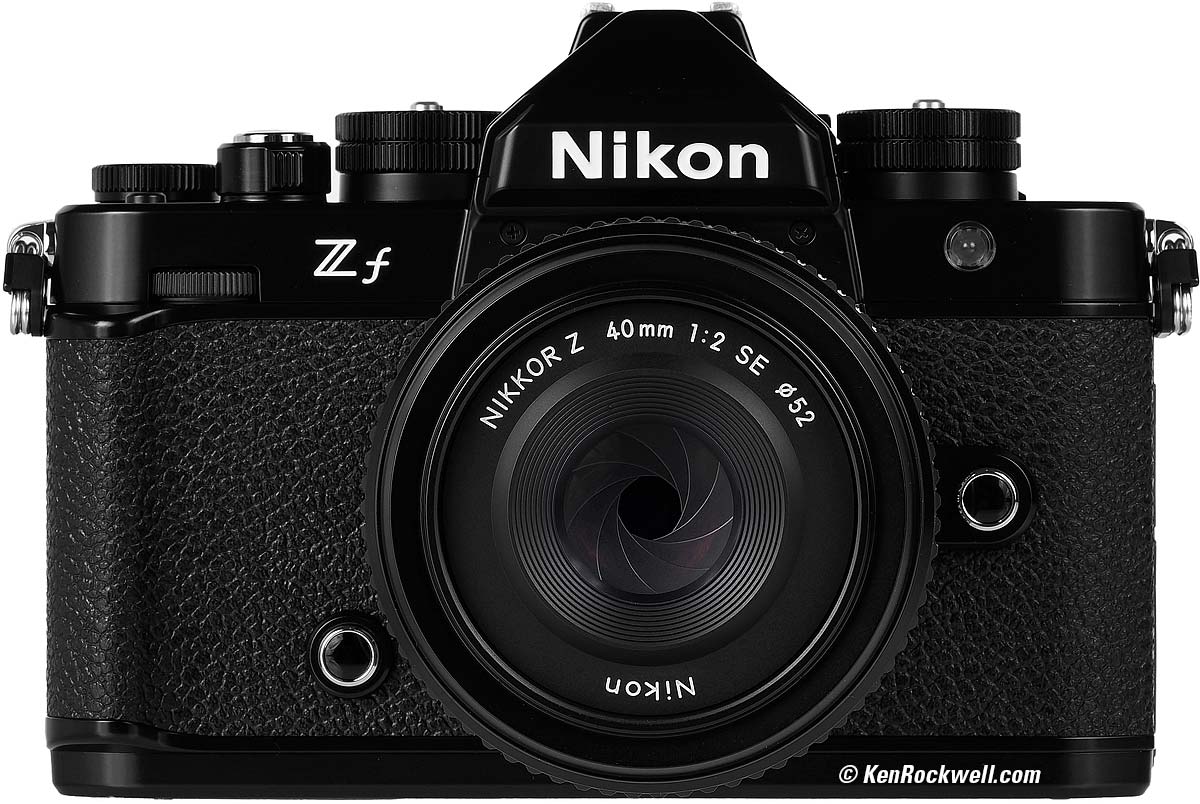
Nikon Zf and Nikon Z 40mm f/2 Special Edition. bigger.

Introduction top

I buy only from these approved sources. I can't vouch for ads below. |


Here are tricks and secrets I use with my Nikon Zf.
Mastering every feature has nothing to do with making great pictures. See How to Take Great Pictures to learn that.
This will make you an expert on the Nikon Zf's controls and menus. It also includes a lot of tips, tricks, and the settings I prefer to use.
To get great photos you still need to get yourself to the right place at the right time and point the camera in the right direction, which is a lot harder than mastering the settings of the Nikon Zf. Right out of the box at default settings, the Nikon Zf does a great job all by itself. Making a great photo involves timing, FARTing, knowing the critical basics of what makes a great photo and a whole lot more.
Please enjoy my articles on How to Make Great Photos if you haven't already. Cameras don't take pictures, people do. It's all about finding something cool, and then showing us exactly what's cool about it. This guide will help you become an expert at the Nikon Zf, but most importantly you need to be able to see the picture in the first place.
Zf body-only: $1,797 at B&H, at Adorama, at Amazon and at Crutchfield.
NEW: Zf in tan fake leather: $2,097 at B&H.
NEW: Zf in blue fake leather: $2,097 at B&H.
Zf with discounted Z 40mm f/2 Special Edition as shown above: $2,037 at B&H, at Adorama, at Amazon and at Crutchfield.
Zf with discounted Z 24-70mm f/4: $2,397 at B&H, at Adorama, at Amazon and at Crutchfield.
About $1,540 used if you know How to Win at eBay.
This is as of firmware C1.10 LF 1.10; menu locations can move around over time.
Firmware top
Load the newest firmware. Version 1.00 was awful, loaded with many bugs.
Version C1.10 L1.10 is fine.
Charging & Power top
You can charge the battery the old-fashioned way in an optional Nikon MH-25a external charger, or plug the Zf into any USB-C source.
My Zf charges from a USB-C charger, USB-C power bank, USB-C source in a car, solar panels or solar generators — but it only charges from USB-C sources, not USB-A.
It won't charge from an older-syle (rectangular) USB-A source with a USB-A to USB-C cable; you have to use a USB-C to UCB-C cable.
While I've not had a problem with any USB-C source, I've been told that the USB-C source must meet at least the PD (Power Delivery) 2.0 specification.
 The Amber CHARGE LED is usually hidden behind the strap on the top left side of the Zf; it's not on the back where we could see it easily:
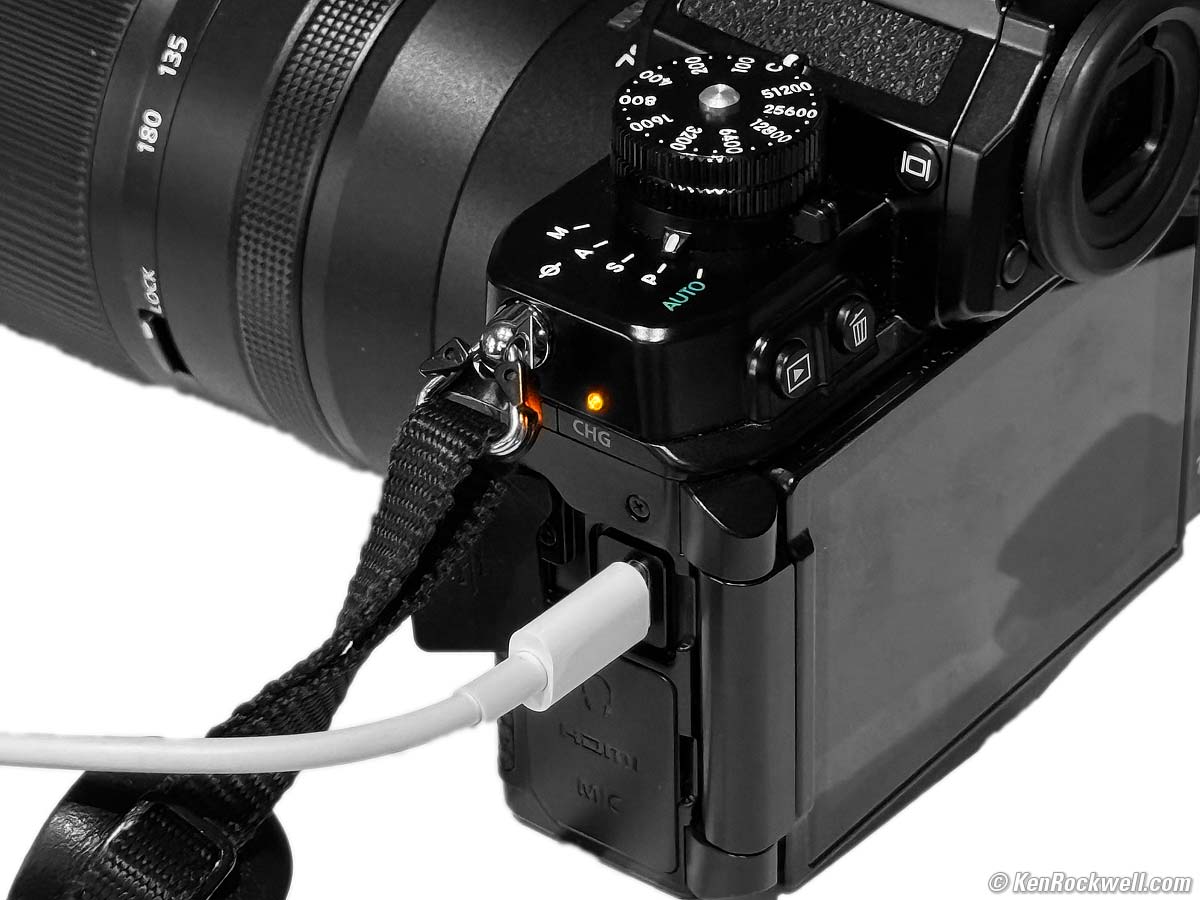
Charging the Nikon Zf. bigger.
It won't charge while ON, but will charge while sleeping or OFF. No worries if you plug it in and walk away with the power ON; it will go to sleep and start charging.
It charges at 9 W (9V at 1A) from USB-C.
Mine seemed to drain the battery quickly when left ON and carried around my neck because its eye detector thought my face was still on the finder. This made the camera hot and drained the battery quickly as it wouldn't shut off automatically, even set to MENU > 🔧 SETUP > Energy saving (photo mode) > ON.
Shooting at 30 FPS top
The Zf really rips at 30 FPS with full autofocus and exposure tracking, but there are some feature restrictions explained below to allow it to run that fast. If you want to shoot raw files or use any of the other settings and features unavailable at 30 FPS, no big deal; shoot at 14 FPS with the mechanical shutter and you're good. 14 FPS is no slouch.
To set 30 FPS, tap the rear 𝒊 button, use the rear controller to set the Advance Mode (on the lower left by default), tap OK, click to "30" and tap OK. Of course you have other ways to select this with the dials or touch screen.
Hint: click down in "L" to select the slow frame rate. I prefer 3 FPS for Low as it's fast enough for the occasional sequence if I hold the shutter, but not so fast that I get more than one shot when I want just one.
Hint: click down in Self Timer to select the delay and number of shots.
Restrictions 30 FPS top
At 30 FPS the slowest available shutter speed is 1/60 and the picture format is fixed at LARGE JPG NORMAL (24 MP), only. You can't shoot raw or any other image sizes or JPG compression levels.
The battery-gauge shot counter only increments by one for each burst, even if you shoot hundreds of frames.
The EXIF shot counter ("actuations") increments correctly for each shot.
Picture Control settings work as always.
All the autofocus settings work; focus tracks great at these frame rates.
You can shoot in any of the P, S, A or M exposure modes at any ISO, including programmable AUTO.
You can't use Program Shift; instead use other exposure modes to select any particular aperture or shutter speed.
Flicker reduction is OFF.
You can't use flash.
You can't use exposure bracketing.
You can't make multiple exposures on the same frame; get a room and take it up on your own computer to stack frames.
You can't do HDR overlays.
You can't use the interval timer.
You can't do time-lapse video.
You can't do focus shift.
Digesting, Sorting and Selecting Images 30 FPS top
We all have our favorite methods for selecting the best images out of all we shot. Here's how I do it.
I don't bother copying all the images to my computer to pick the good shots because there's too much data and it's not necessary. Worse, often you can't copy all the images and put them in the same folder because once you shoot 10,000 images, now trivially easy to do, the file numbers repeat and can't be put in the same folder!
I pop my SD cards in my OWC Thunderbolt 3 Dock then view and select the best images directly from the card with Photo Mechanic on my Mac. Photo Mechanic is so smart that it works super-fast even if reading from a slow card.
In Photo Mechanic, I tap my Mac's number buttons to color-code the better shots by rating. I then sort by color code, select the few winning shots and drag only them to my computer for actual use. I may select and delete the non-winners directly from the card if I don't plan simply to reformat these cards. In this way I've never clogged my computer or had to wait for the files to copy from the card, especially on my little 13" MacBook Pro (2017) whose SSD was only 128 GB, less storage space than many modern cards, before I updated it to an OWC Aura Pro NT internal 1TB SSD.
Card Settings top
I prefer to record the same thing to both cards at once, for backup. Set this at:
MENU > 📷 PHOTO SHOOTING MENU (camera icon) > Secondary slot function > Backup.
Autofocus Settings top
Some people spend years learning how to twiddle with the Zf's innumerable AF system settings.
I don't.
I only use a few settings, and disable all the others so they don't get in the way of me setting the few I do use.
I set MENU > ✎ (pencil icon) CUSTOM SETTINGS MENU > a Focus > a8 Limit AF-area mode selection > and I uncheck everything except Single-point AF, 3D-tracking and Auto-area AF.
Now when I set my AF Area mode, I only have to click through the two or three modes I actually use.
I use AF-S (Single) for things not moving. It focuses and locks. If things are moving I use AF-C (continuous), which continues to track focus. Easy.
I usually use the All-Area AF-Area mode[▆] , in which the Zf just figures out which area(s) to use, and just locks (AF-S) or tracks (AF-C). Easy.
Only if my Zf can't find the subject, then I'll use the 3D AF-area mode [3D] and put the AF area where I need it. Focus locks in AF-S, and it tracks and moves all over the frame in AF-C.
Hint: Rather than moving a single sensor around in single-AF-area mode [□] , use the 3D AF-area mode [3D], point the camera so the center sensor is on the subject, then recompose in AF-C [3D] and the sensor will move itself to stay on the subject as you recompose! Hand-held it can be much easier to move the camera than to move the sensor.
Hint: I set MENU > ✎ (pencil icon) CUSTOM SETTINGS MENU > a Focus > a1 AF-C priority to Focus + release. In English, this setting means most of your pictures will be in focus. The default Release setting means that the Zf shoots whether a subject was in focus or not. If you're still getting out-of-focus frames, select Focus, which will only shoot when it's in focus. Of course setting this means it may shoot more slowly, but it will be in focus.
Use the Touch Screen to Select AF Areas AF Settings top
Hint: The Zf is the first Nikon to let us use the rear LCD as a touchpad to select AF areas as we look through the finder. This is a huge improvement over having to click a clicker; now just slide your finger to move the area. To set this, set:
MENU > ✎ (pencil icon) CUSTOM SETTINGS MENU > f Controls > f4 Touch Fn > Enable/disable touch fn > ON.
This activates the touch screen.
MENU > ✎ (pencil icon) CUSTOM SETTINGS MENU > f Controls > f4 Touch Fn > Assign touch fn > [□] Move focus point.
This lets us move focus points by sliding a finger on the LCD, while we're using the finder!
MENU > ✎ (pencil icon) CUSTOM SETTINGS MENU > f Controls > f4 Touch Fn > Touch fn area > "Wide" orientation > Right half .
Set this to taste. "Right half" means you don't have to stick your finger in your eye to move the AF sensor to the left side of the screen.
MENU > ✎ (pencil icon) CUSTOM SETTINGS MENU > f Controls > f4 Touch Fn > Touch fn area > "Tall" orientation > Entire screen.
Set this to taste. This lets you use the whole screen when shooting vertically.
Getting Green for GO! AF Settings top
In 2018 Nikon paradoxically chose to make in-focus AF areas in AF-C (continuous AF) mode show in red or yellow, which means stop or caution, rather than in green which means GO!
The Zf finally allows us to fix this, but ONLY if we set:
MENU > ✎ (pencil icon) CUSTOM SETTINGS MENU > a Focus > a11 Focus point display > AF-C in-focus display > ON.
Flash top
Nikon has always mastered flash. For fill flash, just slide-on a flash, leave it set to TTL and shoot.
Hint: Flash only works with the standard mechanical shutter. It won't work with the silent electronic shutter or at 30 FPS.
Finder Size top
A new "Finder display size" option lets you reduce the size of the Live View image to allow the Zf to be held farther away and still allow the complete live image to be visible through the finder. Set this at
MENU > 🔧 SETUP > Finder display size (photo Lv) > SMALL if you prefer.
I leave it at STANDARD, but I don't wear glasses.
The menu display has always been reduced in the finder but full-size on the rear LCD; this option doesn't change the menu or playback image size, just the Live View image in the finder.
Finder Release Displays top
Selectable finder modes let you choose how the camera lets you know it shot: either nothing, lines around the frame, lines at just the left and right sides or the frame blacks-out.
Select this at
MENU > ✎ (pencil icon) CUSTOM SETTINGS MENU > d13 > Release timing indicator:
OFF does nothing as it shoots.
TYPE A blacks-out the frame when it shoots, like a DSLR.
TYPE B blinks lines along all four sides of the finder frame. They are both black and white so you can see them regardless of the picture you're taking. I use this mode.
TYPE C blinks lines only at the left and right sides of the frame.
Level Display Options top
To show the level display, hit the rear DISP button until it appears.
There are two different kinds of level display.
Type A is the usual aircraft-style artificial horizon lines, and TYPE B are two little bars along the bottom and right side.
Select these at
MENU > ✎ (pencil icon) CUSTOM SETTINGS MENU > d16 > Virtual horizon type.
HLG Still Image Format top
You can select this at
MENU > 📷 PHOTO SHOOTING MENU (camera icon)> Tone mode.
CAUTION: by all means try this format if you like, but:
1.) Before shooting anything important, be sure your software can read these files. I kid you not; it's not uncommon for some people to shoot a job or special vacation trip for which they bought this new camera in RAW or some new format only to discover after the shoot is done that they have no way of reading the files, and
2.) Before you save edited images or try to deliver original images to your client or try to post them, first be sure that wherever or to whomever you are planning to send them likewise can use or read the file type.
I have never used this format for exactly these reasons.
Customize Controls top
Program your buttons, dials and controls as you like at
MENU > ✎ (pencil icon) CUSTOM SETTINGS MENU > f Controls > f1 ~ f13, especially f2 Custom controls (shooting) and f3 Custom controls (playback).
Setting ISO in Full Stops top
Except for when Auto ISO selects them, I have no need for fractional ISOs like 125 or 8,000. I don't want to have to make three times as many clicks to skip past the fractions.
Therefore I set (manual) ISOs to set in full stops at
MENU > ✎ (pencil icon) CUSTOM SETTINGS MENU > b Metering/exposure > b1 ISO sensitivity step value > 1 step.
Setting this to FULL STOPS only effects manual settings; AUTO ISO still sets itself in what looks like sixths of a stop.
Set to FULL STOPS I can get from ISO 100 to ISO 6,400 in just 6 clicks of the dial rather than 18!
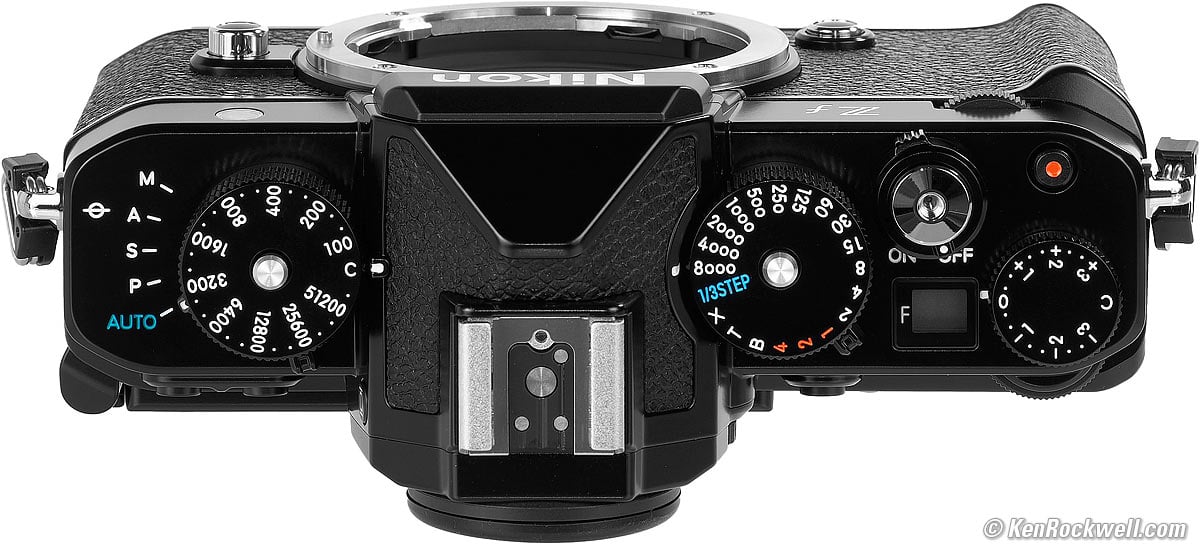
Exposure Mode Switch top
Just like the Nikon FA "Technocamera," the Zf has a dedicated exposure mode lever:
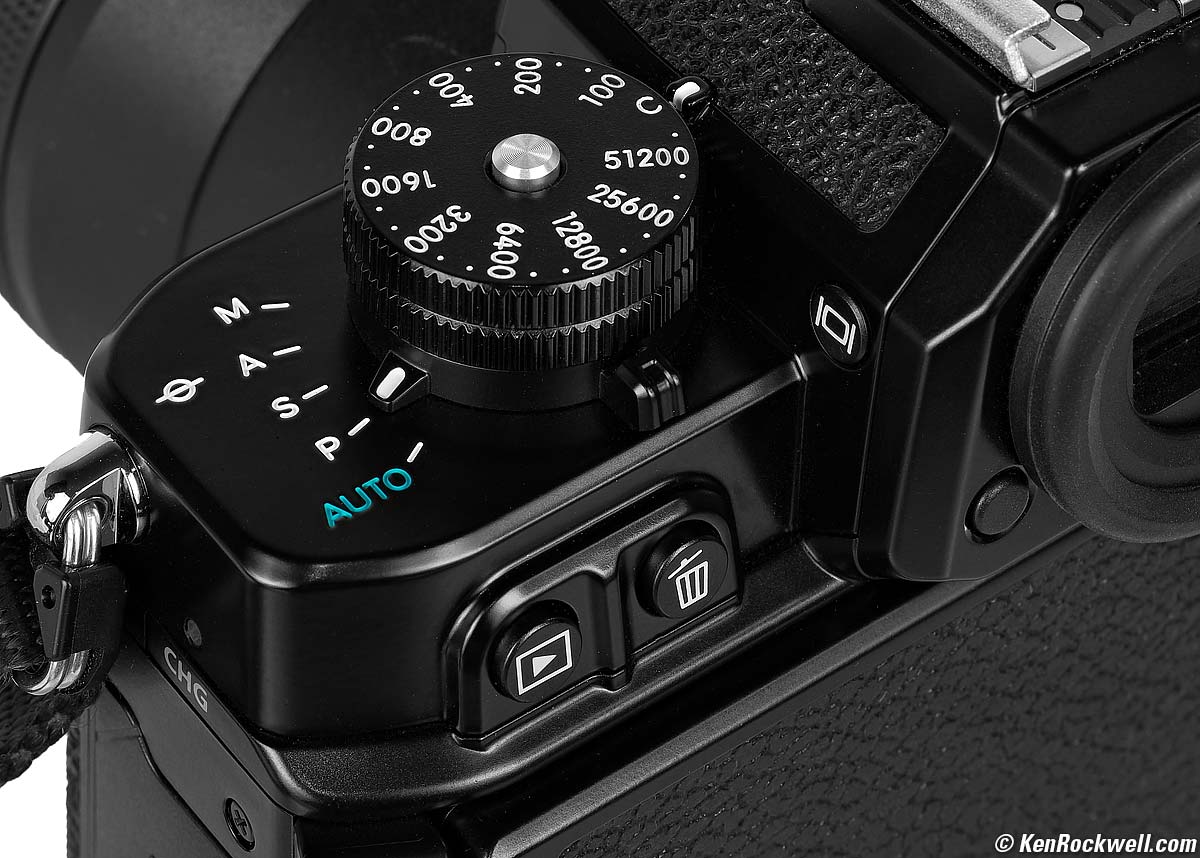
You can't save or recall this from memories or set it in the menu system; you set it here and that's it.
Sadly the Zf has this lever on wrong side so you need a second hand to adjust it; the Nikon FA "Technocamera" has it correctly on the right side and it has a lever so we can adjust it with our trigger finger. Oh well.
Automatic Dynamic Range Optimization top
Nikon has a magic image optimizer called "Adaptive D-Lighting" that does its best to ensure that everything from highlights to shadows and everything in between always looks great. I always use this feature.
For some reason it's OFF by default in my Zf, so I activate it at:
MENU > 📷 PHOTO SHOOTING MENU (camera icon) > Active D-Lighting > Auto.
The Auto position does its best every time; I've never used any of the manual settings like Normal or High ever since Nikon added the AUTO setting.
Picture Controls top
This is where we set the look of our images. Photography is art; set these wherever you like to get the look you want. Set these at:
MENU > 📷 PHOTO SHOOTING MENU (camera icon) > Set Picture Control.
Personally I love insanely colorful images, so I find colorful things and leave this set to VIVID — and I also peg saturation at +3.
I also usually set Sharpening very high, often to 9, but never play with anything else. I don't touch Mid-range sharpening (left at +2.00), Clarity (left at +1.00) or Hue (0.00); these can look ugly if set away from their defaults.
The same Picture Control applies in Movie or Still mode, while B&W mode selects only the monochrome Picture Control modes.
Movie & Black and White Shooting top
The Black and White , regular still shots and Movie shooting options are selected with a tiny dial under the shutter speed dial:
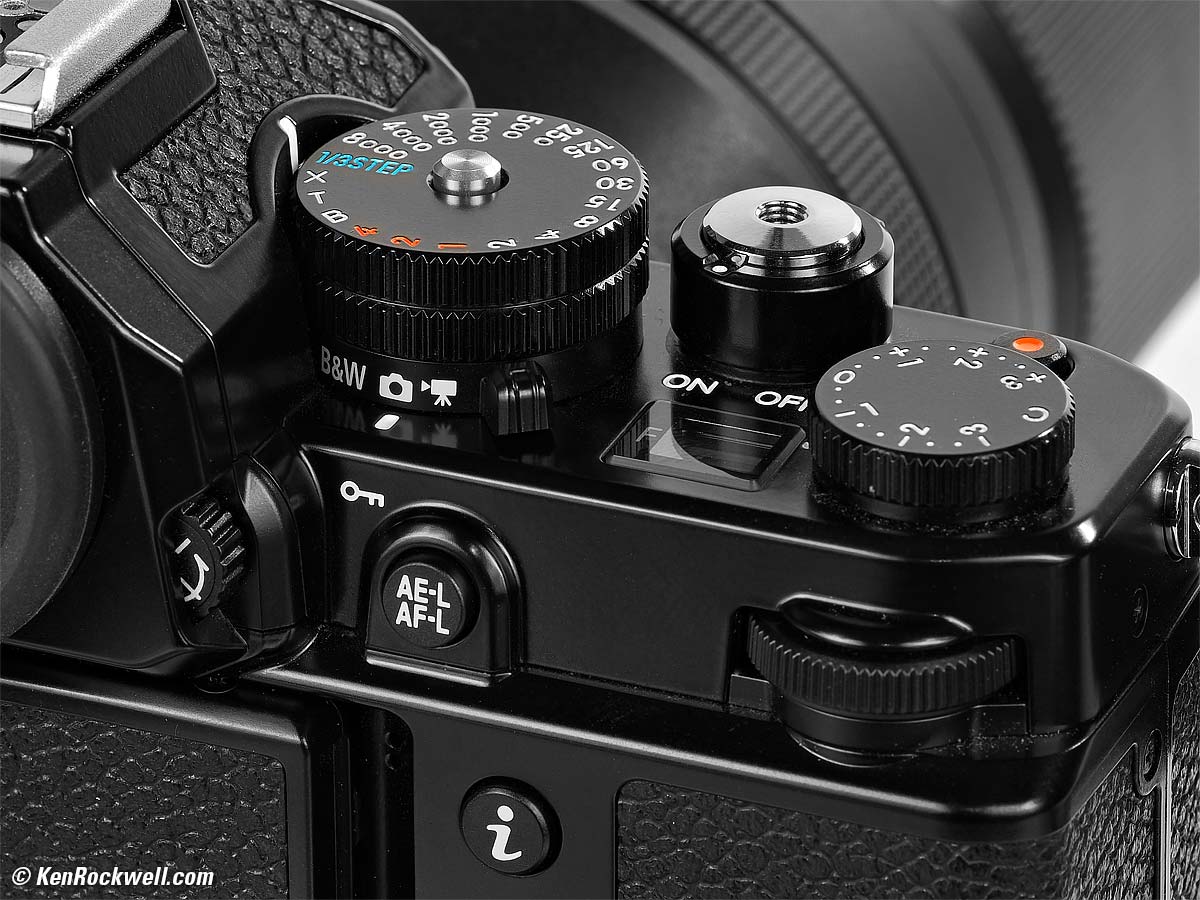
Set it to B&W and it selects the MC (monochrome) Picture Control mode (MENU > 📷 PHOTO SHOOTING MENU (camera icon) > Set Picture Control > MC Monochrome.
Adjust the Picture Control in any of these modes and it will be as you left it when you return to any of them. The movie and still modes use the same Picture Control.
Just to keep you confused, you're also perfectly welcome to select any of the Monochrome Picture Control modes in STILL CAMERA or Movie modes, but you're only able to select the Monochrome modes when set to B&W.
This switch is essentially a fast way to swap between these Picture Control modes.
If you have sky and clouds to shoot in B&W, select MENU > 📷 PHOTO SHOOTING MENU (camera icon) > Set Picture Control > MC Monochrome > Filter effects > Yellow, or for an even stronger effect, select Orange or Red, which will make the clouds stand out from the blue sky. Yellow gives a natural rendition; Orange and then Red are stronger effects. The photos are Black and White; the filter settings make the blue sky darker against the white clouds. Without a filter the blue sky tends to be too light and hide the clouds.
I prefer setting Toning > Sepia 1.0 or so for warmer-toned images. Setting this higher (Sepia 3.0) makes even warmer-toned Black and White images.
A huge advantage of mirrorless is that you see all these effects in your finder before you take a photo. The finder shows all the effects as you're shooting; you're looking at a Black and White image as you focus and compose, possibly even toned.
These effects only apply if you're actually taking pictures (JPG images) rather than merely collecting raw data to process later. I never shoot raw; you probably lose all this if you do.
This is fun, but honestly I always shoot with my usual color settings and convert to B&W later in Photoshop with a B&W adjustment layer and adjust its color sliders in Layer Properties to taste because these sliders let me choose my color-filter effects manually after I've shot, and then lets me use a expert warm split-tone that Nikon's simple toning options can't replace.
Regardless of how you get to Black and White, know that all these methods result in dull B&W images because that's how color sensors are designed: for less overall contrast than we prefer for powerful Black and White. Regardless of the conversion method you use (either the Black and White Picture Control or later in Photoshop), I always increase the contrast with a Curves adjustment layer in Photoshop.
I make the curve into an "S" by lifting it at 75%, lowering it at 25% and leaving 0%, 50% and 100% alone. This adds snap, impact and contrast, and leaves midtones, highlights and shadows alone. Cool, huh? I haven't tried the contrast options in Black and White Picture Controls which may — or may not — do the same thing.
I add this contrast layer before I tone the final print.
That was the easy part. Black and White is all about leading the eye and creating your story with selective burning and dodging (lightening and darkening). You need to lighten what's important and darken what's not to give your image impact and make your message stand out. No message = boring image. I prefer to burn and dodge with curves adjustment layer masks; you can do it with whatever software and methods you prefer, but you do need to do all this to get powerful Black and White images.
Auto White Balance top
There are four different Auto White Balance (AWB) settings. I usually use the AUTO1 setting, which is not the default.
There are three of the usual AWB settings: AUTO0, AUTO1 and AUTO2, and a fourth Natural Light Auto setting. Use whichever looks best. Geesh; if you have to choose among four of them, it's not really Automatic, is it?
We set these at
MENU > 📷 PHOTO SHOOTING MENU (camera icon) > White balance or with the 𝒊 button.
With the 𝒊 button use the rear dial to select between AUTO (1, 2 or 3) or ☀ AUTO, with ☀ AUTO being Natural Light Auto. Use the front dial to select among 1, 2, or 3 if you select AUTO (1, 2 or 3). It's easier to do than to explain here.
These all look the same in daylight and under most conditions. They vary in what they do under tungsten, sunsets, with green or yellow subjects or under fluorescent light.
The AUTO0, AUTO1 and AUTO2 settings differ only in how low they will allow the camera's Kelvin color temperature compensation to drop to compensate for tungsten light. Regular AUTO lets the camera correct from a maximum of about 7,500 K and as low as about 1,500 K in AUTO0 Keep White, about 2,700 K in AUTO1 Normal and about 4,000 K in AUTO2 Keep Warm. In any of the AUTO0, AUTO1 or AUTO2 settings the camera will vary all over the green/magenta axis as needed.
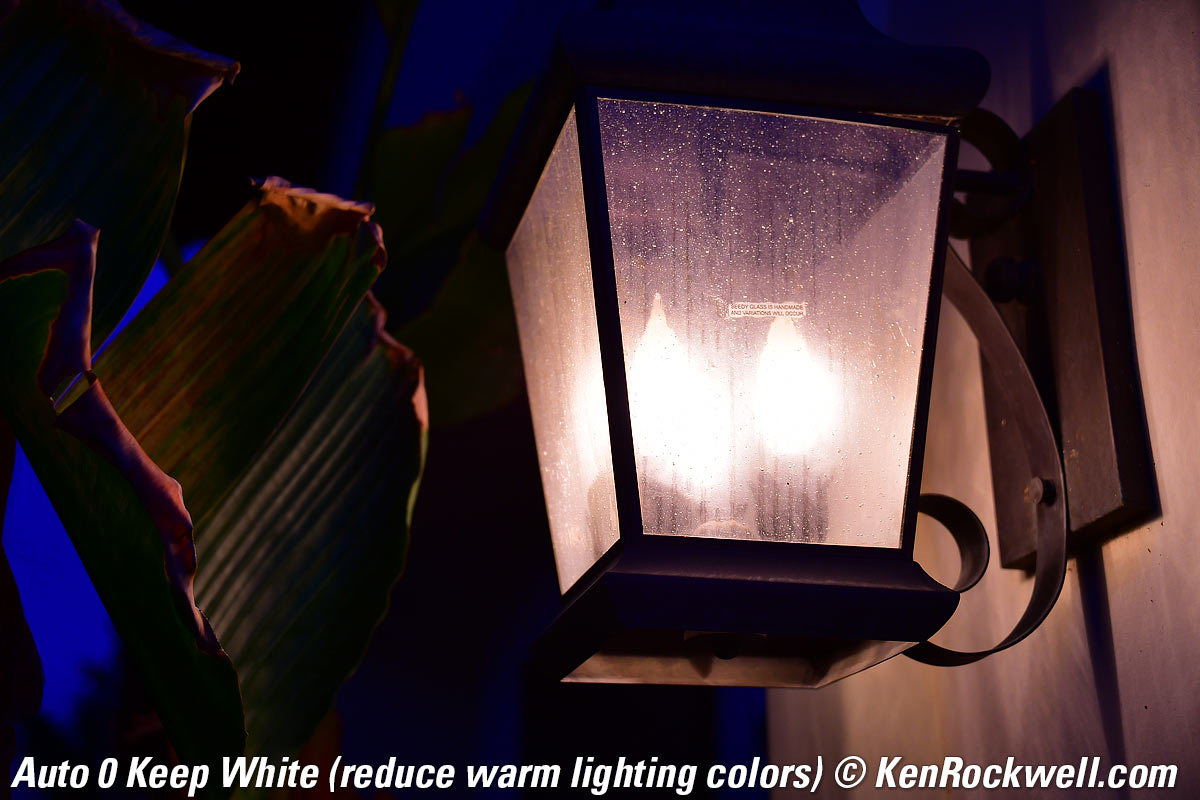
The AUTO0 "keep white" setting allows the camera to correct more fully under tungsten light to let indoor shots look whiter (less orange).
The AUTO2 "keep warm lighting colors" limits the camera's ability to correct for tungsten light, leaving indoor shots looking warmer (more orange).
Which of these three you prefer depends on how warm you want indoor shots to look. Most people and I prefer the default AUTO1 setting. The Zf defaults to AUTO0, which I rarely use.
The Natural Light Auto setting is specifically for shooting under natural light, which means light from the sun either directly, under clouds or shade, or indoors lit from a window without other interior lights. The Natural Light Auto setting can look better (warmer) in shade or indoors by window light, and also prevents the camera from confusing green subjects or plants in shade with fluorescent light so these shots stay green instead of turning too purple. It also prevents shots with pale yellows or oranges from being presumed to be under tungsten and made to look too blue. It allows the camera to correct from about 10,000 K to 5,000 K on the amber/blue axis, and doesn't let it vary much on the green/magenta axis.
Use regular AUTO1 most of the time, especially under artificial light, and consider using Natural Light Auto in under natural light. (Invention disclosure, Friday, 20 October 2017, 2:15PM PDT: Ideally there should be an Auto Auto White Balance setting that figures out which Auto WB setting to use all by itself. A white balance system also should look for flickering light, and if it sees it, presume that it's artificial light and set itself accordingly — but if not flickering, know that it could be any kind of lighting.)
Dimmed Tungsten Auto WB top
Click any to enlarge:
|
|
 |
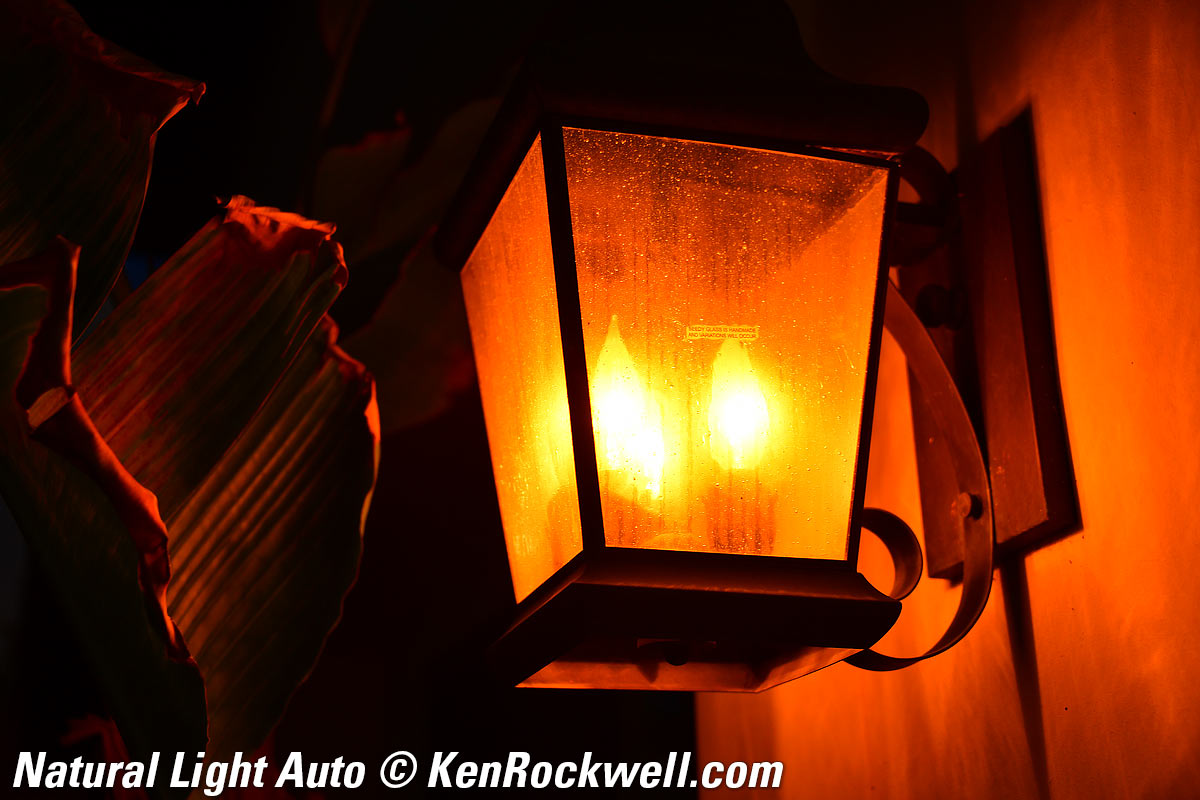 |
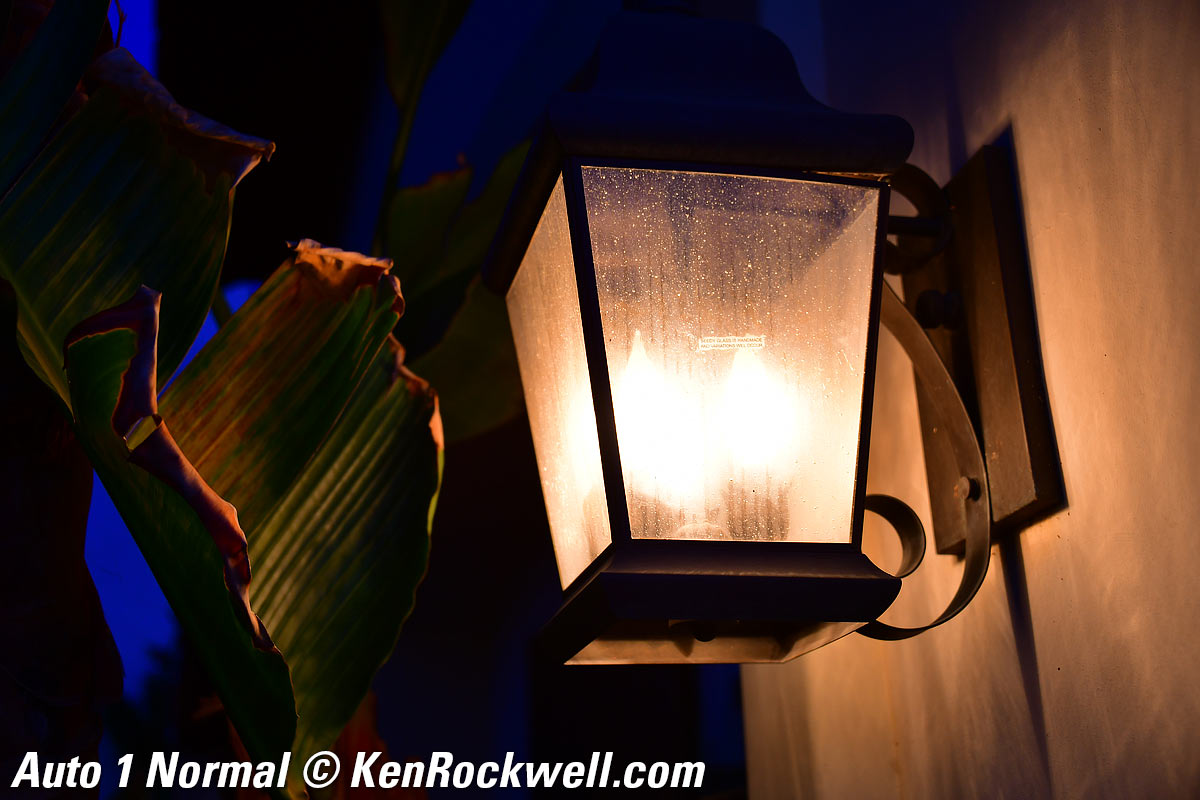
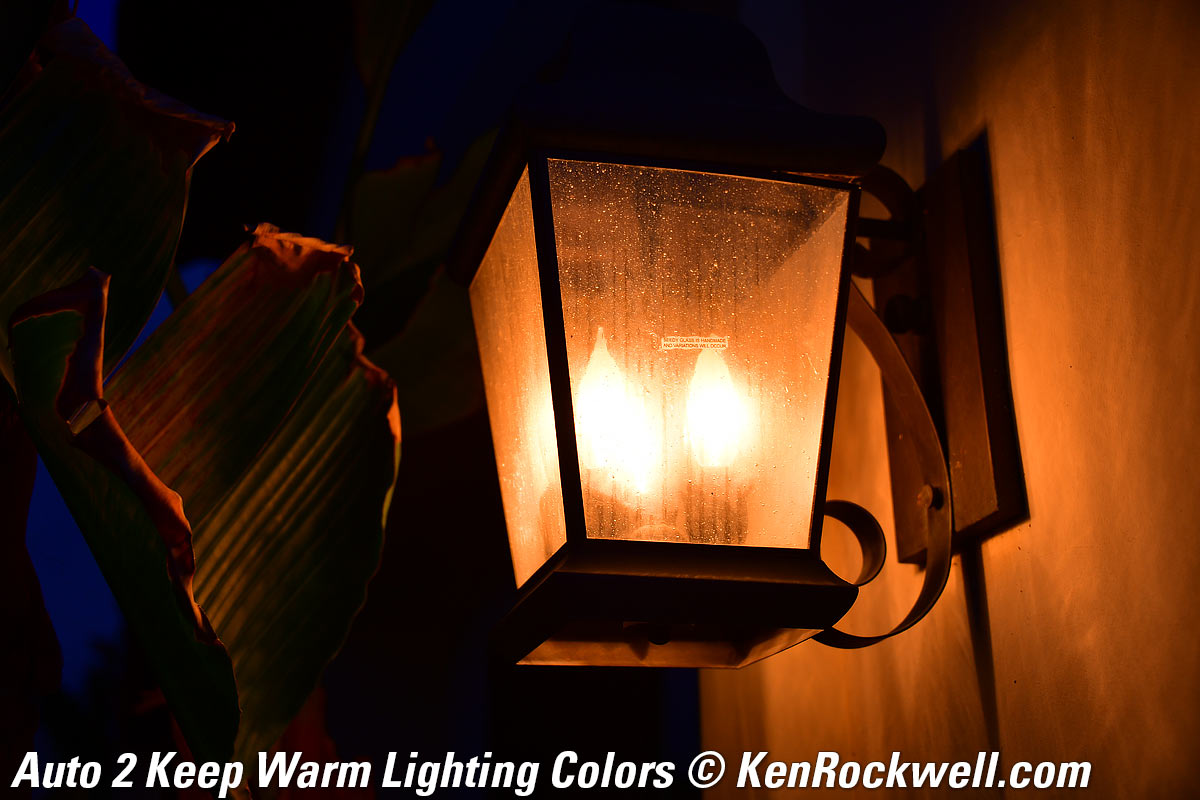
This was not a regular tungsten light; it was a tungsten light deeply dimmed so it was about 1,500 K or less— and the AUTO0 Keep White mode still did exactly that!
The Natural Light Auto setting is expecting light from the sun, so it doesn't correct for tungsten at all and it stays very orange. Not shown here is that for sunsets, Natural Light Auto keeps sunsets and warm afternoon light looking like sunsets and afternoon light, leaving everything in its warm brilliance.
12V 20W halogen Malibu lights at dusk Auto WB top
|
|
 |
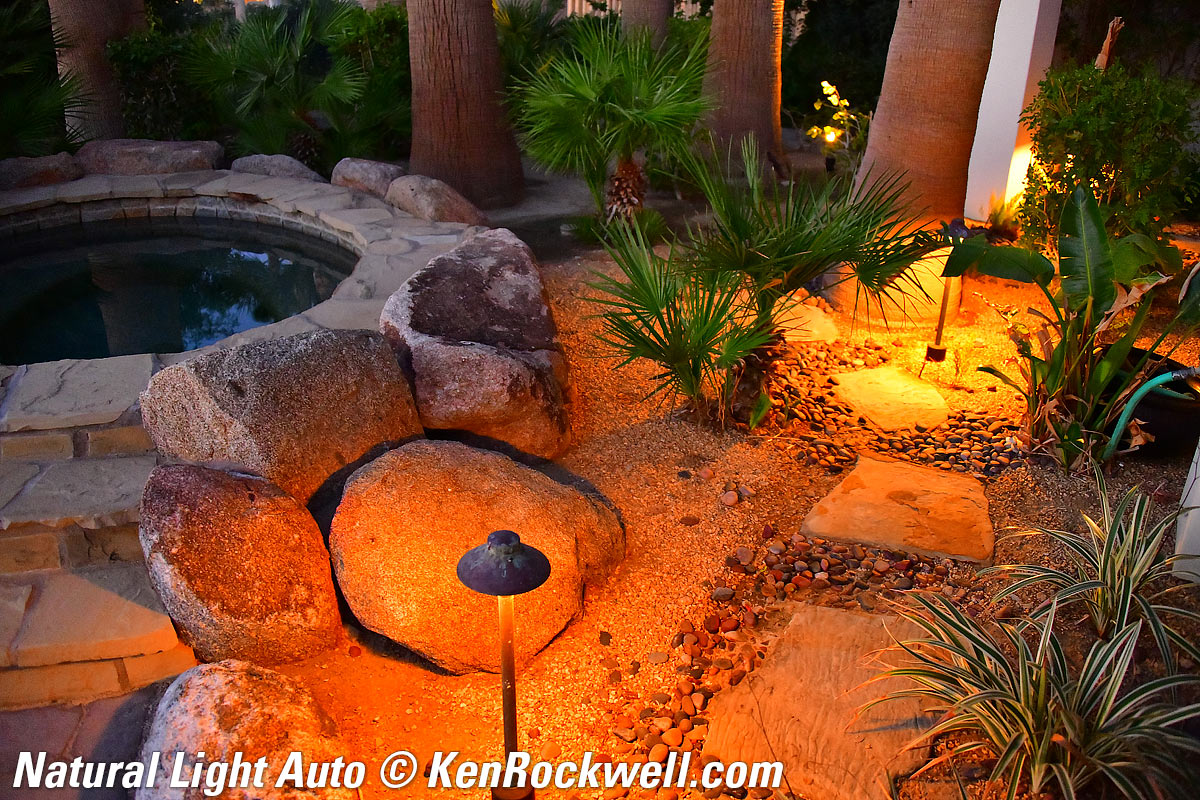 |

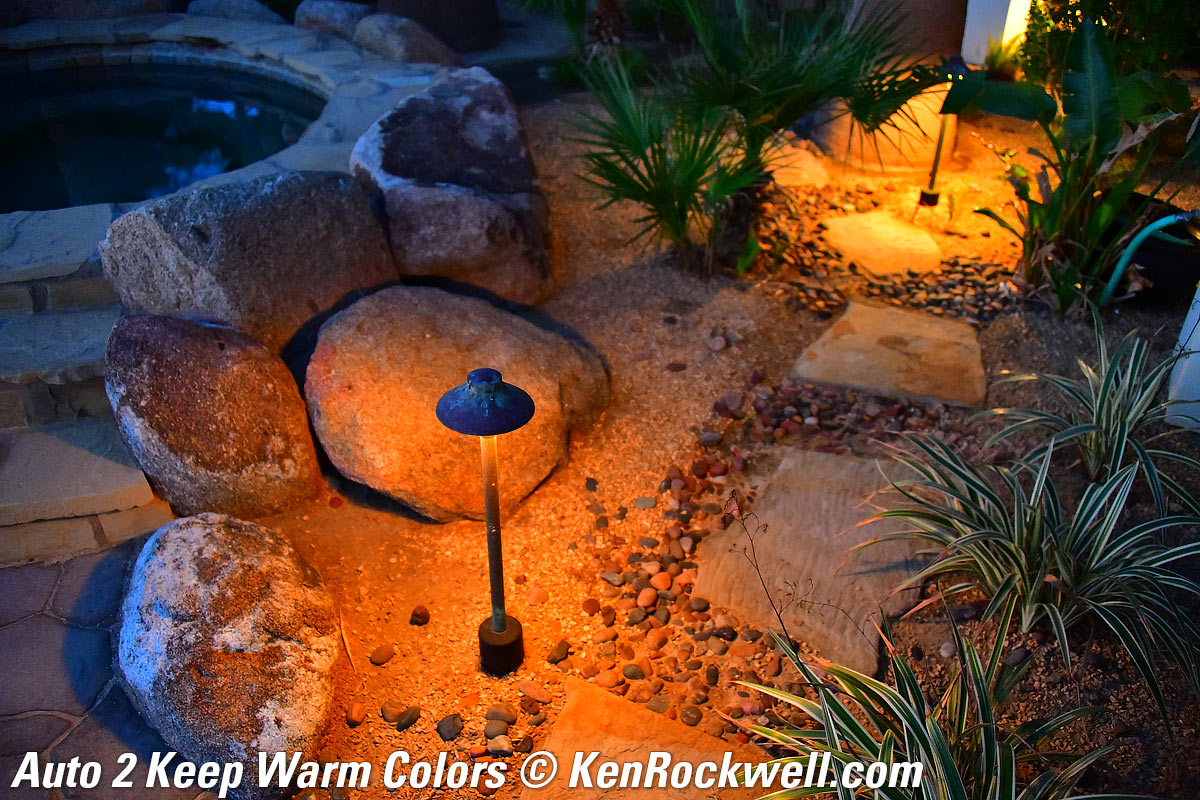
Click any to enlarge.
It's similar here, but notice how Natural Light Auto didn't make the twilight turn blue on the sandstone to the left; it left it neutral as it looked at the time.
Green Agave in Shade Auto WB top
|
|
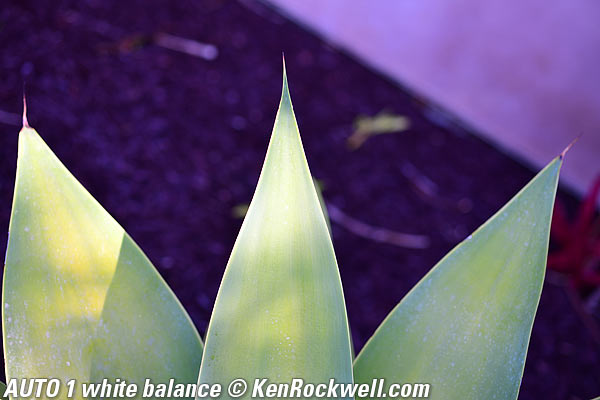
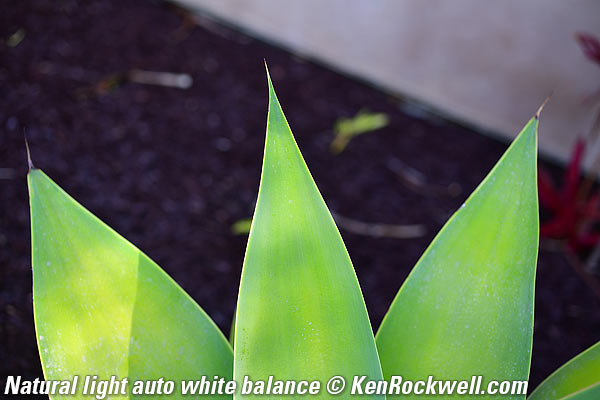
Click either to enlarge.
This is why Nikon added Natural Light Auto: green plants in shade are often confused with fluorescent lights, and the usual AWB will try to remove what it thinks is too much green, making greens duller and everything else too magenta (purple). When you set it to Natural Light Auto, it knows there isn't any fluorescent light, and lets the leaves stay as green as they should.
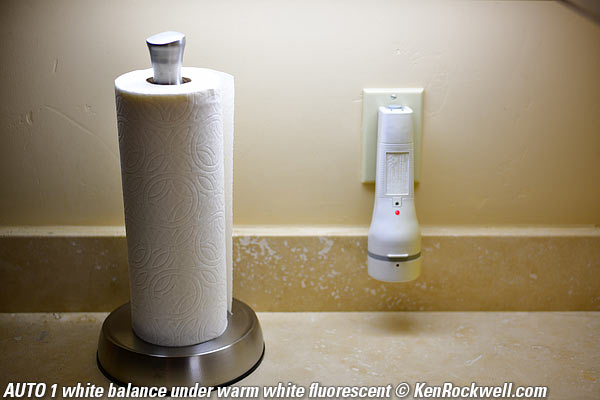
Warm White Fluorescent Auto WB top
|
|
Click either to enlarge.
In this case the AUTO1 setting expertly renders the subject naturally, while the Natural Light Auto setting is powerless to try to correct the fluorescent light.
VR Settings top
With a non-VR lens, I prefer to set VR to normal at MENU > 📷 PHOTO SHOOTING MENU (camera icon) > Vibration reduction > NORMAL. It defaults to SPORT.
If you can set this with switches on a VR lens, then these menu options are grayed-out.
Long Time Exposures top
California Desert Home, 22 June 2019, 8:50-8:52 PM. Nikon Z7, Nikon 14-30mm at 14mm at f/11 at ISO 64, 104 second time exposure, Perfectly Clear v3.7 "landscapes" mode. bigger, full-resolution or camera-original © file.
Select TIME in manual exposure mode. It's one click to the left of BULB, which is to the left of the longest time setting. Easy!
Press the shutter and it stays open until you press it again. Use the self-timer to start and put your hand or a hat over the lens when you press the shutter to stop and you don't need a remote release!
There is no timer displayed; you have to clock it yourself.
Even better, the Zf has manual exposures settable out to 15 minutes in Manual exposure mode (only) if you enable them at
MENU > ✎ (pencil icon) CUSTOM SETTINGS MENU > d6 Extended shutter speeds (M) > ON.
This extends the manual shutter speed range from 30 seconds to 15 minutes, shown as 900 seconds.
Astronomical and Surveillance Night-Vision Preservation Mode top
This mode makes the rear LCD and electronic finder a dim monochromatic red so it doesn't affect your ability to see in the dark. It only affects the finder and rear LCD; it doesn't affect how the pictures look.
Set this at
MENU > ✎ (pencil icon) CUSTOM SETTINGS MENU > d11 Warm display colors.
Mode 1 makes everything red, and Mode 2 lets you see images in color and just the menus are red. You can set the dimness here; note that what's ideal for use in the pitch dark will be very dim and difficult to see in typical indoor light.
Starlight View top
A new "Starlight View" option doesn't do anything to the pictures, but makes live-view shadows and dark areas look brighter which may help you see better while trying to compose in the dark.
Set this at
MENU > ✎ (pencil icon) CUSTOM SETTINGS MENU > d10 Starlight view (photo Lv) > ON.
Delete from Both Cards top
Previous two-slotted Nikons have deleted photos only from the first card (as I prefer), leaving otherwise deleted photos on the second backup card in case you need them later.
If you prefer that your delete button deletes from both cards while shooting in Backup mode (I don't), set this at
MENU > [▶] PLAYBACK MENU > Delete pictures from both slots > YES.
Front Dial Playback Function top
You can program what the front dial does during playback. I set mine to advance or retreat by 10 frames per click.
I set this at
MENU > ✎ (pencil icon) CUSTOM SETTINGS MENU > f3 Custom controls (playback) > Sub-command dial > OK > Frame Advance > 1, 10 or 50 frames per click, or lots of other things as well.
Image Review top
Set this at
MENU > [▶] PLAYBACK MENU > Picture Review.
Set it to ON and the picture pops up right after you shoot it.
Voice Note Recorder top
This is very useful for taking notes for news, sports, party and event reporting. It records an additional audio file along with the image file.
I set my Fn button so it records a note while holding it while playing an image. Critical is that I just hold the button and talk; one-click and done — no menus required. Tap again to play the note: easy!
Set this at:
MENU > ✎ (pencil icon) CUSTOM SETTINGS MENU > f Controls > f3 Custom Controls (playback) > Fn button > Voice memo.
My Personal Setup Files top
If you'd like to set your Zf exactly as I set mine, simply download my personal NCSET013.BIN file (278 kB, 10 January 2024, v1.10 firmware) on your computer and copy it to the top-level of a card (don't put it in the DCIM or any other folder) in a card reader.
Put a card in your Zf and press
MENU >🔧 SETUP > Save/load menu settings > Load menu settings > OK.
Your Zf will become somewhat of a copy of mine, possibly complete with my personal copyright information programmed into the EXIF of each of your files.
Be sure to set your own personal EXIF information in your camera if you choose to use my settings. Set these at
MENU >🔧 SETUP > Copyright Information > and MENU > Wrench (Setup) > Image Comment, Copyright information and IPTC.
and be sure to set all of the IMAGE COMMENT, ARTIST and COPYRIGHT fields.
My NCSET013.BIN file won't do anything on your computer and certainly won't do anything here in your browser; you download it by clicking this link on your computer and then use your computer for no other purpose other than to copy it to a card from which the camera can load the settings.
Before you put my settings in your camera be sure to save your own settings first by pressing:
MENU >🔧 SETUP > Save/load menu settings > Save menu settings > OK
and then copy that file from your card to your computer for safe keeping in case you hate my settings. You'll also see where the file belongs on your card, so do this first and then you'll replace your file with mine.
Remember, this only works if the camera is in P, S, A or M mode and only if the file isn't in any folder but is in the top-level directory of the card, the same place as the DCIM and NIKON folders. Otherwise you won't be able to load settings from a card. It doesn't run or do anything on your computer; it only runs in the Zf.
I haven't bothered to reset my Zf to reload my own settings back into it so I can't vouch as so how much it recalls. There were defects in the Z7 II where it forgot to bring across some settings. Good luck.
If you really screw up, here's the original NCSET013.BIN file (278 kB, 14 December 2023, v1.00 firmware) I saved when I got my Zf and hadn't made any settings yet.
That's it! Don't forget to FART First and have fun!
Zf body-only: $1,797 at B&H, at Adorama, at Amazon and at Crutchfield.
NEW: Zf in tan fake leather: $2,097 at B&H.
NEW: Zf in blue fake leather: $2,097 at B&H.
Zf with discounted Z 40mm f/2 Special Edition as shown above: $2,037 at B&H, at Adorama, at Amazon and at Crutchfield.
Zf with discounted Z 24-70mm f/4: $2,397 at B&H, at Adorama, at Amazon and at Crutchfield.
About $1,540 used if you know How to Win at eBay.
This 100% all-content, junk-free website's biggest source of support is when you use those or any of these links to my personally approved sources I've used myself for way over 100 combined years when you get anything, regardless of the country in which you live. Nikon does not seal its boxes in any way, so never buy at retail or any other source not on my personally approved list since you'll have no way of knowing if you're missing accessories, getting a defective, damaged, returned, non-USA, store demo or used camera — and all of my personally approved sources allow for 100% cash-back returns for at least 30 days if you don't love your new camera. I've used many of these sources since the 1970s because I can try it in my own hands and return it if I don't love it, and because they ship from secure remote warehouses where no one gets to touch your new camera before you do. Buy only from the approved sources I've used myself for decades for the best prices, service, return policies and selection.
Thanks for helping me help you!
Ken.
© Ken Rockwell. All rights reserved. Tous droits réservés. Alle Rechte vorbehalten. Alla rättigheter förbehållna. Toate drepturile rezervate. Ken Rockwell® is a registered trademark.
Help Me Help You top
I support my growing family through this website, as crazy as it might seem.
The biggest help is when you use any of these links when you get anything. It costs you nothing, and is this site's, and thus my family's, biggest source of support. These places always have the best prices and service, which is why I've used them since before this website existed. I recommend them all personally.
If you find this page as helpful as a book you might have had to buy or a workshop you may have had to take, feel free to help me continue helping everyone.
If you've gotten your gear through one of my links or helped otherwise, you're family. It's great people like you who allow me to keep adding to this site full-time. Thanks!
If you haven't helped yet, please do, and consider helping me with a gift of $5.00.
As this page is copyrighted and formally registered, it is unlawful to make copies, especially in the form of printouts for personal use. If you wish to make a printout for personal use, you are granted one-time permission only if you PayPal me $5.00 per printout or part thereof. Thank you!
Thanks for reading!
Ken.