Home Search Gallery How-To Books Links Workshops About Contact
Nikon
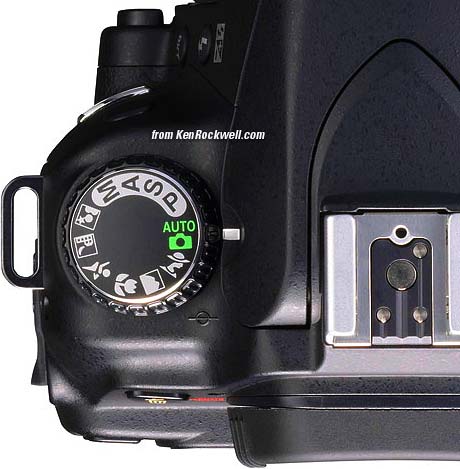
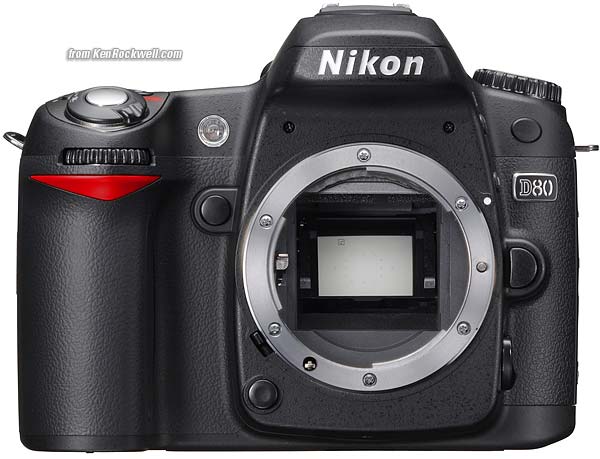
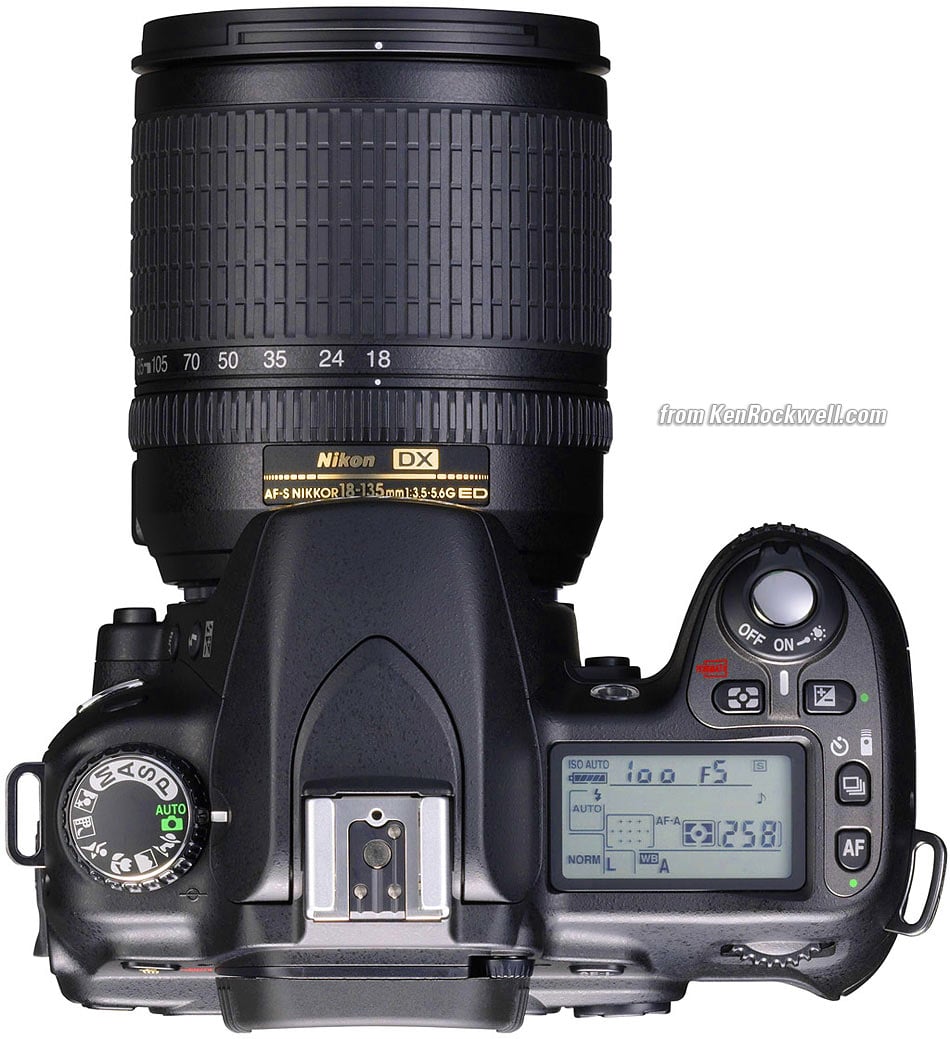
D80 Controls Want free live phone support? In the USA, call (800) NIKON-UX, 24 hours a day, 365 days a year. Back to top of D80 User's Guide. Back to D80 User's Guide page index. Controls: Top Left Top Right Rear Front Left Front Right back to top of page Mode Selector Knob (On top left, shown above.) Spin it to select among P, S, A and M exposure modes. I ignore the green AUTO (as shown above) and the other convenience modes (flower, lady in hat, etc.). Many of the menu options are shown only after you select the FULL MENUS option in the Setup Menu and are often deactivated in anything except the P, S, A and M modes. P: Program Automatic Exposure Mode I use "P" for program auto exposure. In this mode the camera chooses the f/stop and shutter speed for you. If I want different apertures or shutter speeds I rotate the rear command dial, which selects alternate combinations of f/stops and shutter speeds which give the same exposure. Nikon calls this "Program Shift." A *P symbol appears on the top LCD lets you know you've chosen a different combination for exposure. The *P doesn't appear in the finder, but you can see the apertures and shutter speeds. Three easy ways to return to the standard program combination are to: 1.) flip to a different mode and back to P, or 2.) turn the D80 off and back on, or 3.) spin the rear dial back to its original position. The *P symbol goes away when you've returned to the standard combinations. The standard combinations are f/1.4 @ 1/8, f/2 @ 1/15, f/2.8 @ 1/30, f/4 at 1/60, f/5.6 @ 1/125, f/8 @ 1/250, f/11 @ 1/500, etc. A shifted set might use f/2.8 @ 1/2,000, f/4 @ 1/1,000, f/8 @ 1/500 or might use f/2.8 @ 1/4, f/4 @ 1/2, f/5.6 @ 1 sec, etc. Don't worry, just flick the rear dial until you get the combination you prefer. A, S and M Modes If you want to use only one aperture or one shutter speed then use S or A mode and the camera will automatically pick the other value. I never use these; I shift the program instead. If you want to set both the hard way, use M, manual, mode. In these three modes you select the aperture with the front dial and the shutter speed with the rear dial. You can reverse which dial does what in the Custom Setting 15. In A or S mode you can only set one of the two values because the camera is setting the other one for you. A Mode: Aperture Priority In A mode you choose the Aperture and the D80 chooses the shutter speed. S Mode: Shutter Priority In S mode you set the Shutter and the D80 sets the aperture. If the D80 runs out of available apertures you easily can get under or over exposure in S mode: watch that the D80 can select a correct aperture for your lighting. M Mode: Manual You set everything the hard way. I look at the LCD to check exposure. You can use the bar graph in the finder - but why? If you wanted to do that use another mode and let the D80 do the setting for you. HINT: Due to a continuing firmware defect, AUTO ISO doesn't deactivate in Manual mode. I always turn off AUTO ISO when I enter Manual Mode, otherwise Auto ISO changes ISO on you and ruins your intended exposure. TOP RIGHT PANEL CONTROLS top of page
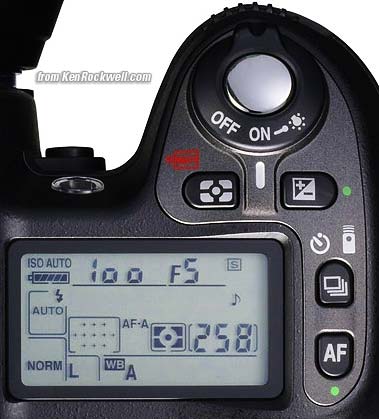
Nikon D80 Top LCD and Controls, Right Side OFF, ON, Light and Shutter Release Button Leave it ON unless you're putting it away. It draws no more power in ON than OFF. OFF is a lock to prevent accidental operation in your case. Twist it clockwise to illuminate the top LCD. FORMAT and Weird Rectangle Button This is the metering switch. I always use Matrix, shown by an icon on the top LCD which looks like the same weird rectangle on the button. It's shown this way in the image above. Hold the weird rectangle button and spin the rear dial to set the metering modes to Matrix (weird rectangle), center weight (a dot with a ring around it) or spot (a small dot), as seen on the top LCD. There is no indication in the finder. Hold this and the other FORMAT button on the top left rear to format the memory card. I do this every time I shoot. Hold down both buttons and the top LCD flashes "For." Hold them both down again and the card is formatted. This erases everything, and ensures you won't be getting any errors. Professionals reformat a card each and every time a card is put in the camera. This is because files and folder structures are sometimes messed up or changed when the card is read in-camera or with a reader or used in any other camera. Professionals prefer to be safe than sorry. We don't use cards to archive previous photos. One time I kept saving my winner shots on a card by simply erasing the rest each time. After a few months I started to get errors. These went away as soon as I reformatted the card. Reformatting completely renovates the card. Erasing does not, and leaves potential errors lurking. +/- and Green Dot Button This exposure compensation button is very important. You'll probably wear the paint off this one. This button makes the photos lighter or darker. + is lighter, and - is darker. A flaw in the D80's firmware makes most photos too light, so I leave mine set to -0.7. If your photo is too light, hold the +/- button and spin the rear dial to a more negative number, like -1.3. If your photos are too dark, hold it and spin the dial to a more positive number, like -0.3 or 0.0. It's perfectly OK to go to any number you need, like -2.3 or +1.0. This only affects photos as you take them. Use whatever setting looks best. This error isn't a simple calibration issue. The D80 does different weird things with different subjects. The D80's meter firmware is designed erroneously to expose for the darkest part of the image, so it's almost impossible to get the right exposure of someone wearing black, especially as they move around the image. You may need -2.0 or -3.0 compensation, while other shots of light objects may be fine with 0.0. It is this need for constant variation and supervision which makes this meter so bad and why I prefer my D200. The D40 is the same as the D80. Flash exposure is Nikon's usual perfection. HINT: You can see the + or minus value displayed in the finder as well as the top LCD, so you can adjust this without taking your eye from the finder. The finder display only reads the value when the button is pressed, otherwise those digits read exposures remaining. Hold this and the other green dot button below at the same time for a few seconds to reset most settings to their defaults as explained on the first page. I do this every time I shoot to cancel whatever whacky settings I may have been using before. Bearded Rectangle, Backwards Clock and Remote Clicker Button This controls how the shutter fires. Hold it and turn the rear dial, or press it to cycle among the various modes. The modes are shown on the top LCD. [S]: Normal mode is shown as an [S] in a rectangle on the top LCD, as shown above. The D80 takes one picture each time you press the shutter, regardless of how long you hold the shutter. Bearded Rectangle: The D80 takes one picture if you press the shutter and release it. The D80 takes photos at about three frames per second if you hold down the shutter. I use this mode because I have my choice of one or many shots depending on how long I hold the shutter. In dim light I hold it for many exposures so I can pick the best one later. Backwards Clock: Self Timer. Rectangle with Hole (Remote Control): This lets my D80 fire from my excellent ML-L3 remote control. It's the best $20 you'll spend and it works with the D70 and D40, too. The D80 has to stay on in this position, which is why it turns off automatically after a period of a minute or so as set in Custom Setting 30. I use this mode on my tripod and for self portraits.
Trick Self Portrait. My ML-L3 is in my other hand out of the picture. You can get the backwards clock and remote icons to show at the same time, in which case the D80 fires after an interval after you press the remote. AF and Green Dot Button This sets the autofocus mode. You can tap it to cycle through the settings, or hold it and spin the rear dial. AF-A, the default I use, magically selects between the next two modes. AF-S stands for AF-Single. The D80 focuses once, then locks AF for you to recompose and shoot. AF-C stands for AF-Continuous. The D80 keeps focusing as the subject moves. Use this for sports and vehicles in motion, like cars, birds and aircraft. I covered green dot reset on the first page. It resets most of the D80 settings. I reset this every time I shoot. REAR PANEL CONTROLS top of page
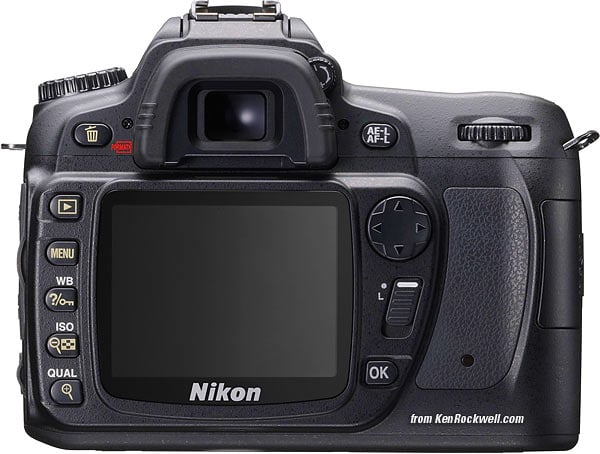
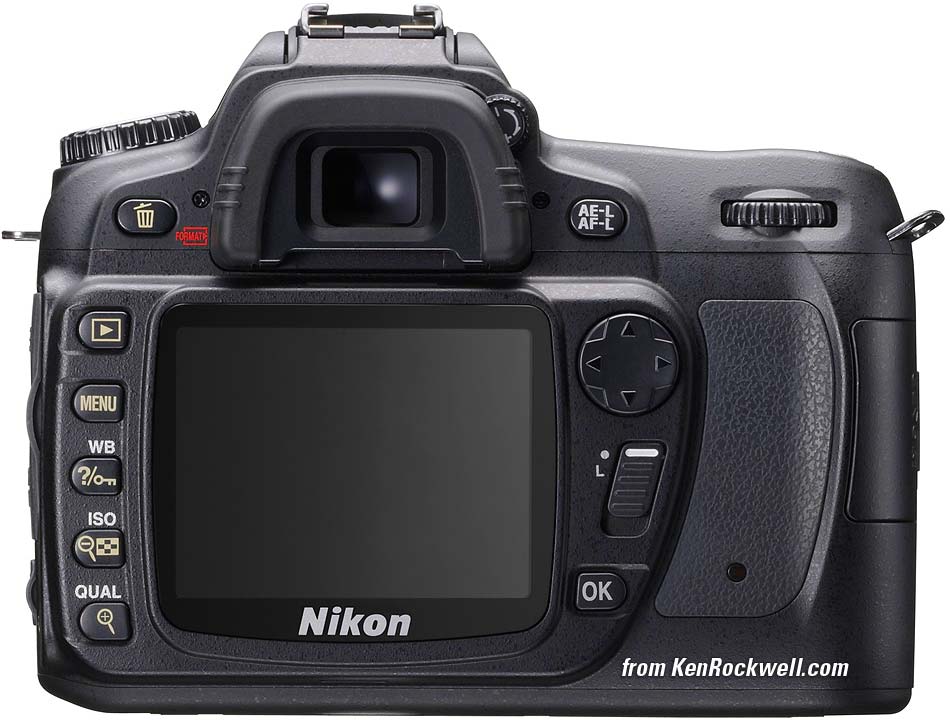
Nikon D80 Back. enlarge From top left to bottom right: Trash Can and FORMAT Button This is the D80's dual-purpose flush lever. Press it while a photo is displayed to erase that photo. You'll get an "are you sure?" screen, and press it again to dump that shot. Meatheads like me get used to double pressing it every time out of habit, which means I accidentally erase some shots. Serves me right. Pressing and holding this FORMAT button along with the other FORMAT button on top formats the card (erases and resets everything on the memory card) as explained above. [>] (Play) Button This plays an image, or stops playing an image. You don't need this often, since the LCD turns off the instant you tap the shutter button, and if you set Image Review ON in Custom Setting 06 it plays automatically after each shot. With Custom Setting 06 set to ON, you can do anything and everything to the image immediately after shooting without having to press Play. Want to zoom, scroll, or see other images? Just move the appropriate controls. I thank my lucky stars with my Nikon, because on my idiotic Canon 5D I have to wait and press the Play button just to zoom in on a shot I just made! No need for this with Nikon, so long as you have Image Review set to ON. The only reason you may want Image Review OFF (its default) is if you prefer to make many immediate changes to your next shots. If Image Review is ON, the image pops up after your shot, and the D80 interprets your front and rear dial commands as next/back and info page scrolling. My D80 won't be reading the command dial inputs to change apertures or shutter speeds until I wait a moment and tap the shutter to put the D80 back into Shooting mode. If you want to change your settings immediately, turn off Image Review. The Canon Rebel XTi is smarter than the 5D, since the XTi has a sensor to determine if you have your eye at the viewfinder and switches automatically. MENU Button This gets you into the menus, as explained at the many menu pages below. WB / ? / Key Button: WHITE BALANCE 1.) If playing (note the color code: yellow: play, silver: shooting), it locks the image from deletion. I never do this, since it makes it a pain to erase later from my computer. Of course Formatting the card erases everything! One trick for which I use the lock is if I forgot to format the card when I started shooting. I lock the few new shots, then use the DELETE ALL command in the Play Menu to dump all the old stuff I didn't lock. I then have to unlock each shot and proceed normally. 2.) If setting the menus, pressing this ? button often gets help and explanations of what's going on with that menu item. 3.) If not playing back, then you're in shooting mode. Hold this button and turn the front and rear dials to set the White Balance. You can see the setting on the top LCD. The rear dial makes selections among the major settings. The front dial fine-tunes the setting from -3 (warmer or redder) to +3, cooler or bluer. I leave my WB at AUTO. See also How to Set White Balance and White Balance Examples. Here is a run down of the individual WB settings from left to right, as shown on the bottom of the top LCD: Auto (A): I use this all the time. It makes its best guess for WB. It's usually very good. Indoor tungsten can be too orange unless you have some bright tungsten light also in the image. If you do, it removes the orange and compensates completely. If not, the D80 only partly compensates and you get a nice warm image instead. Tungsten (hanging light bulb icon that's easy to confuse with the sun icon): This makes the picture very blue. Use this only for deliberate Arctic freezing effects, or under conventional tungsten light bulbs. Fluorescent (glowing tube icon): Used to make crappy fluorescent light look less crappy. These settings rarely work; use the preset setting for better results. Direct Sunlight (sun icon): Use this outdoors in direct sunlight. Use other settings for shadows or indirect sunlight. Flash (lightning bolt icon): I never use this. It's almost the same as direct sun. I'm told it's really for studio strobes, since the Auto mode compensates magically for flash if you use it on-camera. The reason to use this is if you use a different trim value for your strobes than you do for sunlight. Cloudy (cloud icon): Warmer (more orange) than the sunlight position. I use this in shade, too. Shade (house casting a shadow icon): very warm (orange). Use this for sunset shots and deep shade. K (Continuously Variable): This setting lets you choose any amount of blue or orange. Once you select "K" you choose the value, from 2,500 to 10,000, with the front knob while holding WB. The calibrations are abstract in what we scientists call (degrees) Kelvin. More degrees look warmer (more orange) and fewer degrees looks cooler (bluer). There are no rules in real-world photography: use whatever setting looks best to you. 2,500 K is very, very blue. I'll use something around 2,650 K in dim home lighting to get neutral results. 3,200 K is the same as tungsten above. 5,400 K is the same as direct sun above. I'll use something around 4,000 K indoors with a mixture of sun and tungsten light. 10,000 K is very, very orange. The shade setting is similar to 7,500 K, and 10,000 K is warmer. Preset (PRE): You use this setting with a white or gray card to get perfect color matching. Hold "WB" and spin the front knob after choosing PRE with the rear knob. To set it to a white or gray card (or anything neutral): 1.) Ensure your card or other neutral object is in the light representative of the light on the subject. 2.) Hold WB and spin the rear dial to get to the PRE setting. 3.) Release the WB button. 4.) Press and hold the WB button again for a few seconds. 5.) PRE starts to blink. 6.) Release the WB button. 7.) Point your camera at the card or neutral colored thing and press the shutter. 8.) If the display flashes "good" you're set. 9.) If the display flashes "ng" then repeat from step 4.) ISO / Minifying Glass / Checkerboard Button If playing, it reduces the images to fit 2x2 or 3x3 on the screen. If the image was zoomed, it zooms out. If shooting, hold this and turn the rear dial to change the ISO, or sensitivity to light. I usually leave my ISO at 100 and let the D80's Auto ISO adjust as needed. Auto ISO makes all the ISO adjustments for you. I always use Auto ISO since it's as smart as I am. Higher ISOs can give sharper images in dimmer light because they let the D80 shoot at faster shutter speeds or smaller apertures, but they also can add more grain (noise) to your photos. ISO 100 gives the cleanest images, but the most potential for blur in dim light. I use ISO 100 outdoors. ISO 400 and ISO 800 are perfect for sports outdoors. ISO 1,600 gives the noisiest images, with the least potential for blur. ISO 1,600 still looks pretty good if you need it, but I only use it indoors. ISO 3,200 is for use as a last resort. It is grainy, and lets you shoot in the dimmest light without flash. Auto ISO selects magically among all these (except for ISO 3,200) so you and I don't have to worry about it. Firmware Flaw: ISO goes from 100 to 3,200. Above ISO 1,600 Nikon uses bizarre terminology to scare amateurs away from setting these, because these same amateurs would clog up Nikon's (800) NIKON-UX support lines complaining about grainy photos. Nikon calls ISO 2,000 "Ho.3," ISO 2,500 "Ho.7" and ISO 3,200 "H1.0." HINT: If you've selected Auto ISO then you cannot set a manual ISO higher than you allow in Auto ISO. To get to ISO 3,200 (cryptically called H1.0 by Nikon) you must turn off Auto ISO. QUAL / Magnifying Glass Button If playing, zooms in. Use the up/down/left/right button to scroll around. TRICK: When zoomed in, flicking the rear dial will go forward/back among other images, all at the same zoom and location. (The Left/Right/Up/Down key still moves around inside the zoomed images.) This makes it easy to see which shots in a sequence are sharp or not. The bad news is that when you delete one that the monitor returns to the default full-image view. If not playing, press this and spin the dials to set the kind of file, the size of the file and the size of the image. You read the setting from the top LCD. The rear dial controls the kind of file (raw, JPG or both), and the size of the JPG file (FINE, NORMAL or BASIC). I always use JPG, never raw. (see JPG vs. Raw.) I usually use BASIC JPG and sometimes NORMAL JPG. BASIC JPG looks almost the same as NORMAL, unless you're making six foot wide prints. It also makes a file half the size of Normal, which speeds up everything and saves space on my hard drives and backup CDs. I never use FINE; it looks the same as NORMAL and wastes space. Feel free to use any settings you like; that's why they're here. The front dial selects L, M or S image (pixel) size for the JPG images. I usually use L or M. You can see examples from my similar D200 at D200 Quality Setting Examples. AE-L AF-L Button This locks the focus or exposure. You select what it locks in Custom Setting 18. I set mine to lock exposure for as long as I hold the button. Rear Dial Click this left and right to control most of the D80's functions. You can reverse which dial does what in Custom Setting 15. This is the four-way thumb switch. While playing, this moves among your images and the data for them. I find it more convenient to spin the front and rear dials to do the same thing; try it. When playing a zoomed image, it scrolls around the image. Trick: After zooming, push the center to make the little zoom preview go away immediately! Otherwise you have to wait a second or two. Pressing the FUNC button will do the same thing. While shooting, it selects the AF areas. In the menus, it moves around your selections. Dot - L Slide Switch Locks the Up/Down/Left/Right switch, but only in the shooting mode. While shooting, L (lock) makes the D80 ignore the Left/Right/Up/Down key. This keeps your selected AF area unchanged. It doesn't have any effect in the other modes. Smart! Almost Invisible (when off) Green Light This light should be red, because it means the D80 is talking to the SD memory card and you must not remove it. If you're dumb enough to yank out the card with the light on, you not only will lose some photos, you may destroy your SD card. This normally blinks when the D80 is turned on or off or wakes up to shoot. It blinks for a moment after each shot to record it to the card. it blinks as you select different playback images as it reads them from the card. It can stay lit for a minute or more while data gets written, if you insist on shooting a lot of fast sequences in raw. You may ignore it while shooting. You don't have to wait for it, except to pull out your SD card. The D80 has a fat buffer to let you shot as fast as you want without having to wait for this light. OK Button In playback, calls up the Retouch Menu. If zoomed in (or zoomed out to the 2x2 or 3x3 modes), it returns you to a normal sized image. In menus, sets menu items. The D40 is much better, since it puts the OK key in the middle of the Up/Down/Left/Right key. FRONT and SIDE CONTROLS top of page
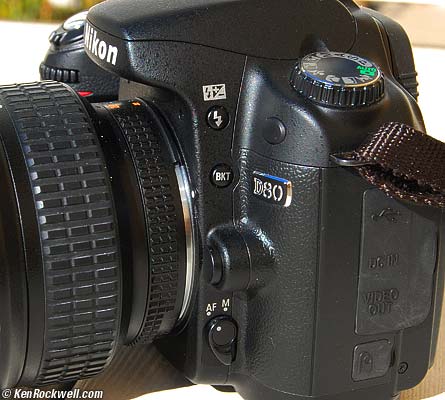
Nikon D80 with Nikon 17-35mm f/2.8. From the top down: +/- Lighting Bolt Button 1.) Press once to pop up the built-in flash. 2.) Hold and spin the front dial to alter the brightness of the flash. 0.0 is normal and I leave it there almost all the time. Only in rare instances do I ever need to adjust it towards the minus side to make it darker, or the plus side to make it lighter. 3.) Hold and spin the rear dial to select flash sync mode. The Sync Mode is displayed in the box with the lightening bolt on the left of the top LCD. Here are the modes and what they do: Normal (blank, which is the default): In Program and A exposure modes, the shutter won't stay open longer than about 1/60 second. You can change this minimum speed in custom function 24, which defaults at 1/60 second. I forget the exact default because I have mine set to 1/15. In this mode you won't get blur indoors, but you may not get more than a very black background either. Choose a longer speed, like 1/8, in custom function 24 to lighten the backgrounds indoors, but watch for motion. I usually use Normal mode and a custom function 24 setting of 1/8 or 1/15, since in SLOW mode I can get scary long exposures in the dark. This little trick of being able to select the exact slowest shutter speed in these modes is a significant reason why I prefer my Nikons over my Canon SLRs. Red-Eye (eyeball icon on top LCD): I never use this. It shines an obnoxious light in your subject's eyes for a couple of seconds and then releases the shutter. If I set this mode by accident it bugs the heck out of me, because the camera doesn't go off until several seconds after I've pressed the shutter, but I have no idea why because I've set no self timer! It doesn't do much to reduce redeye anyway. Skip this mode. SLOW (called SLOW on the top LCD): This mode is very useful. It lets the shutter stay open as long as it needs to so dim ambient light can expose properly with flash. Of course if it's dark these exposure times can get long. You can get blur from subject motion and camera shake. In daylight SLOW is the same as NORMAL, since exposure times are short. SLOW unlocks the camera in P and A exposure modes to make exposures as long as it wants to in dim light. Have a look at most issues of National Geographic and you'll see many indoor shots made in this mode. The background exposes correctly, people may be blurred, and a burst of flash freezes them along with the blurry ghost images. Normal and SLOW do the same thing in S and M exposure modes, since you or the camera may select any shutter speed in these modes regardless of flash sync. I usually prefer to choose an exact slowest shutter speed in the Normal mode as explained above. In SLOW mode and dark conditions the shutter speeds can become too long for comfort. Red-Eye SLOW (eye and SLOW icon): This is the SLOW mode and redeye. I don't use it for the same reason I don't use Redeye. REAR (called REAR on the top LCD): Normally the flash goes off the instant the shutter opens. With long exposures and blurred ghost images you ordinarily get the ghost streaming out in front of the subject. Think about it: if a car is driving, the flash goers off and freezes it, then the car moves forward. You'll have a ghost image ahead of the car, which usually looks stupid. Select REAR mode to have the flash go off as the shutter closes. Now you'll have motion blurring behind the frozen flash image. Another reason to select REAR is because the flash goes off at the end of the exposure. People presume photos are made the instant a flash fires, then leave. This wreaks havoc with long exposures. If you use REAR mode with long exposures they'll stay put and not move until the end. Of course you'll also want to select flash lock to eliminate the preflash. REAR doesn't do anything with short exposures. Trick FV Lock Mode: You can set this in the Custom Menus. I cover this below. It prevents people from blinking with flash! BKT Button Bracketing. I never use this. Bracketing was a popular crutch used by new photographers who couldn't get their exposures correct on film. Ansel Adams (and I) thought bracketing was very bad, because it was more work than learning how to expose correctly and because it usually guarantees that your best exposure is at the wrong instant, making you lose 2/3 of your good shots. Today the D80 has a great LCD and color histogram for getting the correct exposure. Use them, not bracketing. Big Button Above AF - M Switch This unlocks the lens. Push this straight in and rotate the lens to remove it. It's a bayonet mount. AF - M Switch Autofocus or Manual focus. If your lens has the same switch, you usually can leave this at AF and use the switch on the lens to select manual. Some lenses are different; see your lens manual or ask Nikon in the USA at (800) NIKON-UX. FRONT RIGHT CONTROLS top of page
Nikon D80, Naked. Front Dial This is used to fine-tune most settings. You can reverse which dial does what in Custom Setting 15. Top Unmarked Button to Left of Lens Mount: This button can be programmed to many clever tricks. I wish my Nikons had more of these! You set what it does in Custom Function 16. I leave mine on flash exposure lock (Bolt FV Lock), which lets me make flash photos without people blinking. Tap it to fire the flash and set the exposure, and subsequent photos won't need to fire a preflash, which ensures people blink.
Read Custom Function 16 to learn all the clever things it can do. Trick: Tap this when you've zoomed the playback to make the little guide frame disappear from the lower right of the screen. You also can tap the center of the Up - Down - Left - Right button to do the same. Bottom Button Below Lens Mount: Tap this to stop the diaphragm down to the taking aperture. The viewfinder probably gets darker, but look carefully and you can see what's in focus or not. This analog feature is a remnant from film days. Today most people look at the LCD playback. Safety Defect: Nikon has a flaw in the firmware which fires a huge, blinding burst of flash when you press this button. You must disable this in Custom Function 26 to save your eyesight. The blinding flash burst is intended as a way to let you preview the effects of flash or multiple flashes. The defect is that it is left ON by default. PLUG My D80 User's Guide continues below. No one pays me anything to write all this. I do it because I love to help. If you find this as helpful as a book you might have had to buy or a workshop you might have had to take, please help me share more. Thanks! Ken back to top of page back to top of Nikon D80 User's Guide MENUS PLAYBACK MENU < NEXT
Caveat: The ads below come from a third party and I don't see or approve them. They are sent to your screen directly from a third party. They don't come from me or my site. See more at my Buying Advice page. Personally I get my goodies at Ritz, Amazon and Adorama. |
Home Search Gallery How-To Books Links Workshops About Contact


