|


Nikon
D200 User's Guide
© 2006 KenRockwell.com

I bought mine from Ritz here. I bought another D200 from Adorama here. Also try Amazon here. Adorama usually has D200/18-70 kits in stock here. It helps me keep adding to this site when you click these links to get yours.
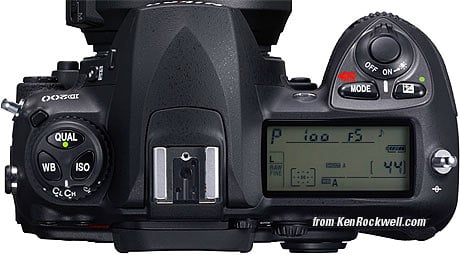
TOP PANEL CONTROLS
Want free live phone support? In the USA, call (800) NIKON-UX, 24 hours a day, 365 days a year.
From left to right:
The Three Kings: WB, QUAL and ISO: Hold any of them and spin the control knobs to adjust. In detail:
White Balance (WB): spin the rear knob for broad changes. Spin the front knob to fine tune. See my White Balance Examples page and my White Balance page for the specifics.
Here is a run down of the individual settings from left to right, as shown on the bottom of the top LCD:
Auto (A): I use this all the time. It makes its best guess for WB. It's usually very good. Indoor tungsten can be too orange unless you have some bright tungsten light also in the image. If you do, it removes the orange and compensates completely. If not, the D200 only partly compensates and you have a nice warm image instead.
Tungsten (hanging light bulb that's easy to confuse with the sun): This makes the picture very blue. Use this only for deliberate freezing Arctic effects, or under conventional tungsten light bulbs.
Fluorescent (glowing tube icon): Used to make crappy fluorescent light look less crappy. These settings rarely work; use the preset setting for better results.
Direct Sunlight (sun): Use this outdoors with sun on the subject. It looks great.
Flash (lightning bolt): I never use this. It's almost the same as direct sun. I'm told it's really for studio strobes, since the Auto mode compensates magically for flash if you use it on-camera. The reason to use this is if you use a different trim value for your strobes than you do for sunlight. I'll get to trims in a bit.
Cloudy (cloud): Warmer than the sunlight position. I use this in shade, too.
Shade (house casting a shadow): very warm. Adds orange to your photo. Use this for sunset shots.
Continuously Variable (K): This setting lets you choose any amount of blue or orange. Once you select "K" you choose the value, from 2,500 to 10,000, with the front knob while holding WB. The calibrations are abstract in what we scientists call (degrees) Kelvin, Forget that, because it's backwards to how it really works. More degrees look warmer! There's no rule in real-world photography: use whatever setting looks best to you.
2,500 K is very, very blue. I'll use something around 2,650 K in dim home lighting to get neutral results. 3,200 K is the same as tungsten above. 5,400 K is the same as direct sun above. I'll use something around 4,000 K indoors with a mixture of sun and tungsten light. 10,000 K is very, very orange. The shade setting is similar to 7,500 K, and 10,000 K is warmer.
Preset (PRE): You use this setting with a white or gray card to get perfect color matching. The D200 can recall five settings: just hold "WB" and spin the front know after choosing PRE with the rear knob. You need to use menus, explained later, to save the five settings.
To set it to a white or gray card:
1.) Ensure your card or other neutral object is in the light representative of the light on your subject.
2.) Hold WB and spin the rear dial to get to the PRE setting.
3.) Release WB.
4.) Press and hold WB again for a few seconds.
5.) PRE starts to blink.
6.) Release the WB button.
7.) Point your D200 at the card and press the shutter.
8.) If the display flashes "good" you're set.
9.) If the display flashes "ng" then repeat from step 4.)
The D200 stores this as value d-0. Recall other saved values by holding WB and spinning the front knob. The five values are d-0 through d-4. d-0 is always the value you just saved. Thank God you can use this without menus. THe menus (explained later) are only for storing, sorting and managing these. I have mine set to 1.) indoors under crummy residential light, 2.) the screen of my laptop computer, 3.) mercury street lights and 4.) a cloudy day. I'm sure you will be more inventive.
Quality (QUAL * [also has a green dot]): This sets the file format and compression levels. Hold it and turn the rear dial to choose JPG compression and raw or not. Hold and turn the front dial to change JPG image size in pixels. I use Large JPG BASIC. I have an entire page with explanations and examples at D200 Quality Settings.
The green dot is used with the other green dot button to reset most of the common shooting parameters. I explained that back on page one.
ISO: Hold this and spin the rear dial to change ISO. Default is 1/3 stop steps. I prefer to change ISO in more meaningful full stops as you can set in a menu here.
Firmware Flaw: ISO goes from 100 to 3,200. Above ISO 1,600 Nikon uses bizarre terminology to scare amateurs away from setting these because these same amateurs would clog up Nikon's (800) NIKON-UX support lines complaining about grain. Nikon calls ISO 2,000 "H+0.3," ISO 2,500 "H+0.7" and ISO 3,200 "H+1.0."
HINT: Since ISO is displayed in the finder you can set this without taking your eye from the eyepiece.
HINT: If you've selected Auto ISO then you cannot set a manual ISO higher than you allow in Auto ISO. To get to ISO 3,200 (cryptically called H+1.0 by Nikon) you must turn off Auto ISO.
Frame Advance Mode Dial (S, CL, CH, clock and Mup): This sets the frame advance rate, the self timer, and the mirror lock up. It's located in the same protuberance on the top left as the Three Kings above.
S: Single Frame. One frame for each press of the shutter button.
CL: Continuous Low. I always use this setting. Press the shutter once and you get one photo. Hold it down and the D200 takes pictures continuously at 3 FPS. You can set this in a menu (d4) to be 1, 2, 3 or 4 FPS. 3 FPS is default and where I leave mine.
If I need one shot I get one shot. If the light is dim and I want a few shots to ensure I get a sharp one I hold the release down and make several from which I'll pick the sharp one.
CH: Continuous High. The D200 runs at 5FPS as long as you hold the shutter. I don't use CH because it's so fast I often get 2 shots where one will do.
Self Timer (clock): Press the shutter and the D200 takes a picture some seconds afterwards. We can set the delay in a menu later.
Mup: Mirror Up: Press the shutter and the mirror flips up. Nothing happens until you press the shutter again, at which time the picture is taken and the mirror flips back down.
NOTE 1: The Self Timer and Mirror Up modes are defective in design. If you forget to set either back to the other modes (I always forget) you'll still be in these weird modes tomorrow! Worse, the Mirror up mode is still stupid, since you need to buy a $100 cable release to release the shutter after the mirror goes up. The correct design for these two functions, as done on the Mamiya 7, is to add a dedicated button. Press this button and the shutter fires several seconds later. On an SLR the correct implementation is to have the mirror flip up at the beginning of the self timer interval. You'd get sharper pictures, not have to screw with screwing and unscrewing caps and cable releases, not have to remember a cable release, and not miss tomorrows shots because you forgot and left the D200 selector in last night's position.
NOTE 2: If you have no cable release, you can use the Mup mode and wait 30 seconds. 30 seconds after you press the shutter and the mirror flips up the D200 gets tired of waiting and fires the shutter anyway.
NOTE 3: At default the D200 needs perfect locked focus to take a picture in S mode, and locked focus to start the Mirror Up or self timer modes. If you don't have perfect focus the D200 ignores you in these modes. Sometimes bad lenses may not be sharp enough to get good enough focus to let the D200 take a picture in these modes, especially with other than the center AF sensor. You can set the D200 to shoot even if it's not in perfect focus here.
The D200 takes pictures whether or not it's in focus in the C modes.
Power Switch (right side): Tap it past ON to turn on the LCD illuminator and the meter.
There's no need to turn OFF the D200 except to prevent accidental operation when squashed in a camera bag. The D200 turns off by itself after a few seconds of ignoring it. The only thing the OFF position does is act as a lock against unintended operation.
Exposure Mode Button (MODE, right side): Hold it and spin the rear dial to select among P, S, A and M.
P: Program
I use "P" for program auto exposure. In this mode the camera chooses the f/stop and shutter speed for you. If I want different apertures or shutter speeds I rotate the rear command dial, which selects alternate combinations of f/stops and shutter speeds which give the same exposure. Nikon calls this "Program Shift." An asterisk ( * ) shows up next to the P on the top LCD to let you know you've chosen a different combination for exposure. The asterisk doesn't appear in the finder, but you can see the apertures and shutter speeds. The asterisk goes away when you return to the standard combinations. The standard combinations are f/1.4 @ 1/8, f/2 @ 1/15, f/2.8 @ 1/30, f/4 at 1/60, f/5.6 @ 1/125, f/8 @ 1/250, f/11 @ 1/500, etc.
An easy way to return to these standard combinations is to flip to a different mode and back to P, or turn the D200 off and back on.
A, S and M Modes
If you want to use only one aperture or one shutter speed then use S or A mode and the camera will automatically pick the other value.
If you want to set both the hard way, use M, manual, mode.
In these three modes you select the aperture with the front dial and the shutter speed with the rear dial. You can reverse which dial does what in the Custom Setting: Controls Menu. Of course in A or S mode you can't set one of the two values because the camera is setting one for you.
A Mode: Aperture Priority
In A mode you choose the Aperture and the D200 chooses the shutter speed.
S Mode: Shutter Priority
In S mode you set the Shutter and the D200 sets the aperture.
If the D200 runs out of good apertures you easily can get under or over exposure in S mode: watch that the D200 can select a correct aperture for your lighting.
M Mode: Manual
You set everything the hard way. I look at the LCD to check exposure. You can use the bar graph in the finder - but why? If you wanted to do that use another mode and let the D200 do the setting for you.
HINT: AUTO ISO doesn't deactivate in Manual mode. I always turn off AUTO ISO when I enter Manual Mode.
HINT: You can see P, S, A and M displayed in the finder, so you can adjust this without taking your eye from the finder.
Format (combined with MODE button): Hold this along with its brother on the back left rear of the camera (combined with the trash button). You'll get a blinking "For" on the top LCD. Release and hold both of these again and you'll completely reformat your memory card.
Professionals reformat a card each and every time a card is put in the camera. This is because files and folder structures are sometimes messed up or changed when read with a card reader or used in any other camera. Professionals prefer to be safe than sorry. We don't use cards to archive previous photos. One time I kept saving my winner shots on a card by simply erasing the rest each time. After a few months I started to get errors. These went away as soon as I reformatted the card. Reformatting completely renovates the card. Erasing does not, and may leave the potential for errors.
Exposure Compensation Button (+/- * [a green dot]): Hold the button and spin the rear dial. + makes the picture brighter and - makes it darker. If your photo is too dark or light, just change the setting and try again. This is easy!
Remember to set it back to zero when you're done. If you don't, you'll see a "+/-" in the viewfinder and the top LCD.
See more at How to Set Exposure. Ignore Nikon when they suggest you don't use this with Matrix Metering; I do it all the time.
The green dot means if you hold it and the QUAL button down for a few seconds the D200 returns to it's default settings as I explained on page one. This clears any compensation values and other crazy things you may have set yesterday.
HINT: You can see the + or minus value displayed in the finder as well as the top LCD, so you can adjust this without taking your eye from the finder. The two displays only read the value when the button is held, otherwise those digits read exposures remaining.
PLUG
My D200 User's Guide continues below.
It took me two months to write this D200 User's Guide. No one pays me anything. If you find it as helpful as a book you might have had to buy or a workshop you may have had to take, feel free to help me share more.
Thanks!
Ken
Back to Top of D200 User's Guide
KNOBS and BUTTONS
BACK < < NEXT
MENUS