Home Search Gallery How-To Books Links Workshops About Contact
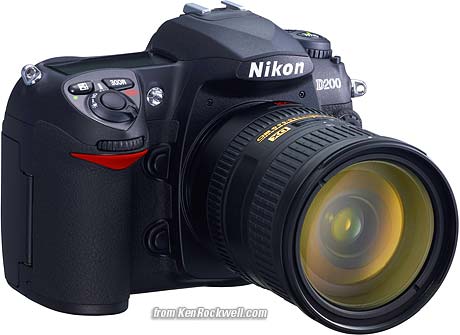
© 2006 KenRockwell.com I bought mine from Ritz here. I bought another D200 from Adorama here. Also try Amazon here. Adorama usually has D200/18-70 kits in stock here. It helps me keep adding to this site when you click these links to get yours. DEVELOPING REPORT: September, 2006 I'm working on these pages live. You'll see plenty of typos and things moving around as I write and organize it. I will eventually organize this into logical sections as it grows, as well as add a detailed operators guide. PERFORMANCE General: My D200 is fast, smooth and quiet. Unlike my D1H, my D200 makes less noise and vibration. It doesn't feel as macho, and allows me to shoot in more places more discreetly. At five frames per second it just hums along sweetly, compared to my bigger cameras which always felt like something was going to come flying off of them from all the clattering. The D200 is essentially the electronic guts of the D2X in a compact package. The D2X is a world leader in performance. I never got a D2X because it was too big and heavy. I ordered a D200 the day it came out. Much of the image processing DSP and menus and features of the D2X are in the D200. Color Color is great! My D200 seems uniquely free from a problem that runs rampant in every other digital camera I own. My D200 seems much less sensitive to getting too blue under cool light. My D200 appears to require much less fiddling with white balance to get the look I want. Specifically, on other cameras I have to go through a lot of gyrations to get a decent look in shade. It usually takes a lot of filtration or the SHADE setting. My D200 looks great left at the DAYLIGHT setting. CLOUDY gets even warmer. I don't know how they did this. My D200 looks much more like the scene does to my eye without requiring much, if any, tweaking of manual white balance. Maybe they restricted the blue sensitivity to longer wavelengths. I don't know how they did it; all I know is it looks a lot better than any other camera I've used. Ditto for AUTO white balance; even in shade it looks OK where other cameras would look too blue. In other words it looks warmer than other cameras in cool light, which means that even set manually it seems to magically compensate and give the look I want. I used to run my D1H and D70 at AUTO -3 and an 81A filter. Today I still run the 81A filter, but only AUTO 0 or DAYLGHT 0. I'm thinking about losing my 81A warming filters I always have used and replacing them with UVs. The great news for beginner photographers (and bad news for Pros who like to stay a step ahead) is that most people don't bother with 81As and will simply get better images without trying. The D200 seems to be letting rest of the photographic world catch up to getting the look of the pros without al the filters. Bravo! Metering My D200 has the best meter I've ever used. The meter of my D70 used to be the best, but I usually had to dial in +1 stop indoors in the dark to compensate for the lighting. My D200 gives me perfect exposure even in those conditions now! My D200 meter is also smart enough not to let warm and colored objects overexpose. My D70 and D1H could overexpose small colored highlights, which of course meant on a digital camera that they would often look nasty and have their colors shift. I had to be careful with each shot. Even worse, those cameras had the old useless one-color histograms making it hard to check unless I brought the images into Photoshop. My D200 adds a useful four-channel histogram which makes this easy to check. This is important for the sort of work I do. The better news is that the D200's YRGB histogram been confirming that the D200 isn't overexposing where the other cameras used to. Bravo! I thought I was going to have to use the new histogram to tweak exposure in these tough conditions where I would have had to on the older cameras.
Laguna Beach, California, 07 January 2006. This shot above was made with my 18-200VR at 22 mm, D200 set to auto everything except Saturation set to + and Color Mode III (saturated). Note that the white shutters, lit by warm evening light and only a small part of the image, are not overexposed and washed out as happens with older cameras, Excellent! Also note lack of any distortion from the 18-200 VR at 22mm. Except for resizing and branding this is a JPG straight from my D200 with no tweaks.
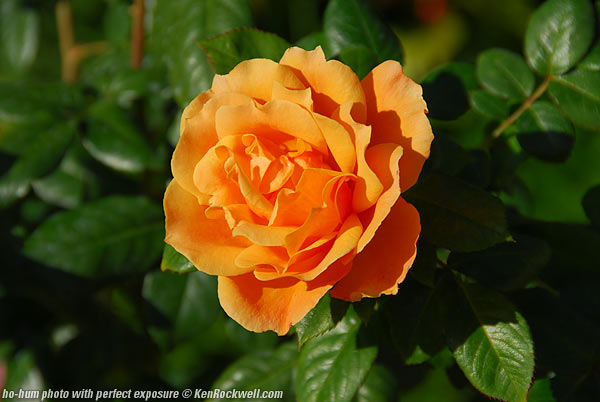
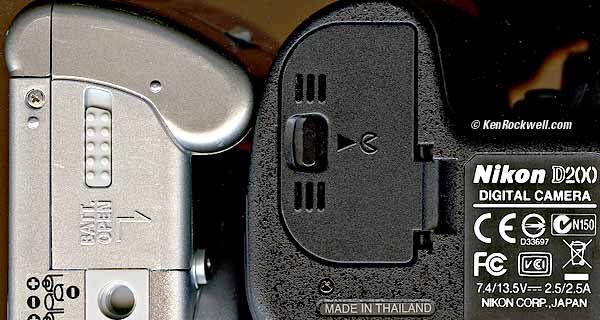
Dull but technically difficult photo with perfect automatic exposure, Olivenhain California, January 2006. 18 - 200 VR, auto everything except Saturation at "+" and Color Mode III. Image unaltered except for resizing. Experienced digital shooters know the difficulty getting correct exposure with the shot above. Most cameras are fooled by the dark surround and overexpose. Good cameras with multi segment meters will expose correctly for the overall brightness of the vivid orange flower, but wind up overexposing and clipping the red (or other) channel because most of the brightness is concentrated in one or two colors, not spead among all three. I usually have to play with exposure to get this sort of shot not to overexpose the red channel. It doesn't look that bad if you do, but you lose texture in the flower. I made this shot running around with my wife shopping. I was astounded when all the shots were dead on, especially when checking the YRGB histogram. The red channel histogram was right where it was supposed to be. Every other camera blottos out the red channel on a shot like this and I usually have to dial in -1 stop exposure compensation. Not here. It is these subtle refinements which make the D200 an awesome camera for me. Hobbyists worry about noise and resolution, but those are tertiary concerns by comparison. I haven't bothered to address them yet, since the differences between cameras is insignificant for noise and resolution while quite different when it comes to subtleties of exposure and color. The latest Matrix meter II improves on the previous Matrix meters, which for 20 years have given me consistently spectacular results. The Matrix meter for digital SLRs attempts to preserve the highlights, since once they clip they are gone forever. Dark shadows can always be lightened later. In contrasty situations many amateurs erroneously think the meter is underexposing, while in fact it's doing its best to deal with your crappy lighting. The meter works in concert with the D200's DSP to optimize the camera's contrast to fit the lighting conditions. See also historical details on the very first Matrix Meter. I never use the center weighted or spot meters. See my page on exposure secrets. The Spot meter meter reads from the selected AF area. It's so smart that in the dynamic AF modes where the camera selects the AF area that the spot area moves as well. Freedom from Blooming Blooming is a weird smearing of extremely brilliant highlights which plagues CCDs. I can't get any blooming shooting straight into the sun at any intensity level at which I care to look through my finder. The D70 could exhibit a little, the D200 is better. Even on the D70 blooming is fixed by shooting at a smaller aperture. There is a weird but negligible banding or striping issue that only happens if you make a really bad image with a lot of the frame blown-out at ISO 400. I only saw this when I tried to reproduce the work of hackers. It is insignificant because it's minor and won't happen in correctly lit images anyway, or if you shoot at ISO 100 or 1,600. See The D200's Banding, Striping and Corduroy Effects if you care. I don't care and only wrote about them to pacify the conspiracists out there. Resolution Don't sweat the resolution. This is the last thing I'll test. Megapixel numbers mean little when comparing cameras. For instance, the 10MP resolution of this D200 translate into images that are 3,872 pixels wide, which isn't that much more than the 6MP D70s' 3,008 pixel wide images. Likewise the 3,872 pixel wide images of the D200 aren't that much less than the 4,288 pixel wide images of the 12MP D2X. My D200 has much higher resolution than any other digital SLR I've owned. Therefore my D200 is very critical of my lenses. My D200 has more resolution than many lenses. When I see soft images it's because of a soft lens or a lack of photo skills, not my D200. My D200 is very, very sharp. It's exactly what it should be. I use the best Nikon Nikkor lenses I can get and even they aren't completely perfect on my D200. My D200 has so much resolution that it's easy to see sharpness differences among lenses. Just look at the images at 100%. I have to be picky to get the best results. It's tough enough picking the best Nikon lenses. If you're not happy with the sharpness of your images, first examine your technique, then examine your lenses. Third party lenses are great if you're on a budget, but not if you're wanting the very, very best results on a new D200. Amateurs worry too much about this. Digital camera sharpness is defined by the format and the Bayer and anti-aliasing filters and firmware. I haven't seen any significant sharpness variation among DSLRs since 2002. I have seen a great deal of variation owing to photographer's technique. For instance, using f/22 almost guarantees you'll get a soft image due to diffraction. Most popular lenses are sharpest at f/8, and fast pro lenses at f/5.6. Aliasing (called Moiré by hobbyists) I've seen almost none. This is much improved over the D70, especially if you shoot fabrics or fine repeating patterns like screens or fences. These are weird color bars seen over fine repeating textures. Battery Battery life is worse than my D70, contrary to specifications. I only get about 600 shots per charge. This is from the huge LCD screen sucking far more battery power than the D70's little screen. This is what I get pretty regularly the way I shoot. When running buffer burst tests, making dozens of shots in a row on motor drive at 5 FPS without looking at them much I got 1,200 shots on a charge. I never worried about my battery with my D70. It ran for days or weeks and the biggest problem was me getting so lackadaisical that I'd forget to charge it before a shoot. Good news is the D70 gets such great battery life that even then I was fine! I do need to remember to charge the D200 each night. I never did for my D70. Unlike the D70, I do see the battery running down as I use it and it's not just because of the D200's more precise battery meter. Because the battery of my D200 lasts about 99% as long as a day of shooting I bought a spare EN-EL3e battery here. Check here, too. Both Adorama and Amazon are using the photo of the older black EN-EL3 battery. The new EN-EL3e is gray. The big LCD uses a lot of power. On my first charge I only got 250 shots because I was playing with the menus all day. Today I regularly get 500 shots when I get the low battery warning, and at 600 shots it dies. As an experiment to check if it was the LCD or whatever I decided to see how many shots I could motor off after the Low warning before I recharged. My battery was at 15% and gave me the low warning after 600 shots. I usually look at the LCD after every few shots. I turned off the auto preview I always used on my D70 to save power. With the LCD off I held down the shutter at 5FPS repeatedly to see how many more shots I could get on my last 15% of battery. I ran it up to 1,200 shots, or just as many shots on the last 15% of battery with no LCD as I did with the LCD on the first 85% of charge! Of course this also could have been from the VR of my 18 - 200 VR; however my other VR lenses haven't used more battery than other lenses. I'll have to look into this, too. The new high-tech EN-EL3e battery is gray to distinguish it from the incompatible but similar earlier batteries, which are black. Not only is it gray, but it has three, not two, metal contacts. The new contact is for data. The brilliant MS-D70 throw-away CR2 battery holder doesn't work in the D200. It's also keyed so it can't slide all the way into the D200. I tried jamming my D70 battery into my D200. It won't go because of keyed slots. If you carve it with a Dremel tool it will fit, but won't work because there is no electronic communication. The D200 will think it's dead, even if full. The D200 battery works great in my D70 and D50. A real Nikon Battery has an embossed-foil "Nikon" hologram on it. Unlike the primitive D1X, the D200, D2X and all the current Nikon DSLR cameras use rechargeable lithium-ion batteries. These batteries love being charged after or before every time you use the camera. They have no memory and no need to be discharged before recharging like the crappy Ni-MH batteries in the D1X. Lithium batteries give the best service when charged frequently, which is completely opposite from the old Ni-MH. More at my Batteries page. TIP: The D200 stays on the entire time you have it connected to your computer during downloading. It will not shut off automatically, since that could cause data errors if it shut down at the wrong time. I like to walk away after I start a download, since a couple of gigs can take a few minutes. If I forget to return and disconnect the D200 it stays on and the battery will be completely dead. Battery Charge Indicators They're great. The 5-segement display on the top LCD is right on. It's fed from the percentage charge indication you can see by MENU > Setup (wrench) > Battery Info. Each bar represents 20%, exactly. The manual is in error: the "shots" indicator in that menu is the number of shots made so far on the charge, not the predicted number remaining. This is how you can see how few shots you get per charge, but you'll have to do some algebra to calculate how many remain. The menu gives you battery life to the nearest percent, and it's completely accurate. I wish there was an easier way to get it to display without so many button pushes. Like most of the poorly thought out menu structure of the D200, this display is not remembered in the "recent settings" menu. Sorry, Nikon didn't ask me. Battery Charger The book says it charges in 2 hours and 15 minutes. Mine charges a completely dead EN-EL3e in just 1 hour and 45 minutes. My charger is made in China while my battery is made in Japan. Battery Door The battery door is the weakest point of the D200. It's plastic, has a plastic catch and doesn't latch that tightly. It is gasketed against the weather. Luckily a reader in the UK writes that when his door broke off that the part only cost £1.12, or about $2.00 USD. That's good: the weak door prevents you from breaking the more expensive camera body. My battery doors have a tendency to pop open. I discovered that they sometimes don't close all the way and lull me into a false sense of being securely closed. Be certain the latch snaps fully closed. Twice I've also accidentally had the door pop open on me while shooting. My finger nudged the catch. I hope that this was because I had not fully clicked it closed. Now that I'm careful it hasn't happened again. Let's hope in a year we don't all have duct tape holding these closed. It looks the same as my D70 which has never had a problem.
Canon A70 and Nikon D200 Battery Doors My D200 battery door is flimsier than the door on my three-year old Canon A70 point and shoot. The D200 door pops open with the slightest nudge to the catch. The A70 has a solid two-step latch which will never open unless you tell it to. You have to move the Canon latch one way and then another to open it. The D200 is just a catch. The D200 battery door isn't smart. You easily may open it with the camera on. You even can run the camera with the door open and let the battery fall out at just the wrong moment. Be careful. Try duct tape if you have to. There is good news about the D200 battery door. Because of the lack of electrical interlock the D200 runs fine even if the door breaks off. Jam in some wadded-up newspaper and use duct tape to hold it all together, even with no door. CF Card Door The CF card door springs open completely when the release lever is pressed. The plastic door's catch is a metal pawl screwed into the door which mates to another metal pawl. Unlike my Canon point-and-shoot, the D200 isn't smart enough to turn off the power in expectation that you're about to pull out the card. The D200 isn't stupid proof and it's easy to pull a card while it's writing. No problem for JPGs which write immediately, but if you shoot raw you want to be careful since you can pull the card while it takes 10 seconds or so to write out the buffer. The good news about that is that if you break off the CF card or battery door that the D200 runs fine with duct tape. My Canon A70 would turn off. Mechanics and Ergonomics It's solid! It feels like an F100, not a Canon 5D or plasticy Nikon D70s. The command dials, front and back, are solid grippy rubber, not hard plastic. Everything is gasketed against the weather. The rear thumb rest is great. You can hold the camera solidly with just one hand. There's no comparison to the old D100, which was a plastic amateur camera hacked out of an an N80 body. No camera has backlit buttons. This would be great for use at night. Every $40 cell phone has backlit buttons, so why not a $1,700 camera? Where It's Made My D200 is made in Thailand. The manuals are printed in Thailand. The CDs are all pressed in Thailand, too. Thailand is a great place, not to be confused with primitive Communist countries exploited for cheap unskilled labor. My battery is made in Japan. My battery charger is made in China. Initial Settings My clock showed up on 19 Dec 2005 set to UTC and thought it was January 21st, 2005. It was set to an arbitrary time. My battery showed up charged at 32%. I just checked it for fun and of course put it on the charger. Firmware is A1.01 and B 1.00. My second D200, received on Dec 22nd, thought it also was in London and 24 January 2005. At 4.15PM PST it thought it was 22:53 UTC. I bought a spare EN-EL3e. It arrived at 39% charge. Clock Accuracy (click) LCD Screen The LCD is extraordinarily better than any other DSLR I've owned: it looks the same from every angle. Every other digital camera and laptop computer gets lighter or darker as you look at it from above or below. It has more resolution than all the other digital cameras I've owned, so images are smooth and look great. Color is also excellent. I always use my camera LCD for setting critical things like white balance in the field so it's nice to have a screen that requires no mental compensation. The text and menus look a generation improved from the D70. The D200 text is an anti-aliased Frutiger-esque face which is also boldly white on black. These will be easy and pleasant to read outdoors. The prophylactic clear cover that protects the LCD comes with a prophylactic translucent sticker to protect the cover! Peel off this sticker before using the D200. The LCD has adjustable brightness from +2 to -2. This is a backlight control, not a contrast bias tweak. When zoomed the image expands to 2.5" diagonal, however when showing the full 3:2 aspect ratio image on the 4:3 LCD the image has a diagonal of only 2.25" or 58mm. This is still good; it's almost as big as a medium format 645 transparency on a light table. The first press of the zoom control crops the sides and expands the vertical dimension to fill the screen. The protective cover is called a BM-6 by Nikon. I guess it's tough to find model names that don't make some of us laugh! Top LCD Data Panel The top panel is huge and loaded with information. The top screen is illuminated by green LEDs. That's too bad, since the blue-green electro-luminescent panel of the F100 is much better. Rear Thumb Navigation Rocker Control It now has a center position. My D70 and D1H never had this. The center position may be programmed to do different things. While shooting I have it programmed to return me to the center AF sensor. I have it programmed in playback to zoom the image to check sharpness. You have the option to choose if up/down on the rocker key steps between images, or steps between screen display options. This is great; my Casio and Canon cameras do it one way and I always get confused going between them. Now I can set my D200 to match the rest of my less flexible cameras. Playback You can program the system to do what I've been wanting for years: a one-push magnification that's high enough to see sharpness You have to set this in the custom menu: Custom Settings > Controls > Center Button (f1) > Playback Mode > Zoom On/Off > High Magnification > OK. Just press the center of the four-way thumb control to zoom way in. HOLY COW!!! When you play this trick the D200 is smart enough to zoom in on the chosen focus point, even if it was off center or chosen automatically by the D200. Brilliant! This saves you from having to scroll to the side to check your focus! It's so smart it even knows the AF point chosen in modes where the D200 gets to pick itself. There is a playback option, under PLAYBACK > Display Mode, that shows which focus point was used to make an image. It shows the point whether it was chosen by you or by the D200. It shows in red. If nothing was in focus they all show in white. This mode also shows you if the 11 or 7 area mode was used. There is a ton of zoom range if you want to tweak. You can blow up the image so much you can see individual pixels. Today most cameras offer so much flexibility that I have to scroll up to the value I want. You now have the option to select which, if any, data screens come up as you scroll through them. I love this because some screens, like blinking highlights, I never used. Now I won't have to scroll through it anymore. Oddly default is OFF for all these, so if you want to get them all as we take for granted as the default in other cameras you need to turn them on under PLAYBACK > DISPLAY MODE. A new mode allows you to see the entire image with nothing superimposed, just like my point-and-shoot cameras. My D70 always had at least one number written over the top right of the image which only went away if you zoomed in. BAD NEWS: The D200 is slow in playback mode. It takes a while for the image to come up after each shot when you select "Image Review ON." It takes a while to fire up when pressing PLAY. It takes a while to go from one image to the next. It's so slow I can click it a couple of frames ahead on playback and sit back and watch it mosey through them. This is bad; one of the great things about the Nikon DSLRs ever since the 1990s was zero lag on scrolling through different images or data screens. Today the color histogram takes a moment to compute for each image. This sucks. The color histogram takes the longest to compute, but even with every playback option turned off it still takes too long to scroll through images. This delay is the same whether it's a Basic Small JPG or RAW + LARGE FINE JPG. By comparison, my Casio pocket cameras are three times faster! I'm using a Lexar 40x 1GB card in my D200. CF cards specify record speed. Playback speed is similar regardless of rated record speed. Both my D200s are this slow slow regardless of image size, file size or format. I notice this delay because I think and work at a frenzied pace. Most people wouldn't notice the slowness about which I'm complaining. My D200 scrolls from one image to the next at 3 FPS. I prefer my pocket Casio which scrolls at 10 FPS. Playback of Images from Your Archive or Shot in Other Cameras A card shot on my D70 put it in my D200 shows more data than playing it in the D70! I also can use the D200 to read YRGB histograms from D70 files. The D200's YRGB histogram is great compared to the D70's useless single channel histogram. The D200 even displays part of the "Image Comment" field recorded by the D70, which the D70 doesn't display! It doesn't work the other way around: playing D200 files on my D70 I can't even zoom them. The D200 seems to give full functionality to playing D70 files. It also plays images, zooms, and reads data and calculates YRGB histograms from files from my two year old Canon A70. The only crutch to playing files shot on other cameras is the D200 displays their fuzzy thumbnails. These get sharp if you zoom in. My D200 is smart enough to read all the secret data if I copy a D200 shot from my computer back on the card and play it in my D200. I can read off all the focus zone and other data. This makes a point for me not to load any of Nikon's software onto my computer for analysis. Nikon software, like many camera makers' software, is often buggy and I try to avoid installing it if I can. YRGB (RGB) Histograms YRGB means luminance, called "Y" in engineering, and R, G and B. Nikon's display shows all four simultaneously. Since photographers aren't engineers Nikon simply calls their four channel histogram "RGB Histogram." It's all the same thing. You need to turn this indication on under Playback > Display Mode > RGB Histogram. If you'll never see any of the data on playback. For the first time you can use this new histogram function for setting exposure. The yellow single channel histograms of the D1X and D70s were useless because they are blind if just one of the three color channels overexposes. In color photography it's almost always one channel that overexposes before the others. See How to Use YRGB Histograms for why this is so critical if you use histograms. Auto Focus AF is better than any camera I've used. It's dead on and smart. it's also easy to manipulate all the AF zones from the D200's controls without needing menus. Focus is dead-on, even at f/1.4 in dim light. There is no consistent offset as some of the very first D70s had. Far better than the D50/D70s, the D200 has a lever to switch between continuous and single AF. I always had to use a menu on my D70. I can't detect any speed difference between my D70 and D200 with either traditional AF lenses like my 80 - 400 VR or with AFS lenses. I was expecting more. Tip: The AF mode switch is easy to move between auto and manual focus. Be careful not to move it to manual by accident. Black-and-White Mode There is a B/W option under SHOOTING MENU > Optimize Image. The D200 defaults to display "B/W" as an idiot warning superimposed on your finder in the B/W mode. You can turn this off at CUSTOM Setting > Shooting/Display > Viewfinder Warning (d3). Sharpening I leave mine in AUTO. Your fixed options are OFF and -2 to +2. You set this under SHOOTING MENU > Optimize Image > Custom > Image Sharpening. Contrast Nikon calls contrast "Tone Compensation." You set it under SHOOTING MENU > Optimize Image > Custom > Tone Compensation. I leave it at its default AUTO setting. You also have three fixed settings of +, normal and -. Color Modes I use color mode III, which gives even more vivid color than the default of mode I. IIIa is gone, now called III. Does anyone know what the "a" in IIIa was all about? I don't; it was just more vivid color. Your choices today are I and III, not I and IIIa as the earlier cameras. II is grayed out unless you select Adobe RGB color space. You set this under SHOOTING MENU > Optimize Image > Custom > Color Mode. Saturation Default is AUTO, which I've never had on other cameras. Other options are three settings, +, normal, and -. Nikon calls + ENHANCED, which I use all the time, and Nikon seems to take on a British air of understatement calling - as MODERATE. Setting Mode III and + Saturation gives a nice vivid look. It looks good and not gaudy for my work. I'd leave it alone for people pictures. You set this under SHOOTING MENU > Optimize Image > Custom > Saturation. Hue Adjustment Don't mess with this. You can change this this under SHOOTING MENU > Optimize Image > Custom > Hue. Card Door Release Lever: Doing the Nasty Unlike the power switch, the card door lever is not stupid-proof. Unlike my Canon point and shoots, this lever has no electronic connection to the D200. You can open it and pull out your card in the middle of anything. Even I wasn't stupid enough to rip out the card in the middle of a write. I hear you can damage a CF card that way and reformatting won't fix it. JPEG Compression Options This is different and a new addition to the traditional FINE, NORMAL and BASIC options. You now have the choice of Size Priority (default) or Optimal Quality JPG settings. These are in addition to the three FINE, NORMAL and BASIC settings. These now give you six JPG quality options in addition to the three image size options (Large, Medium and Small), or 18 possible combinations without even mentioning raw. These are found halfway down the SHOOTING Menu under JPEG Compression. Size Priority, the default, is what Nikons have always done. The new Optimal Quality JPG setting allows the file size to grow to retain quality for images with a lot of detail. In the old days (November 2005) I would manually set FINE for very busy subjects on my D70. This saves me the trouble, bravo! More detailed images require larger JPG file sizes to retain the same quality. JPG is very smart at throwing away data I can't see. Details and contrasts and edges require more information so JPG files of busy images need to be bigger. Sony and Canon have always let the file size adjust itself to the subject. Casio and Nikon have historically kept files sizes about the same at each setting. Now you have the choice. I disagreed with Nikon's original choice. The only advantage to constant file size constant was allowing more accurate prediction of how many shots you had left on a card. My D70 always underestimated anyway. So? Even with this new option you still know approximately what fits on a card. Just like my D70, my D200's remaining shots indicator reads low (on the safe side). The Size Priority default give Large Normal JPG files of about 2.3MB for most shots, and 1.4MB for flat images of a blank sky. The Optimal Quality JPG setting usually is a little larger for most subjects, and can grow to 3.5 MB for busy images. The "shots remaining" indication changes as you select each version. With a 1GB card my D200 tells me I will get 334 Normal Large JPGs at Size Priority, or 224 in Optimal Quality It saves space to use NORMAL and OPTIMAL QUALITY over simply shooting everything in the old FINE and Size Priority. In FINE and Size Priority my D200 only says I'll get 169 shots. RAW Compression You can turn it ON and OFF. Oddly default is OFF, while the D70, D70s and D50 only worked in ON. This is lossless compression which I prefer on the rare occasions I shoot RAW. File Sizes
* These values will vary by subject. I've listed a value on the high side. The D200 tags its JPGs at 300 DPI. RAW Files As of March 2006 PhotoShop CS2 can now read these files. I prefer the look when NEFs are opened with Nikon's own reader. Nikon doesn't share the precise color coeficients used in interpreting the linear 12 bit sensor data to 2.2 gamma RGB data. These color matrices are trade secrets. Therefore every other program, Bibble, Phase One, Aperture, Adobe Camera Raw, etc., opens the files with different color than Nikon's software. This gotcha for all Raw shots is easy to show: shoot someting in Raw + JPG. Open the NEF and try to get it to match the JPG. It won't, unless you open the NEF in Nikon's included plug in. You don't need to buy Nikon Capture. The plug in included for free with Picture Project works great. Remaining Shots Indication The D200 has the same firmware defect as the D70. It underestimates the number of remaining shots. My 512MB card holds 235 images at Large Normal JPG, size priority. The D200 claims I'll only get 166 with the same card empty. The D200 errs on the safe side. No big deal, these are just approximations. Other cameras estimate more closely. EXIF Data When read with Nikon's software the time of day is recorded to a tenth of a second. File Naming The D200 messes with the punctuation to warn you if you've shot something in Adobe RGB. The files will be named _DSC0123.JPG instead of DSC_0123.JPG. Obviously JPEGs are marked .JPG and raws are marked .NEF. Triva buffs ought to know that dust-off reference photos are marked .NDF. Custom Vanity File Naming and Pranks Whoo Hoo! You can prefix your files with any three letters you want. No longer do they have to be boring DSC_0123.JPG. You get your choice of 26 capital letters or the digits 0-9 for each space. Sorry, no curse characters like (&%)#*%)*#%. I just set mine to name my files as SEX_0239.JPG. When I grow up I'll probably set this to KEN_xxxx.JPG. You only get three letters; Nikon reserves the _ to help differentiate between sRGB and Adobe RGB. You conspiracists probably think they kept the fourth letter so none of us vulgar Americans would start churning out thousands of files named POOP0239.JPG, bet we clever Americans also know we can use the Image Comment feature to include even naughtier bits in our files. You can confuse your hacker friends by setting your D200 to name files as IMG_xxxx.JPG, which is how Canon cameras do it! You could also misspell DSC as DCS_xxxx.JPG which either sounds like Kodak, or pester your retailer and demand a refund for having a dyslexic camera! Go easy; now that we have this freedom please don't be a jerk and make them take this away in the next firmware revision. I really want to get that fourth letter so I can name my files ROCK0123.JPG. Microdrives My 1 GB IBM/iOmega microdrive works slowly. You can shoot as fast as you want, just that playback is slow waiting for the drive to spin up. Dynamic Range All digital cameras, except maybe for the Fuji S3, have awful highlight overload characteristics. Unlike film, digital cameras simply overload and wash out as soon as they saturate at 255, 255, 255. You see this as the big spike on the right side of the histogram when highlights are too hot. Film has a gradual highlight overload called its shoulder. This also gives film freedom from the nasty hue shifts present in all digital cameras when a broad non-gray area washes out to white. The D200 is no different. Overexpose and your highlights clip like every other digital camera. There's a trick. In situations where I want to simulate film's shoulder I set my exposure compensation to -2 stops and lighten using PhotoShop's curves. See Adding Dynamic Range to Any Digital Camera. Playback and Shooting Menu Colors Nikon's color coding is misleading on the left side of the LCD. These are the icons which guide you among the top level Playback, Shooting, Custom Setting, Setup and Recent Settings menus. I'm used to a red camera for shooting, green triangle for playback and magenta for custom. The D200 shooting menu is a green camera and playback is a gray triangle. Custom Settings, Set-Up and Recent Items are all identical yellow. No big deal. It just seems like a downgrade easily rectified in new firmware. Unfortunately today you have to take a little more precious shooting time reading the menu heading at the top instead of just knowing what's going on by color. NEXT: Performance Page 2 or back to SPECIFICATIONS or back to D200 review page index or back to top of D200 review |


