Home Donate New Search Gallery How-To Books Links Workshops About Contact
DxO Optics Pro Software
© 2009 KenRockwell.com

For Art
Home Donate New Search Gallery How-To Books Links Workshops About Contact DxO Optics Pro Software
For Art |

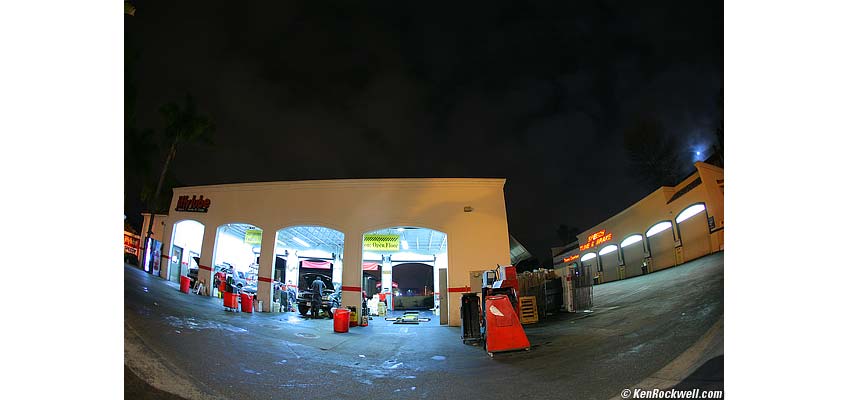
Original fisheye image, Death Valley. Roll mouse over to see after rectification in DxO.
And for Science
Canon 24-105mm f/4 L IS at 24mm, full-frame. Roll mouse-over to see after fully automatic distortion, vignetting and shadow lighting correction in DxO. Try the free demo, then I'd get mine here (Elite) or here (Standard). It helps me publish this site when you get yours from those links, too. See much better photo examples at my Death Valley 2007 and Route 66 galleries.
December 2009
NEW: New DxO modules. (all modules) June 2010
DxO Optics Pro is a program which automatically and completely corrects for lens distortion (even from fisheyes), color fringing and vignetting, and even corrects for unsharpness as needed. It does this by reading the EXIF so it knows exactly what camera, lens and settings you used, and then uses the specific measurements DxO made in its laboratory to apply perfect correction to your image. Better, it also improves the artistic aspects of color, highlight and shadow, when lighting gets too harsh. Technically, it also can do a bang-up job of cleaning up high-ISO noise, again specifically corrected as measured in DXO's labs for your camera. I started using DxO at version 4 in 2007, as detailed farther below. As of November 2009, DxO has just released version 6 of DxO Optics Pro. The new version 6 of Optics Pro is out for WIndows, but the Mac version won't be out until 2010. DxO Optics Pro is software that perfectly and automatically (by reading the EXIF) corrects lens distortion, improves lens sharpness as needed, and does the best job I've ever seen of automatically optimizing highlights and shadows. Not only does it do a perfect job of correcting the complex distortion of ultra-wide zooms, it creates perfect straightening of fisheye images, regardless of focused distance, and that was even in version 4 that I've been using. Unlike other shadow and highlight programs (or Photoshop or Lightroom themselves), DxO magically knows how to apply just the right amount of whatever to get my photos to sing, automatically. I last used old version 4 for my photos on Rt 66 back in 2007, and it worked wonders. I pointed DxO to the photos I wanted, it crunched the numbers, and out popped perfected images. New in version 6 is the ability to remove noise and even push-process images two stops past the highest ISO on your camera. That's right: shoot your D3 at ISO 12,800 in raw, and processed through DxO they showed me it looking better than when processed in ACR or Capture NX. Even crazier, set your camera, like a Canon G10, to underexpose by using negative exposure compensation, and DxO can push the image a stop or two to get you ISO two to four times the maximum that you thought you had on your camera. Optics Pro works with both raw and JPG images, but to get the extraordinary noise reduction performance they showed me, it has to do that from raw files. Of course you can control it manually, but for a guy like me that would rather be shooting than playing on a computer, the fact that DxO can be trusted to do its own thing, and do it extremely well, is a Godsend. When you buy it. you buy a license to run it on two computers, just like Photoshop. Dxo Optics pro is compatible with Lightroom 2. It can browse Lightroom catalogs, export back to to lightroom catalogs, and you can call up DxO as an external editor from inside Lightroom by right-clicking and selecting "send to DxO." Another advantage of DxO over most other software is that it doesn't need to create a duplicate-copy library of all your photos, as Aperture, iPhoto and Lightroom do by default. It it these stupid libraries which cause the compatibility problems where you need to get things in and out of "libraries." With DxO, it works with images as they are stored in my regular file system. Other software makes duplicates of everything you "import" into them, and with the amount I shoot, I can't afford that. With DxO, you show it what photos you want processed, and it goes to work. DxO 6 has the ability to split-screen "virtual copies" of different sets of manual corrections. These virtual copies only exist in the software; they don't clog up more hard drive space. DxO Optics Pro 6 makes it easy to store and recall presets of settings you might like. There is a Presets box near the top right in the Customize tab, and in the other tabs, simply right-click a thumbnail image to use presets. If you bought Optics Pro v5 since June 2009 you get a free upgrade to v6. If your copy of v5 is older, you get a 40% discount on the upgrade through 31 December 2009. If you're new to DxO Optics Pro, there is a 33% discount through 31 December 2009. So? The Mac version won't be out until 2010. For Mac, as of course I use, the key is to buy or upgrade to version 5 today, and then the upgrade to v6 ought to be free when v6 becomes available for Mac. The rest is my review from 2007 of version 4.
Janvier 2007 Specifications Performance Recommendations NEW: March, 2007: Version 4.2 was released. This entire review is of version 4.1 from January. The new version processes much faster and harder on my Mac Quad G5: it runs all four CPUs at 100% and causes my fans to spin up and my computer to draw 190 watts more power form the wall while processing! It processes four images in parallel and takes an average of only 9 seconds per image from my Canon 5D in batch mode. Guess what? 190 Watts is a quarter-horsepower! Yes, DxO uses a quarter HP while it's processing Images! I have it chewing on 60 images in series parallel as I write this. It's got my Mac Quad G5's fans blowing like a hurricane, and everything else, like Dreamweaver on which I write this and my browser and email, are humming along as if nothing else is happening. DxO is expanding a bunch of fisheye shots of real estate interiors. I rectify them as a batch, and sort them out after conversion. The rest of this review now proceeds as written in January: This software package from DxO really works, it's easy, and it works insanely well. All these examples are from my first day of fooling around. I could spend a lifetime trying to show everything this package does. What I can't show is how magically it identifies everything about the file, and just does what it needs to automatically. Get this package if you worry about lens defects or want to convert your fisheye images into useful linear images. Most people don't need either of those, so if you don't think you need it, you don't. If you worry about distortion, light falloff and color fringes, just go get this. It works! It corrects conventional lens defects as well as converting fisheye images back to regular, and much more. It's not a hoax: DxO has measured the optical transfer functions of the cameras and lenses it supports. The software applies the inverse of these previously measured transforms to your files to correct them exactly. DxO also makes the advanced analyzer software used to make these measurements, a key competence lacking in other software companies. For thirty years I've been looking forward to when I could transform (stretch out) my fisheye images back into something useful. It's just math, but back in the 1970s the technology to do this wasn't something anyone but first-world governments could afford. I wanted to project my slides back through my fisheye lens, but no projector had a condenser set up for that, and that would melt my lens anyway. (IMAX uses a similar process.) DxO is easy to get and use. Buy the version for your camera, and every lens they've characterized is included. Gone are the old days when they used to sell lens data separately. Hooray! Automatic Optical Adjustments DxO Optics Pro corrects optical imperfections. It fixes: 1.) Distortion (curved or wavy lines that are supposed to be ruler-straight), 2.) Lateral chromatic aberration (color fringes), 3.) Light falloff (darkened corners), and even corrects 4.) Some lenses' tendency to get softer in the corners. It can't correct for your own stupidity if you forgot to focus. It improves greatly on the performance of most of my lenses. It really works! The accuracy of these corrections is far better than anything I've been able to hack in Photoshop. DxO does this so well because they've measured all the supported cameras and lenses in their lab. The software then corrects exactly based on the exact settings used, even for focus distance!
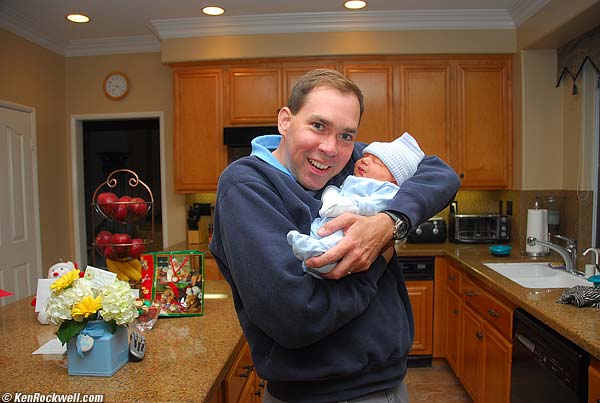
Baby photo by wife. Roll mouse over to see distortion correction. Also note how delicately DxO lightened the background. Nikon D200, SB-600 in bounce mode, Nikon 18-200mm VR at 18mm. Distortion and the dark background corrected automatically. I had to correct the tilts by moving sliders and cursors, which is why the after shot on mouse over zooms in a little. When you rotate you lose the corners and have to crop more tightly. Other Automatic Adjustments Unlike my camera and lens reviews, where I go into far more detail than any reasonable person ever needs to know, this software package does far more than I'll ever be able to explore. I got it for correcting optical defects and for rectifying fisheye images. I already got my $300 worth just with the automated lens corrections, and I only needed to spring for the $300 version to cover my Canon 5D. The $150 version is all you need if you're using any of the lesser Canons, or any Nikon up to and including the D200. Spend an hour or two reading the unusually clear user's manual and there's another $700 worth of features very clearly explained. It works much easier, faster and more intuitively than you'd expect. I had no idea these other features were in there, too. DxO Optics Pro fixes these automatically, meaning no inputs are needed to go off and optimize these: 1.) Automatically knows when to lighten dark shadows and other areas, and does it well. If you have a good shot, it leaves it alone. If you have a crappy one with overly contrasty light, only then does it fire itself up and dial in just the right amount of lightening. It does all this by magic, and you can tone down this feature, or turn it off, if you prefer. Here's a typical example: |
Canon 15mm Fisheye on Full-Frame 5D. Roll mouse over to see after DxO.
See how the sky goes from black to perfect? This is typical - DxO leaves everything alone unless something sucks. If something needs lightening, DxO does it right. I made this shot out the window of my wife's car as we prowled for dinner; nothing fancy here. 2.) DxO reduces noise, specific to your camera and its settings. Manual Adjustments It also does loads of useful color and light manipulations, many of which we also can do differently in Photoshop. These require manual input: 1.) Corrects skews, keystoning and perspective, 2.) Changes color profiles, 3.) Adds simulated film grain, 4.) Can simulate film cross-processing special effects, 5.) Can match colors between images, 6.) Offers subtle and powerful color and contrast correction controls (I haven't tried these; they may be more powerful and subtle than what I can do in Photoshop), 7.) Allows making one brand of camera look like another (haven't tried it), 8.) Changes exposure and white balance, even with JPGs, and 9.) "Filmpack" converts digital images to look as if they were shot on Velvia or other films (color, B/W, slides and negatives, all manually). To simulate Velvia, use Expert Mode, Enhance tab, Expert Settings, DxO Color. I didn't particularly like the results because I've tweaked my in-camera shooting to give me the Velvia-like results I want, but play around and see for yourself. DxO calls this feature DxO Filmpack - it came free with DxO back in December 2006, but today it's an extra $59. Complete, Exact and Easy to Use There has been other software to do this the past few years, but none of them was anything I tried or got to work well. The other solutions, like Panorama Tools, required getting the base program (Pan Tools), getting a front end for it (unless you're a math Ph.D.), and then collecting data for your lenses. You know what a nut I am about all this, and this was beyond my enthusiasm. DxO measures all sorts of lenses and cameras in their labs. The software reads the EXIF data, identifies not only what camera and lens you used, but the focal length, aperture, ISO and focus distance settings, and then applies exact corrections. If you've already edited a file, that data may not be there and DxO may or may not find it, in which case DxO may not be as big a help. I always work on camera-original files, so no problem. You'll want to run DxO first, before getting into any crazy editing. DxO is smart; very smart. They've spent a lot of time doing far more measurements than I ever do on lenses, and employ this data in correcting them. The values I measure for distortion correction in PhotoShop CS2's lens distortion correction filter are primitive compared to using DxO. If you worry about this, just get DxO. Now that I've tried it, I wonder if I'll ever bother with the crude measurements I've done in the past. More magic is complete distortion correction, even with advanced lenses that have complex, high-order distortion. Most ultra-wide lenses have this distortion, where the lines aren't simply curved a little - they are bent both back and forth and back again! DxO fixes these distortions perfectly. It looks like I used a view camera lens, even if I started with a fisheye! They look perfect to me on my 30" monitor. In Auto mode it's very smart. The bad-lighting (dark shadows) correction seems to work perfectly every time, and only when it needs to. It's much better than Photoshop's sloppy, manual Shadow/Highlight tool. Other People's Software The Fisheye Hemi plug-in is something completely different from another company. The Fisheye Hemi plug-in stretches-out fisheye images in only one dimension so that vertical lines become straight. The Fisheye Hemi plug-in leaves horizontal lines curved, which makes people look natural, even in the far corners. The Fisheye-hemi plug-in transforms fisheye images into the equivalent of images made from rotating panoramic cameras like my Noblex. Use the Fisheye Hemi plug-in if you're using a fisheye lens for photographing people, especially large groups of people standing in a semi-circle around you. Since the Hemi plug-in is only $30, I'll get it too when it comes out for Mac. There is more lens correction software out there, like PTtools and Kekus and I forget who else. I haven't tried them. I doubt anything could be better than DxO. One way to see if other packages are likely to be as accurate as DxO is to see if they have an input for subject distance. Lenses perform differently, and DxO has measured and processes differently, depending on subject distance. SPECIFICATIONS back to top Introduction Specifications Performance Recommendations System Requirements It runs Mac and Windows. DxO doesn't demand much in the way of printed hardware requirements, but I'd be careful because, like most advanced software, it can run on slow machines, but may be too slow to make you happy. Don't worry. Try their free demo and see for yourself. It does a lot of mathematics, so it depends on having a hot machine to run well. I run it on a quadruple-processor 2.5GHz Mac G5 and it takes a minute to crunch a single image. It works about twice as fast when you batch process them. It gets up and boogies with multiple processors. If you're on consumer hardware, it might explode or run slowly. Even my hot Mac has to fire up it's cooling fans to deal with the mental load of all the calculations. That's why I bought the Mac I did; this program makes it think - hard. Versions There are three versions: Starter, Standard, and Elite. They all do the same thing. The differences are in what cameras and lenses are supported in each package. Each more expensive package includes everything in less expensive package(s). You can see DxO's chart of which does which here. Starter DxO Starter only works for several higher-end fixed-lens digital cameras, like the Fuji FZ30 and Sony DSC-R1. Standard DxO Optics Pro Standard works the fixed-lens cameras, and DSLRs like the Nikon D80, D70, D200 and Canon Rebels and 30D. Elite DxO Optics Pro Elite works with all those, as well as pro cameras like the Nikon D2Xs and Canon 5D and 1Ds. See DxO's up-to-date chart of the exact lenses and cameras covered here. It covers much more than I mentioned. As of January 25th, 2007, the new Nikon D40 was just added. Supported Cameras and Lenses You can see DxO's chart of which does which here, with lens details here. They don't support ultra-tele lenses for two reasons: Reason #1 is that these lenses, like 300mm f/2.8s, 400mm f/2.8s, 500mm f/4s and 600mm f/4s, are usually so optically perfect that they have nothing to gain from any further electronic correction. Reason #2 is practical: it takes DxO a week to make all the measurements on a lens in order to provide correction as accurate as they do. So few people use these lenses that there are other lenses that need to be characterized first. User's Manual Download it here. The program is much easier to use than it seems; I was up and running long before I found the manual. PERFORMANCE back to top Introduction Specifications Performance Recommendations Correcting Distortion with Good Lenses DxO easily corrects the complex distortion typical of complex ultra-ultra-wide fixed and wide zoom lenses, like my Nikon 18-200mm at the wide end. Here's a very good $1,800 ultra-ultra-wide, the Canon 14mm f/2.8L, which has very little distortion to begin with. What distortion it has is complex: it's not a smooth curve, but a bulge in the middle and then straight on the ends. This doesn't correct well in PhotoShop CS2's Lens Distortion Correction Filter, which either removes the bulge and flails out the ends, or leaves in all the waviness. The Canon 14mm also has some lateral chromatic aberration: green-magenta color fringes along the horizontal lines (this doesn't appear on radial lines). I'll magnify the color fringes next; look here at the overall distortion:
Canon 14mm f/2.8L on Full-Frame 5D. Roll mouse over to see after DxO. Perfect! This is scary - I've never used software complex enough to correct this sort of distortion. You also can see the vignetting correction lightening the corners. When I first saw this on my 30" monitor I was amazed! It just snapped in without any of the aberrations, and sharper, too! Chromatic Aberration This is a crop from 100% magnification of the top left center of the above image. At this magnification, the complete image will print at 44" (1.1m) wide.
Crop from Canon 14mm f/2.8L on Full-Frame 5D. Roll mouse over to see after DxO. The two images move a bit because of the distortion correction. If I wanted, I could have unchecked the distortion correction just to show the chromatic correction, but tough! I made these shots the first day I got the software, and in full auto mode to boot. Correcting Distortion with Bad Lenses The Canon 24-105mm f/4 L IS is a great lens, but a pig for distortion on a full-frame camera at 24mm.
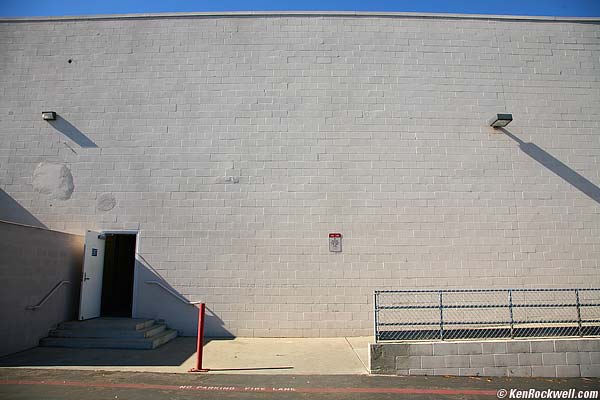
Canon 24-105mm at 24mm, full-frame. This shows how DxO can make this pig into a prince. Roll your mouse over to see before and after the fully automatic DxO correction. Let me save your eyes from squinting at this little web-sized image. This result looks perfectly straight, even on my 30" monitor, which I can't show here. DxO also corrected the light falloff, which is visible even in this example at f/8, and lightened the shadow area without looking artificial. Fisheye Correction and Conversion Think fixing a regular lens is cool? Look at what it does with a fisheye:
Crop from Canon 15mm on Full-Frame 5D. Roll mouse over to see after DxO. Criminy! The straight lines after conversion are perfect; better than those from an uncorrected ultra-wide lens! That's the full-auto conversion. My Canon lenses don't record distance data for DxO, now that I've read the manual I realize that I could have input the distance and gotten an even more perfect conversion. In Auto it converts the fisheye images to fill the same image size, yet fisheye lenses record even more to the left and right if you want it all. This saves money. You can buy the $1,800 Canon 14mm f/2.8L or, for half price, get wider results almost as sharp in the corners with the $600 Canon 15mm f/2.8 Fisheye and this $300 software package. On a full-frame camera, the converted fisheye gives the same angle of view as a 12mm rectilinear lens. On a Canon 1.3x camera (1D Mk II etc.), the converted 15mm fisheye files give the same results as a 13mm rectilinear lens on a 1.3x camera, or a 17mm lens on a full-frame camera. But wait, there's more! Ultra-Wide Fisheye Conversion Mode DxO starts in AUTO mode. You'll need the Guided or Expert modes. To get to the guided or expert modes, go to DxO Optics Pro > Preferences > General > Processing mode. You'll have to close and restart DxO for your choice to take effect. Once in Expert or Guided, click a tab under the Enhance tab to select guided or expert. All this is in the manual. Click a button ([Expert mode], Enhance tab, DxO Optics tab, check Distortion, check Max Image under the checked Distortion tab) and you can get the unplugged conversion, which goes even wider: |
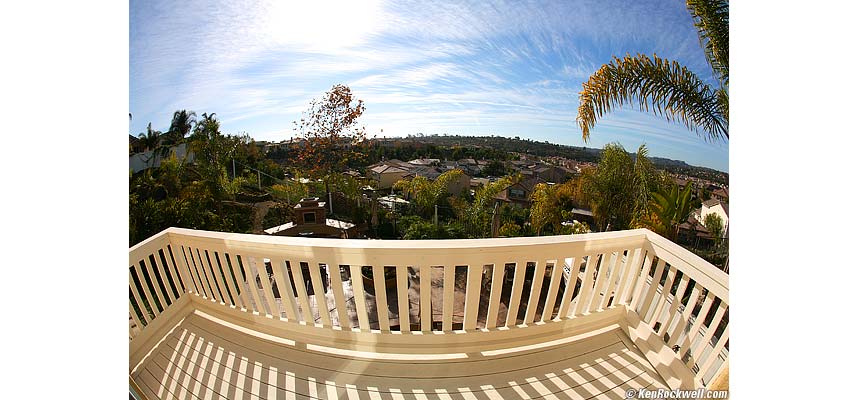
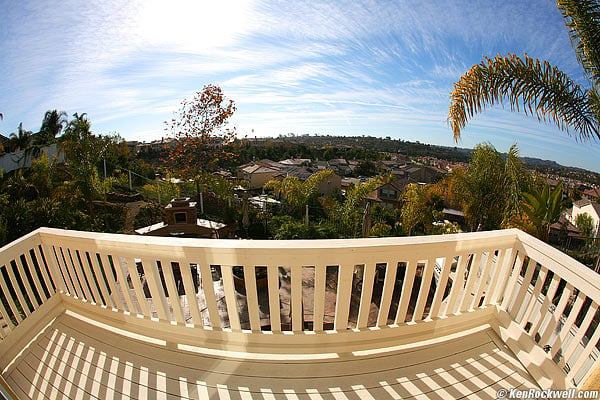
Canon 15mm on Full-Frame 5D. Roll mouse over to see after DxO in maximum width mode.
The ease with which it works belies just how insanely wide this is - you'd need a nonexistent 7.2mm rectilinear lens on a full-frame camera to see this wide, a 5.7mm lens on a 1.3x Canon, a 4.7mm on a Nikon digital or 4.4mm rectilinear lens on a Canon 1.6x camera (Rebel, 20D, 30D) to see this wide. It's crazy; it includes a horizontal angle of almost 180 degrees, and does it without vignetting or distortion. Here's another hand-held snap made while carpet shopping with the wife the first night I got this: |
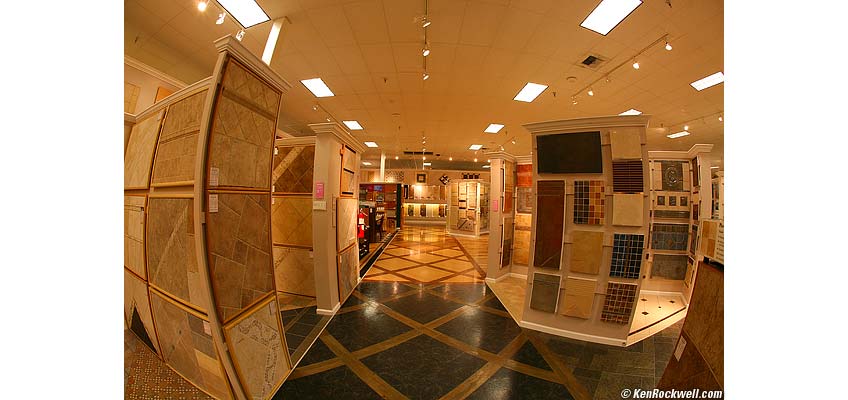
Canon 15mm on Full-Frame 5D. Roll mouse over to see after DxO in maximum width mode.
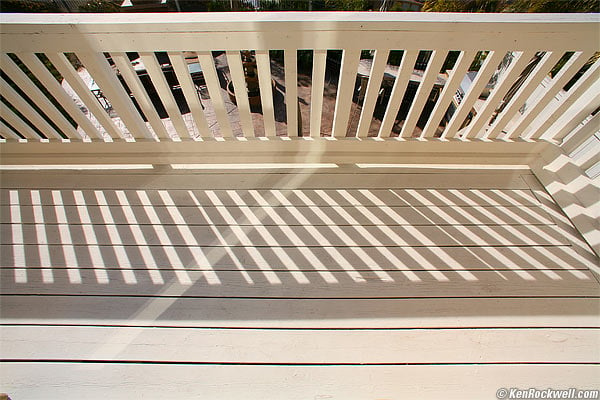
Here's a larger version of the kitchen at the top of the page, also made in this MAX mode: |
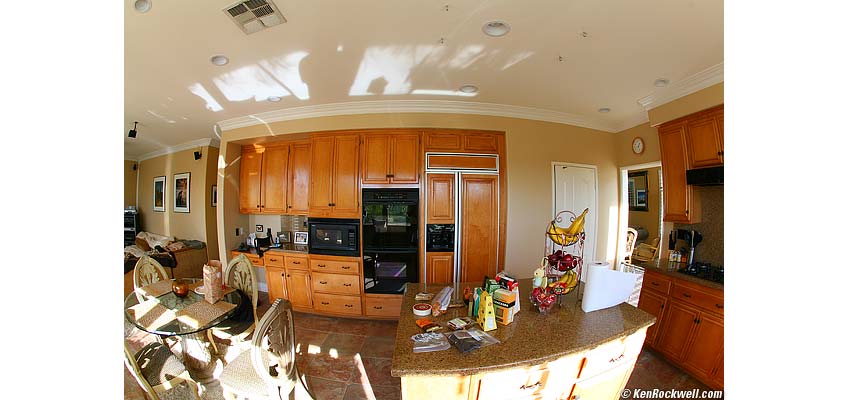
This shot of a kitchen covers 45 feet (15m) horizontally, and I was only 9 feet (3m) away from the far wall! That calculates to 135 degrees horizontally, which is the same as a rotating panoramic camera like my Noblex. The sobering difference is that the fisheye/software combo does this without the curvature. Each of these images has the same pixel height as the original file, and is even wider horizontally in this Max mode. Of course the sides get softer than the center because they must be stretched further. Try for yourself and see if you like the results. I love them! DxO also delicately lifted the shadows just a little. Perfect! DxO does a great job working with the image detail in the file. Fisheye lenses squish the sides together to create the fisheye look, and DxO very accurately pulls those sides back out to look straight again. Detail is lost when the image is squished by the lens, since the camera's sensor can't magically increase its resolution at the sides to match the squishing. When DxO stretches the image back into a rectangle it has to interpolate, so the farthest edges will look softer than the center, if you stick your eye too close to a big print or look at it at 100% on your monitor. This isn't an issue with software, it's an issue with reality. I find that my $2,000 Canon 14mm f/2.8L rectilinear lens (no distortion) isn't very sharp on the sides in the first place, so I see very little difference between an image from my $500 15mm fisheye and $300 DxO software compared to my $2,000 14mm lens. The sides look about the same, and the converted fisheye has less distortion than the unconverted 14mm. (Of course I use DxO to help with my 14mm, but that's not saving you any money.) If you look closely at the very far corners, the converted fisheye is a little worse, but you'll have to ask yourself if it's $1,000 worse. The biggest reason I usually use my 14mm lens instead of my fisheye is artistic visualization: with my 14mm I see the rectangular image as I compose through my viewfinder, and with the fisheye I have to extrapolate in my mind to imagine the final result and framing after conversion Canon vs. Nikon Fisheyes In the default mode both systems give similar results. They give results the same pixel size as the original file with the same angle of view, equivalent to a 12mm lens on a full-frame camera. The Max mode works differently between Canon and Nikon. These extra-wide images are from my Canon fisheye and full-frame camera. My Nikon 10.5mm Fisheye and Nikon digital cameras aren't as sharp at the sides as the Canon combination, and therefore DxO won't dare correct an image to be as wide in this crazy Max mode. Inputs DxO Optics Pro works with JPGs (my favorite) and raw. It doesn't do anything to your original files, JPG or raw. It always saves a new, corrected file wherever you prefer. I save the corrected files back into the same folder, which makes it trivial to keep track of it all. With my Canon 5D, the results were better from JPG originals! The results starting from .CR2 files had duller color and were less sharp than the same images converted from JPG. I pump up the color settings in-camera, so I suspect DxO isn't reading those settings when converting the CR2 files. Beats me why the CR2 results are softer, but just as well, since I hate the hassle of raw. In raw's favor, the lateral chromatic aberration correction was better. I don't bother with raw. I shoot ordinary JPGs. When I compared results from Raw+JPG on my Canon 5D, I preferred the conversion from JPG. Only the camera maker's raw conversion software will match the colors and tones of the JPG perfectly. When I shoot, I ensure that my JPG looks perfect, so I want my raw conversions to match my JPGs. Every other brand of software will make the tones and colors look slightly different. If you shoot raw and prefer different raw conversion software than DxO, use the raw converter of your choice to open the raw files, save them, and open the saved tiffs or jpgs in DxO. Outputs It saves outputs in as many different simultaneous JPG, raw and TIF options as you like. Ease of Use I figured most of it out before I found the user's manual. This is excellent! It all makes sense, which I wish all software did. It runs only as a stand-alone program. Even though a PhotoShop plug-in is offered, all this does is open up Optics Pro via FILE > IMPORT. You still need to make your file selections and settings inside of Optics Pro. It does not come up in the Filter menu. This isn't as much of a pain as I expected. I first missed the ability to process an image in Photoshop as a filter. A day later I realized that DxO does such great stuff that I usually batch-process entire folders from inside DxO Optics Pro, catalog the results in iView, and then select what I want to use in Photoshop from within iView. Workflow DxO converts from camera original files. Do your DxO corrections first and do any Photoshop work next. I shoot hundreds of shots at a time, and then use iView to sort and dump. I put each shoot in a folder. If I'm going to use DxO, I batch-convert everything that folder. God Bless DxO: it doesn't matter which lenses I used; it cranks through everything, automatically identifying how it was shot and processing accordingly. I set it up, and let it process while I work on something else. I have DxO drop the new converted files into the same folder. Ease of Tweaks A clever feature I wish I had in Photoshop is the ability to click on the plus or minus on each side of a slider to increment or decrement each by one unit. I can click while I'm watching the preview image. I need this for keystoning correction. Click on either side of the slider itself to slam the slider to the end. A secret in recent versions of Photoshop is the ability to click over a wide area around a slider or its name and drag to change the slider. In Photoshop you don't have to hit the slider itself. Perspective Correction First make the up/down and left/right corrections in the GEOMETRY pane. Then go to the top, click the cube icon and select LEVEL HORIZON. Unfortunately one cannot use level horizon first; if you do, you can't use the geometry controls. Either do your corrective rotations in Photoshop, or you have to be cagey about the order in which you do them in DxO. I found myself saving a DxO project (a file with all the instructions of what and how you plan to process), and reopening it again to let me retry the horizon fixes if I needed to go back and reset the perspective issues. Modules DxO uses many files called modules. These modules are the data specific to a camera and lens combination. This data allows the software to correct the image perfectly, as far as I can see. If you don't have the appropriate module loaded, you'll see a red camera icon above the image on the bottom pane showing the images you've selected for processing. The software will cheerfully process the images as best it can, but won't warn if you (or I) forgot to download the correct module. The way I figured out I was missing a module was when my fisheye images shot on a borrowed Canon 1D Mk II still looked like fisheye images after conversion. I found it easy to get a new module when I needed it. Go to the DxO OPTICS PRO menu and select DxO Modules. You'll see what you have. Click the lower left box to get more. It was easy. (I'm on Mac; menu locations may vary on Windows.) Presets If you prefer to tweak things, you can save, recall and modify your selections of what and how you intend to process as presets. Variable Correction Leaving no stone unturned, you may apply partial or excessive levels of correction for creative purposes. You may leave a fisheye as a fisheye (0% correction), fix it back to completely straight lines (100% correction, the default) or move the slider anyplace in between! Ditto for Chromatic Aberration correction: you may select how much correction is applied. Look for the slider for vignetting correction. I often prefer vignetting, which darkens the sides and corners. This is a useful artistic effect which focuses the viewer's attention on the subject and keeps his eyes from wandering off the frame. Laboratory perfection in vignetting correction can make images sterile and boring. DxO allows you to dial-in any amount of correction, from none to full or more. Crazier still, DxO allows you to tweak the maximum lift applied to shadows in case you don't want it to bring up any noise in high ISO shots. Details are in the excellent user's manual. Preview Mode There is a big preview (at least on my 30" monitor) as I play with the variations before processing the final results. Focus Distances Lenses have very slightly different distortion levels at different focus distances. That's why I try to give figures in my reviews at different distances. No one else does, and I thought I was the only one other than lens designers who worried about this. DxO is so insanely thorough that the software corrects distortion differently depending on the focused distance! Canon DSLR EXIF data omits focus distance, Nikon includes it. For all I know this could be a key reason Nikon's flash exposure system is so much more consistent than Canon's. I see a little yellow triangle on each image in the lower selection pane from my Canon DSLRs, meaning they are missing focus distance data. If so, DxO presumes infinity focus, or you can select the images and tell DxO the focused distance. I kid you not, but this software is so good that at one foot this focus input made the difference between a good fisheye conversion (99% straight lines) and a perfect conversion (completely straight lines). These DxO folks impress me - I don't know of anyone else with correction software loaded with all the real-world data that these folks do. My Nikon shots embed the focus data, so I don't have to do this. Very Clever Sharpening DxO is smart enough to apply sharpening as needed by your exact lens and its settings at different points in the image. In other words, wide lenses that get soft in the corners wide open will have more sharpening applied in those corners as needed. DxO is applying an inverse of the MTF measured at each aperture, zoom setting and focus distance. I find that it tends to over-sharpen at the center of some images. No big deal, I can turn this off, or apply only a percentage of sharpening. DxO also can be used for old-fashioned (pre-2005) unsharp masking. Today most of us use the Smart Sharpen tool in Photoshop CS2 (select LENS BLUR and radius = 0.2). Hacking to use the Nikon D40 News - as of 25 January 2007, DxO has just added the D40. Warning: this is a hack. If you're not a hacker, please skip ahead before you get yourself into trouble with law enforcement. DxO doesn't yet support my new Nikon D40. I discovered that I can trick DxO into interpreting the files as if they were shot on a D70, for which DxO has a module and which I presume has the similar imaging characteristics, by changing my D40 files' EXIF data to say it was shot on a D70. I did this by opening the D40's JPG in my Mac's TextEdit program and changing the phrase "D40" to "D70," which I see in the first few lines when editing the JPG file as text. Save the file with a new name (I used DSC_0123-D70.jpg) and you're set. Don't try this at home, because you may screw up your file, and you also have now corrupted the EXIF data. Ten years in the future, unless you document this, you'll think you made the shots on a D70 and not the D40. I haven't looked at the accuracy of these tricked conversions. Power Drain Power drain for software? Think I'm kidding? Computationally-intensive businesses like Hollywood animation studios and Google run budgets based on both power consumption and, more importantly, the cooling to deal with the power dissipated by their computers. Google's secret new data center is being built in The Dalles, Oregon, to capitalize on Oregon's cheap and plentiful hydropower, and has two giant cooling stacks to get rid of the waste energy. Running all these mathematical calculations draws a lot of power, and my computer has to draw more power from the wall while running these conversions. My Mac Quad G5 draws 160 watts more power when it's running these transforms than when it's only doing other things. I measured this with a real wattmeter. While processing multiple images from my 5D and 17-40mm L lens, it takes 22 seconds each. That's 3.5 kJ (kWs), or one Watt-hour each. Process 1,000 files, and that cost you a kWh from the electric company, and more if you're air-conditioning your facility! If you heat with electricity; it's free, since the computer's heat reduces the need for other electric heat. Extra Credit Reading: Europe Strikes Back! This software comes from the same people who invented art, painting, the X-Y coordinate system, photography, the wide-angle SLR lens and the zoom lens. Ever since the Japanese took over the photography world in the 1970s, we haven't seen much main-stream photographic equipment from Europe, short of medium-format film cameras and view camera lenses. This program is amazing, and comes from France. Just to reiterate some other French innovations: 25,000 BC: World's first art (paintings): The Caves of Lascaux, France. 1637: Invention of the Cartesian (X-Y) coordinate system, which is the two-dimensional space we fill with pixels, and the mathematical space in which all this image processing takes place: René Descartes, France. (He also invented philosophy - he thought, therefore he was.) 1822: Invention of the Fresnel lens, used in every DSLR viewfinder, many projectors and in Canon's newest DO lenses: Augustin-Jean Fresnel, France. 1822: Fourier Series, the basis of Fourier transforms, FFTs, Modulation Transfer Functions (MTFs) used to measure and describe optics, and the basis of the Discrete Cosine Transform (DCT) which is the basis of all JPG and MPEG images today: Joseph Fourier, Paris. Fourier used this math in his research, published in 1822, which is still the core around which most of modern digital image processing and image and audio compression systems operate, including all the images you see on my website. 1826: World's First Photograph: Joseph Nicéphore Niepce, France. 1903: Le Tour de France 1931: Henri Cartier-Bresson 1950: World's First Wide-Angle SLR Lens (retrofocus): Pierre Angénieux, France. 1956: World's First Zoom Lens: Pierre Angénieux, France. This software comes from just outside of Paris. France's experience in art, optics and math all show in the elegance and thoroughness of this software.
RECOMMENDATIONS back to top Introduction Specifications Performance Recommendations I love DxO. It does exactly what I need it to do, and does it extremely well. If you have different needs, for instance, if you're using a lens or camera for which DxO has no module, you're out of luck. See 16-9.net's article covering some of these limitations. I also have an extremely hot professional computer to handle the mathematical load of DxO; if you're on a lesser machine DxO may take too long to run for you. DxO Optics Pro does a lot more than I've been able to show. Other software companies charge you for a separate program to fix distortion, another to correct colors, another to reduce noise and another to lighten shadows and so on. Seeing how DxO does all this and more, and does it so well, it makes DxO a bargain, at least if your time is as valuable as I bill mine. I'm surprised you've read this far. If you have, you obviously need to get this software in whatever version is needed to support your camera and lenses. Most people don't need this. It's especially interesting for people like me, and you people know who you are.
Help me help you top I support my growing family through this website, as crazy as it might seem. If you find this as helpful as a book you might have had to buy or a workshop you may have had to take, feel free to help me continue helping everyone. If you've gotten your gear through one of my links or helped otherwise, you're family. It's great people like you who allow me to keep adding to this site full-time. Thanks! If you haven't helped yet, please do, and consider helping me with a gift of $5.00. The biggest help is when you use any of these links when you get anything. It costs you nothing, and is this site's, and thus my family's, biggest source of support. These places always have the best prices and service, which is why I've used them since before this website existed. I recommend them all personally. Thanks for reading!
Ken Home Donate New Search Gallery How-To Books Links Workshops About Contact |