Home Donate New Search Gallery Reviews How-To Books Links Workshops About Contact
How To Shoot Macro
See also Best Macro Lenses
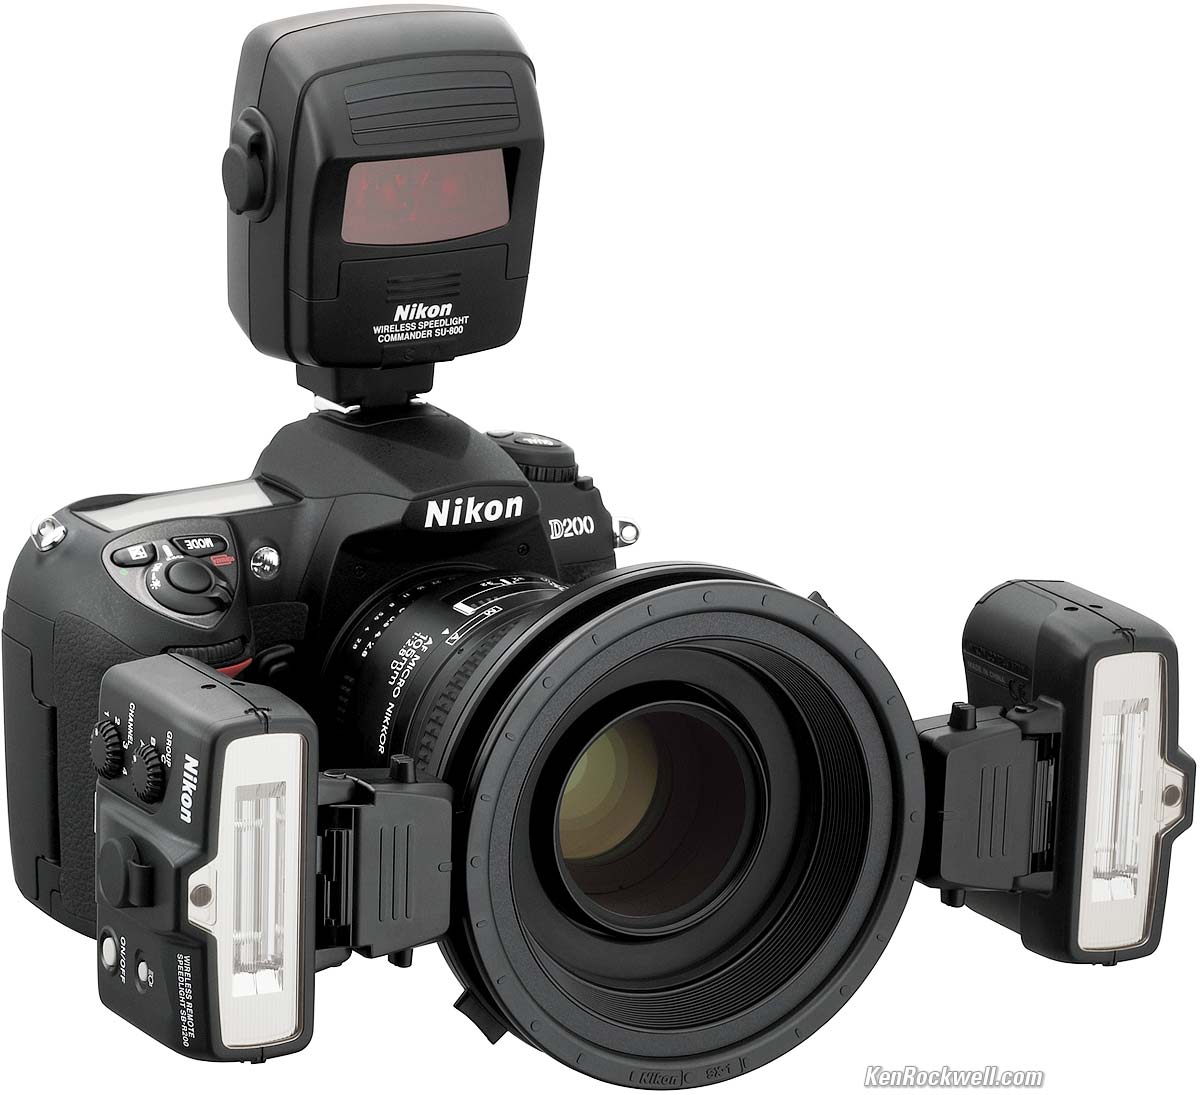
Nikon D200 with 105 mm lens and R1C1 flash system. bigger.
This all-content, junk-free website's biggest source of support is when you use any of these links to approved sources when you get anything, regardless of the country in which you live. Thanks for helping me help you! Ken.
April 2023 Better Pictures Canon Nikon Sony Fuji OM SYSTEM LEICA Zeiss HASSELBLAD All Reviews


I buy only from these approved sources. I can't vouch for ads below. |

Introduction top
If you're serious about macro, there are a few critical things most people miss.
Yes, you can shoot many other more difficult ways, but for for super sharp and clear photos that are easy to shoot and look great, be sure to pay attention to:
Lighting
Lighting is the most important artistic part of every photograph. Additionally for macro, the kind of lighting you use is critical to getting sharp, clean images.
Use regular (electronic xenon) flash or studio strobe lighting, NOT continuous light, NOT LED and NOT CFL lighting. Continuous light is for video, not for still photography. Continuous light would have to be about ten times brighter than direct sunlight to give us the same advantages as flash does.
Use flash because it's bright enough to let us shoot around f/22 which is needed for depth of field at macro distances, and it lets us shoot at ISO 100 at the same time for the cleanest, sharpest results. Cameras get softer at ISO 200 and above.
Flash is an instantaneous burst which eliminates camera and subject motion blur so we can shoot hand-hold, no stabilization needed. Win, win, win!!!
DO NOT use continuous lights, available light or LED lights. They're not bright enough, so we have to shoot at large apertures which prevents us from getting depth of field at macro distances and we have to shoot at higher ISOs which lead to noisier, softer images. If you want to use continuous light, use a tripod and make long exposures so you can shoot at around f/22 and ISO 100, but sadly this leads to painfully long exposures and having to fumble with a tripod to compose each shot.
Some kinds of continuous LED lights claim to have a "flash" feature, but these are weak and usually don't stop camera shake because at full power the "flash" is typically a half-second long. Traditional electronic flash has a duration of about 1/1,000 of a second which stops just about anything. You need a traditional electronic flash with a glass tube filled with xenon gas, which is how all electronic flash have worked since the 1960s.
There are two kinds of flash to use: small battery-powered macro flashes mounted to the front of your lens connected to a central power pack mounted in your hot shoe as shown above, or big plug-in-the-wall studio strobes. Little flashes on your lens work great because they're so close to the subject that they're plenty bright and appear to be softer light.
Don't use a regular flash in your hot shoe. Using just one flash atop the camera throws ugly, harsh direct light, and often you'll have a shadow cast by your lens. If you want to be portable, mount little flashes (or a ring flash) to your lens or use a special macro flash bracket to hold two flashes near your lens. Two small flashes close to the subject look like two big soft flashes, and give sharp and detailed images devoid of deep shadows. Perfect!
Here are macro flashes for Canon, macro flashes for Nikon, macro flashes for Sony and macro flashes for the OM SYSTEM.
I leave my studio strobes set up in my studio. I plug them into a switched wall outlet so I just flip the light switch as I enter and I'm ready to shoot. They're the best to use in a fixed location because they stay plugged-in and set up and the light doesn't change as you change your distance from the subject. Battery-powered flash is best for when you're out in the field chasing bugs.
As I show at Product Photography, in the studio I prefer to use two umbrellas for the left and right lights, and a plain light for the backlight. I set the left and right lights to full power and dim the direct backlight. Simple, and looks great.
I never bother putting battery-powered flash on stands or with umbrellas in a fixed location; just get real plug-in-the-wall strobes for sanity's sake. I have links to suggested strobe sets at studio strobes.
I avoid multi-light setups with battery flash unless they're corded on a mounting bracket because otherwise they're too much of a pain to get them all to fire at the right settings. Half your time with multi-light battery-powered flash is spent trying to get them all to fire properly each time you set them up.
While battery-powered flash usually exposes via TTL auto exposure dedicated to your brand of camera, studio strobes are usually run manually at set power levels. You set the exposure by trial and error on a digital camera. Use a small manual flash on your camera to trigger the studio strobes wirelessly. I use my tiny Nikon SB-30 on my Nikons because it has a built-in, slide-up visibly opaque but infra-red passing filter that lets my strobes trigger but never contributes any visible light to the image. Clever, eh?
Lenses
Long focal length lenses, typically 180mm or 200mm or equivalent are needed so you have enough distance from the subject not to annoy it, to render it with a pleasing, natural perspective and so that we don't block our own light.
Shorter 90mm, 100mm and 105mm or equivalent lenses require us to get too close for serious macro, blocking our own light and making things look weird due to the unnatural perspective from being too darn close.
50mm macro lenses are really only for copying flat documents on vertical stands where we don't want the camera too high in the air. With flat documents perspective doesn't matter, and the documents usually are big enough that we're far enough away to get light on the subject.
Longer lenses are critical for bug and critter photos so don't bother them, as well as not blocking our light.
If you use the proper flash as outlined above you don't even need stabilization because flash is usually only lit for about 1/1,000 of a second!
Most serious macro work is done in manual focus, since it's faster to look at the three-dimensional object and focus by eye. It's usually impossible for an autofocus system to figure out where to focus, and by the time you've assigned a focus point manually you could have just turned the focus ring instead.
For Canon, the only long macro is the EF 180mm f/3.5L. Use it on a DSLR or with an EF-RF adapter on mirrorless. It works great! Yes, this lens has been discontinued and never replaced, so get it used for a steal if you know How to Win at eBay. The current RF 100mm f/2.8L is too short for serious macro use and doesn't work with teleconverters. Sorry.
For Nikon, the only good long macro is the AF 200mm f/4D. Use it on a DSLR, or on an FTZ or FTZ II on mirrorless. It becomes manual-focus only on mirrorless, which is fine because that's the best way to focus anything macro. Hint: every product shot on this website since 2007 has been shot with my 200mm on full-frame. Yes, this lens has been discontinued and never replaced, so get it used for a steal if you know How to Win at eBay. The old 200mm AI-s was the industry standard in film days, but on digital at macro distances it has a lot of lateral color fringes. Nikon's current Z 105mm macro is too short for serious macro use and doesn't work with teleconverters. Sorry.
OM SYSTEM has a brand-new M.Zuiko 90mm f/3.5 IS Macro, which on the OM SYSTEM is equivalent to 180mm on full-frame. For serious macro this is the best and only current (as of 2023) serious macro lens available new today.
Sony has never made a long macro, so now is a good time to upgrade to Canon, Nikon or OM SYSTEM. You can't use a teleconverter on the FE 90mm f/2.8G. Your best bet is the expensive and long-discontinued Minolta MAXXUM APO 200mm f/4 Macro (How to Win at eBay) on the LA-EA4 adapter. Good luck.
Fuji's best shot is an 80mm f/2.8 (120mm equivalent), so you're in a leakier boat than Sony. Time to upgrade.
You can adapt any Nikon AF macro or manual-focus macro lens for manual focus to any other brand of camera. You can use the AF 200mm f/4D as manual-focus adapted to anything, but the lack of electronic communication and aperture control with any inter-brand adaptation will drive you crazy if you do much macro shooting.
Irix makes a 150mm macro that comes in mounts for Nikon F, for Canon EF and for Pentax K. If it doesn't come in your mount, you get the Canon EF version and then get an adapter to any other mount like Fuji and it might even have electronic communication for EXIF data. If you can't get an electronic adapter to another camera brand, forget this lens as you'll have no way to control the aperture setting.
See also Best Macro Lenses.
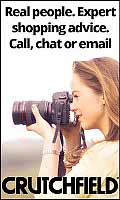
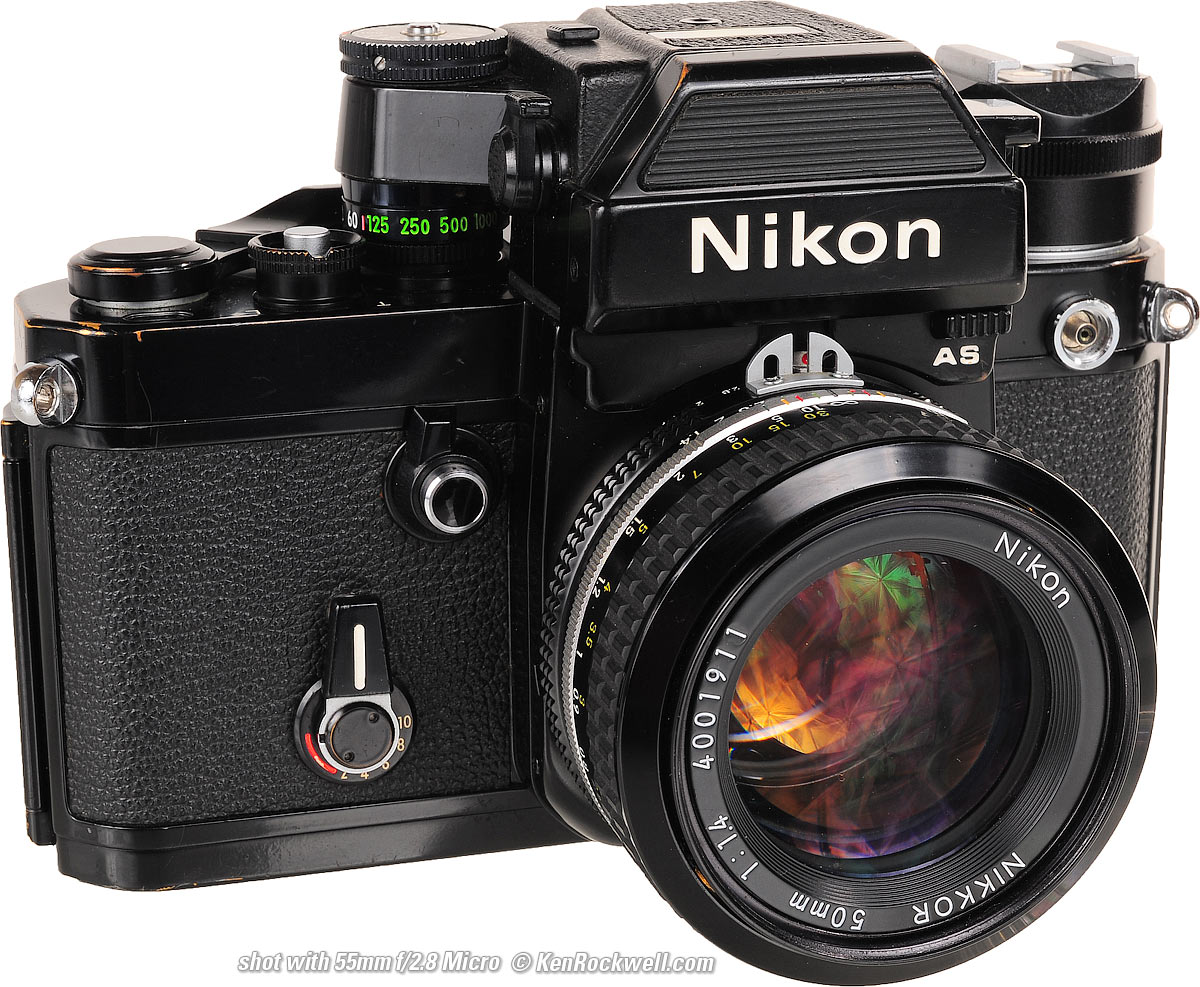
Here are samples of my Nikon F2AS with AI NIKKOR 50mm f/1.4 shot with three different lenses from three different distances on full frame. Click any to enlarge:
Shot with Nikon AF 200mm f/4D on full frame. bigger.
The F2AS looks pretty square, which is what I want.
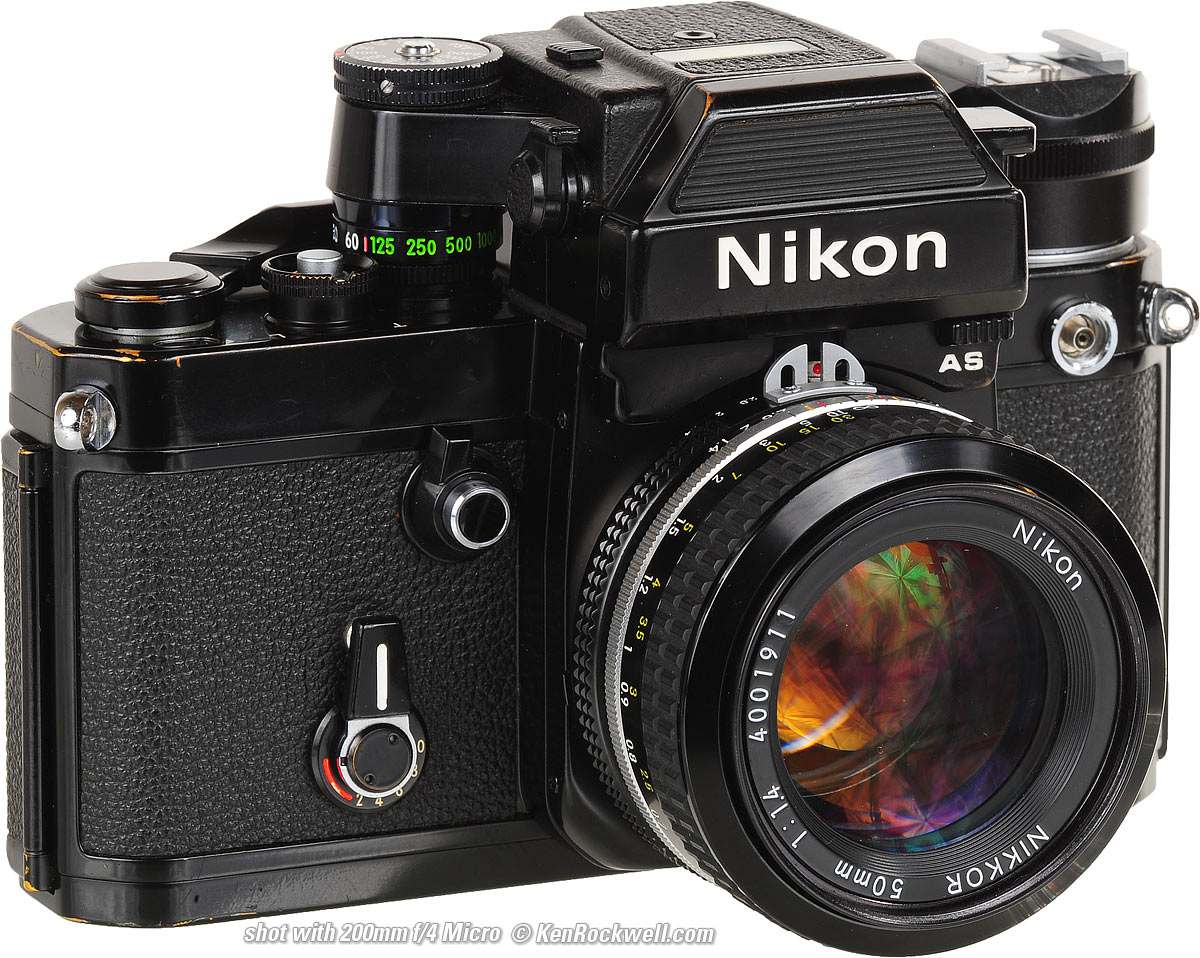
Shot with Nikon AF 105mm f/2.8 on full frame. bigger.
Almost as good as with the 200mm, except you'll notice the bottom of the camera looks smaller than the top and the sides aren't vertical. This isn't horrible, but this isn't what I want.
Shot with Nikon AF 55mm f/2.8 on full frame. bigger.
Shot this close with a 55mm there's obvious perspective distortion, with the bottom of the camera shrunk and the two sides crooked.
Exposure
Our subject will be lit entirely by the flash light which we control. The ambient light, even in sunlight, won't contribute much if anything to our final exposure as we are going to set our exposure.
Set your camera to manual exposure.
Set the shutter to its X-sync speed (typically 1/125 to 1/250), set the ISO to 100 (or the lowest normal ISO in your camera) and the aperture to where it gives the best depth of field and sharpness, typically f/11 to f/16 on Micro 4/3, f/16 to f/22 on APS-C and f/22 to f/32 on full-frame. (see also Getting the Sharpest Aperture.)
Use your battery-powered strobe's TTL auto exposure with your camera set to manual exposure mode, or set your manual strobe's power level to taste by trial and error.
If using TTL flash, be sure to set its exposure mode so the flash is 100% of the light hitting the subject and ignoring the ambient light.
White Balance
I set a manual white balance on a white or gray card to the actual color of my studio strobes.
You have to set this with an actual flash exposure, not simply pointing the camera at the card under the ambient light.
Finder Settings
DSLRs work great as-is.
Be sure to set mirrorless finders to the setting which provides a natural view without showing any of the effects of camera settings or exposure. If you don't find this setting and use the usual setting which previews the effects of camera settings, your finder will be mostly black because without the flash lit at the instant of exposure, we have the manual exposure set to underexpose the ambient light so far as to look black.
Preset C1,2,3, U1,2,3 or M1,2,3 Modes
I use one of my C-, M- or U- preset modes on my top dial (if my camera has this) to save all the exposure, flash and finder settings I use for macro so I easily can get to and from these settings in one click.
Easy!
Here's the rest of this article I first wrote in 2005 ~ 2015
Back in 1999, there were no practical DSLRs (the world's first 2.7 megapixel Nikon D1 didn't ship until Christmas 1999 — for a bargain $5,000!), compact cameras were crummy and the iPhone was still almost ten years away in the future. If you were serious about great closeup photos in 1999 when I started this website, you needed a 35mm or larger SLR and very specialized macro lenses.
It's not 1999 anymore. Today, even the cheapest DSLRs come with kit lenses that already get very close, compact digital cameras almost always have macro modes that get within about an inch of the lens, and even the iPhone 5 gets super-close all by itself.
Want great close-up shots? Just be sure to wait a moment for your camera or iPhone to focus, and even the iPhone works great for super close-ups:
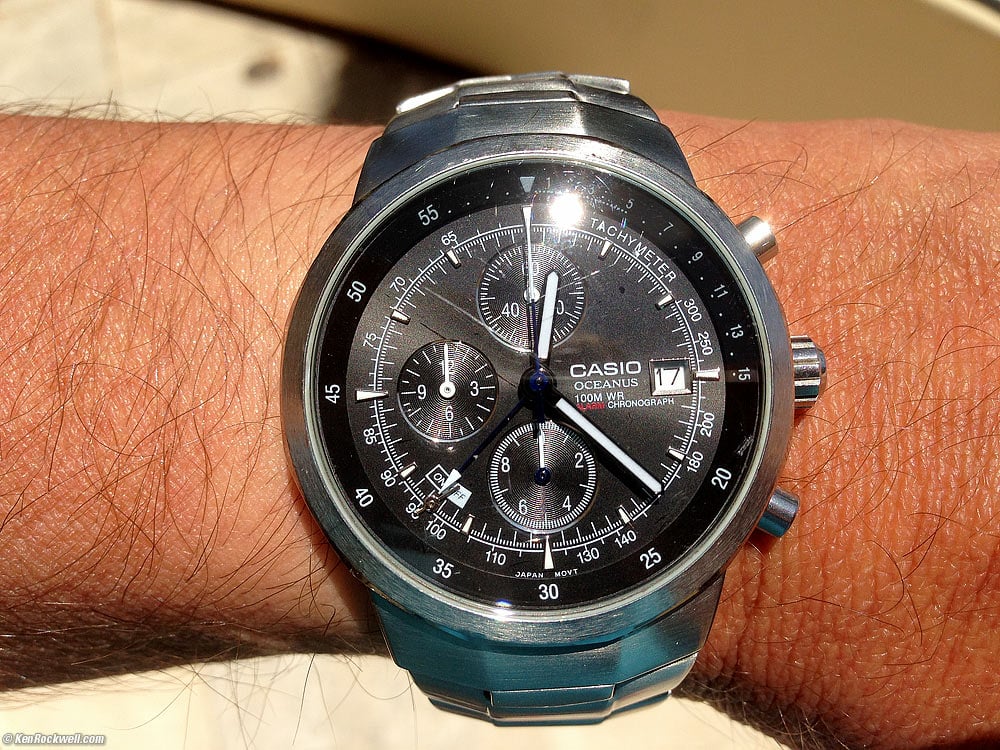
Rockwell's Watch, 17 June 2013. (iPhone 5, f/2.4 at 1/2,358 at ISO 50.) bigger.
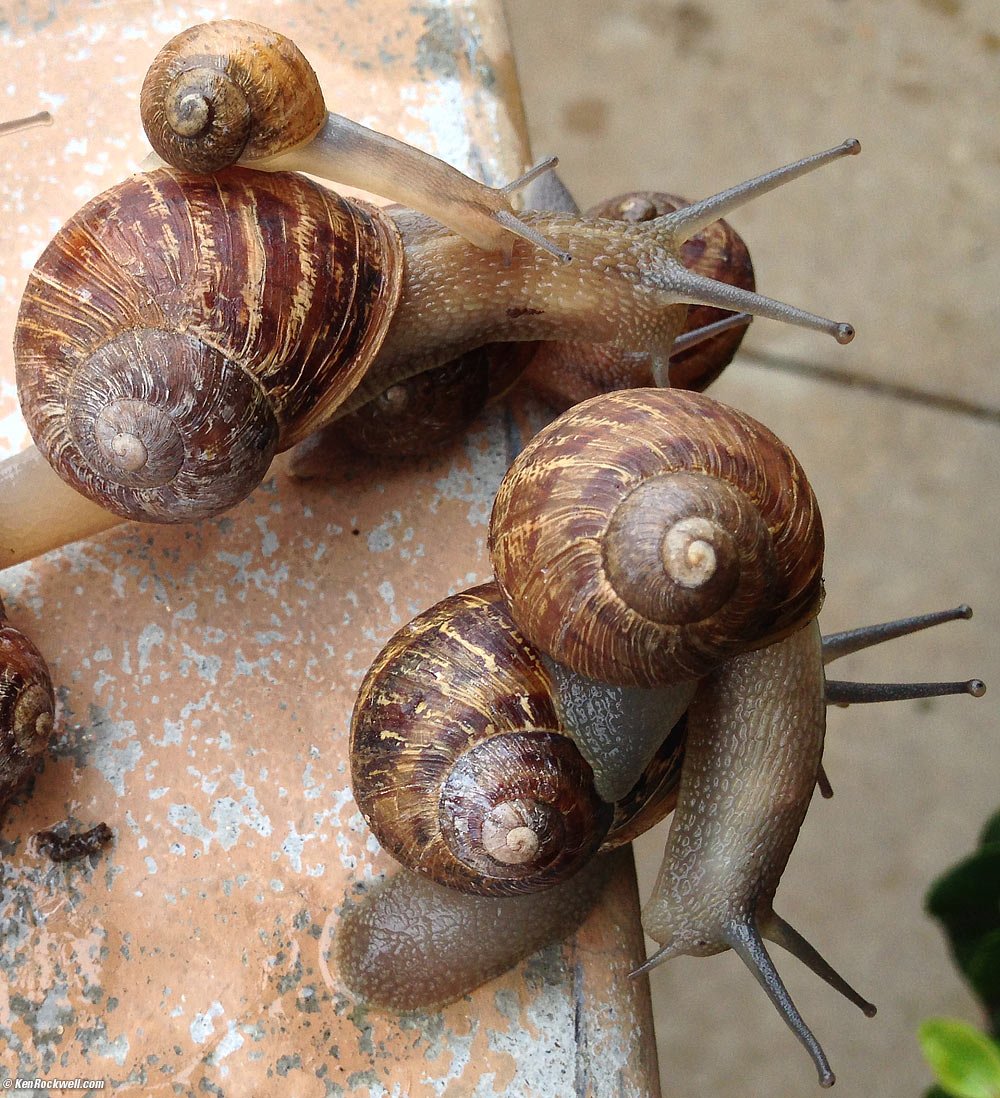
Snail Family, 07 June 2013. (cropped from iPhone 5, f/2.4 at 1/120 at ISO 50.) grosser.
Only if you are really serious about your macro work or need to get closer than these shots do you need anything fancier.
If you want to get closer, don't even bother with 50mm or 105mm macro lenses; skip all the way to the Canon 180mm Macro or the Nikon 200mm Macro lenses. Here's why:
Distance
Macro photos are often thought of as close-ups, but as macro pros know all too well, you don't really want to get too close trying to do it.
If you get the camera too close, you:
1.) Get in the way of your own lighting.
2.) Annoy live subjects like bugs.
and
3.) Show the subject in an unnatural perspective, since we'd never really be that close when looking at it ourselves. For instance, in the iPhone shot above from a few inches (10 cm) away, my watch looks much bigger than my wrist because it's so much closer to the lens than my wrist. This isn't natural — do you really think my watch face is as wide as my wrist?
Therefore, we want a longer lens for macro photography, not a 50mm, 55mm or 60mm lens.
Lens Choices (see also Best Macro Lenses)
Lens Sharpness
Guess what: it doesn't matter!
While some macro lenses may be sharper than others for regular photography, as you'll learn below, there is no depth-of-field at macro distances so nothing is in perfect focus anyway. No matter how sharp your lens, it won't matter because nothing will be in perfect enough focus to notice.
Since you'll be shooting at around f/32 to try to get at least one tiny swath in focus, diffraction is the limiting factor regardless of lens.
50mm Lenses
50mm macro lenses are useless for serious macro work except for copying slides, stamps and other flat artwork.
Any flatbed scanner does a better, faster and easier job for photographing anything small and flat.
50mm, 55mm and 60mm macro lenses are foolish for serious macro use precisely because you have to get too close, so we'll pass on the 50-60mm range.
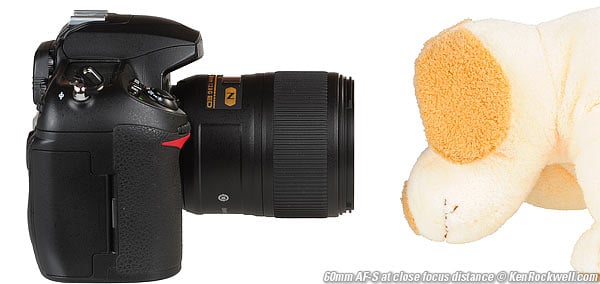
Nikon 60mm f/2.8 G at closest focus distance: too close to be useful.
By the time we get close enough for a big enough image with a 60mm macro, there are only inches between the end of our lens and our subject. We can't light the subject, it gets annoyed, and it looks funny.
100mm and 105mm Lenses
Ideally we want at least a 100mm macro lens so that we can be far enough away so we don't annoy the bugs, are able to light our subject, and for them to be seen from a reasonably normal perspective.
We are used to seeing everything from at least a foot or two away (50 cm). Our eyes aren't comfortable — or can't — focus closer than about a foot (30 cm), so macro photos made closer than this give unnatural perspectives. Be they bugs or products, three-dimensional objects look weirder than they should when shot from a only foot away.
Only at least a 100mm lens lets us get far enough away, and still have enough magnification for our macro shots.
180mm and 200mm Lenses
Macro pros all use 180mm or 200mm macro lenses precisely so we can get far enough away, and still get close enough.
With a 200mm macro, you'll have a foot or two of clearance ("working distance") between the lens and your subject, so you'll be able to light it well, and its perspective won't be all screwed up.
Paying attention? With my favorite Nikon 200mm f/4 AF-D, I still have less than 11 inches (260mm) between the front of my lens and my subject at its closest focus distance. For most subjects I shoot a few inches to a foot (10-30 cm) wide, I can stand a couple of feet away to have enough breathing room. Whew! This is why we need 200mm macro lenses.
Magnification and Reproduction Ratios
Magnification ratios, the same as reproduction ratios, are the ratio between the size of your subject and the size of the image at the sensor or film. Of course when displayed or printed there is even more magnification.
Most macro lenses have the reproduction ratios engraved on the focusing scale. This is handy for forensic and scientific work.
Definitions
Macro is defined as photos which are made between 1/10 life size and life size — at the sensor. The resulting prints will be even bigger depending on the size of the print.
Normal photography is defined as less than 1/10 life size at the sensor, and microphotography is defined as greater than life size. Don't worry about this, since even these terms are defined differently by different people. For instance, Nikon, who also makes many microscopes, refers to their macro lenses as "micro" lenses.
Focus Modes
Serious macro work is shot in manual focus because it's faster and easier.
Unless your subject is flat, in which case a scanner is a much better idea than a camera, autofocus gets lost and has no idea on what to focus when you're up close to a real three-dimensional subject.
Therefore, it doesn't matter if you use an auto- or manual-focus lens! You'll set your AF to manual anyway, so don't presume you have to buy a new AF lens when a used manual-focus Nikon lens will work exactly as well — and save you a lot of money.
Hand motion alone changes camera distance so much and so quickly that it drives any AF system crazy.
I sometimes focus my lens and then focus by moving the camera back and forth. This keeps framing constant. Small variations in your position become huge variations in image size, so fixing the focus and moving the camera keeps this stable.
Apertures and Depth of Field
There is no depth of field at macro distances.
Because there is no depth-of-field when you're this close, shoot everything at about f/32.
Try to orient your subjects so they lie in the plane of focus. For instance, you have to snap butterflies when their wings are lying flat. If you can do this you can get the entire bug sharp, otherwise you get an amateur looking photo.
With bugs, pro macro shooters spend a lot of time trying to get the wings to lie perfectly flat, because even at f/32, they'll be out of focus if they move a millimeter (1/32") up or down from the plane of focus.
Shoot at larger than f/32 and you'll get too little in focus, and shoot smaller and you'll start to loose sharpness from diffraction. f/22 to f/45 are all you'll ever need.
Image Stabilization and VR
Image stabilization and VR are useless with live subjects like flowers, bugs and animals which are always moving. VR and IS can only counteract camera motion, not subject motion.
VR and IS might help when using a macro lens as a general-purpose telephoto, but are of no help for close-in macro shooting because they usually aren't calibrated to work at macro distances anyway, and when shooting at f/32, your exposures would be way too long to hand-hold even with IS or VR.
VR and IS only work in two axes, or three axes in a camera maker's dreams. Even three-axis VR or IS can't do anything to help prevent camera motion forwards and back. When we're focused at close macro distances, a millimeter (1/32") of motion will ruin a hand-held macro photo.
Therefore, when shooting serious macro, you don't need to worry about getting a lens with VR or IS. It's just a marketing tactic to sell newer and more expensive lenses. I do this for a living, and use my non-VR Nikon 200mm f/4 AF-D every day.
Lighting
This is easy: use flash!
Flash lets you easily shoot at f/32 and stops any action or camera motion. Available light is asking for trouble, since you'll be shooting at larger apertures eliminating any of what little depth of field you might have, or will lead you to perilously long exposures at smaller apertures.
Most bug photographers use two flashes mounted on opposite sides of the lens. I use a Lepp Bracket which holds two flashes, one on each side of the camera. This becomes a clumsy contraption with the flashes and sync cables.
An elegant solution for bugs is Nikon's R1C1 system shown at the top of the page. It uses special small flashes which screw into the front of your lens. It also eliminates all the wires. It may pay for itself in convenience, light weight and simplicity for bug and flower shots.
I have not used ring lights. The off-brand one I tried had too little power, and the overall lighting was duller from the complete ring than the two-point lighting from two discrete flashes. If the light gets too soft, you won't see surface texture.
Personally, my macro work is product photography, and for that, I use plug-in-the-wall studio strobes. A set of real studio strobes costs about the same as buying a bunch of battery-powered flashes, but has far more power and flexibility to add umbrellas and light modifiers easily. Studio strobes are made to sit on light stands, while battery powered flashes require a lot of fiddling to get them to stay put on light stands. See Product Photography for more.
Bigger than Life Size
You can add extension tubes or bellows between your lens and camera body. I always focus manually, so these extensions being manual focus only is no bother.
Close up lenses don't help much with today's lenses, since they already get so close.
You also can use teleconverters, which will let even the oldest macro lenses get to life size, and all macro lenses today to twice life-size, at the sensor. I used to add my TC-200 to my 105 AF Micro before I got a 200mm macro. Of course my TC-200 is manual focus, not a problem since I focus manually in macro anyway.
Canon makes a very special 65mm f/2.8 closeup-only lens which works between life size and five-times life size. It sold for $830 in 2005, and $950 in 2013. The bug and raindrop guys love these, too, but it's not going to replace a regular macro lens for general use.
Exposure
I manually set the camera to f/32 for depth of field and set the shutter to the flash sync speed (1/125 to 1/500 depending on your camera) to eliminate ambient light.
I use the TTL flash system to let the flash control itself for perfect exposure as I vary distance, except when I use my manual studio strobes, for which I simply look at the results on my LCD and adjust accordingly.
Bellows Factors
In the old days we spent a lot of time worrying about exposure variations as we got closer. This is because the lens moves away from the film or sensor as you get closer and reduces the effective aperture. The effective aperture reduces by two stops at life size!
Today the Nikon cameras automatically correct the aperture of the macro lenses to give the same effective f/stop as you get closer. Of course your f/2.8 lens is only an f/5.6 lens at life size, but at f/32 you won't even notice this. Remember macro lenses are only used at full aperture for focusing and framing, not shooting.
Don't worry; your TTL exposure system reads right through all this automatically.
Camera Support
I always hand hold.
The flash freezes any motion for perfect sharpness so there's no need for a tripod.
If using a tripod you'll need a geared positional mount which allows you to shift the entire camera left and right or forward and back to get the precise framing you need. It's almost impossible to lift and move a tripod precisely by the fractions of an inch needed in macro work.
Other Formats
Physics makes this easier as the sensor or film gets smaller. As film gets bigger the depth of field collapses to nothing, and the f/stops are approaching pinholes and eliminating resolution due to diffraction and making lighting impossible.
Macro shooting is trivial with point-and-shoot digital cameras and iPhone, easy with digital and 35 mm SLRs, doable with medium format cameras and next to impossible with 4 x 5" cameras.
Compact Digital Cameras
Most point and shoot digital cameras have built-in macro modes which let you get as close as an inch.
These cameras focus most closely at the widest zoom setting, where you usually get a lot of barrel distortion which curves out straight lines along the sides of the image. Try zooming them in a bit towards tele, and expect that they usually can't get quite as close at the tele setting. You have to find the best zoom setting for each camera.
The distortion is usually easy to fix in Photoshop, but you can't fix the weird point of view you get from shooting too close with a wide lens.
Zoom as long as you can and get as far away as you can to frame the photo you need.
Medium Format
Forget rangefinder cameras like my beloved Mamiya 7 and 6. They just don't get close enough.
Use an SLR like the Hasselblad or Contax 645. Not only can you focus close enough and get dedicated macro lenses, the SLR viewing lets you see what you're getting and make exposure measurements through the lens.
SLR cameras with bellows like the Fuji GX680 system and old Rollei SLX are even better because every lens can focus extremely closely.
Large Format
Unless you're a professional jewelry photographer you'll probably want to skip this.
It is very tedious because you need to calculate your bellows factors manually. See a book like Ansel Adams' "The Camera" or Steve Simmon's "Using the View Camera" for the calculations.
I do the calculations once for each lens and mark the factors on a long strip of paper. I hold the paper to the camera and read off the correction depending on lens extension. Calumet sells calculator sticks, which are rulers marked with the factors for different lenses. Some calculators are viewed through the ground glass and the factors read off by how many 1 cm graduations they cross. I told you this got complicated!
You'll need a lot of light and will probably need a set of studio strobes like the Novatrons.
© Ken Rockwell. All rights reserved. Tous droits réservés. Alle Rechte vorbehalten. Ken Rockwell® is a registered trademark.
Help Me Help You top
I support my growing family through this website, as crazy as it might seem.
The biggest help is when you use any of these links when you get anything. It costs you nothing, and is this site's, and thus my family's, biggest source of support. These places always have the best prices and service, which is why I've used them since before this website existed. I recommend them all personally.
If you find this page as helpful as a book you might have had to buy or a workshop you may have had to take, feel free to help me continue helping everyone.
If you've gotten your gear through one of my links or helped otherwise, you're family. It's great people like you who allow me to keep adding to this site full-time. Thanks!
If you haven't helped yet, please do, and consider helping me with a gift of $5.00.
As this page is copyrighted and formally registered, it is unlawful to make copies, especially in the form of printouts for personal use. If you wish to make a printout for personal use, you are granted one-time permission only if you PayPal me $5.00 per printout or part thereof. Thank you!
Thanks for reading!
Ken.